Remove Clerk from your JTL store and cancel your subscription. This guide covers the uninstallation process and important notes about subscription cancellation.
Uninstalling
#
Below you’ll find a guide on and general steps to uninstall Clerk from your JTL store.
Removing plugin
#
You can remove and uninstall Clerk from your webshop by going to Plugins -> Installed Plugins.
Click on the gear next to the plugin to remove it.
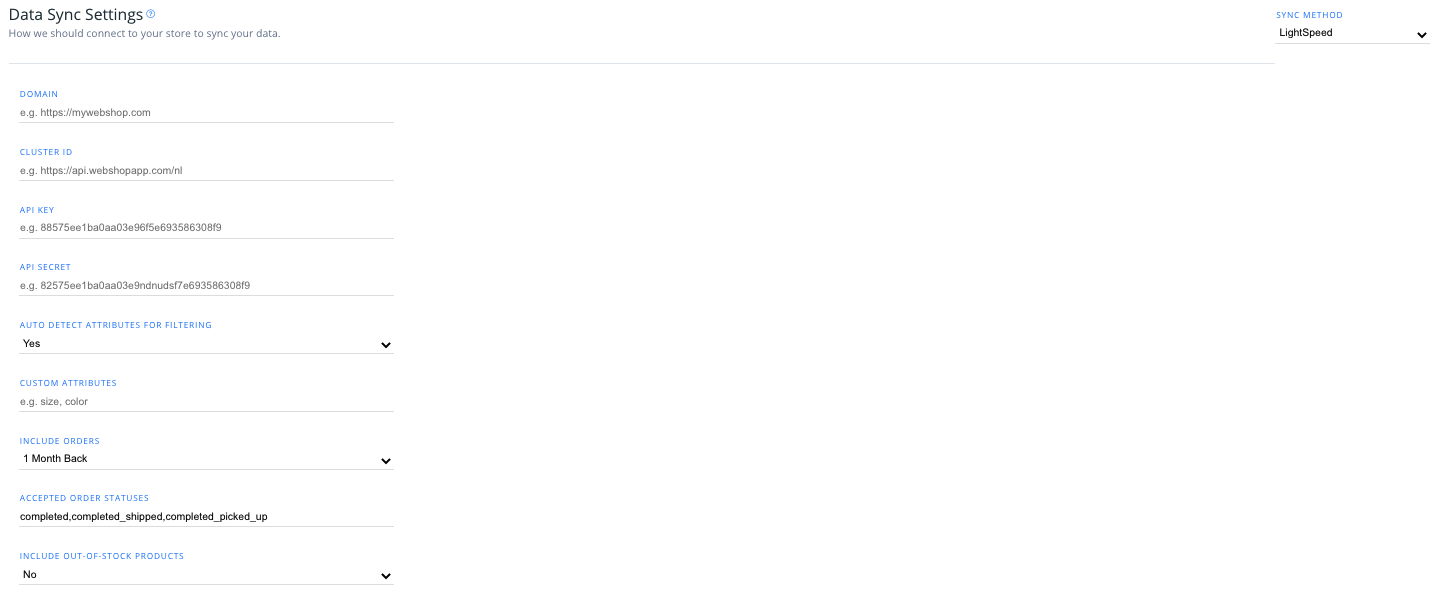
...After setting up your Lightspeed data feed to sync with Clerk, you can choose your integration options within my.clerk.io.
Click “Data” in the left-side menu, then go to “Configuration” to view your options.
Attributes settings
#
From the dropdown, you can select whether or not you want the integration to automatically detect attributes(such as stock variants, color, etc.) in your store to sync with Clerk.
...Create Design
#
Recommendations are shown as a slider by default. You can either use the
Design Editor to configure it visually, or use
code designs.
Design Editor
#
- Go to Recommendations > Designs and click New Design.
- Choose Product Slider
- Pick a template to start from, give it a name and click Create design.
- Adjust the design as needed.
Code Design
#
- Go to Recommendations > Designs and click New Design.
- Choose Other designs > Blank > With code.
- Give it a name and click Create design.
- Create a code design from scratch using
Liquid code.
If you want a starting design, check the
Slider template further down.
...Configure your Magento 1 extension settings, manage data sync options, and customize search, recommendations, and logging features. This guide also covers installation via Toolbox Script, upgrading, and uninstalling.
The Clerk Toolbox Script has been developed to make it easy to install the Clerk extension in your Magento webshop, without using Magento Connect.
...Configure your Magento 2 extension settings, manage data sync options, and customize search, recommendations, and logging features. This guide also covers installation via Toolbox Script, upgrading, and uninstalling.
The Clerk Toolbox Script has been made to make it easy to install the Clerk extension in your Magento webshop without using Magento Connect.
...Configure your PrestaShop module settings, manage data sync options, and customize search, recommendations, and logging features.
Data sync settings
#
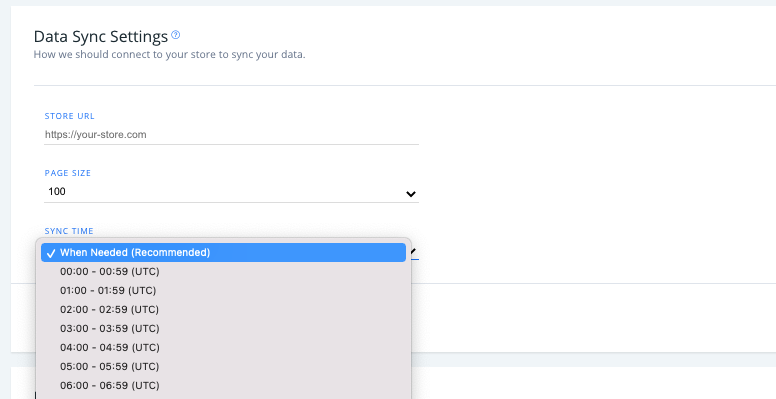
Go to Data > Configuration in my.clerk.io to view your Prestashop sync options.
- Set your store URL, page size of your synced data, and the time of day when your webshop data syncs to Clerk (Default is “When needed”).
Module settings
#
If you are using
v 6.7.0 or a later version of the extension (you can check the newest version
here), you will be able to access the below settings in two ways after adding your Public and Private Keys to the module:
...After connecting Shopify in Clerk.io, this page is your reference for the Shopify-specific sync settings in my.clerk.io > Data > Configuration.
Use this guide together with
Get Started and
Sync Data.
Settings reference
#
This is a complete lookup reference for Shopify sync settings in my.clerk.io > Data > Configuration.
Sync method
#
Choose which Shopify connector type you are using. Most setups should use Shopify from the Dev Dashboard flow.
...Disable or remove Clerk from your Shopware 6 webshop. This guide covers the uninstallation process.
Uninstalling
#
To uninstall Clerk from your Shopware 6 webshop, you’ll want to disable the plugin in your webshop’s admin portal.
Disable plugin
#
To access the Clerk plugin, log into your Shopware 6 store, then head to Settings > System > Plugins, and choosing “Config” with the three dots next to the Clerk plugin.
...Clerk.io offers three distinct search solutions that can be used together or separately:
This article explains how to get started with Search on SmartWeb Classic.
General
#
Use the SmartWeb Classic Design Manager to insert embed codes. To add sync details or start a sync, go to my.clerk.io > Data > Configuration.
Instant Search
#
Instant Search provides real-time results as customers type, displayed in a dropdown under the search input.
...Clerk.io offers more than 23 different types of product logics, making it possible for you to display completely automated products on any page. This article explains how to get started when using a
Clerk.js setup in VTEX.
For our full Best Practices, read
this article on which Recommendations to use.
Slider Setup
#
Recommendations are created with
Elements that reference a Design. Below is the basic guide for setting up an Element.
...