Clerks Technical Platform
Introduction
This guide explains the options you have for integrating Clerk into a website.
All communication with Clerks AI happens through our super fast REST API. We have then built several tools that make it easy for developers to use Clerk with virtually any use case.
This guide has 5 sections:
1. The API
Overview
The API is the cornerstone of Clerk’s functionality.
https://api.clerk.io/v2
Setting up the API communication is done in 4 steps using API calls to various endpoints:
- Syncing your catalog and orders with Clerk
- Retrieving data from the API
- Visualizing the data in your frontend
- Adding tracking to show statistics and keep the AI up-to-date
1.1. Syncing your catalogue
Clerk syncs each webshop domain, called a Store, as its own unique instance, which is accessed by a set of API Keys, found in the Clerk admin:
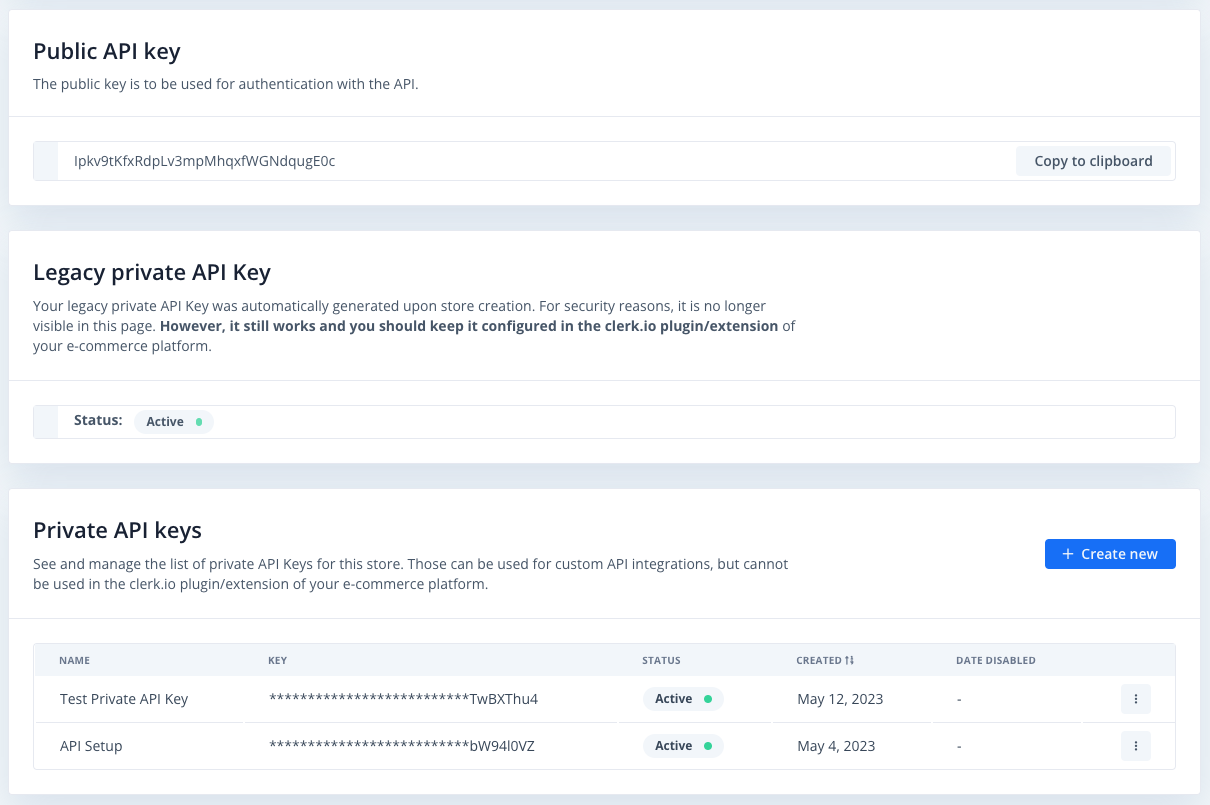
These include a Public key, which gives access to endpoints exposing non-sensitive data, and a Private Key. The Private Key, when combined with the Public key, allows you to work with data on the Store and access sensitive data, such as customer and order information.
You can sync your data using the CRUD API endpoints, which allow you to get, post, update, and delete resources on demand.
curl --request POST \
     --url 'https://api.clerk.io/v2/products' \
     --header 'accept: application/json' \
     --header 'content-type: application/json'
     -d '{"key": "Ipkv9tKfxRdpLv3mpMhqxfWGNdqugE0c",
          "private_key": "osLqDAs5s2tlf3adpLv6Mp1hxxf6GfdDuSE0c2ftT2ot5F3",
          "products":[
                {
                  "id": 123,
                  "name": "Green Lightsaber",
                  "description": "Antiuque rebel lightsaber.",
                  "price": 99995.95,
                  "brand": "Je’daii",
                  "categories": [987, 654],
                  "created_at": 1199145600
                },
                {
                  "id": 789,
                  "name": "Death Star Deluxe",
                  "description": "Death Star. Guaranteed idiot proof. "
                  "price": 99999999999999.95,
                  "brand": "Imperial Inc.",
                  "categories": [345678],
                  "created_at": 11991864600
                }
             ]
           }'
The available ressources are:
One of Clerk’s primary differentiators is that there’s no learning period, since we can utilize all existing orders from day one to understand current customer behavior.
Due to this, it’s crucial to include as many historic orders from the webshop as possible on the first sync.
1.2. Retrieving data
Once data is synced, the AI analyzes it and builds intelligent indexes that can be retrieved through unique endpoints depending on the use-case.
For example, to fetch the hottest products, you can use the recommendations/trending endpoint, and to display the top products for a search on “star wars,” you can use the search/predictive endpoint.
https://api.clerk.io/v2/recommendations/trending?key=Ipkv9tKfxRdpLv3mpMhqxfWGNdqugE0c&limit=30&labels=["Bestsellers"]
https://api.clerk.io/v2/recommendations/search/predictive?key=Ipkv9tKfxRdpLv3mpMhqxfWGNdqugE0c&limit=30&labels=["Search Predictions"]&query="star wars"
All endpoints require you to send the public API key.
Endpoints that return results also require the " limit" argument to control the number of results to be returned.
Additional arguments depend on the endpoint you are calling. For example, complementary products require a list of product IDs to find accessories for, and any search-related calls need the “query” parameter to find matches, and so on.
You can find the necessary arguments for all endpoints in our API documentation.
By default, Clerks API returns all available results, but if necessary, Filters can be used to define a subset of matches.
1.3. Visualising Results
Clerk’s API always returns the IDs of the matches it found when returning results.
// Call
https://api.clerk.io/v2/recommendations/trending?key=Ipkv9tKfxRdpLv3mpMhqxfWGNdqugE0c&limit=10

// Response
{
    "status": "ok",
    "result": [
        12793,
        13827,
        12693,
        12791,
        1546
    ],
    "count": 3902,
    "facets": null
}
To visualize your data, you can make API calls serverside, retrieve the IDs of the matching products, and then fetch all the product-specific information from your webshop platform or PIM before rendering them.
Clerk’s API can also be configured to send back any resource-specific information that you send to Clerk, such as prices, brand names, category URLs, blog cover images, and more. With this, you often don’t need to make individual calls to your PIM before showing results, which will load your page faster.
// Call
https://api.clerk.io/v2/recommendations/trending?key=Ipkv9tKfxRdpLv3mpMhqxfWGNdqugE0c&limit=10&debug=true&attributes=["id", "name", "price", "image", "url"]

// Response
{
    "status": "ok",
    "result": [
        12793,
        13827,
        12693,
        12791,
        1546
    ],
    "count": 3902,
    "facets": null,
    "product_data": [
        {
            "id": 12793,
            "image": "https://admin.davidshuttle.com/media/catalog/product/cache/2aecdb890d2a6ac64962b1f6d4fcec89/2/8/2807199-baccarat-eye-small-oval-red-vase.jpg",
            "name": "Baccarat Eye Small Oval Red Vase",
            "price": 520.0,
            "url": "/"
        },
        {
            "id": 13827,
            "image": "https://admin.davidshuttle.com/media/catalog/product/cache/2aecdb890d2a6ac64962b1f6d4fcec89/1/t/1transatvj.jpg",
            "name": "Sabre Transat Garden Green 22cm Soup Spoon",
            "price": 13.96,
            "url": "/"
        },
        {
            "id": 12693,
            "image": "https://admin.davidshuttle.com/media/catalog/product/cache/2aecdb890d2a6ac64962b1f6d4fcec89/2/t/2transatdl.jpg",
            "name": "Sabre Transat Light Blue 22cm Dinner Fork",
            "price": 13.96,
            "url": "/"
        },
        {
            "id": 12791,
            "image": "https://admin.davidshuttle.com/media/catalog/product/cache/2aecdb890d2a6ac64962b1f6d4fcec89/1/8/1845244-baccarat-dom-perignon-champagne-flute-_set-of-2_.jpg",
            "name": "Baccarat Dom Perignon Champagne Flute (Set of 2)",
            "price": 260.0,
            "url": "/"
        },
        {
            "id": 1546,
            "image": "https://admin.davidshuttle.com/media/catalog/product/cache/2aecdb890d2a6ac64962b1f6d4fcec89/m/a/maison-berger-ocean-breeze-1-litre-lamp-refill.jpg",
            "name": "Maison Berger Ocean Breeze 1 Litre Lamp Refill",
            "price": 29.0,
            "url": "/"
        }
    ]
}
1.4. Tracking Behaviour
Lastly, tracking must be added to keep Clerk’s AI up-to-date and personalize a visitor’s results during their session. Clerk tracking is setup in 4 steps:
- Generating a session ID for each visitor
- Adding descriptive tracking labels to API calls that return results, which are used for showing analytics for individual endpoints
- Logging a visitor’s clicks on products shown by Clerk
- Logging each order made on the webshop
1.4.1. The “visitor” session ID
The session ID is also called the Visitor ID with Clerk. It is strictly required to log a user’s activity during a session on the webshop, including products clicked, searches made, and categories browsed. This activity is stored for each domain, and Clerk never shares it across stores.
For example, you could use PHP’s uniqid(), function to generate IDs that are unique for at least the current session. Once generated, this ID must be included in all calls to Clerk for tracking to work.
<?php

session_start();

$current_visitor = uniqid(); //Example: "646f1f0584371"

$_SESSION["clerk_visitor_id"] = $current_visitor;

?>
1.4.2. Labels Labels must be added to any call that returns results, such as search results or alternatives on a product page. The labels argument is a list containing at least one string, which should be the label of this call. We recommend using labels that contain the page each call is used on and the type of results it shows, like “Homepage - Trending”. This makes them easy to distinguish in analytics.
https://api.clerk.io/v2/recommendations/trending?key=Ipkv9tKfxRdpLv3mpMhqxfWGNdqugE0c&limit=10&labels=["Homepage - Trending"]&visitor=$_SESSION["clerk_visitor_id"]
1.4.3. Logging clicks Then, you should log each click on a Clerk product with log/click. Simply include the ID of the clicked product in addition to the key and visitor ID. It’s important to only make this call when the product clicked is actually shown by Clerk and not the webshop platform itself; otherwise, it will look like all products are found through Clerk.
https://api.clerk.io/v2/log/click?key=Ipkv9tKfxRdpLv3mpMhqxfWGNdqugE0&visitor=$_SESSION["clerk_visitor_id"]&product=12793
1.4.4. Logging sales Lastly, use log/sale to track each order as soon as it is placed on the webshop. With the visitor ID included in this call, Clerk will understand which products were shown, clicked on, and finally purchased. This allows the AI to always stay up-to-date and change results on the fly based on customer behavior.
curl -X POST \
     -H 'Content-Type: application/json' \
     -d '{"key": "Ipkv9tKfxRdpLv3mpMhqxfWGNdqugE0",
          "sale": 567,
          "products": [
            {
              "id": 12793,
              "price": 99.95,
              "quantity": 2
            },
            {
              "id": 1546,
              "price": 14.00,
              "quantity": 2
            }
          ],
          "customer": 1234,
          "email": "theone@matrix.com",
          "visitor": $_SESSION["clerk_visitor_id"]}' \
       https://api.clerk.io/v2/log/sale
2. Syncing with a data feed
In addition to using the CRUD API, it’s highly recommended to add a backup sync method.
After all, many things can go wrong with API calls. For example, your price server might crash, or a product attribute might contain an error that causes several calls to fail. To avoid these issues, consider using a Data Feed as a daily backup for your CRUD calls.
The feed is a JSON file containing the current state of a webshop’s catalog. Any data available in the feed when it is loaded will be what Clerk works with, except for orders, which are logged and do not need to be included in the feed after the first import. Using the data feed is also a great way to preload Clerk with orders.
{
  "products": [ ... ],
  "categories": [ ... ],
  "orders": [ ... ],
  "customers": [ ... ],
  "pages": [ ... ],

  "config": {
    "created": 1567069830,
    "strict": false
  }
}
The data feed should be available at a URL that can be accessed by the importer, which you configure in the my.clerk.io backend:
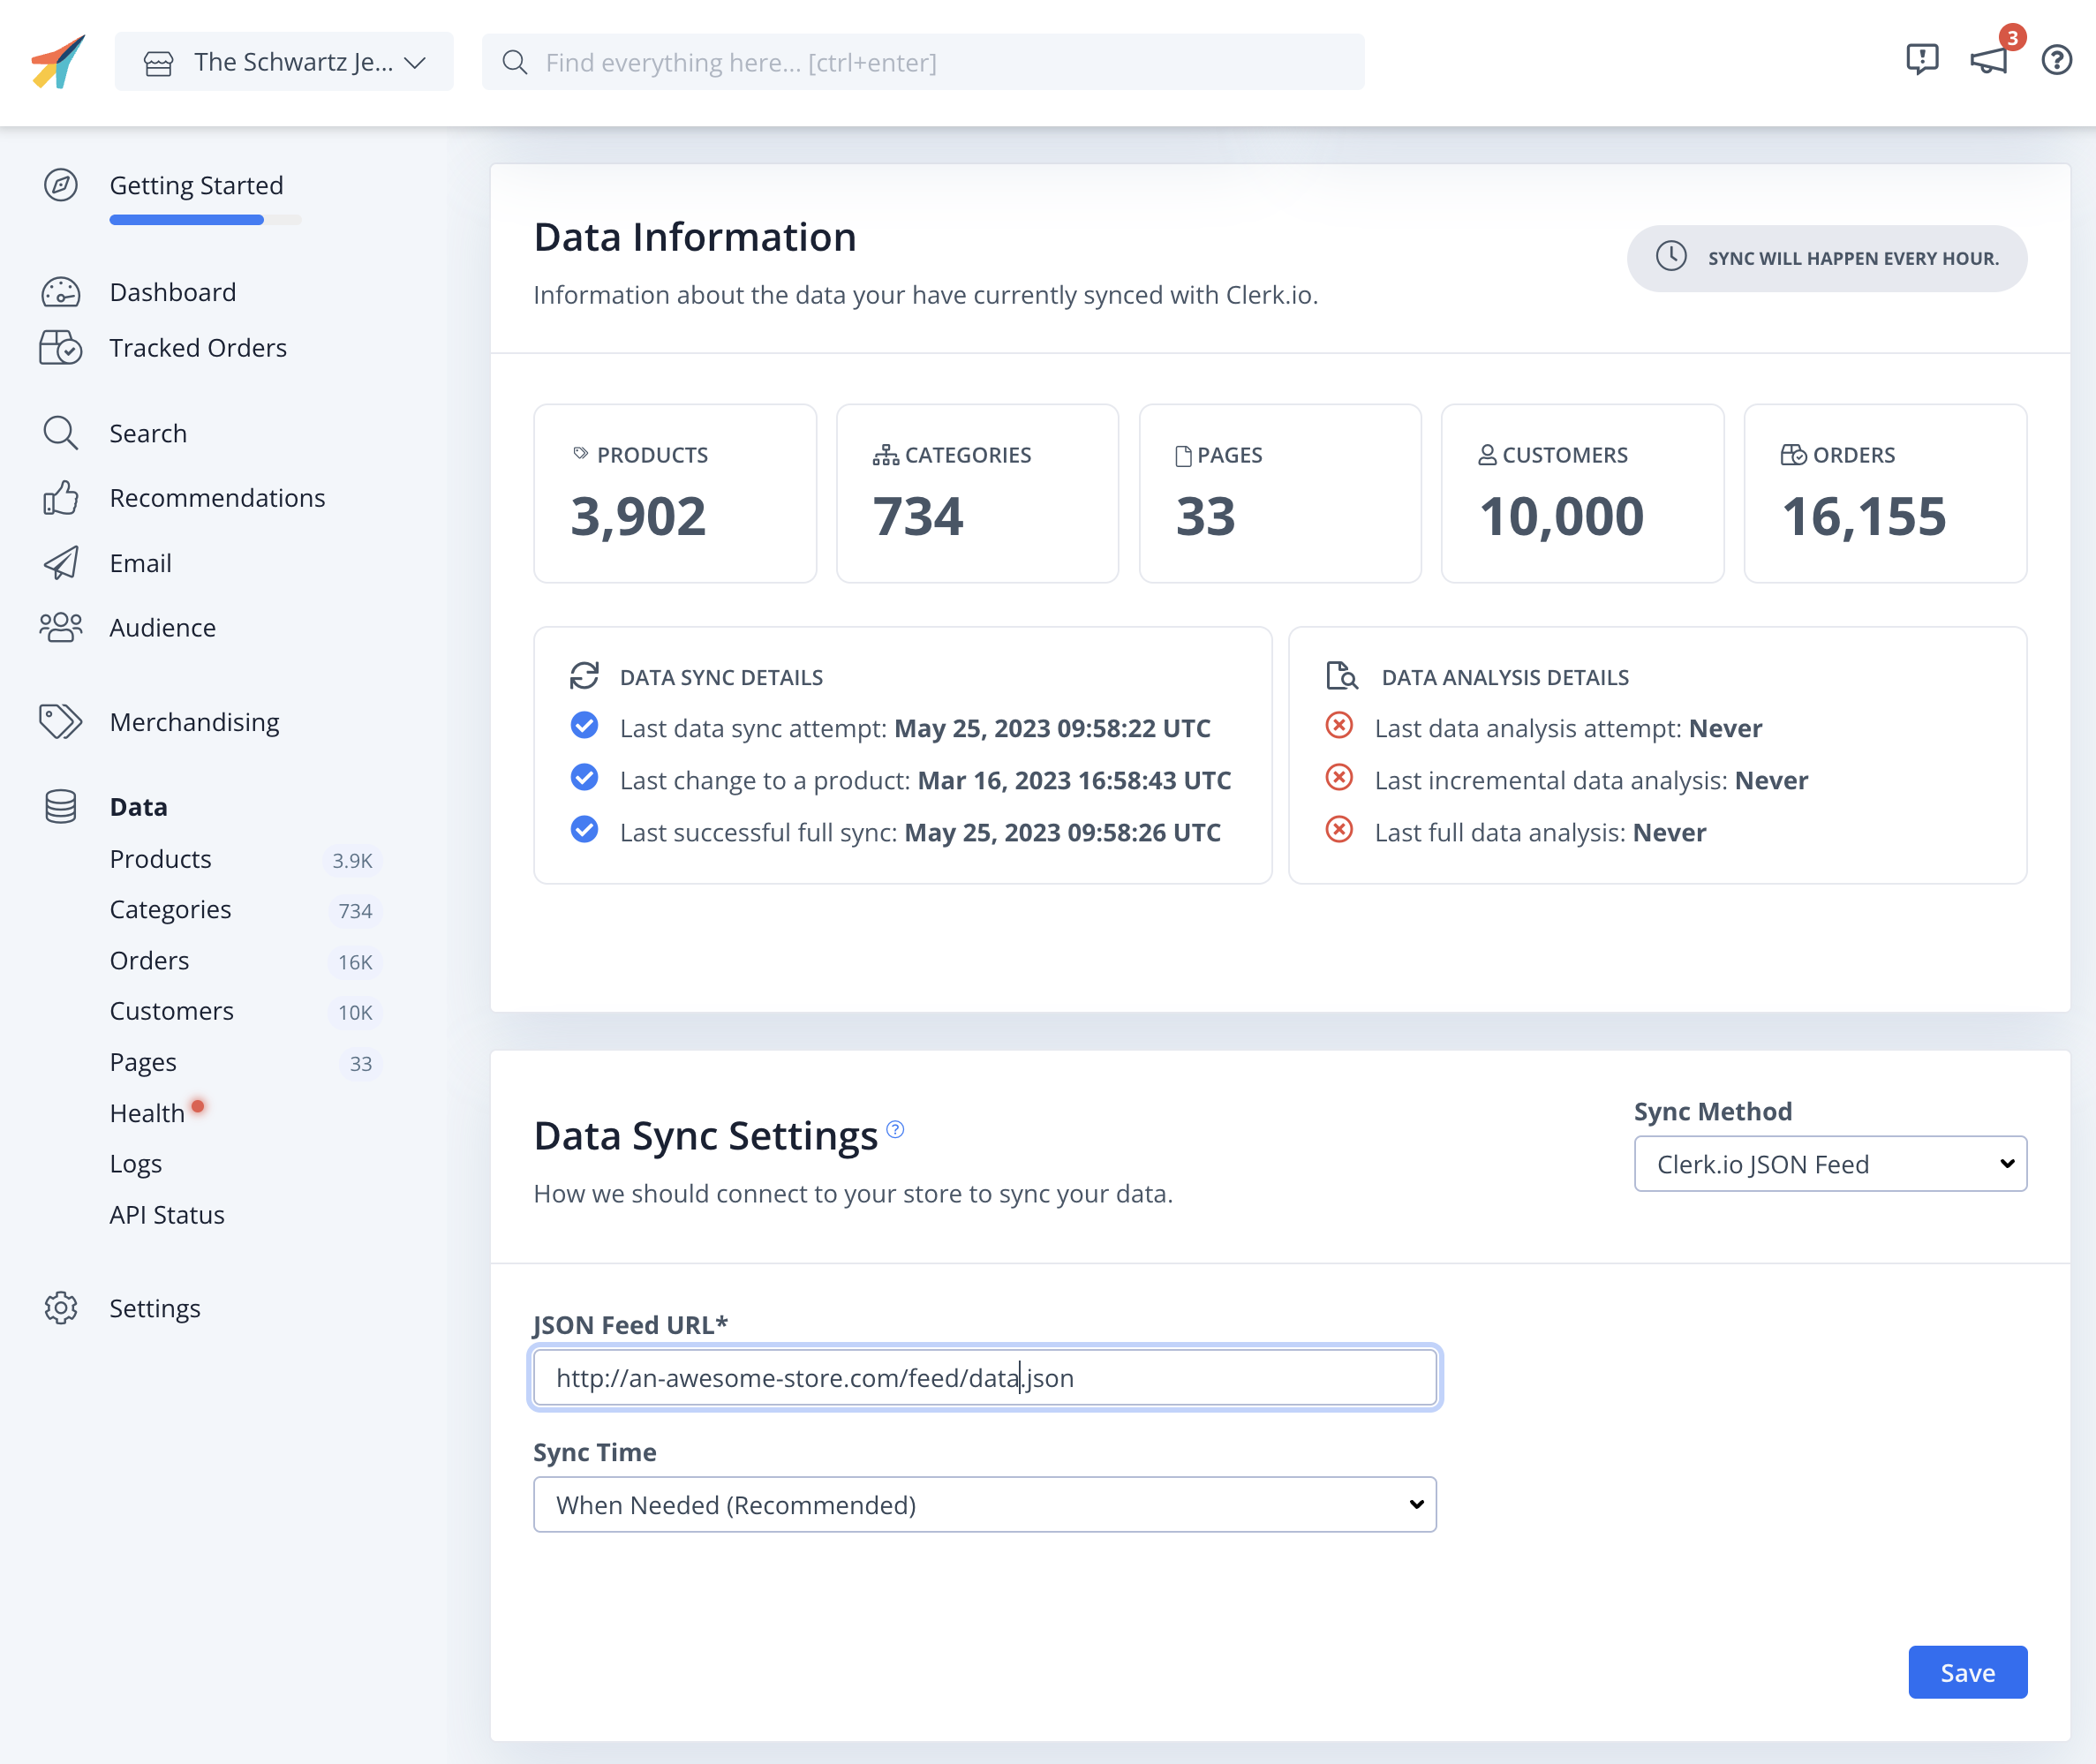
You can secure the feed, so only our importer can access it.
3. The Clerk.js Library
3.1. Overview
Clerk.js is a JavaScript library that simplifies the integration of our API with your frontend. There are three benefits to using Clerk.js:
- It’s robust, as it’s loaded asynchronously. This means that the rest of the page is not dependent on an API response before loading.
- It’s often faster, as your server can start rendering the page in parallel with Clerk.js making calls and rendering results.
- Visitor- and click-tracking is handled automatically for any results shown by Clerk. This requires no cookies, as we generate a hashed value of the visitor’s IP and useragent, combined with a unique store salt that rotates every 30 days.
Clerk.js is loaded with a lightweight tracking script added to the header of the website.
<!-- Start of Clerk.io E-commerce Personalisation tool - www.clerk.io -->
  <script type="text/javascript">
    (function(w,d){
      var e=d.createElement('script');e.type='text/javascript';e.async=true;
      e.src=(d.location.protocol=='https:'?'https':'http')+'://cdn.clerk.io/clerk.js';
      var s=d.getElementsByTagName('script')[0];s.parentNode.insertBefore(e,s);
      w.__clerk_q=w.__clerk_q||[];w.Clerk=w.Clerk||function(){w.__clerk_q.push(arguments)};
    })(window,document);

    Clerk('config', {
      key: 'INSERT_YOUR_API_KEY_HERE'
    });
  </script>
<!-- End of Clerk.io E-commerce Personalisation tool - www.clerk.io -->
This script loads the library from our CDN and lets you access its functionalities through the " Clerk" object. The script configures Clerk.js with the API key so it already knows which Store it’s making API calls for.
When the page is loaded, Clerk.js scans it for any snippets with the class “clerk”.
It then uses the attributes from the snippet to build an API call while getting the API key from the config in the initialisation script.
<span
  class="clerk"
  data-api="recommendations/popular"
  data-limit="10"
  data-template="#clerk-product-template">
</span>
The visual representation is handled by the design, which is also referenced by the snippet.
Clerk.js uses Liquid designs, known from Shopify, to render HTML with the data returned by the API. These should be formatted as scripts, with an ID that you can reference in “data-template” of your snippet.
{% raw %}<span class="clerk"
     data-api="search/search"
     data-query="jedi"
     data-limit="20"
     data-template="#clerk-template">
</span>

<script type="text/x-template" id="clerk-template">
  <h1>Search result for {{ query }}.</h1>
  {% for product in products %}
    <div class="product">
      <h2>{{ product.name }}</h2>
      <img src="{{ product.image }}" />
      <a href="{{ product.url }}">Buy Now</a>
    </div>
  {% endfor %}

  <a href="javascript:Clerk('content', '#{{ content.id }}', 'more', 20);">Load More Results</a>
</script>
{% endraw %}
Snippets can also be simplified to only include a reference to a Content within my.clerk.io.
Designs are then handled with a visual editor or with Liquid HTML code just like in the frontend.
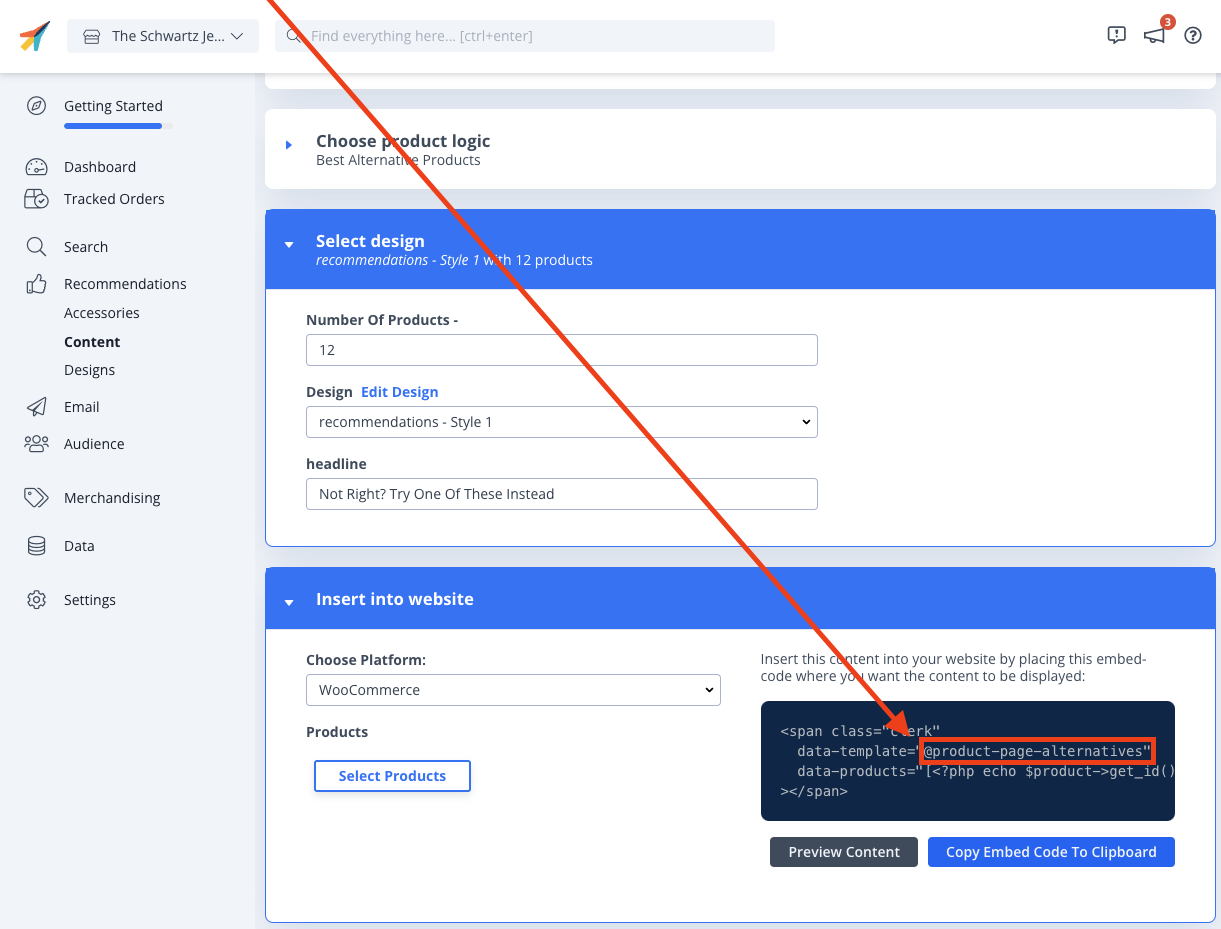
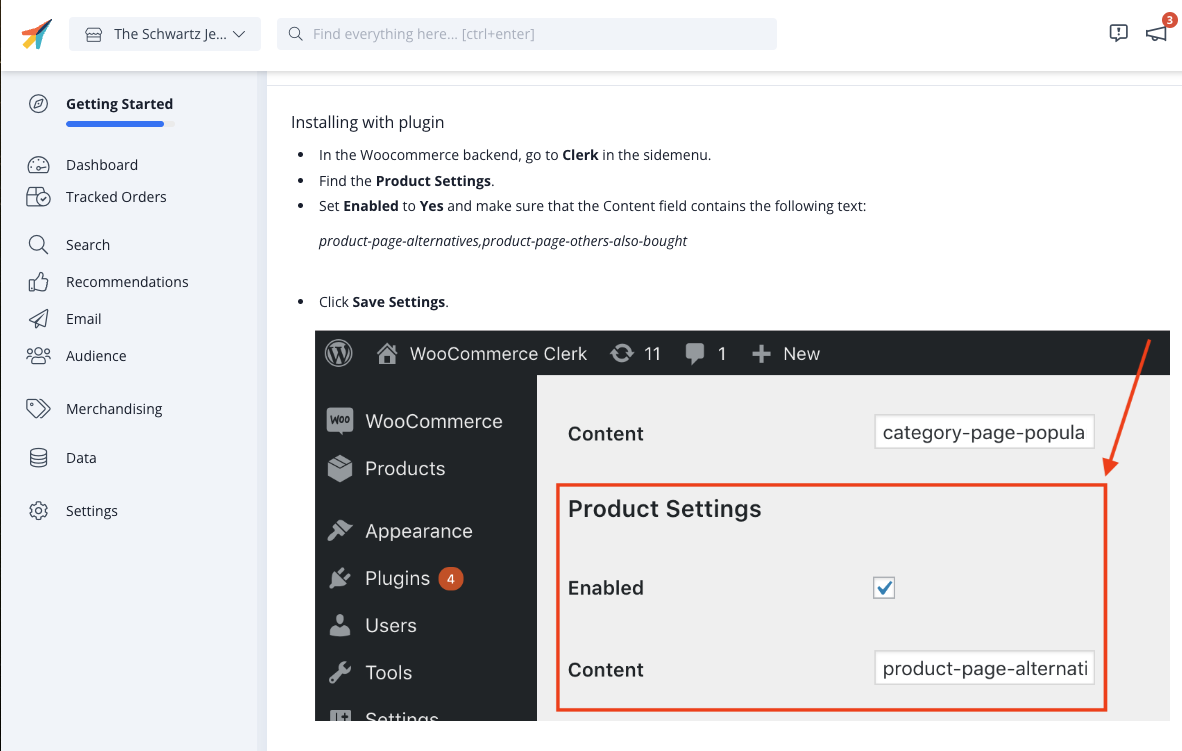
With this approach, most of the configuration is done in a user-friendly way from the admin panel. Your snippets will only need to contain the class “clerk”, any page-specific info like product ID’s, and a reference to the ID of a Content block in “data-template”.
<span class="clerk"
     data-template="@product-page-alternatives"
     data-products="[12352]">
</span>
3.2. Configuration
Clerk.js allows for a variety of configurations.
As mentioned earlier, if you prefer managing session IDs manually, you can configure the visitor parameter that Clerk uses in API calls. Alternatively, you can turn off session tracking entirely by setting visitor to null.
// Custom visitor ID
Clerk('config', {
  visitor: 'ABC123'
});

// Disabling visitor tracking
Clerk('config', {
  visitor: null
});
You can add Formatters and Globals to your design scope.
Formatters are used to influence or change attributes. For example, you may only want to show the first 40 characters of a description, or you may need to calculate a specific discount percentage based on the type of customer who is logged in.
Globals are meant to be used with frontend data that you want to access in designs. This could include the remaining amount needed to achieve free shipping, the name of a logged-in customer, a currency symbol, or a conversion rate, among other things.
{% raw %}// Config
Clerk('config', {
  formatters: {
    uppercase: function(string) {
        return string.toUpperCase();
    }
  },
  globals: {
    currency_symbol: '$'
  }
});

// Use in Design

<div class="clerk-product-name">{{ product.name | uppercase }}</div>
<div class="clerk-product-price"> {{ currency_symbol }}{{ product.price }}</div>
{% endraw %}
3.3. UI Kit
Clerk.js includes a set of UI tools for important elements like the search dropdown and facets on a search page.
For example the search dropdown kit enables you to create a snippet that monitors the input field through a CSS selector and displays a dropdown with content matching a visitor’s search.
{% raw %}<span
  class="clerk"

  data-api="search/predictive"
  data-limit="6"

  data-instant-search="INSERT_CSS_SELECTORS_HERE">

  <dl class="product-search-result-list">
    <dt>Products matching <i>{{ query }}</i></dt>

    {% for product in products %}
      <dd class="product clerk-instant-search-key-selectable">
        <h2 class="product-name">{{ product.name }}</h2>
        <img src="{{ product.image }}" title="{{ product.name }}" />
        <div class="price">${{ product.price | money }}</div>
        <a href="{{ product.url }}">Buy Now</a>
      </dd>
    {% endfor %}
  </dl>
</span>{% endraw %}
Facets let you extend your existing search page snippet to include filters for products on the search page.
<div id="clerk-search-filters"></div>

<span
  class="clerk"

  data-template="@search-page"
  data-query="shoes"

  data-facets-target="#clerk-search-filters"
  data-facets-attributes='["price","categories","brand"]'
  data-facets-titles='{"price": "YOUR-PRICE-LABEL-TRANSLATION-GOES-HERE", "categories": "YOUR-CATEGORIES-LABEL-TRANSLATION-GOES-HERE", "brand": "YOUR-BRAND-LABEL-TRANSLATION-GOES-HERE"}'
  data-facets-price-prepend="€"
  data-facets-in-url="true"
  data-facets-view-more-text="View More"
  data-facets-searchbox-text="Search for "
  data-facets-design="133995">
</span>
3.4. Events
When building more customised setups, such as for B2B businesses, you will often need to react to or modify the results from Clerk before rendering them.
This is where Events are useful.
Events allow you to set up event listeners that run code at specific times before, during, or after Clerk.js renders its results. A common use-case is when you need to check which user is logged in and fetch specific prices for their customer group or remove products they are not allowed to see.
For example, an event can run immediately after Clerk’s API responds, allowing you to call your pricing database with the ID of the customer and the products returned by Clerk to fetch the correct prices before Clerk.js renders the results.
Clerk("on", "response", function(content, data) {
    let products = data['product_data'];
    const product_ids = data['result'];
    const customer_prices = getUniquePrices(customer_group, product_ids); // {"27746": 310.25, "26994": 124.50}
    products.forEach(product =>
      product['price'] = customer_prices[product['id']]) // Add customer price based on product ID;
  })
4. Extensions & Integrations
We differentiate between the two based on their installation methods and how much of the setup they can handle.
4.1. Extensions
These installed into the platform as packages that bundle the feed, API calls, and Clerk.js.
They can take care of synchronization, tracking, and inserting snippets.
Examples include Magento2, WooCommerce, and Prestashop.
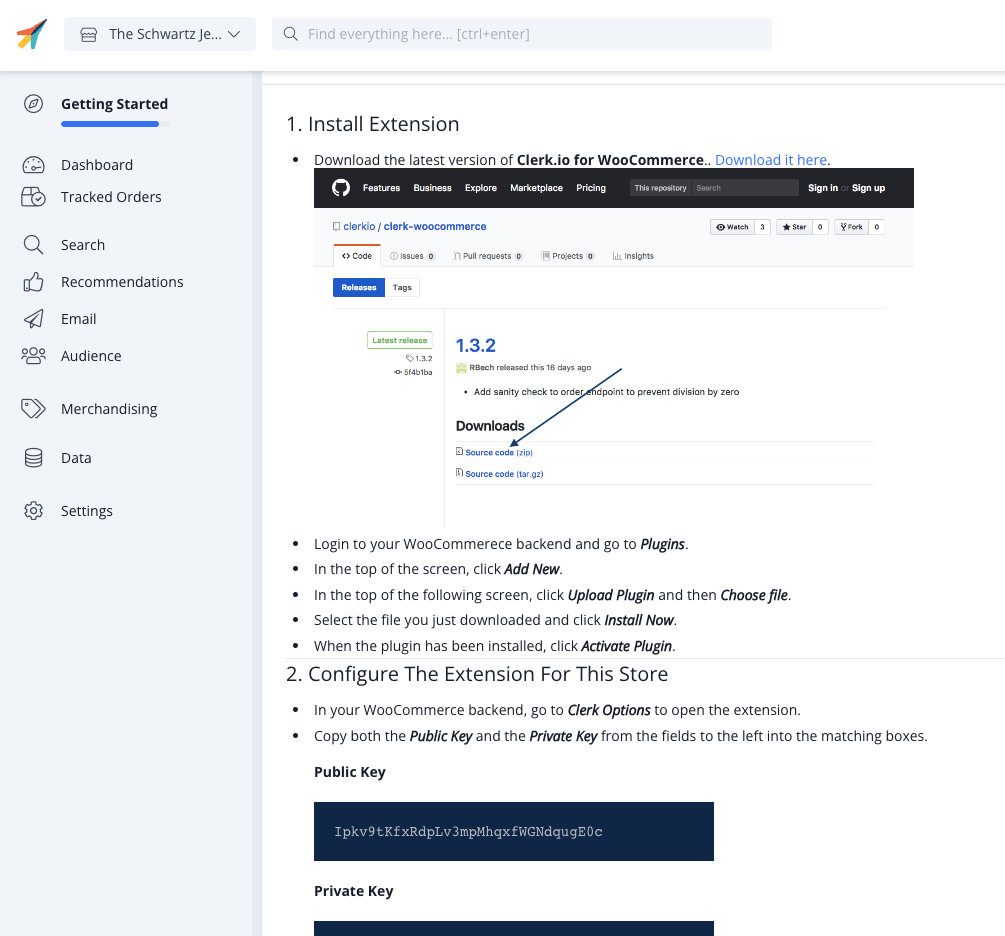
As the extension will be on your server physically, you can extend or change it in the code as you see fit. Just make sure to keep your changes separate from the core files to avoid overwriting them when you update to a new release.
Most extensions sync data by creating endpoints on the webshop, which are then accessed with the Public and Private Key, just like when making CRUD calls. When you run a data sync, Clerks importer accesses each endpoint to receive the data in JSON format, through pagination.
https://awesomestore.com/clerk/product?key=insert_public&private_key=insert_private&page=1&limit=100
https://awesomestore.com/clerk/category?key=insert_public&private_key=insert_private&page=1&limit=100
https://awesomestore.com/clerk/order?key=insert_public&private_key=insert_private&page=1&limit=100
4.2. Integrations
These use the webshop platform’s API to sync data, while snippets must be inserted manually into the theme files.
Examples here include Shopify, BigCommerce, and Lightspeed.
Integrations are hosted on Clerk’s servers, so while you can’t modify their code, they contain various configuration options from the Data page.
If we have an extension or integration for your platform, we recommend using it to simplify at least parts of the installation.
You can still choose to use it only for syncing data and then use the API or custom snippets for the frontend. In other words, think of them as toolkits that you can use to any degree you see fit.
5. Choosing Your Setup
Doing a Clerk.js integration is often the fastest and leaves the non-tech employees of your company with way more control of the setup after the integration.
You also don’t have to worry about tracking and adding server load, as Clerk.js works in the frontend while the page is loading.
API setups are recommended if you have a lot of custom business logic you need to apply.
For example, if you are developing a B2B store, with unique prices and catalogues for each logged in customer, it’s likely easier to make API calls serverside, and apply the business logic after Clerk returns results.
Also, if you need to do a quick switch from another API to Clerk, it is often much faster to simply replace and reconfigure API calls than doing a Clerk.js installation, at least initially. Finally, if you are building an app, using the API is the best way of connecting it with Clerk.