Module
Configure your PrestaShop module settings, manage data sync options, and customize search, recommendations, and logging features.
Data sync settings #
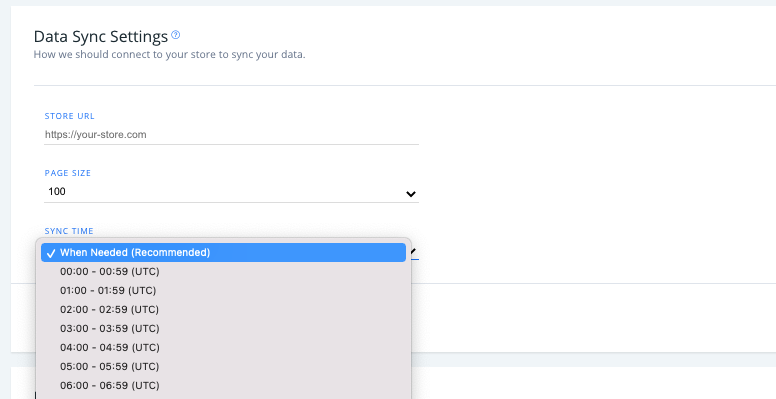
Go to Data > Configuration in my.clerk.io to view your Prestashop sync options.
- Set your store URL, page size of your synced data, and the time of day when your webshop data syncs to Clerk (Default is “When needed”).
Module settings #
If you are using v 6.7.0 or a later version of the extension (you can check the newest version here), you will be able to access the below settings in two ways after adding your Public and Private Keys to the module:
Through the Prestashop backend in Modules > Clerk
Through my.clerk.io, under Developers > Extensions
It does not matter where you make the changes, as the extension will sync with any changes made in my.clerk.io and vice versa.
In my.clerk.io you will also be able to see your current version of the extension, your platform, and the PHP version.
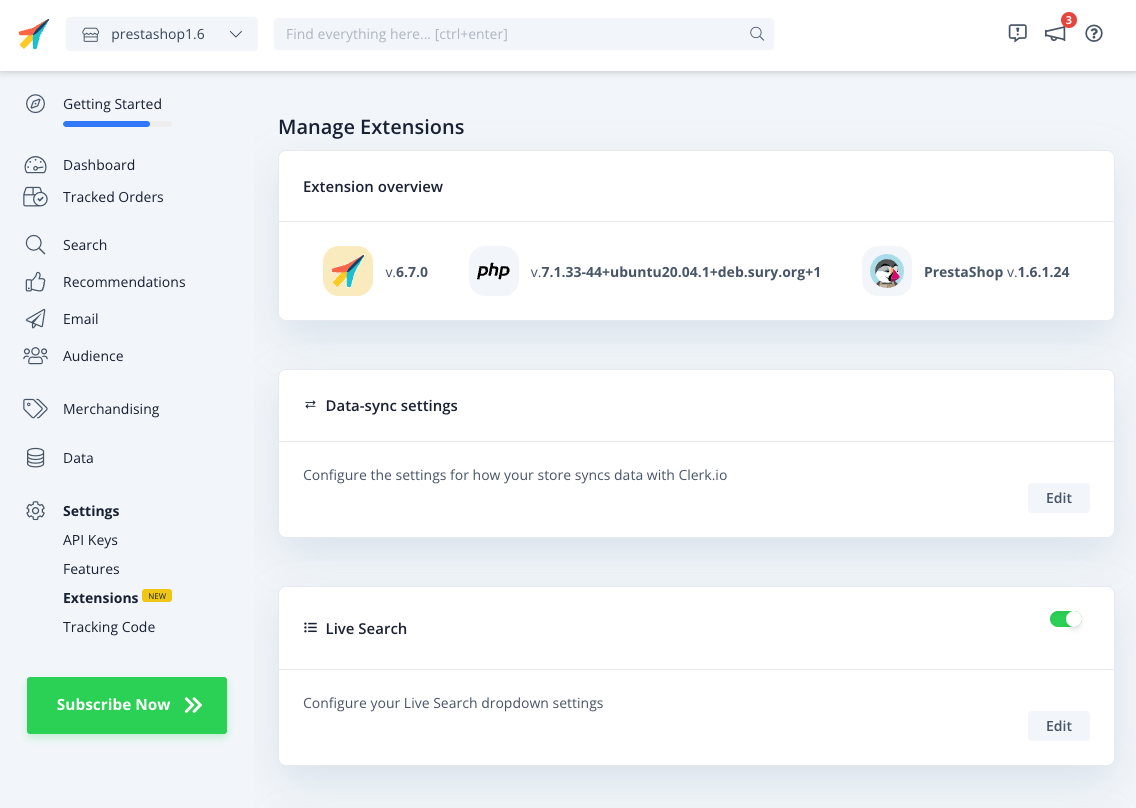
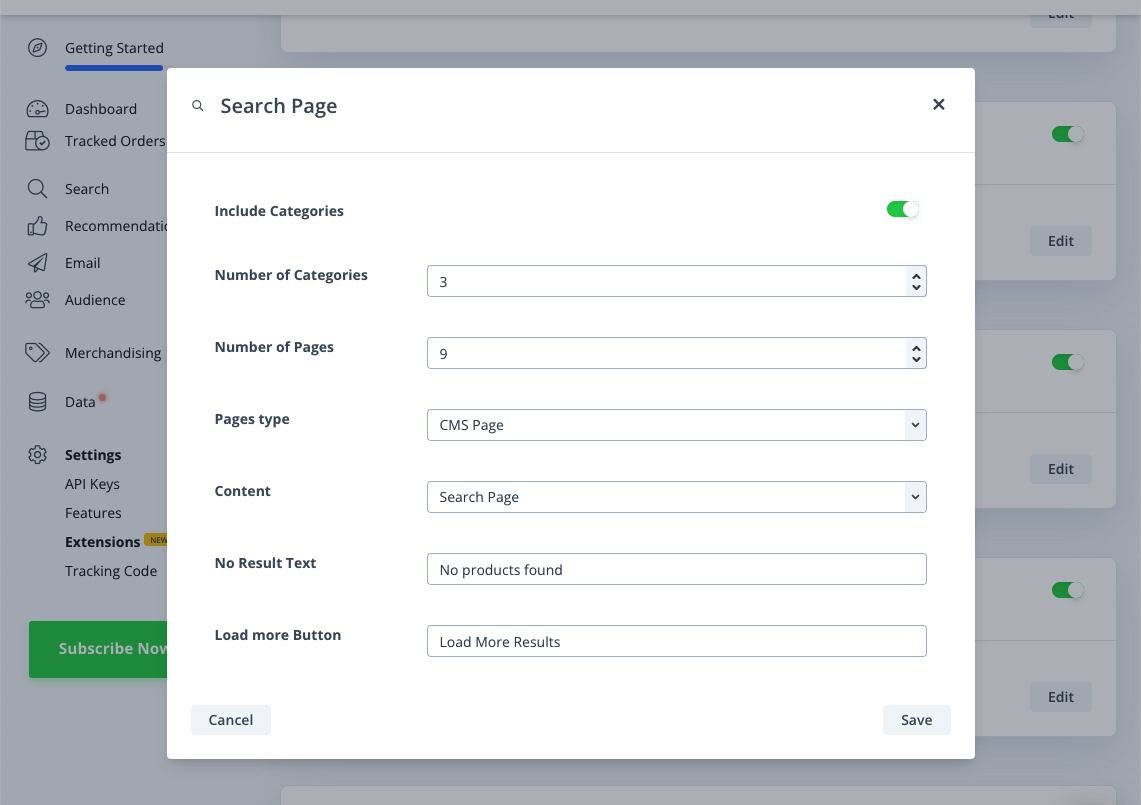
Simply click “Edit” on any setting, to see the available options:
Module overview #
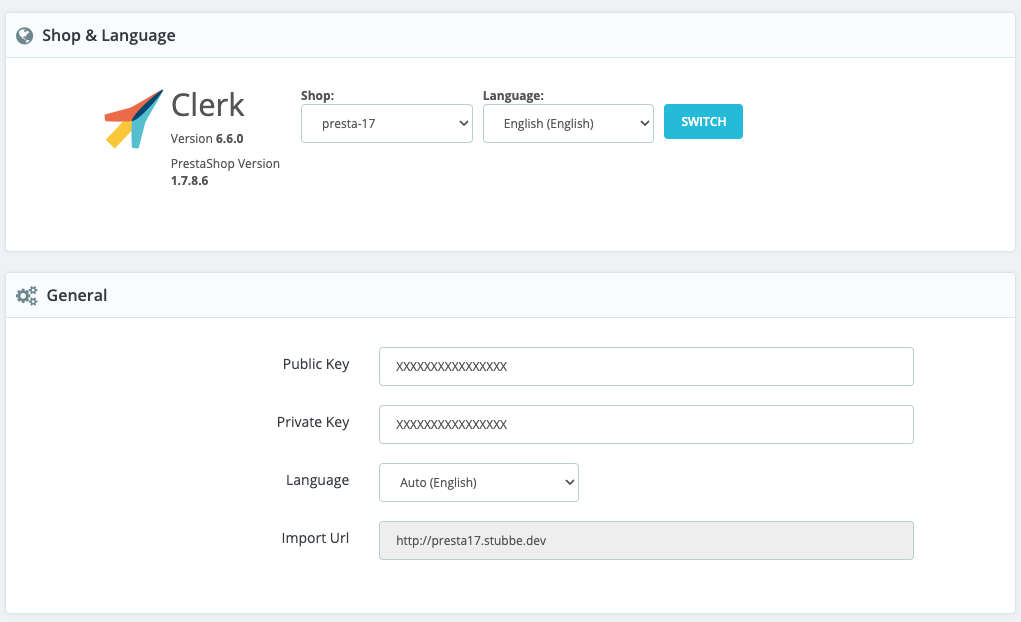
In your Prestashop admin account, choose Clerk from your “Modules” to view and adjust your Clerk module options.
Set the default language for the module at " Shop & Language", and access your API keys, store language, and data import URL under " General".
Sync #
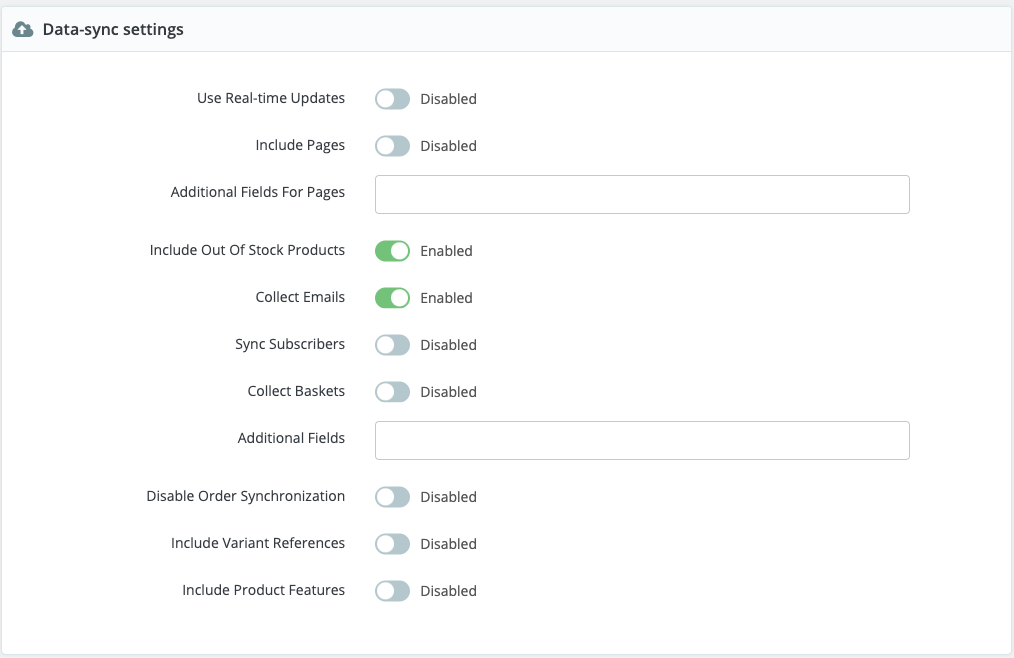
Set your main data sync settings in the next section below.
Use Real-time Updates will update product data in Clerk as soon as its changed in Prestashop.
Include Pages will send your blogs & articles to Clerk so they can be shown in Search, and have Recommendations shown on their pages.
Additional Fields / For Pages allows you to add custom attributes to your products and pages that can then be used in search and visually in a Design.
Include Out Of Stock Products will import products to Clerk regardless of their stock status.
Collect Emails will include email addresses in orders. This is necessary for Audience and personalised recommendations based on orders.
Sync Subscribers let’s you fetch the status of any email subscribers from Prestashop, for use with Auto-Email.
Collect Baskets will track what a user has in their basket, for use with Abandon Cart emails.
Disable Order Synchronisation let’s you stop the import of new orders coming through. Often these orders will be tracked by the live sales-tracking, which is why they don’t have to be imported anymore.
Include Variant References let’s you import attributes based on the variants available for products. By default, we will then import lists of variant IDs, names, prices and SKUs.
Include Product Features will import the special attributes called Product Features from Prestashop.
Search #
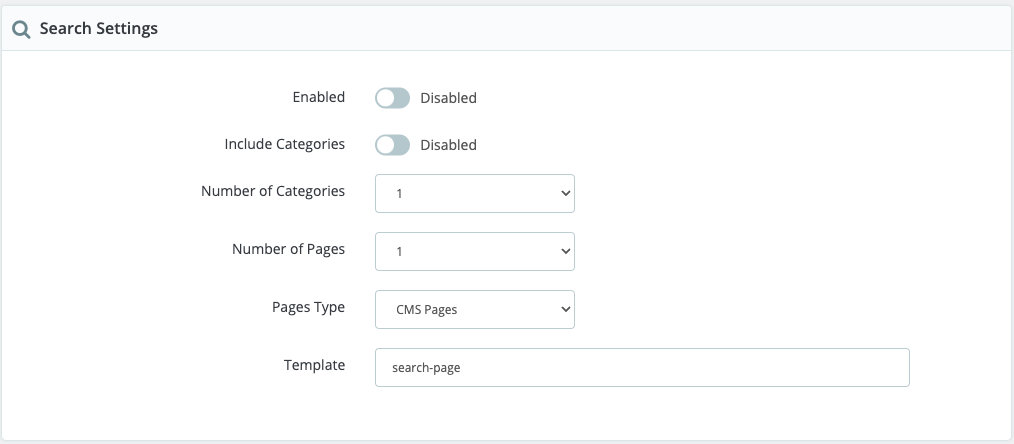
Enable your Search Page by toggling to “Enabled”.
Include Categories will have Clerk return matching categories when searching.
Number of Categories / Pages let’s you decide how many potential matches to return for each type.
Pages Type let’s you control a specific type of pages to import. For example, only articles or service / CMS pages. By standard, all pages are imported.
Template should match the name provided in the embed code of your Search Page Element in my.clerk.io. This is usually " search-page".
Faceted navigation #
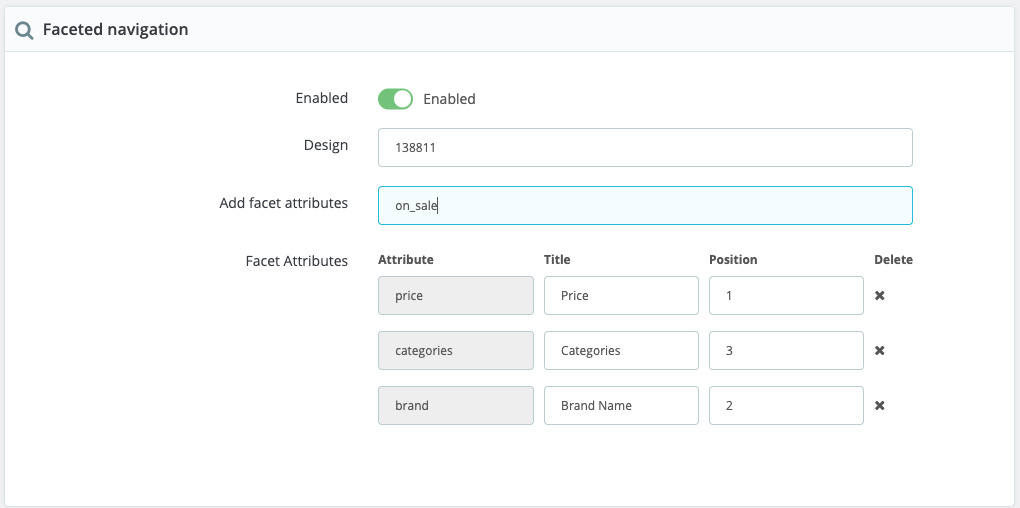
Toggle this to “Enabled”, to add filters to your Search Page.
Design let’s you choose an optional custom design for your facets. See “Customising Your Search Page Facets” below.
Add facet attributes let’s you choose which attributes to allow users to filter by. These must match attributes that you have synced with Clerk. Check which attributes are available in my.clerk.io > Data > Products.
Facet Attributes let’s you customise each facet with the Title as it should be shown to users on your search page, as well as it’s position, which is the order they are shown in based on the number added.
Customising facets #
Clerk allows you to style your search page facets from within the design and you can display this by referencing it with the design ID field.
The design ID can be found in the Clerk backend, on the far left column of each design on the design overview page and in the bottom left of the page once you enter the design to edit.

Note: You are now able to call the data for categories and pages in your Search page in the same way you would in your Live search, giving you a larger range of information to engage your customers with. For more information you can check here.
Live search #
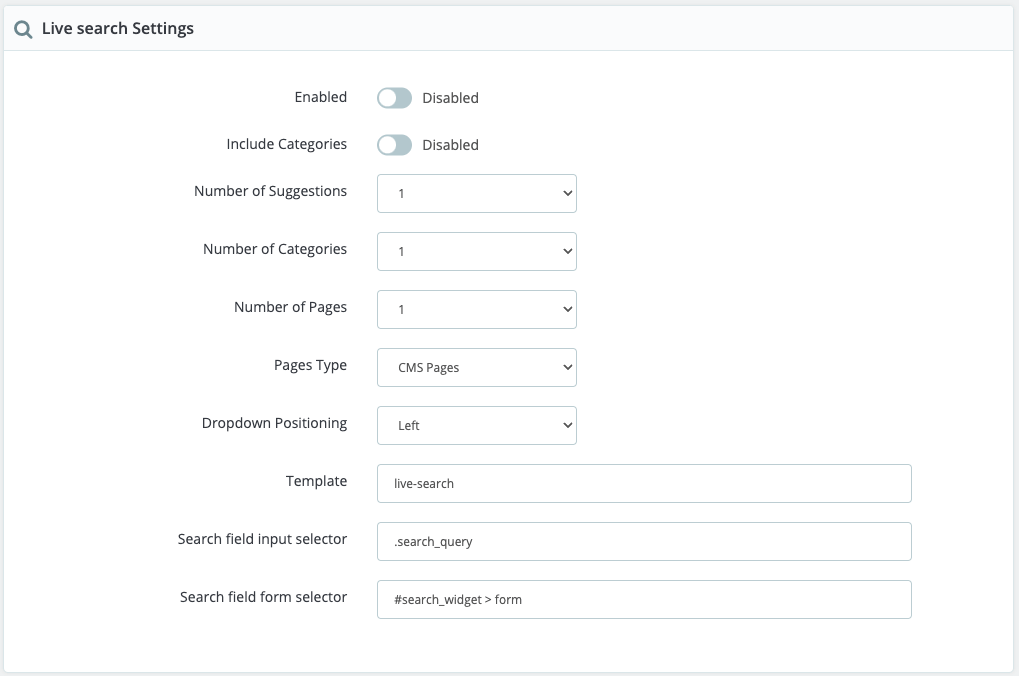
Enable Clerk Live Search in this section by toggling “Enabled” in the first option.
Include Categories will have Clerk return matching categories when searching.
Number of Suggestions / Categories / Pages let’s you decide how many potential matches to return for each type.
Pages Type let’s you control a specific type of pages to import. For example, only articles or service / CMS pages. By standard, all pages are imported.
Dropdown Positioning controls which direction the Instant Search will be shown, relative to the search field. For example, if you have a search-field in the left side of your webshop, choose left.
Template should match the name provided in the embed code of your Search Page Element in my.clerk.io. This is usually " search-page".
Search field input selector should be used if you have a custom search field. Add the class or ID of the input tag here to connect the Instant Search to the field, and have it show when users search.
Search field form selector is also used for custom search fields, and allows Clerk to change the redirect to match the search page that we add.
Powerstep #
Enable your powerstep by toggling to Enabled in the top.
The powerstep will be triggered when a user adds a product to the basket.
Powerstep Type let’s you choose between 3 options:
Page will redirect to a full middle page added by our module.
Popup will show a new popup added by our module.
Embedded will add recommendations to Prestashops existing add-to-cart popup.
Templates let’s you decide which Recommendations to show in your powerstep by adding their Element IDs. This is pre-filled with the best options.

Recommendations #
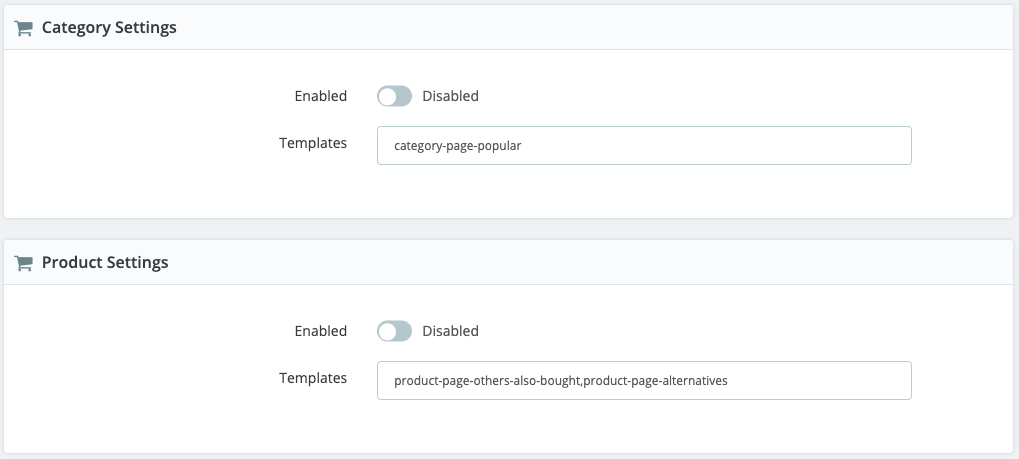
These settings let’s you add recommendations to different pages of your webshop: Category Pages, Product Pages, the Cart, and an Exit Intent Popup.
- Templates let’s you decide which Recommendations to show in the various pages by adding their Element IDs. These are pre-filled with the best options.

Logging #
Logging can be used for showing any errors and/or warnings that happens in Prestashop 1.6.
This is a great help for debugging issues.
To enable Logging, do the following:
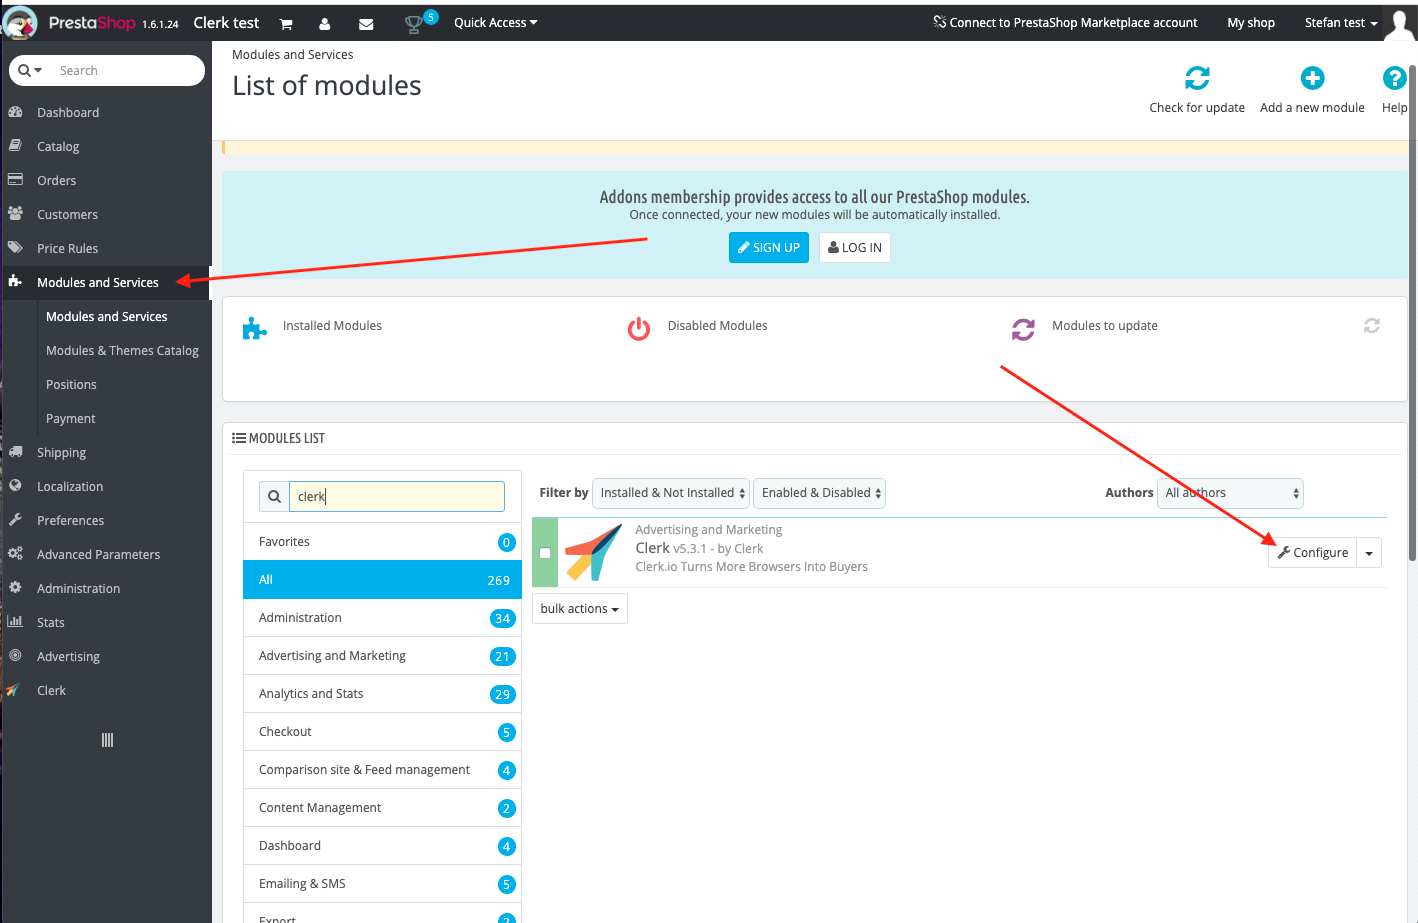
Go into your Prestashop backend.
Go to Modules and Services -> Modules and Services.
Search for clerk to find the module and click Configure:
Scroll down the Clerk module page to find the logging settings.
Set Enabled to Yes:
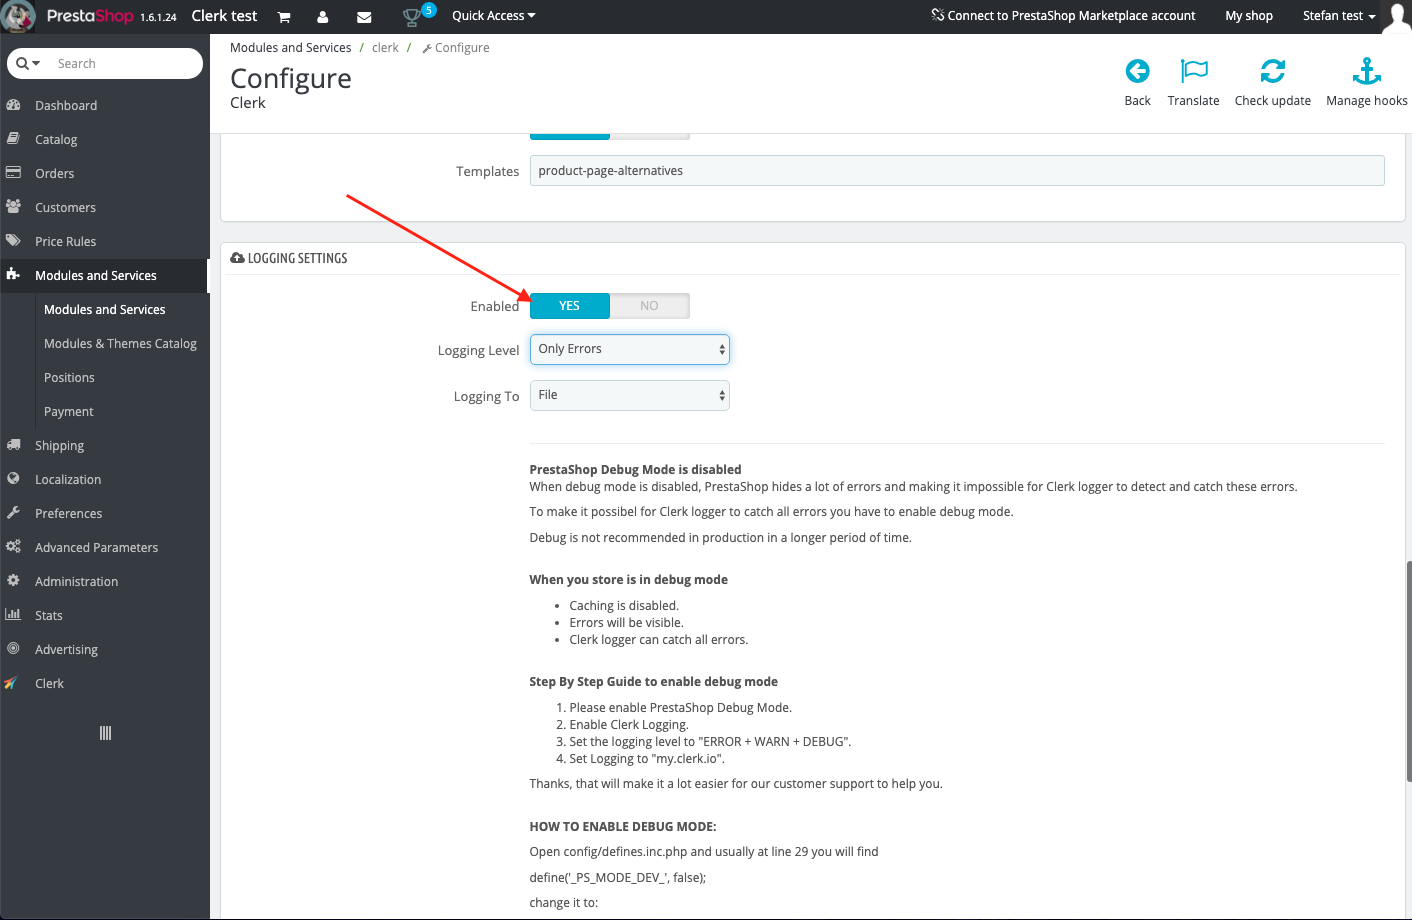
- Scroll to the bottom of the page and click Save.
The Logging settings include:
Logging Level
Only Errors: Will log any errors that stops the module from working correctly.
Error + Warn: Also logs warnings that are not causing the module to stop working, but might be necessary to fix as well.
Error + Warn + Debug: Logs everything that the module interacts with. This should not be enabled on a live webshop as it will slow down the site.
Logging To
File: Will save the log to a file on the Prestashop server.
my.clerk.io: Will log everything to Developers->Logs in the my.clerk.io backend.
Upgrading #
If you are using a version before 5.0.0, upgrading will break your Designs, since Clerk.js 2 will be used. If using an older version, follow this guide instead.
Important: Remember to take backups of any modified files, as they will be overwritten.
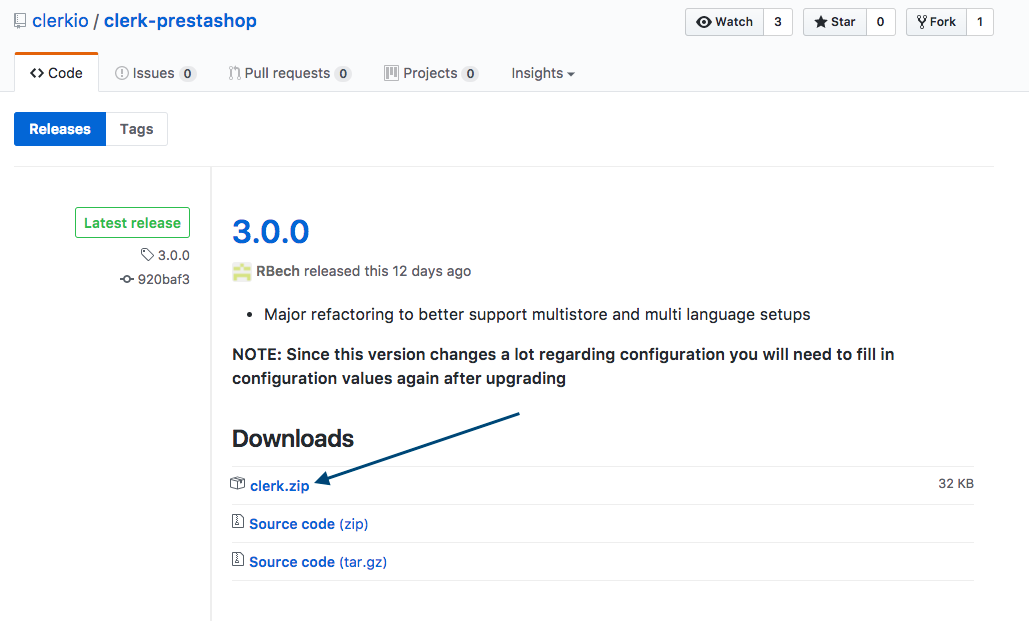
Start by downloading the latest version from this link:
https://github.com/clerkio/clerk-prestashop/releases/latest
Then login to your Prestashop admin and go to Modules And Services -> Modules And Services
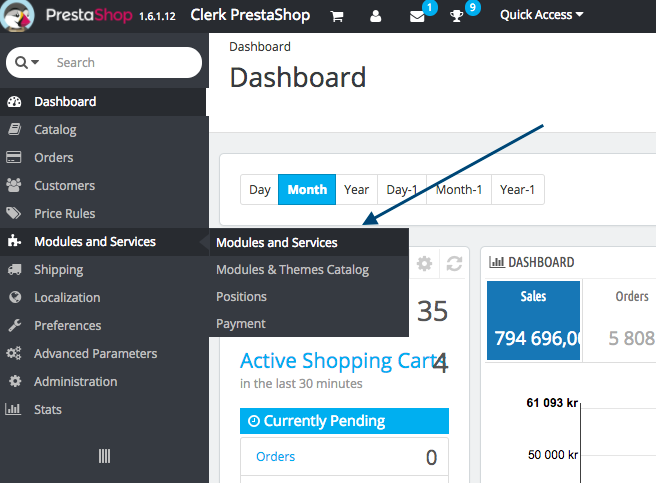
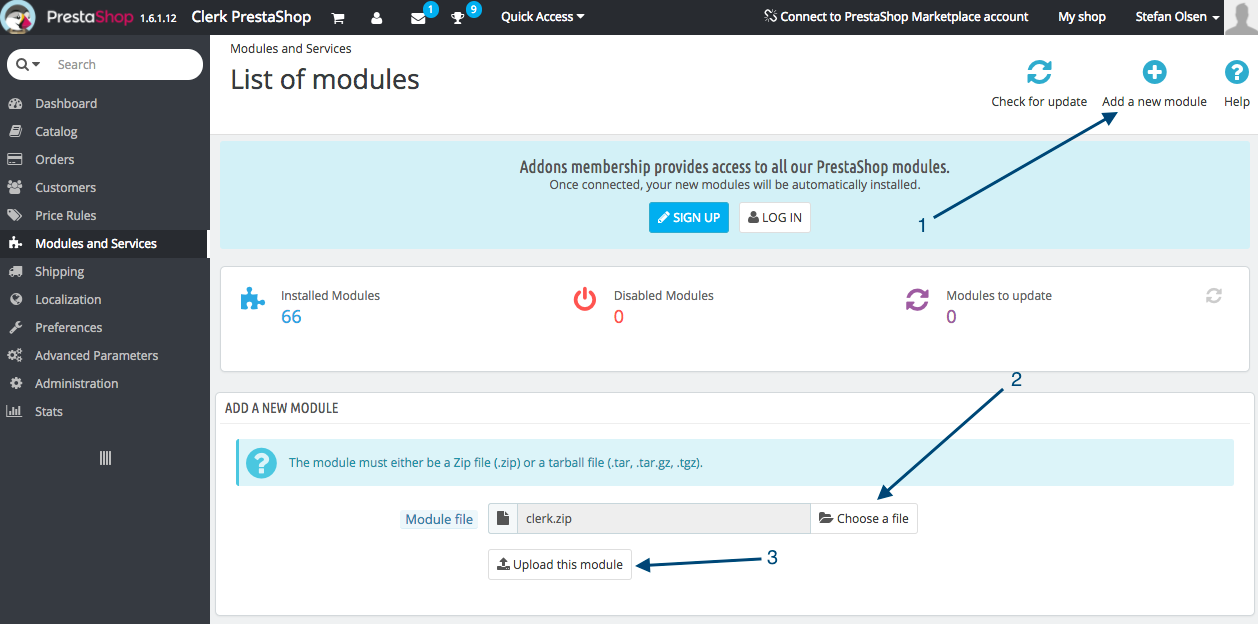
On this page, do the following:
Click Add New Module.
Click Choose a file and upload the clerk.zip file you just downloaded.
Click Upload this module.
PrestaShop will now display a success message, confirming that your module has now been upgraded.
That’s it! Now you are running the latest version of the Prestashop module.
Uninstalling #
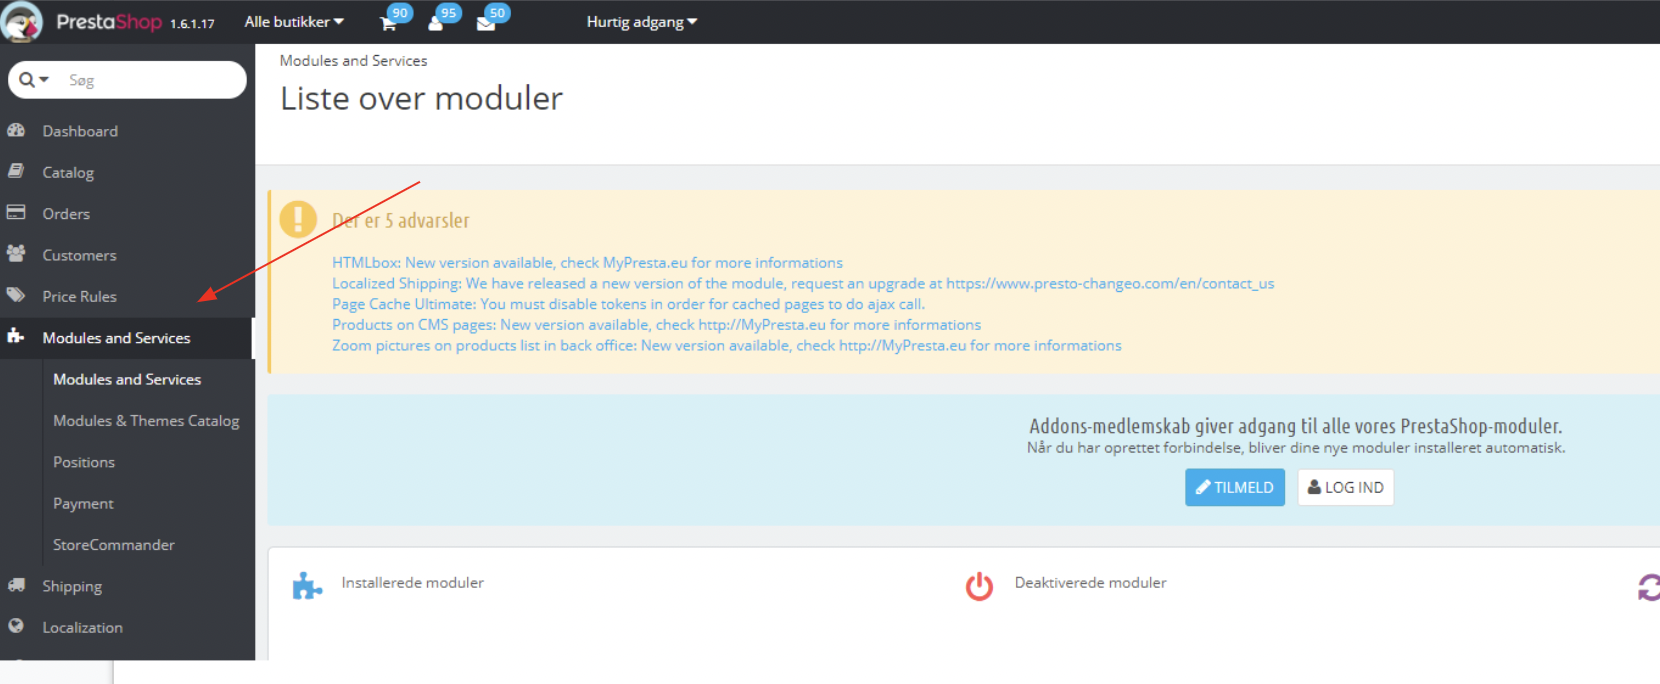
Log into your Prestashop admin portal, and select “Modules and Services” from the left-side menu:
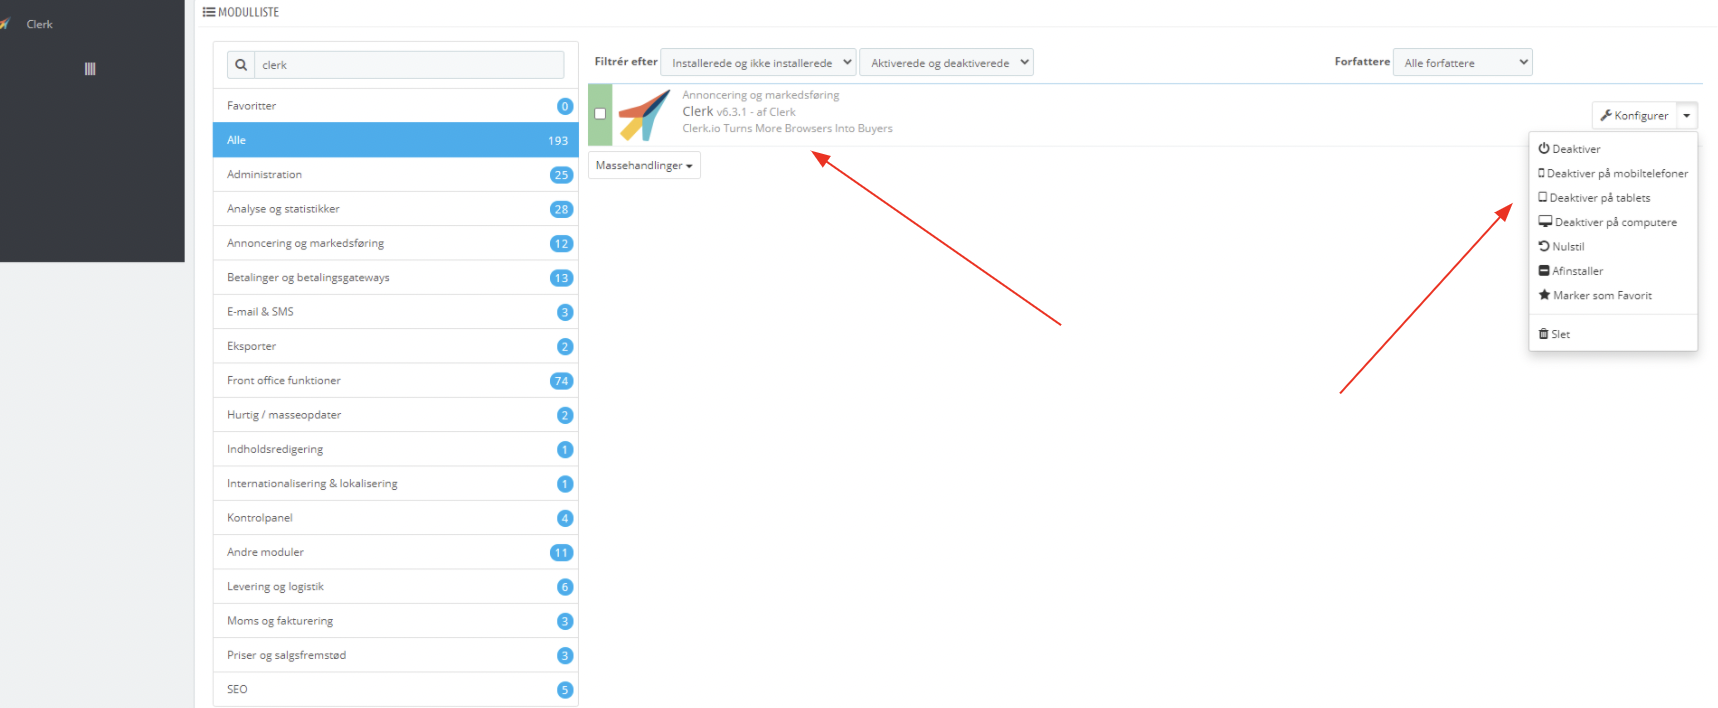
Next, find “Clerk” in your list of modules, and select “Deaktiver” to disable the Clerk plugin:
Once disabled, Clerk should be removed from your Prestashop store.