Get Started
Get Clerk.io up and running on your Shopify store in just a few steps. This guide walks you through connecting your store, installing tracking, and syncing your data.
Before setup #
Shopify and Clerk.io each have a part in the setup. The Shopify side provides access, the app, and storefront tracking. The Clerk.io side connects the store, configures the sync, and starts importing data.
| Shopify | my.clerk.io |
|---|---|
| Find the Shopify domain and collaborator code, approve collaborator access, create and install the app, and add tracking. | Add the Store, configure the Shopify sync, start the first sync, and verify the imported data. |
Shopify access #
If a third party like Clerk.io is setting up or troubleshooting the integration, they need the store’s current myshopify.com domain and collaborator access to log in to the Shopify backend.
Find domain #
- In Shopify, go to Settings > Domains.
- Copy the store’s current
.myshopify.comaddress.
Use the .myshopify.com address for Shopify integration settings, even when the webshop uses a custom public domain. Shopify uses the myshopify.com address to identify the store and for admin access. Read more in
Shopify’s domain documentation.
Find code #
- In Shopify, go to Settings > Users.
- If the store is part of an organization, open Users. Otherwise, open Users & permissions.
- Click Security.
- Click the four-digit collaborator code to copy it.
The third party uses this code when submitting a collaborator request. Approve the request under Settings > Users → Requests. See Shopify’s collaborator-account documentation for the current steps.
Setup ownership #
The Shopify store’s team or a third party with the required Shopify permissions can complete the Shopify-side steps. Collaborator access does not automatically include permission to develop apps. If the third party cannot create or install the app, the Shopify store’s team completes those steps and securely shares the app’s Client ID and Client Secret with the person configuring the sync in my.clerk.io.
Connecting your store #
The first step of installing Clerk.io is connecting your Store with your Clerk.io account.
After following these simple steps, you will be able to see your Live Demo Store, which gives you a personal overview of how Clerk.io will work on your webshop.
Add store #
Login to my.clerk.io. The first time you do this, you will see the Add New Store page.
Write the Name and public Domain of your webshop.
Choose Shopify as the Platform and choose your Currency.
Click Add Store.
The Shopify .myshopify.com domain is entered later in Data > Configuration when the sync is configured.
Install visitor tracking #
In your Shopify backend, go to Online Store > Themes.
Click ... > Edit code for the theme you want to modify.
Open
settings_schema.jsonand append the Clerk settings snippet at the bottom, just before the last].
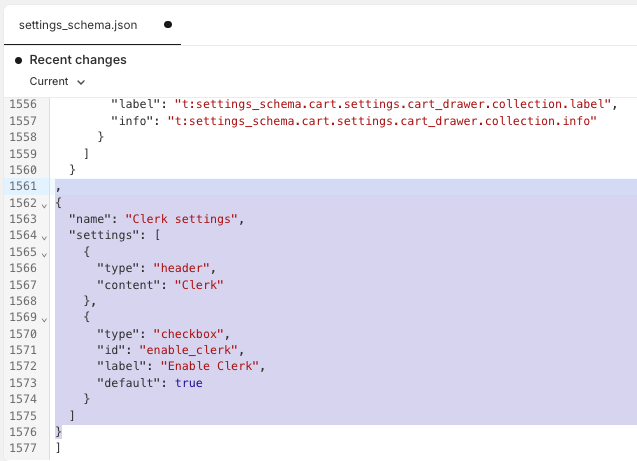
,
{
  "name": "Clerk settings",
  "settings": [
    {
      "type": "header",
      "content": "Clerk"
    },
    {
      "type": "checkbox",
      "id": "enable_clerk",
      "label": "Enable Clerk",
      "default": true
    }
  ]
}
Click Save.
Under Snippets, click Add a new snippet named
clerk-tracking.liquidand click Done.Insert your Clerk visitor tracking snippet into the new file and click Save. Replace INSERT_PUBLIC_API_KEY with your Public Key from my.clerk.io > Developers > API Keys.
<!-- Start of Clerk.io E-commerce Personalisation tool - www.clerk.io -->
<script type="text/javascript">
  (function (w, d) {
    var e = d.createElement('script'); e.type = 'text/javascript'; e.async = true;
    e.src = (d.location.protocol == 'https:' ? 'https' : 'http') + '://cdn.clerk.io/clerk.js';
    var s = d.getElementsByTagName('script')[0]; s.parentNode.insertBefore(e, s);
    w.__clerk_q = w.__clerk_q || []; w.Clerk = w.Clerk || function () { w.__clerk_q.push(arguments) };
  })(window, document);
  const publicKey = 'INSERT_PUBLIC_API_KEY';
  Clerk('config', {
    key: publicKey,
    formatters: {
      currency_converter: function (price) {
        var converted_price = (price * Shopify.currency.rate);
        return (converted_price).toString();
      }
    },
    globals: {
      currency_iso: "{{ cart.currency.iso_code }}",
      currency_symbol: "{{ cart.currency.symbol }}"
    }
  });

  // Clerk.js Context
  Clerk('context', {
    product: {% if product %}{{ product.id }}{% else %}null{% endif %},
    category: {% if collection %}{{ collection.id }}{% else %}null{% endif %},
    page: {% if product %}null
          {% elsif collection %}null
          {% elsif page %}{{ page.id }}
          {% elsif blog %}{{ blog.id }}
          {% elsif article %}{{ article.id }}
          {% elsif template.name == 'index' %}'homepage'
          {% else %}'{{ template.name }}'
          {% endif %}
  });

  {% if customer %}
    Clerk('call', 'log/email', { email: "{{ customer.email }}" });
  {% endif %}

  document.addEventListener('DOMContentLoaded', (e) => {
    (async function fetchVisitorId() {
      let visitorId = window.sessionStorage.getItem('visitor_id');
      try {
        if (!visitorId) {
          const response = await fetch(`https://api.clerk.io/v2/misc/visitor_id?key=${publicKey}&visitor=auto`);
          const data = await response.json();
          visitorId = data.visitor;
          window.sessionStorage.setItem('visitor_id', data.visitor);
        }
        Clerk('config', {
          visitor: visitorId,
        });
      } catch (error) {
        console.error('Error:', error);
      } finally {
        function publishClerkContext() {
          if (window.Shopify?.analytics?.publish) {
            window.Shopify.analytics.publish('clerk_pixel_context', {
              localeApiKey: publicKey,
              visitor: visitorId,
            });
          } else {
            setTimeout(publishClerkContext, 200);
          }
        }
        publishClerkContext();
      }
    })();
  });
</script>
<!-- End of Clerk.io E-commerce Personalisation tool - www.clerk.io -->
- Open
theme.liquidand add this just before</head>:
{% if settings.enable_clerk %}
  {% render 'clerk-tracking' %}
{% endif %}

Install order tracking #
In Shopify, go to Settings > Customer Events.
Click Add custom pixel, name it Clerk.io, then click Add pixel.
Set the pixel’s permission requirement to Not required. This is the recommended setting for the default Clerk.io setup because Clerk.io uses cookieless tracking and does not set persistent cookies. The pixel will therefore run regardless of whether the visitor accepts marketing, analytics, or preferences cookies. Read more about Clerk.io’s cookieless solution.
If you have custom-configured Clerk.io to use persistent visitor IDs, set the permission requirement to Analytics instead. This is only necessary when your custom setup actually uses persistent cookies; it is not required for the default cookieless setup.
Paste your Clerk Sales Tracking code and click Save.
analytics.subscribe("clerk_pixel_context", (event) => {
  browser.localStorage.setItem("clerkPixelContext", JSON.stringify(event.customData));
});

analytics.subscribe("checkout_completed", async (event) => {
  const pixelContextRaw = await browser.localStorage.getItem("clerkPixelContext");
  const pixelContext = await JSON.parse(pixelContextRaw);
  const checkout = event.data.checkout;
  fetch(`https://api.clerk.io/v2/log/sale/shopify`, {
    method: "POST",
    mode: "cors",
    body: JSON.stringify({
      sale: checkout.order.id,
      key: pixelContext.localeApiKey,
      visitor: pixelContext.visitor,
    }),
  });
});
- Click Connect and confirm.

Sync data #
The app and sync are configured in the
Sync Data guide. Follow the Shopify steps first, then complete the my.clerk.io steps to connect the credentials, enter the .myshopify.com domain, and start the first sync.
Markets and locales #
If your Shopify setup uses multiple languages, markets, or domains, configure this before you go live.
- Finish the base setup in this guide first.
- Open my.clerk.io > Data > Configuration.
- Configure market-specific settings (
Shopify Market,Shopify Locale,Prefix URLs with Locale,Force Relative URLs). - Add inventory locations if stock should be scoped by location.
- Start a new sync and verify product URLs on each storefront language/domain.
Shop Locale/Shopify Locale should use the standardized Shopify language locale code, for example da for Denmark and sv for Sweden.
If you are unsure which locale codes your store uses, ask Shopify’s Sidekick assistant to list the locales configured for the store.
Use the detailed mapping guide here: Shopify integration settings.
Remember to translate Headlines in Element -> Edit -> Select Design to match each language.
Switch API keys #
If your setup uses separate Clerk.io stores per market, each store has its own API key. Use Shopify’s request.locale.iso_code to assign the correct key automatically on every page load.
Replace the contents of clerk-tracking.liquid with the full snippet below. Add a {% when %} entry for each locale and set {% else %} to your default store’s key:
<!-- Start of Clerk.io E-commerce Personalisation tool - www.clerk.io -->
<script type="text/javascript">
  (function (w, d) {
    var e = d.createElement('script'); e.type = 'text/javascript'; e.async = true;
    e.src = (d.location.protocol == 'https:' ? 'https' : 'http') + '://cdn.clerk.io/clerk.js';
    var s = d.getElementsByTagName('script')[0]; s.parentNode.insertBefore(e, s);
    w.__clerk_q = w.__clerk_q || []; w.Clerk = w.Clerk || function () { w.__clerk_q.push(arguments) };
  })(window, document);
  {% case request.locale.iso_code %}
    {% when 'da' %}
      {% assign publicKey = 'YOUR_DANISH_KEY' %}
    {% when 'sv' %}
      {% assign publicKey = 'YOUR_SWEDISH_KEY' %}
    {% else %}
      {% assign publicKey = 'YOUR_DEFAULT_KEY' %}
  {% endcase %}
  const publicKey = '{{ publicKey }}';
  Clerk('config', {
    key: publicKey,
    formatters: {
      currency_converter: function (price) {
        var converted_price = (price * Shopify.currency.rate);
        return (converted_price).toString();
      }
    },
    globals: {
      currency_iso: "{{ cart.currency.iso_code }}",
      currency_symbol: "{{ cart.currency.symbol }}"
    }
  });

  // Clerk.js Context
  Clerk('context', {
    product: {% if product %}{{ product.id }}{% else %}null{% endif %},
    category: {% if collection %}{{ collection.id }}{% else %}null{% endif %},
    page: {% if product %}null
          {% elsif collection %}null
          {% elsif page %}{{ page.id }}
          {% elsif blog %}{{ blog.id }}
          {% elsif article %}{{ article.id }}
          {% elsif template.name == 'index' %}'homepage'
          {% else %}'{{ template.name }}'
          {% endif %}
  });

  {% if customer %}
    Clerk('call', 'log/email', { email: "{{ customer.email }}" });
  {% endif %}

  document.addEventListener('DOMContentLoaded', (e) => {
    (async function fetchVisitorId() {
      let visitorId = window.sessionStorage.getItem('visitor_id');
      try {
        if (!visitorId) {
          const response = await fetch(`https://api.clerk.io/v2/misc/visitor_id?key=${publicKey}&visitor=auto`);
          const data = await response.json();
          visitorId = data.visitor;
          window.sessionStorage.setItem('visitor_id', data.visitor);
        }
        Clerk('config', {
          visitor: visitorId,
        });
      } catch (error) {
        console.error('Error:', error);
      } finally {
        function publishClerkContext() {
          if (window.Shopify?.analytics?.publish) {
            window.Shopify.analytics.publish('clerk_pixel_context', {
              localeApiKey: publicKey,
              visitor: visitorId,
            });
          } else {
            setTimeout(publishClerkContext, 200);
          }
        }
        publishClerkContext();
      }
    })();
  });
</script>
<!-- End of Clerk.io E-commerce Personalisation tool - www.clerk.io -->
Multi-store setup #
If your setup spans multiple Shopify stores (not only multiple languages inside one store), create one Clerk.io store per Shopify store:
- In my.clerk.io, click + Add new Store.
- Copy content from the main store during creation.
- Connect and sync each Shopify store separately.
- Use the matching public key per storefront in tracking.