FAQ
Running into issues with your WooCommerce integration? This FAQ covers the most common problems and their solutions, from data sync errors to manual element installation.
Manual element installation #
WooCommerce themes often place hooks in non-standard positions.
This means the Clerk plugin may not be able to automatically insert embed codes.
Follow these steps to manually insert codes when needed.
Locate search form #
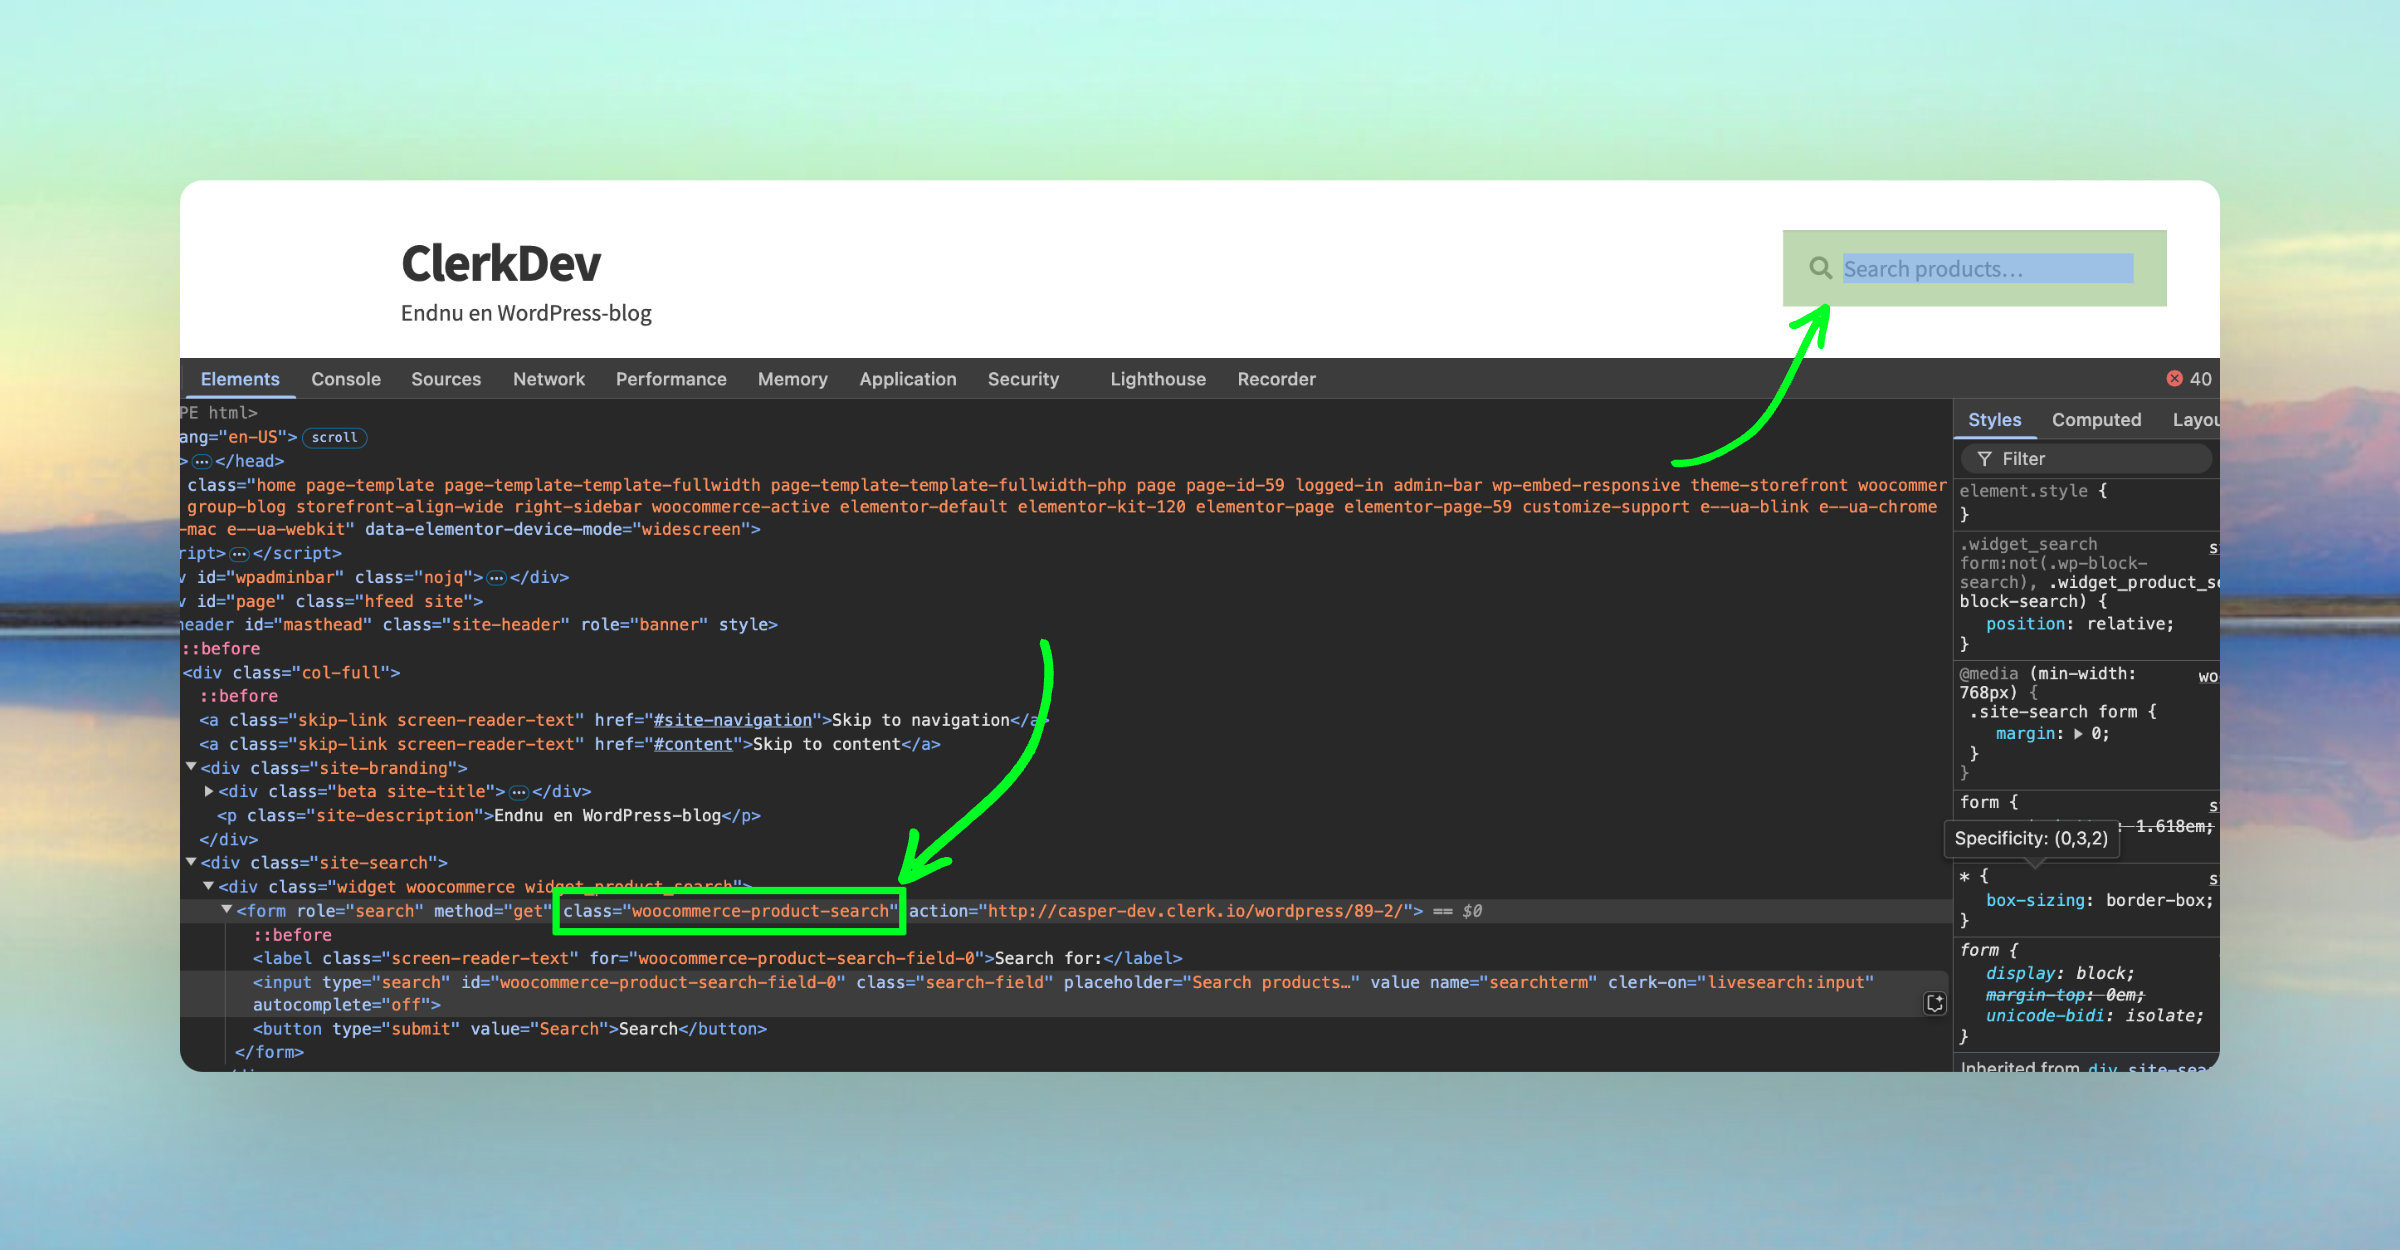
Start by locating your search form.
Inspect your website and find unique text for the search field.
Access theme files #
Open your webshop’s FTP files and locate public_html > wp-content > themes.
Drag the themes folder to your desktop to copy it to your computer.
This allows you to search through the files.
Open in editor #
In your preferred code editor, open the folder.
For example, in Sublime: Project > Add Folder to Project.
Choose the themes folder you saved during the previous step.
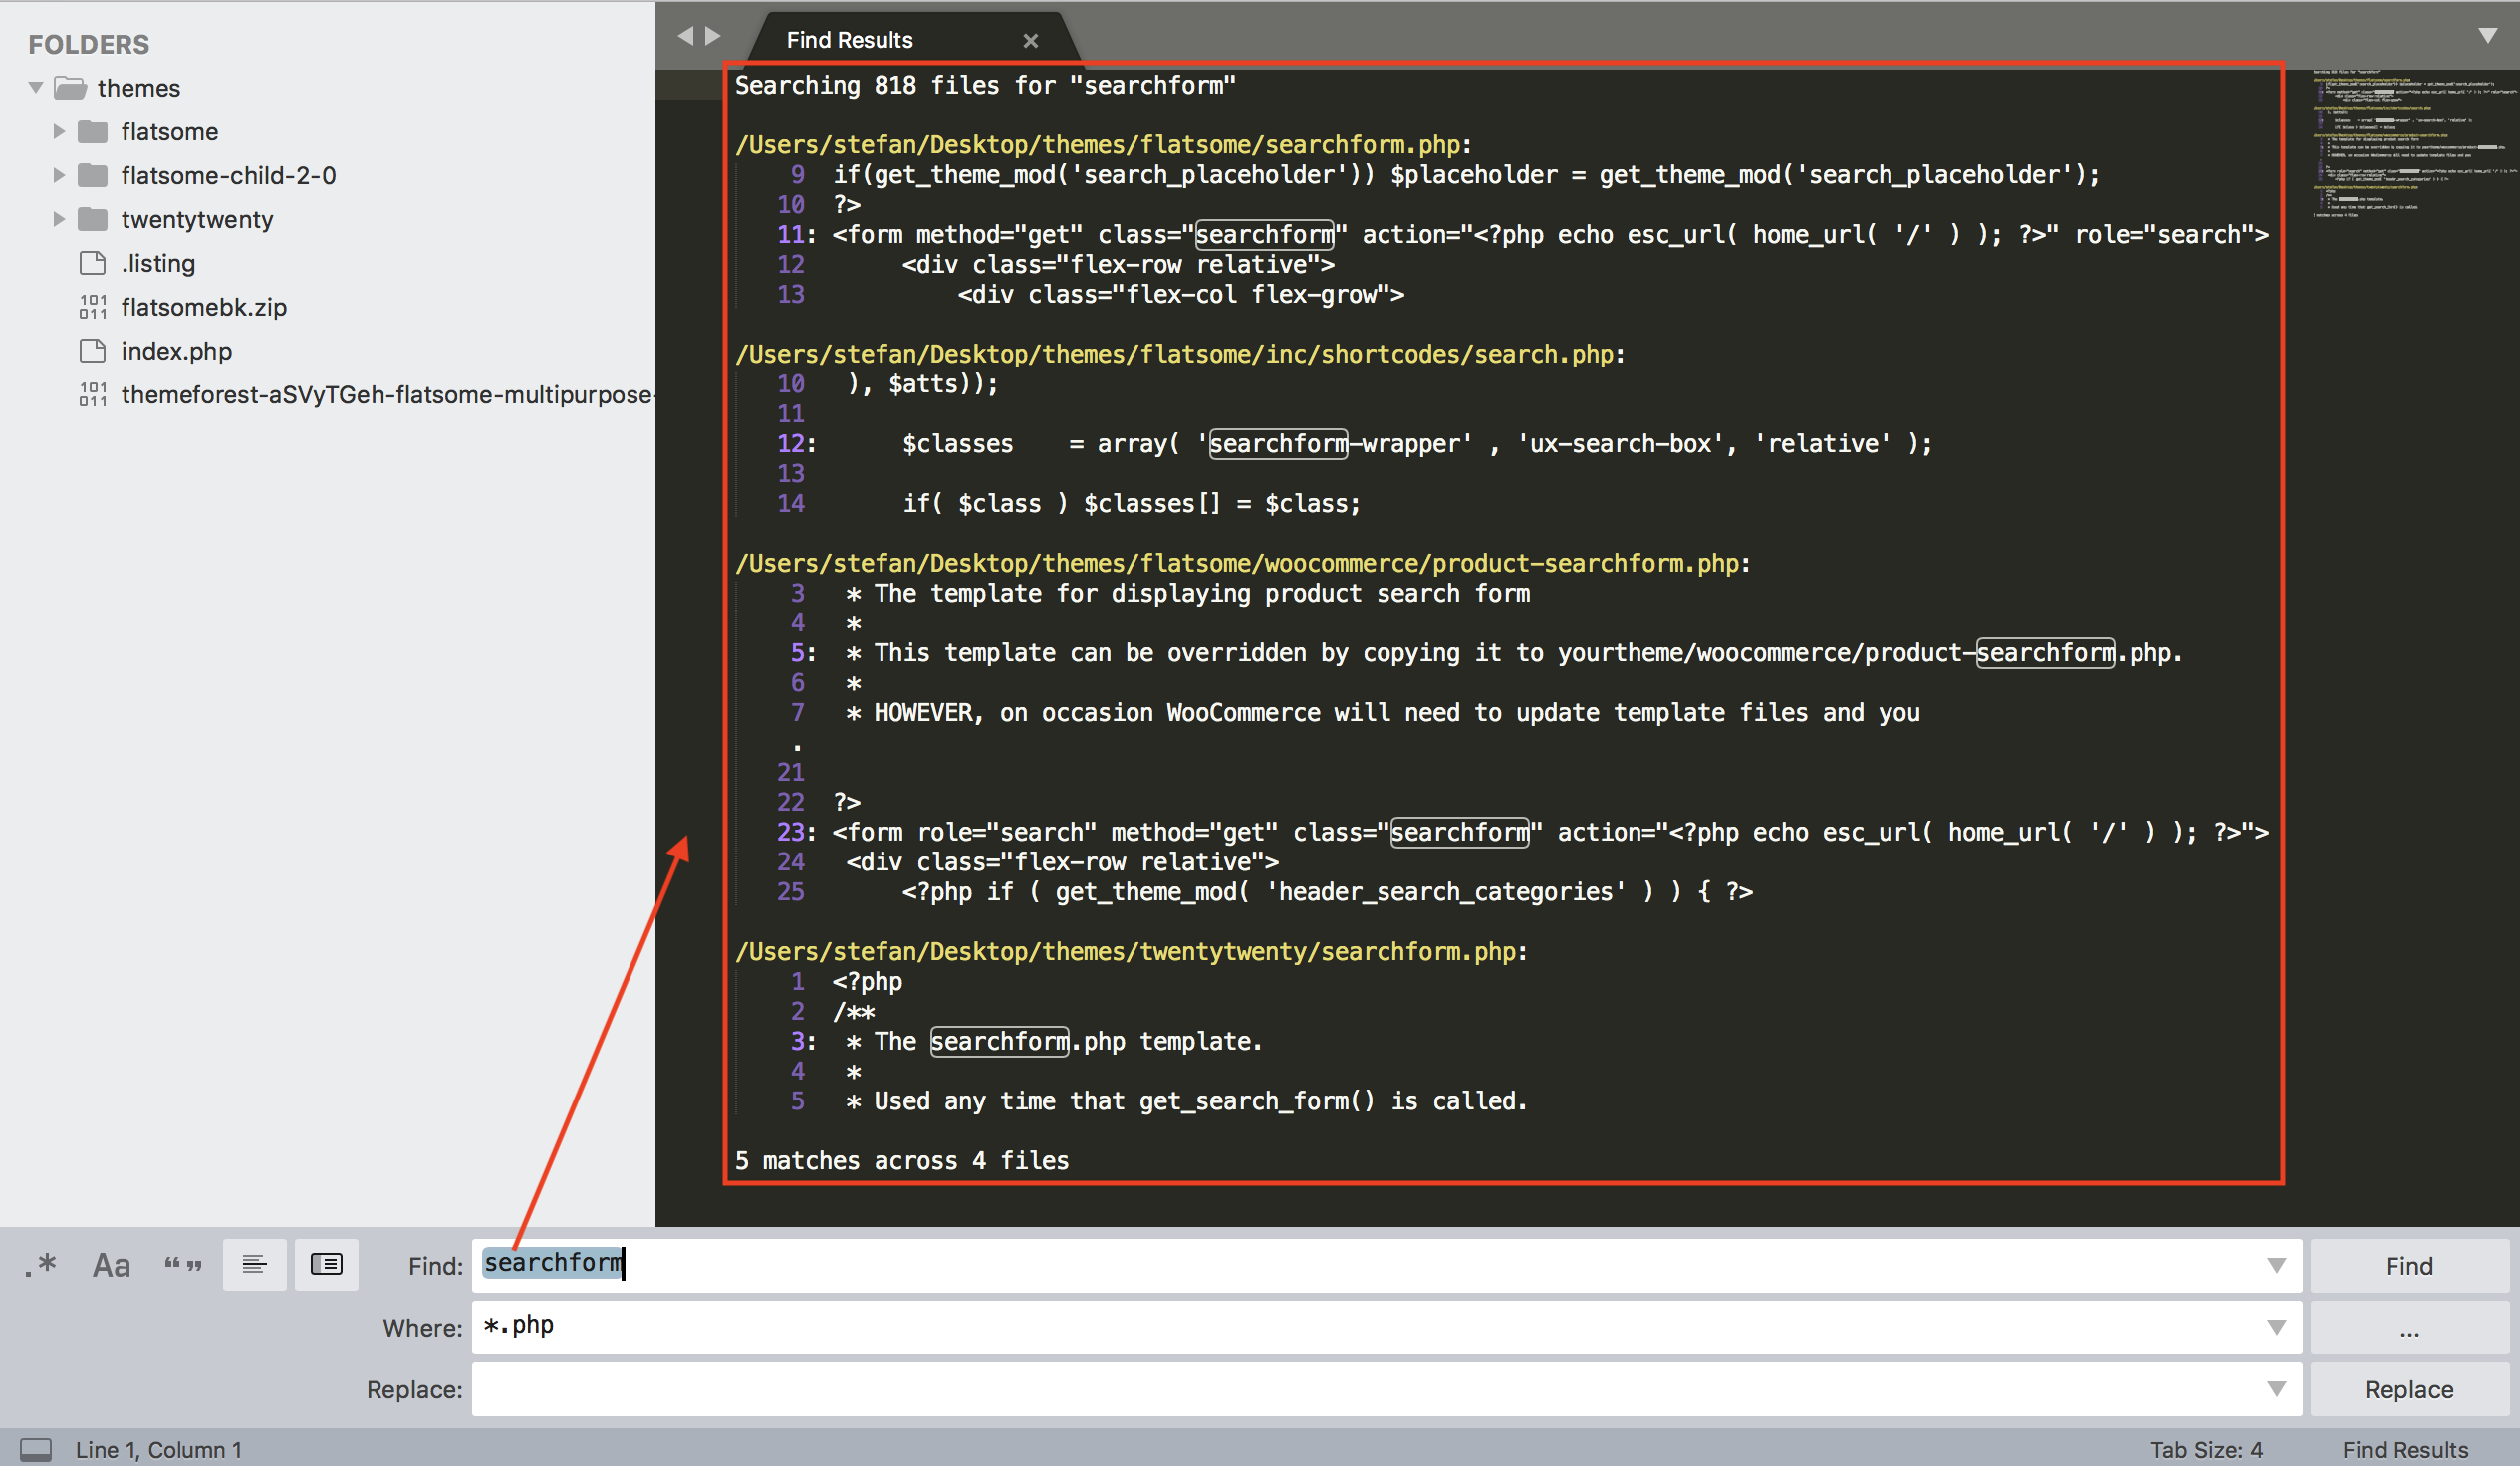
Search files #
Now you can search through the files.
You can choose to search only in .php files, which is the standard file type for WooCommerce theme files.
Fix search links #
If you’ve already set up search and created a page in WooCommerce for Search Results, but your search field isn’t linking correctly, follow these steps.
Start by viewing your webshop in your browser. We recommend using Chrome.
Locate any HTML that seems unique to the search field, for example searchform:
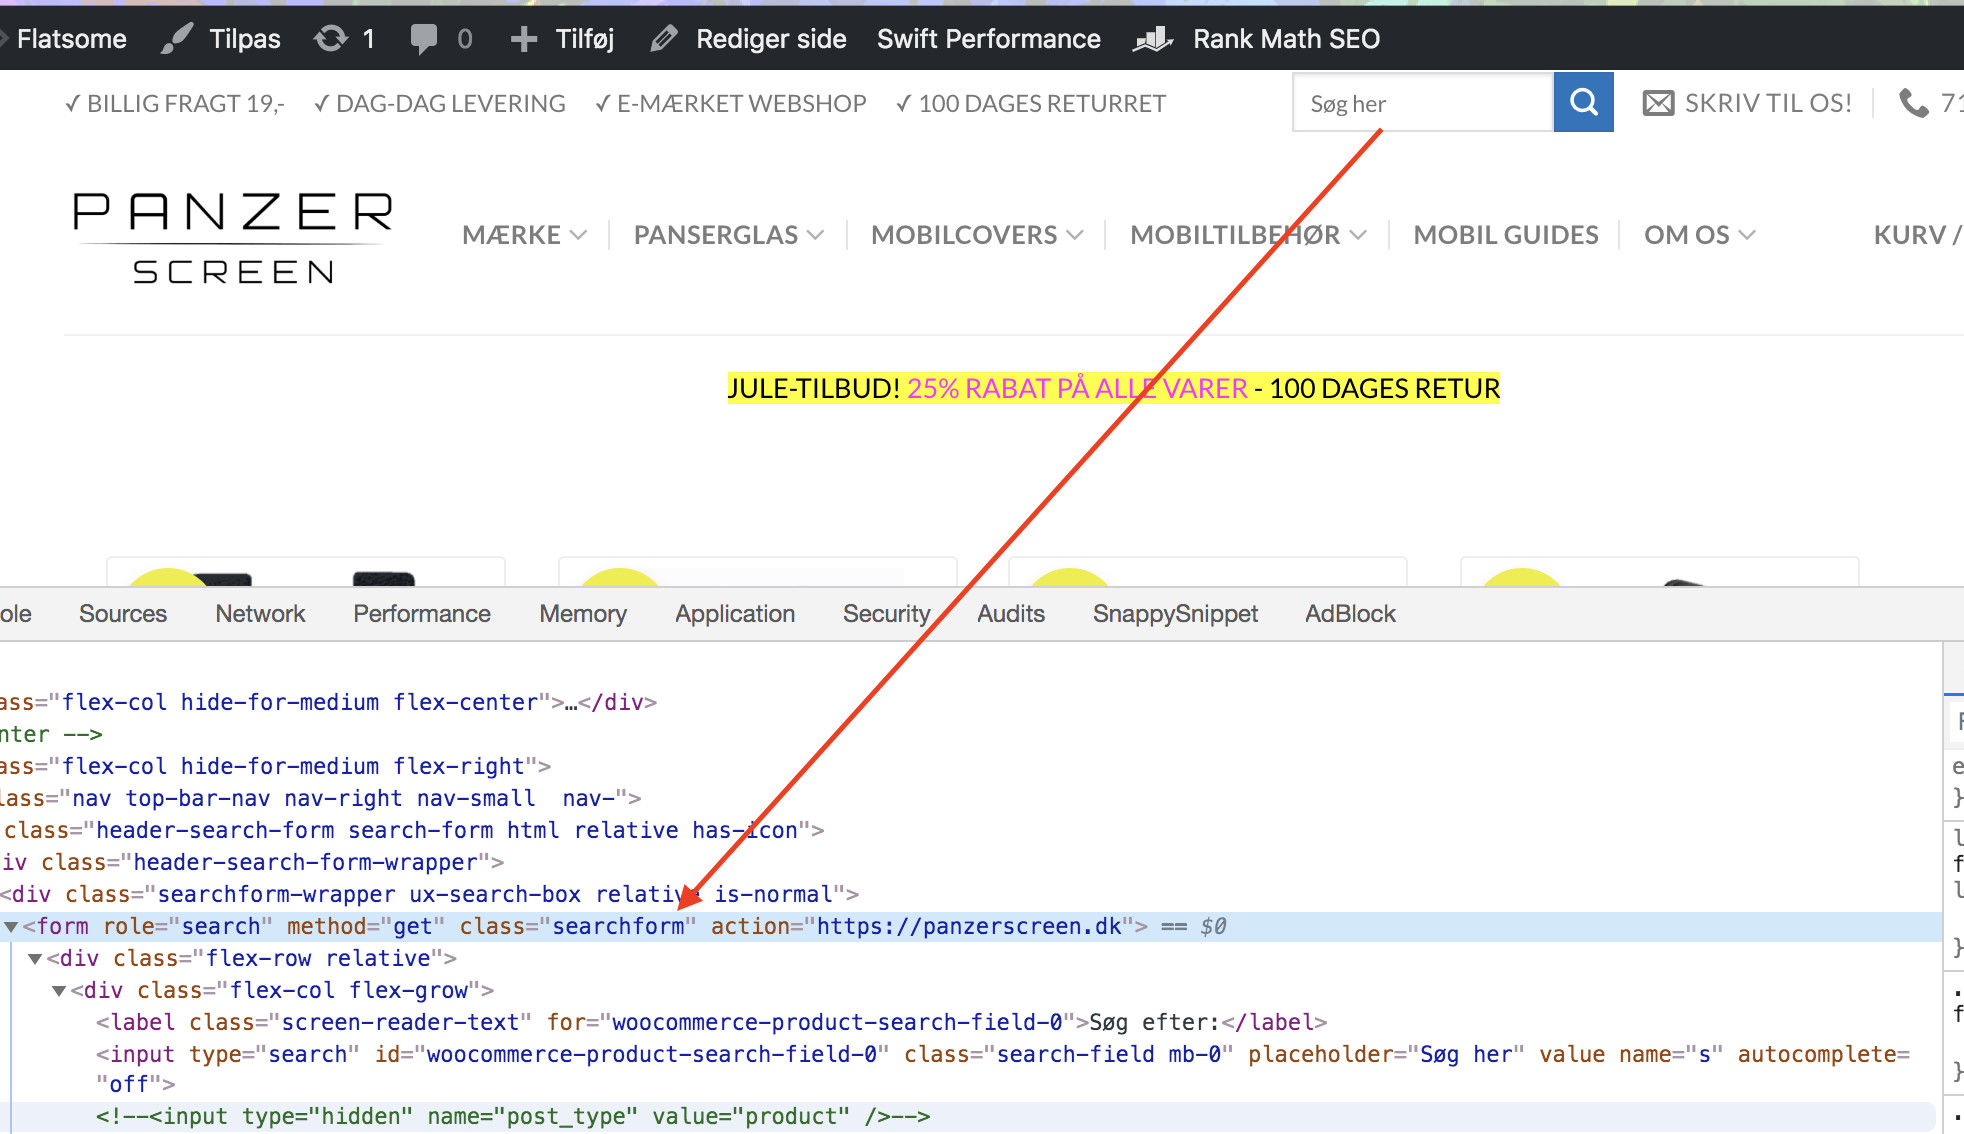
Search for this in your editor to find a list of files that contain it:
Find the matching file on FTP.
Update form settings #
Now you can change the settings so Clerk links to the correct page.
You need to change three things:
The URL that customers are linked to, often found in the
<form>element, needs to match the name of the page you created in WooCommerce. This will often be"soegeresultater"or"search-results".The
"name"attribute of the input field needs to besearchterm.The hidden input field with
name="post_type"needs to be commented out.
A search form could look like this before changing it:
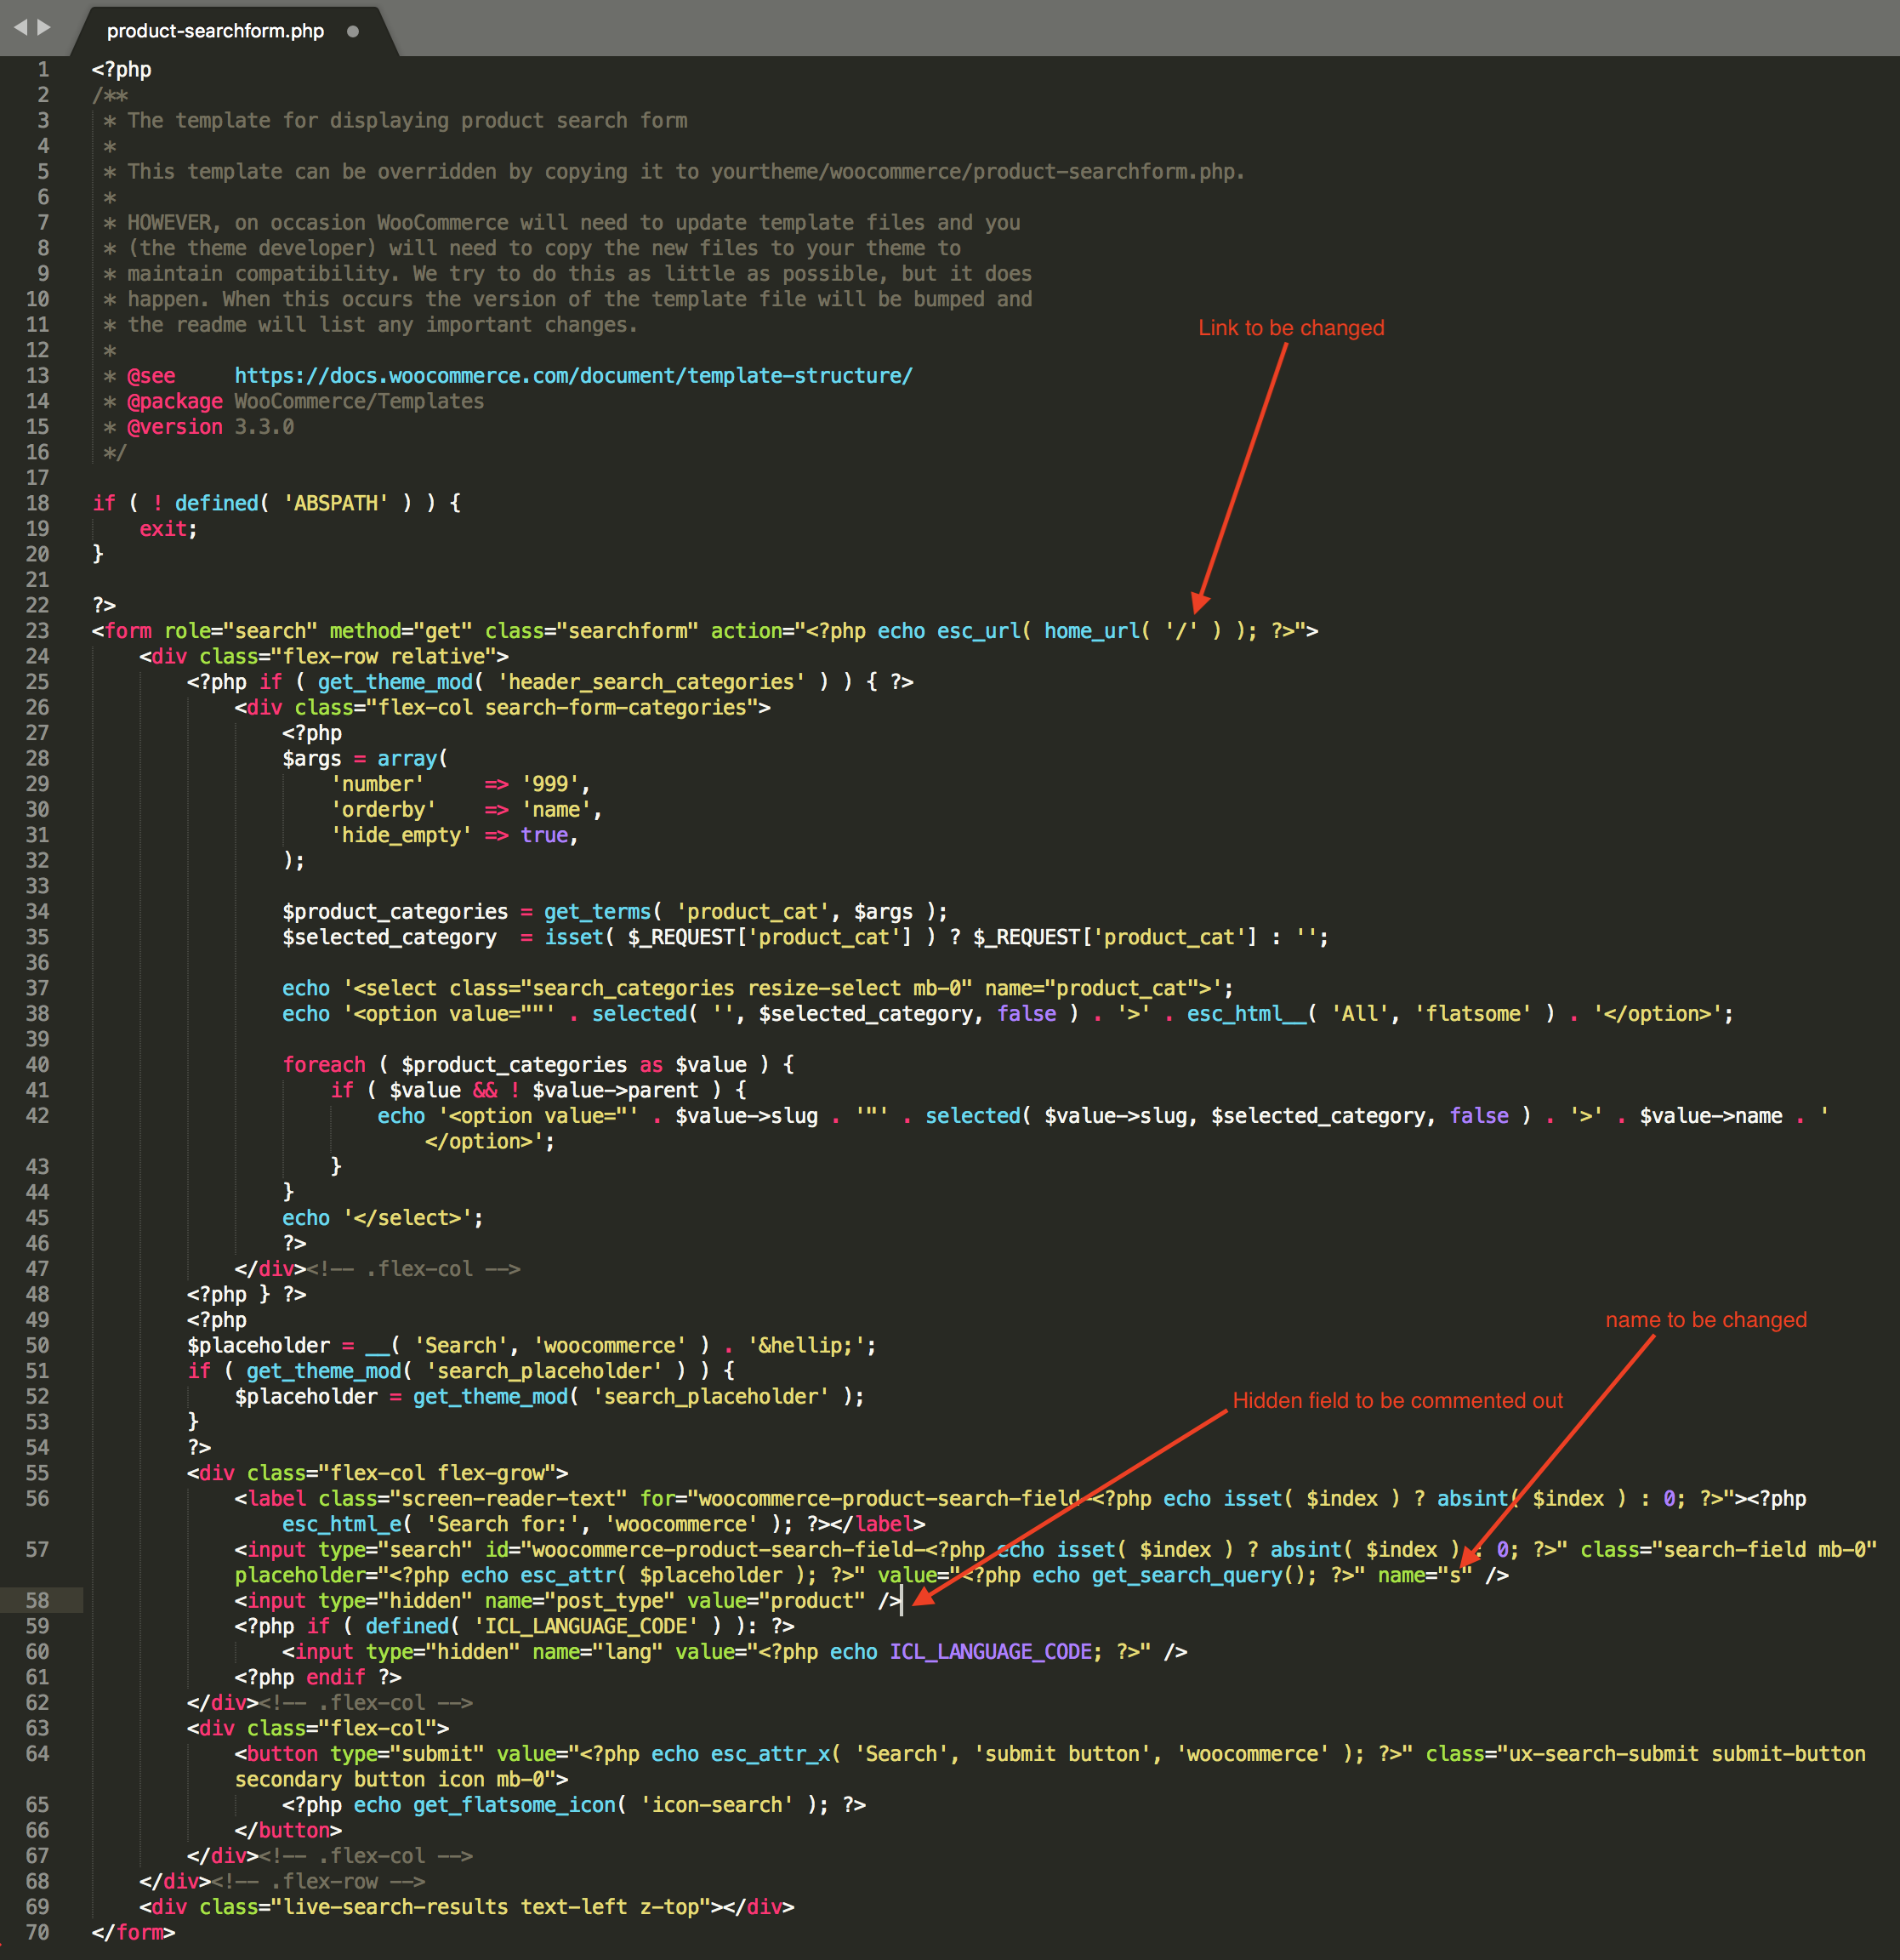
And should look like this after the change:

Now you should be linked to the search page when searching: www.mywebshop.com/soegeresultater?searchterm=test.
Using formatters #
Clerk.js allows you to write custom JavaScript functions that add new functionality to your Designs.
Formatters can be added in two ways:
Via my.clerk.io > Developers > Formatters, where each formatter is created as a separate entry.
As part of the Clerk.js configuration, with the tracking-script added to all pages, allowing multiple formatters to be defined at once.
In WooCommerce, the tracking script is located in: wp-content > plugins > clerkio > includes > class-clerk-visitor-tracking.php.
Example formatter #
An example can be seen below:
Clerk('config', {
  key: 'O7UITkJIXqXibeQF9ONobiGGKYYKtbvh',
  formatters: {
    log_price: function(price) {
      console.log(price);
    }
  }
});
Multiple formatters #
You can write any number of Formatters, separated by comma:
formatters: {
  log_price: function(price) {
    console.log(price);
  },
  calculate_discount: function(price, special_price) {
    return price - special_price;
  },
  substring: function(text) {
    var short_string = text.substring(0, 20);
    return short_string;
  }
}
Use in designs #
After creating your Formatters, you can use them in your Designs using this syntax:
{%raw%}{{ price | log_price }} {{ price | calculate_discount | special_price }}{%endraw%}
This allows you to create any functionality in your Designs that you require.
HTTP authentication #
HTTP authentication is often used on staging sites to avoid unwanted visitors.
This will block the Clerk importer and display a 401 Unauthorized error in the sync log.
You can fix this by inserting the authentication info in the import URL.
In my.clerk.io > Data > Configuration, update your import URL like this:
https://USER:PASS@www.ewoksRus.com
Common sync errors #
Note: We recommend always updating the plugin to the latest version to get all up-to-date features from Clerk.
When importing data with Clerk’s WooCommerce Plugin, your webshop’s server is responsible for sending product, category, and order data to Clerk.
However, in some cases, the server’s configuration might block the import from accessing the data, causing an error in Data Sync.
Below is a list of the most common errors and how to fix them.
401 Unauthorized #
This error happens if your webshop or dev environment requires HTTP authentication to access it.
This is solved by inserting the Username and Password as part of the Import URL:
http://username:password@woocommerce.clerk.io
403 Forbidden #
This error happens if your server blocks the importer from accessing it.
In most cases, you simply need to whitelist the importer’s IP address to give it access.
The latest IP address can be found here.
Also, ensure that the Public Key, Private Key, and Import URL are correct for the store you are operating within my.clerk.io.
What if I have already whitelisted but the same error still occurs?
If you have whitelisted the importer’s IP address but the error persists, check the following:
The authentication part of the body may be removed from the request from the shop’s server.
Rate limit for the server in regards to Cloudflare.
404 Not Found #
This error happens if the importer could not access the link that sends data from the webshop.
In most cases, it happens because the plugin is either:
Not installed at all
Deactivated due to an update
A cache causes the link to not be initialized
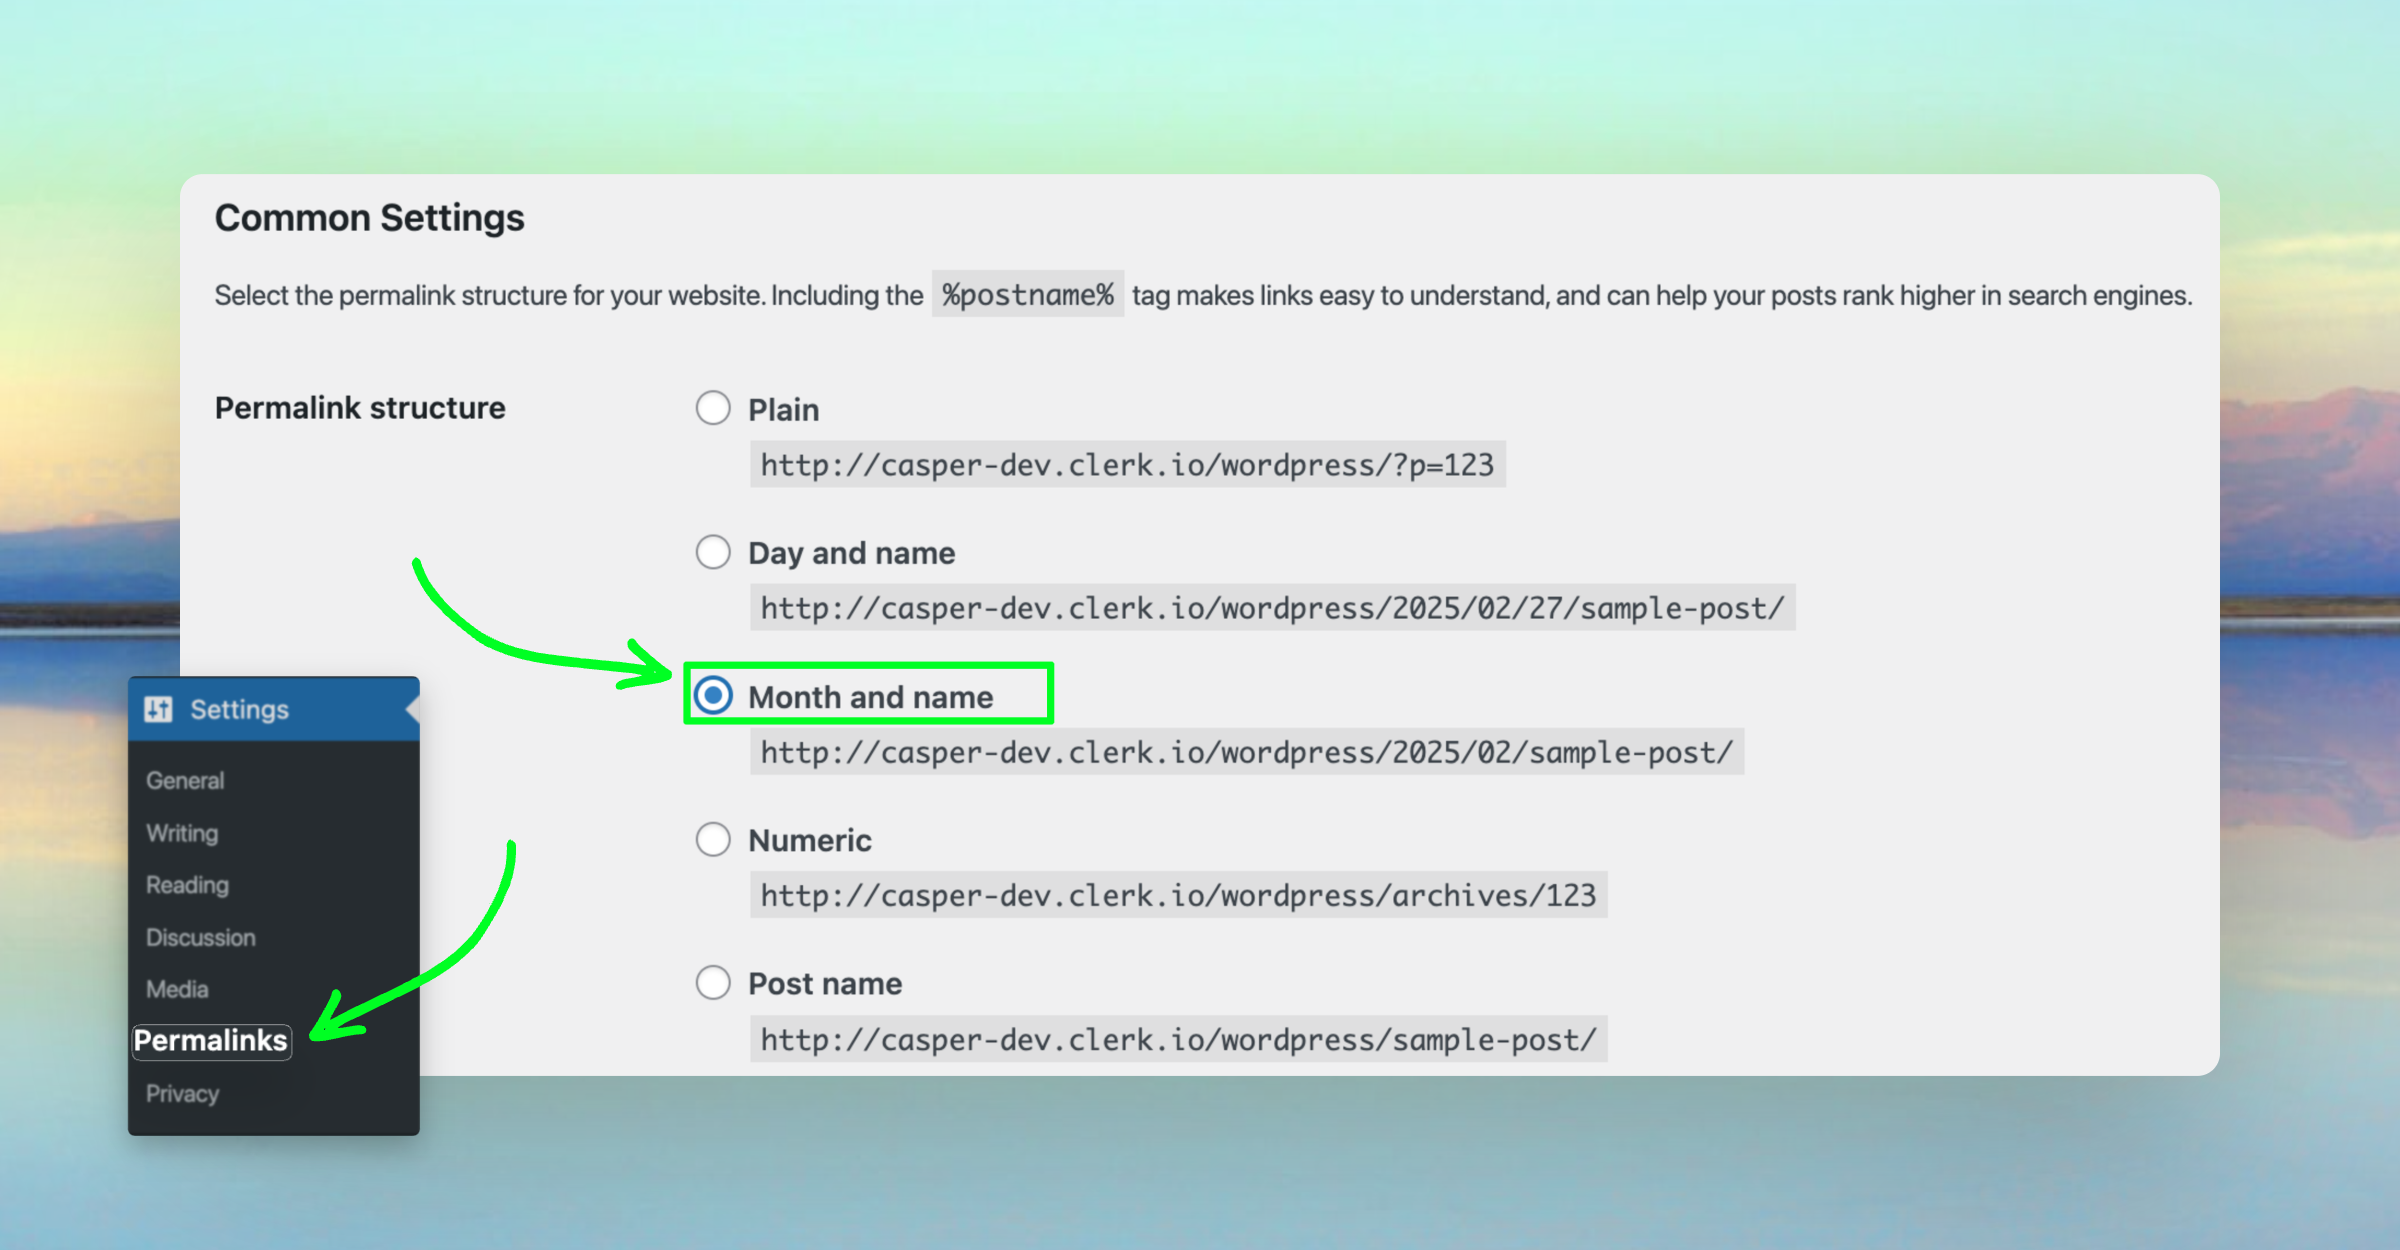
WooCommerce permalinks are set to Post name instead of Month and name
Follow these debugging steps to fix the error:
Make sure that you have installed the Plugin correctly and that it is activated. If you recently auto-updated the plugin, WooCommerce sometimes deactivates the plugin. If this has happened, go to Plugins > Clerk and click Activate.
Empty your webshop’s cache before trying a new import.
If it still doesn’t sync properly, go to your WooCommerce backend, then Settings > Permalinks and change the Common Settings to Month and name and press Save Changes:
429 Too Many Requests #
This error happens if your server denies the importer access because of too many incoming requests.
You can fix this by either:
Setting the request limit higher for your server.
Setting Page Size to a higher value in my.clerk.io > Data > Configuration, causing the importer to make fewer, bigger requests.
If you are using the host provider Byte.nl, the importer usually returns this error because of their rate limiter. In this case, contact Byte.nl support and ask them to whitelist the importer’s User-Agent “clerk”.
500 Internal Server Error #
This error means that your server encountered an internal error and was unable to specify which error happened.
In these cases, check your Server Log to identify which process crashed and why.
In most cases, it’s simply because of a product with an invalid attribute, or a function that is called incorrectly in the webshop.
An example of such an error could occur once you upgrade both WooCommerce and Klarna. In this instance, the problem is created by the ‘woocommerce-gateway-klarna’ plugin which does not upgrade.
If this happens, go to woocommerce-gateway-klarna > includes > variables-checkout.php.
Look for:
if ( ! is_admin() && ! empty( $klarna_country )) {
and change it to:
if ( ! is_admin() && ! empty( $klarna_country ) && WC()->session ) {
503 Service Unavailable #
This error is typically temporary and occurs when the server is too busy to process the request.
Please try again later.
If the issue persists, it may indicate that the server is overloaded and nearing its maximum capacity.
To confirm, check the server load and assess its current usage.
520 Unknown Error #
Usually this error is returned from Cloudflare, and often happens because of a bottleneck in WooCommerce that causes issues with higher Page Sizes.
To fix it, set your Page Size to 50 in my.clerk.io > Data > Configuration and run a new Data Sync.
522 Connection Timed Out #
This error usually happens if the server is too busy to respond, or if our importer is not allowed access to the server.
Wait a few minutes and try syncing again, to see if the server was busy.
If it still does not work, make sure to whitelist the importer’s IP in your server configuration. The latest IP address can be found here.
Invalid API response #
This error usually happens if WooCommerce’s Debugging has been activated.
This is never a good idea to have activated on a live setup because it slows down pages, and potentially shows error messages in the frontend.
The sync issue happens if WooCommerce encounters an error while generating the product data for the import.
This can be solved by deactivating Debugging in wp-config.php by setting define('WP_DEBUG', false).
This guide explains it in more detail:
https://docs.woocommerce.com/document/woocommerce-product-search/api/debugging/
And this guide explains an alternate workaround:
https://aristath.github.io/blog/wp-hide-php-errors
Errors will still be logged even when not in Debug Mode, but they will be logged to a file instead.
Upgrade to Clerk.js 2 #
Clerk.js 2 is a faster and more flexible version of our JavaScript library.
It makes installing Clerk on any webshop easier.
However, since the two versions work slightly differently, you need to follow these steps to successfully upgrade.
The two main differences in Clerk.js 2 are:
The Designs in my.clerk.io use the Liquid template language, but can also easily be created using the Design Editor.
The script must be inserted just before the
</head>tag in your webshop’s template.
Create designs #
Since Clerk.js 2 has a different approach to Designs, you need to create new ones.
You can create your Clerk.js 2 Designs either by redoing them in the Design Editor, or by converting your old code Designs to Liquid.
Below is a description for how to convert your old code Designs to Liquid.
Design Editor option #
Go to my.clerk.io > Recommendations/Search > Designs > New Design.
Select a design type other than Blank and give it a name. We recommend adding “V2” so it’s obvious that you are using Clerk.js 2 designs.
In the Design Editor, click any of the existing elements like the name, image, button, etc. to edit it, or add new elements to the Design.
Click Publish Design when you are done, and go to Step 2 in the guide.
Go to Recommendations/Search > Elements and change your Clerk Element to use your new Design, then click Update Element.
This will temporarily cause them to not show up on your webshop, until you have inserted Clerk.js 2 as described further down in this guide.
Converting designs #
Since Clerk.js 2 uses the more flexible template language Liquid, you need to convert the Designs into this language.
Go to my.clerk.io > Recommendations/Search > Designs > New Design.
Select Blank > Code and give it a name. We recommend adding “V2” so it’s obvious that you are using Clerk.js 2 designs.
Click Create Design.
This will give you a blank design with Product HTML and CSS that you can use.
Go back to the design overview and click Edit Design for your Clerk.js 1 Design. We recommend doing this in a new tab so you can easily copy the code.
Copy over the old Clerk.js 1 Design to your new Clerk.js 2 Design.
You will notice that there is no Container Code in your new one.
This is because Liquid uses for loops to render all the products.
Copy your old Product HTML inside the for-loop, your old Container Code around it and copy the CSS as well.
Convert the Design into Liquid’s syntax. The main difference is that the old Designs used the syntax
{{ formatter attribute }}while v2’s syntax is{{ product.attribute | formatter }}.Go through all of your attributes and change them to the new format.
If you are using
{{#if}}or{{#is}}statements, these need to be converted as well. Use the syntax{% if product.attribute %}{% else %}{% endif %}.Delete
id="{{ $id }}"and the class:targetfrom the container code in the Clerk.js 2 version as they are no longer supported.Below is an example of a Clerk.js 1 design, and the fully converted version:
Clerk.js 1 Design #
// Product HTML
<li class="clerk-product">
    <a href="{{ url }}">
        <img src="{{ image }}" />
        <div class="clerk-product-name">{{ name }}</div>
        <div class="clerk-price-wrapper">
            {{#if list_price}}
                <div class="clerk-old-price">
                    <s>Price {{ money_eu list_price }}</s>
                </div>
                <span class="clerk-new-price">Price {{ money_eu price }}</span>
            {{else}}
                <div class="clerk-product-price">Price {{ money_eu price }}</div>
            {{/if}}
        </div>
    </a>
    <div class="clerk-cta-button btn button">Buy Now</div>
</li>

// Container Code
<h2>{{ headline }}</h2>
<ul id="{{ $id }}" class=":target clerk-slider"></ul>

<!-- This code creates the slider by its ID. -->
<script type="text/javascript">
    Clerk.ui.slider("{{ id }}").init();
</script>
Clerk.js 2 Design #
<h2>{{ headline }}</h2>

<ul class="clerk-slider">
    {% for product in products %}
    <li class="clerk-product">
        <a href="{{ product.url }}">
            <img src="{{ product.image }}" />
            <div class="clerk-product-name">{{ product.name }}</div>
            <div class="clerk-price-wrapper">
                {% if product.list_price %}
                    <span class="clerk-old-price"><s>Price {{ product.list_price | money_eu }}</s></span>
                    <span class="clerk-new-price">Price {{ product.price | money_eu }}</span>
                {% else %}
                    <div class="clerk-product-price">Price {{ product.price | money_eu }}</div>
                {% endif %}
            </div>
            <div class="clerk-cta-button btn button">Buy Now</div>
        </a>
    </li>
    {% endfor %}
</ul>
Click Update Design to save the changes.
Go to Recommendations/Search > Elements and change your Element block to use your new Design.
Click Update Element. This will temporarily cause them to not show up on your webshop, until you are done with Step 2. Choose the new Design for all Elements that should be updated.
Finally, upgrade the plugin, following this guide.
Multi-language setup #
When using WPML in WooCommerce, you should be able to differentiate your languages by URL, like this:
If you have unique URLs like this, you can extend the WooCommerce plugin to support WPML.
It is also ok to define the language via the lang parameter. For example:
Copy store #
The easiest way to implement Clerk in multiple domains in standard setups is by creating a separate Store for each domain in my.clerk.io.
This way, you can separate products, sales, currencies etc. to keep track of each domain.
After you are done with the initial setup, click on the upper left side corner of the side-menu and then click "+ Add new store" the last option of the scroll down list (generally under the existing store(s) and your company name).
On the Add New Store page, fill in the details of your webshop, and choose your main Store from the Copy Elements From Existing Store dropdown, then click Add Store:
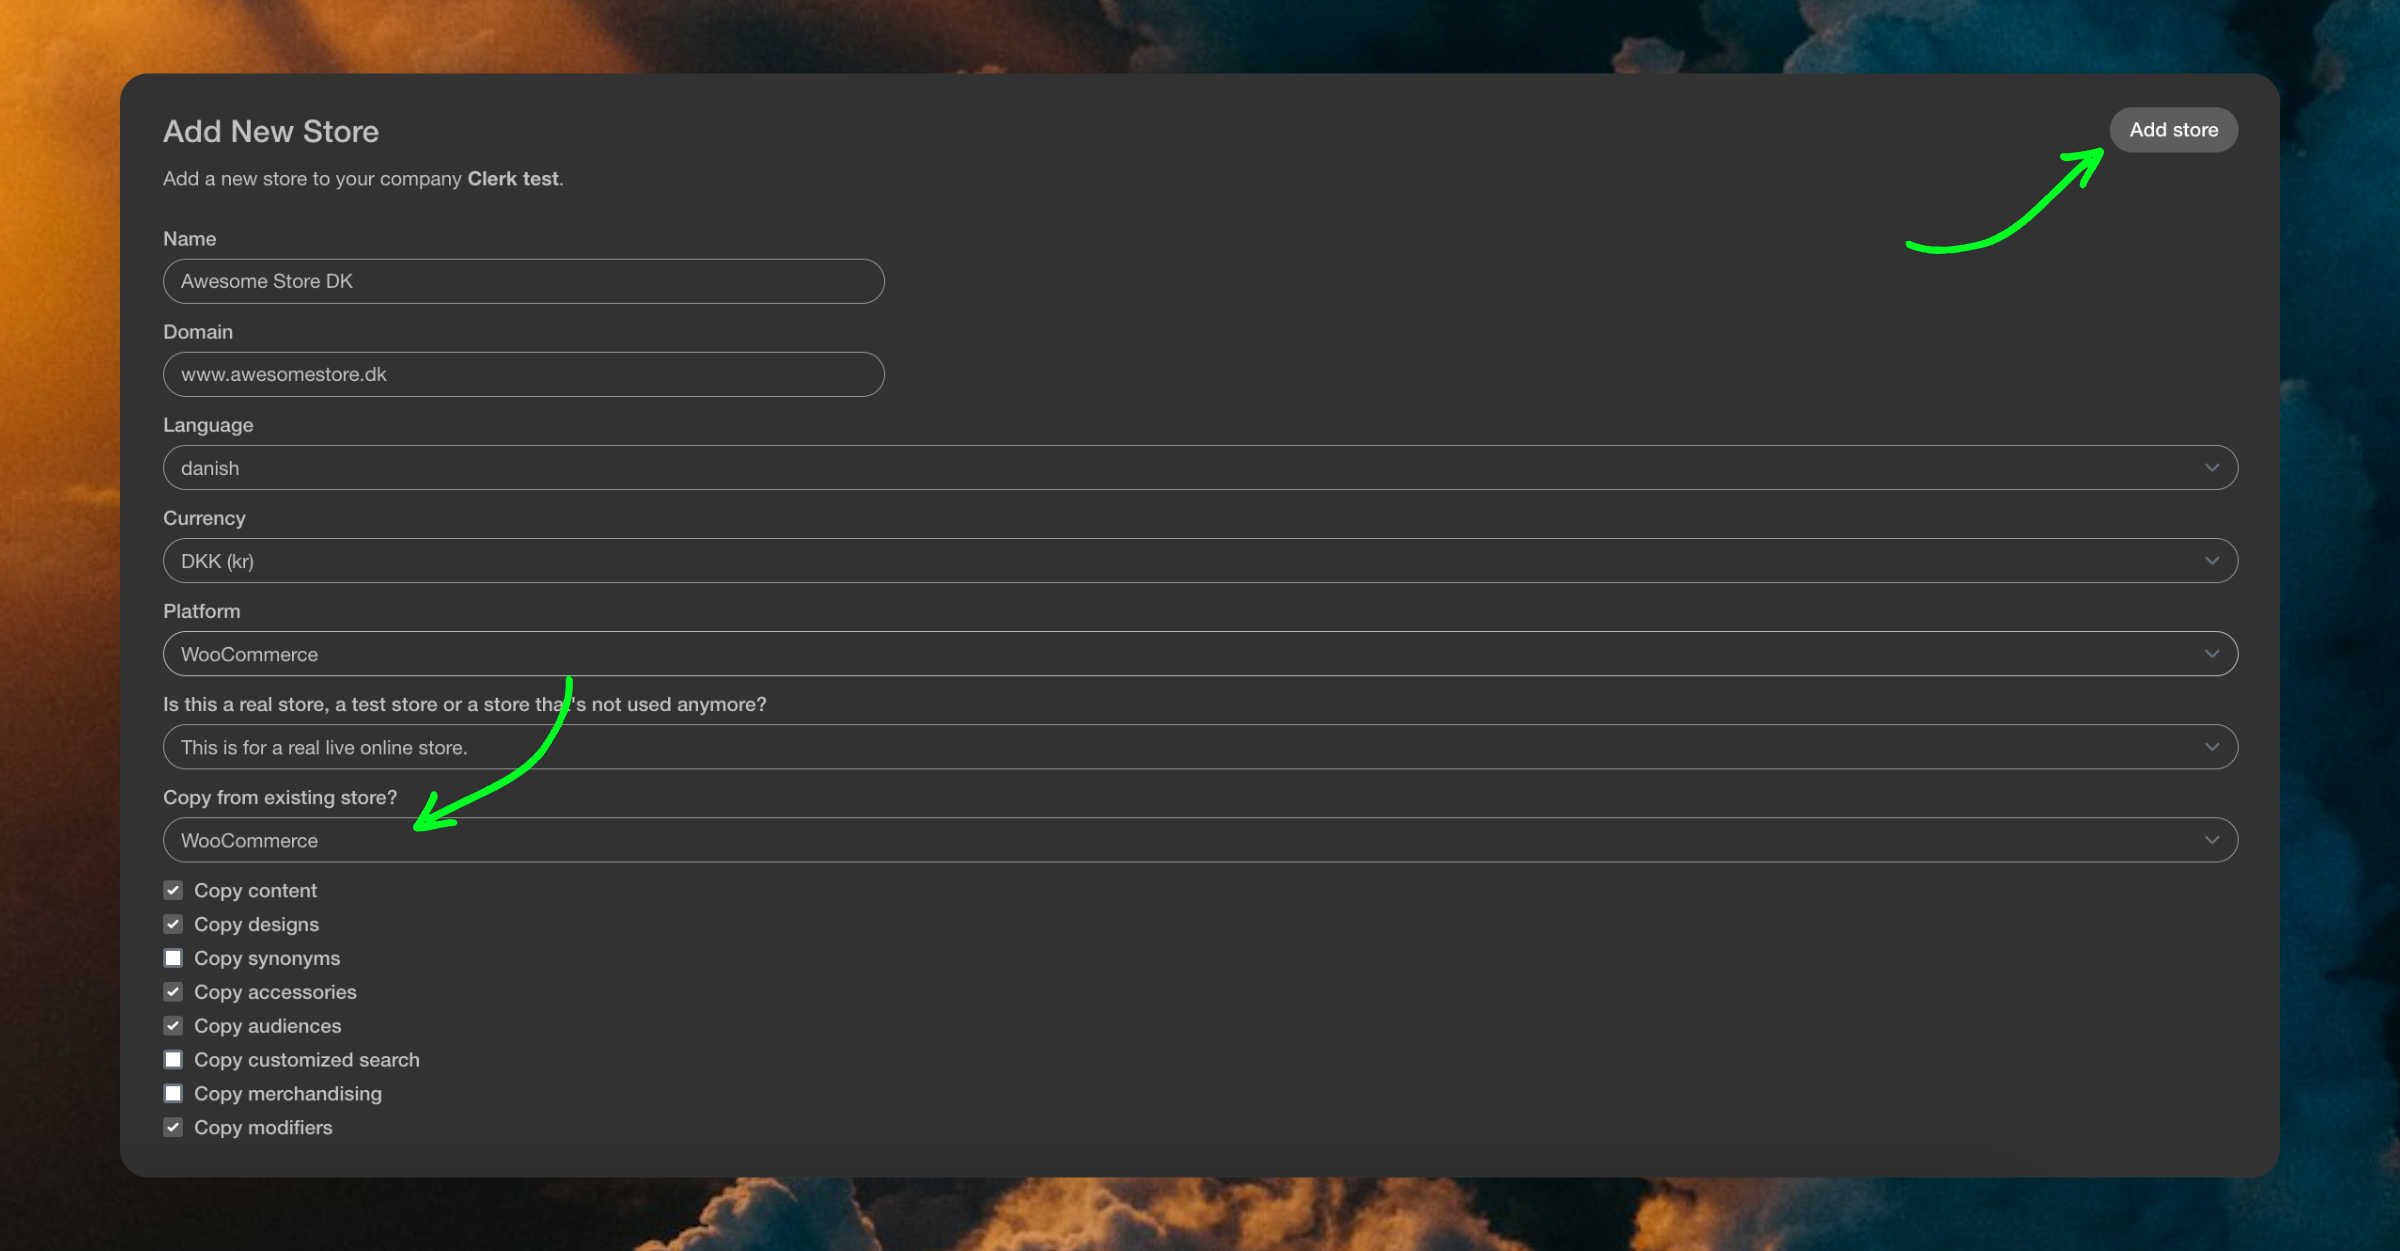
This will carry over the Elements and Designs from your main Store. Remember to translate Headlines to the right language as well.
Install and configure #
Official support for WPML has been added to the Clerk WooCommerce Extension, which means that as long as you use that version or a newer one, WPML should be supported.
In the settings panel for WooCommerce you will see the settings as normal.
If WPML is active and configured on your WordPress site, you will see Multi Language Scope with the current language towards the top of the settings page.
In order to swap the language, simply use the selector on the top panel. You should select the language you wish to configure Clerk for, and provide your desired settings. Repeat this for each language.
Note that selecting All Languages from this dropdown is not advised when saving your configuration, since it will only save your settings as a fallback only.
Sync domains #
Once you have extended the plugin, you can now sync each of your Stores with their language domain.
As you have already installed the extension, you can skip the first step and directly start configuring it and syncing data.
When the Sync has finished, your domain is ready and using the same setup as your main Store.
Shortcode integration #
If you are using a Shortcode editor like Elementor, then our regular recommendation code snippet may not be rendering due to the product ID being syntaxed differently in Elementor than a normal HTML block.
If you are using Hooks, then you can go to Appearance -> Custom Layouts -> Insert the shortcode on the Hook that belongs to Clerk (in case, a developer can create these if they want Clerk to be a Hook).
Replace code #
To insert the code, replace:
<span class="clerk"
   data-template="@product-page-alternatives"
   data-products="[<?php echo $product->get_id(); ?>]">
</span>
With:
<span class="clerk"
   data-template="@product-page-alternatives"
   data-products="[ [clerk_product_id] ]">
</span>
Try first with only simple brackets, and then, if that doesn’t work, with double brackets:
<span class="clerk"
   data-template="@category-page-popular"
   data-category="[ [clerk_category_id] ]">
</span>
If this one does not work, you can try these:
<span class="clerk"
   data-template="@product-page-alternatives"
   data-products="[<?php the_ID(); ?>]">
</span>
<span class="clerk"
   data-template="@product-page-others-also-bought"
   data-products="[<?php the_ID(); ?>]">
</span>
Manual insertion #
If you cannot insert the shortcode or you do not use any kind of Editor, go to Appearance > Personalization then click on the product page and then follow these steps Widget > Shopsidebar 1 > add widget > Clerk Content.
WP Bakery Builder #
Theme File Integration: Adding a Product Page Slider to All Pages
Navigate to Appearance > Theme File Editor > WooCommerce > content-single-product.php (or a similar file where your product page layout is defined).
Insert the span code in the desired location within the file to display the slider. This process is similar to making changes via FTP access.
<span class="clerk"
   data-template="@product-page-alternatives"
   data-products="[<?php the_ID(); ?>]">
</span>
<span class="clerk"
   data-template="@product-page-others-also-bought"
   data-products="[<?php the_ID(); ?>]">
</span>
Visual hooks #
Within WooCommerce, certain website pages are created using Visual Hooks instead of being rendered from an HTML file.
In order to add content to pages created via Visual Hooks, you will need to insert the Clerk content within the webshop’s active functions.php file.
The functions.php file is usually located at the following path:
/wp-content/themes/YOUR-THEME-NAME-child-theme/functions.php
Product page example #
For example, to add a Recommendations element with the Element @product-page-alternatives to your Product Page, you would include the following code within the main <?php ?> tags in functions.php:
// CLERK ADD PRODUCT PAGE SLIDER

add_action('woocommerce_after_single_product', 'clerk_alternatives', 5);

function clerk_alternatives() {
    $clerk_id = wc_get_product()->get_id();
    echo "<span class='clerk'
    data-template='@product-page-alternatives'
    data-products='[$clerk_id]'>
    </span>";
}
Cart page example #
And, another example to add a Recommendations element to the Add-to-Cart Page:
// CLERK ADD CART SLIDER
add_action('woocommerce_after_cart_contents', 'clerk_cart_slider', 5);

function clerk_cart_slider() {
    $clerk_id = get_queried_object()->term_id;
    echo "<span class='clerk'
    data-template='@cart-others-also-bought'
    data-products='[<?php $items = WC()->cart->get_cart(); foreach( $items as $cart_item ){ $product_id = $cart_item['product_id']; echo $product_id; if ($cart_item != end($items)) {echo ',';} } ?>]'></span>";
}
To add your own Recommendation elements to the above pages, remember to replace the code within tags with the embed code provided in your Recommendations Elements in my.clerk.io, like below:

The value set in add_action(), 5 in this example, tells WooCommerce the priority of the Element being added, which in turn influences how early the Element will be displayed in that Visual Hook.
Note: When setting priority, WooCommerce only accepts multiples of 5.
More info about WooCommerce website pages that use Visual Hooks:
https://www.businessbloomer.com/category/woocommerce-tips/visual-hook-series/
Powerstep issues #
Rendering twice #
If you run into an issue where the Powerstep displays twice, you’ll need to split the page to fix it.
In the WooCommerce backend, go to the Powerstep page you created in Pages.
Choose Shortcodes in the top right corner, and then click Row / Columns.
Next, click “OK” on the pop-up that appears.
Finally, move
[clerk-powerstep]within the[row][col]and[/row][/col]tags, and click Save.
Not rendering #
If the Powerstep is still not showing up, you might have to deactivate WooCommerce’s Cart Redirect setting.
To do this, follow these steps:
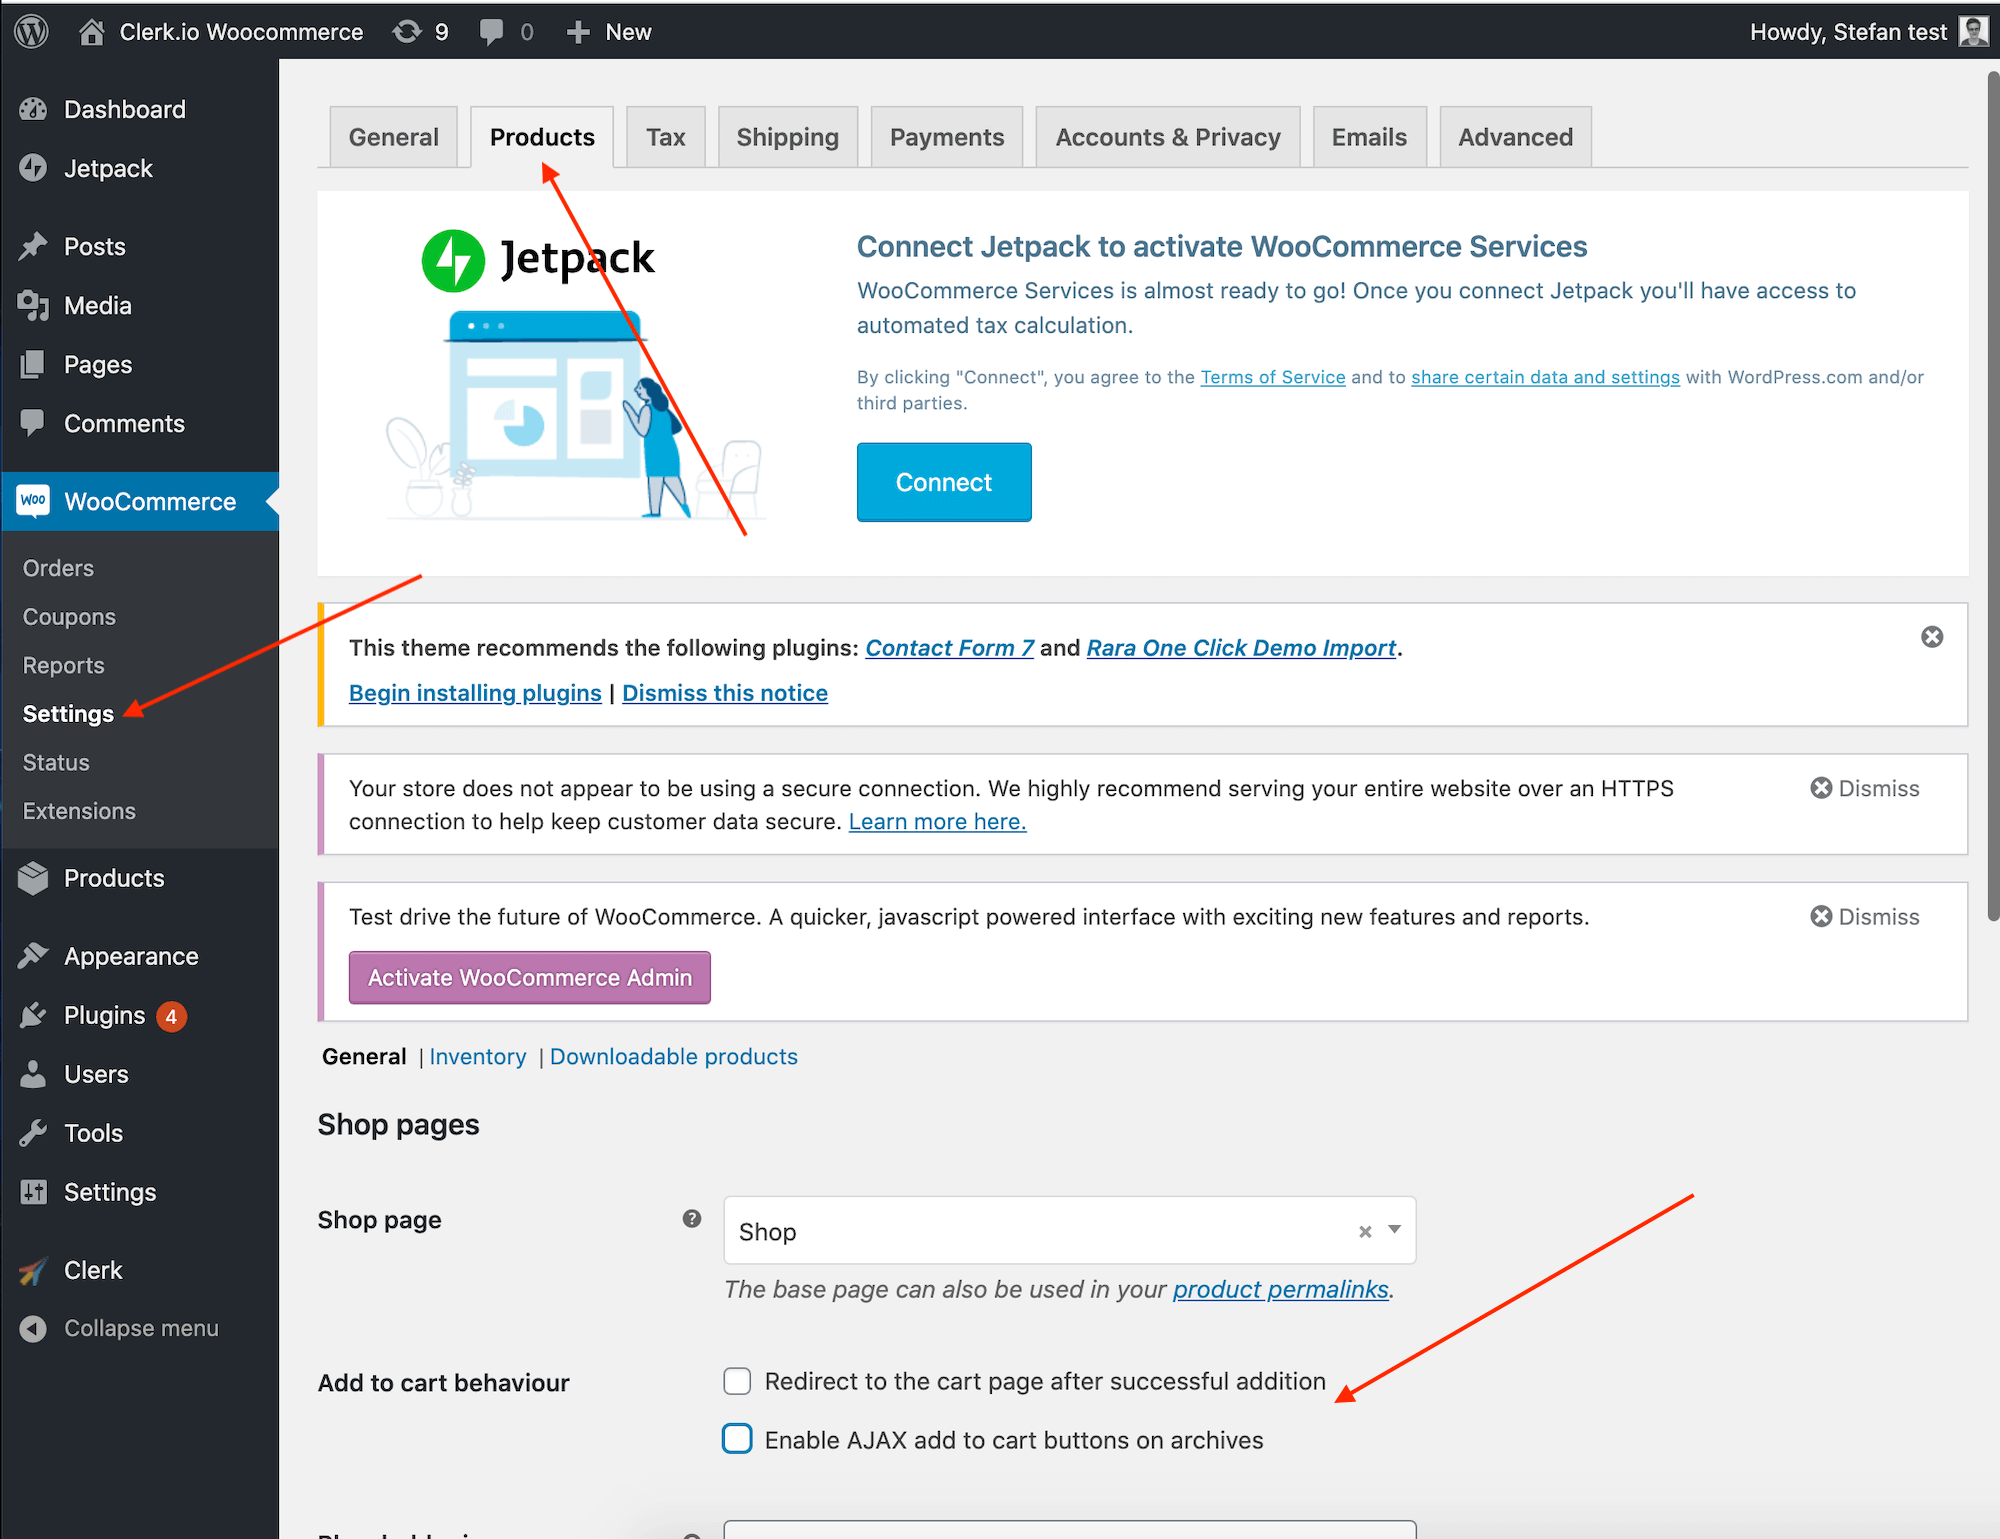
Go to WooCommerce > Settings > Products and find Add to cart behaviour.
Make sure both boxes are unchecked.
Click Save changes at the bottom of the page.