Category Page
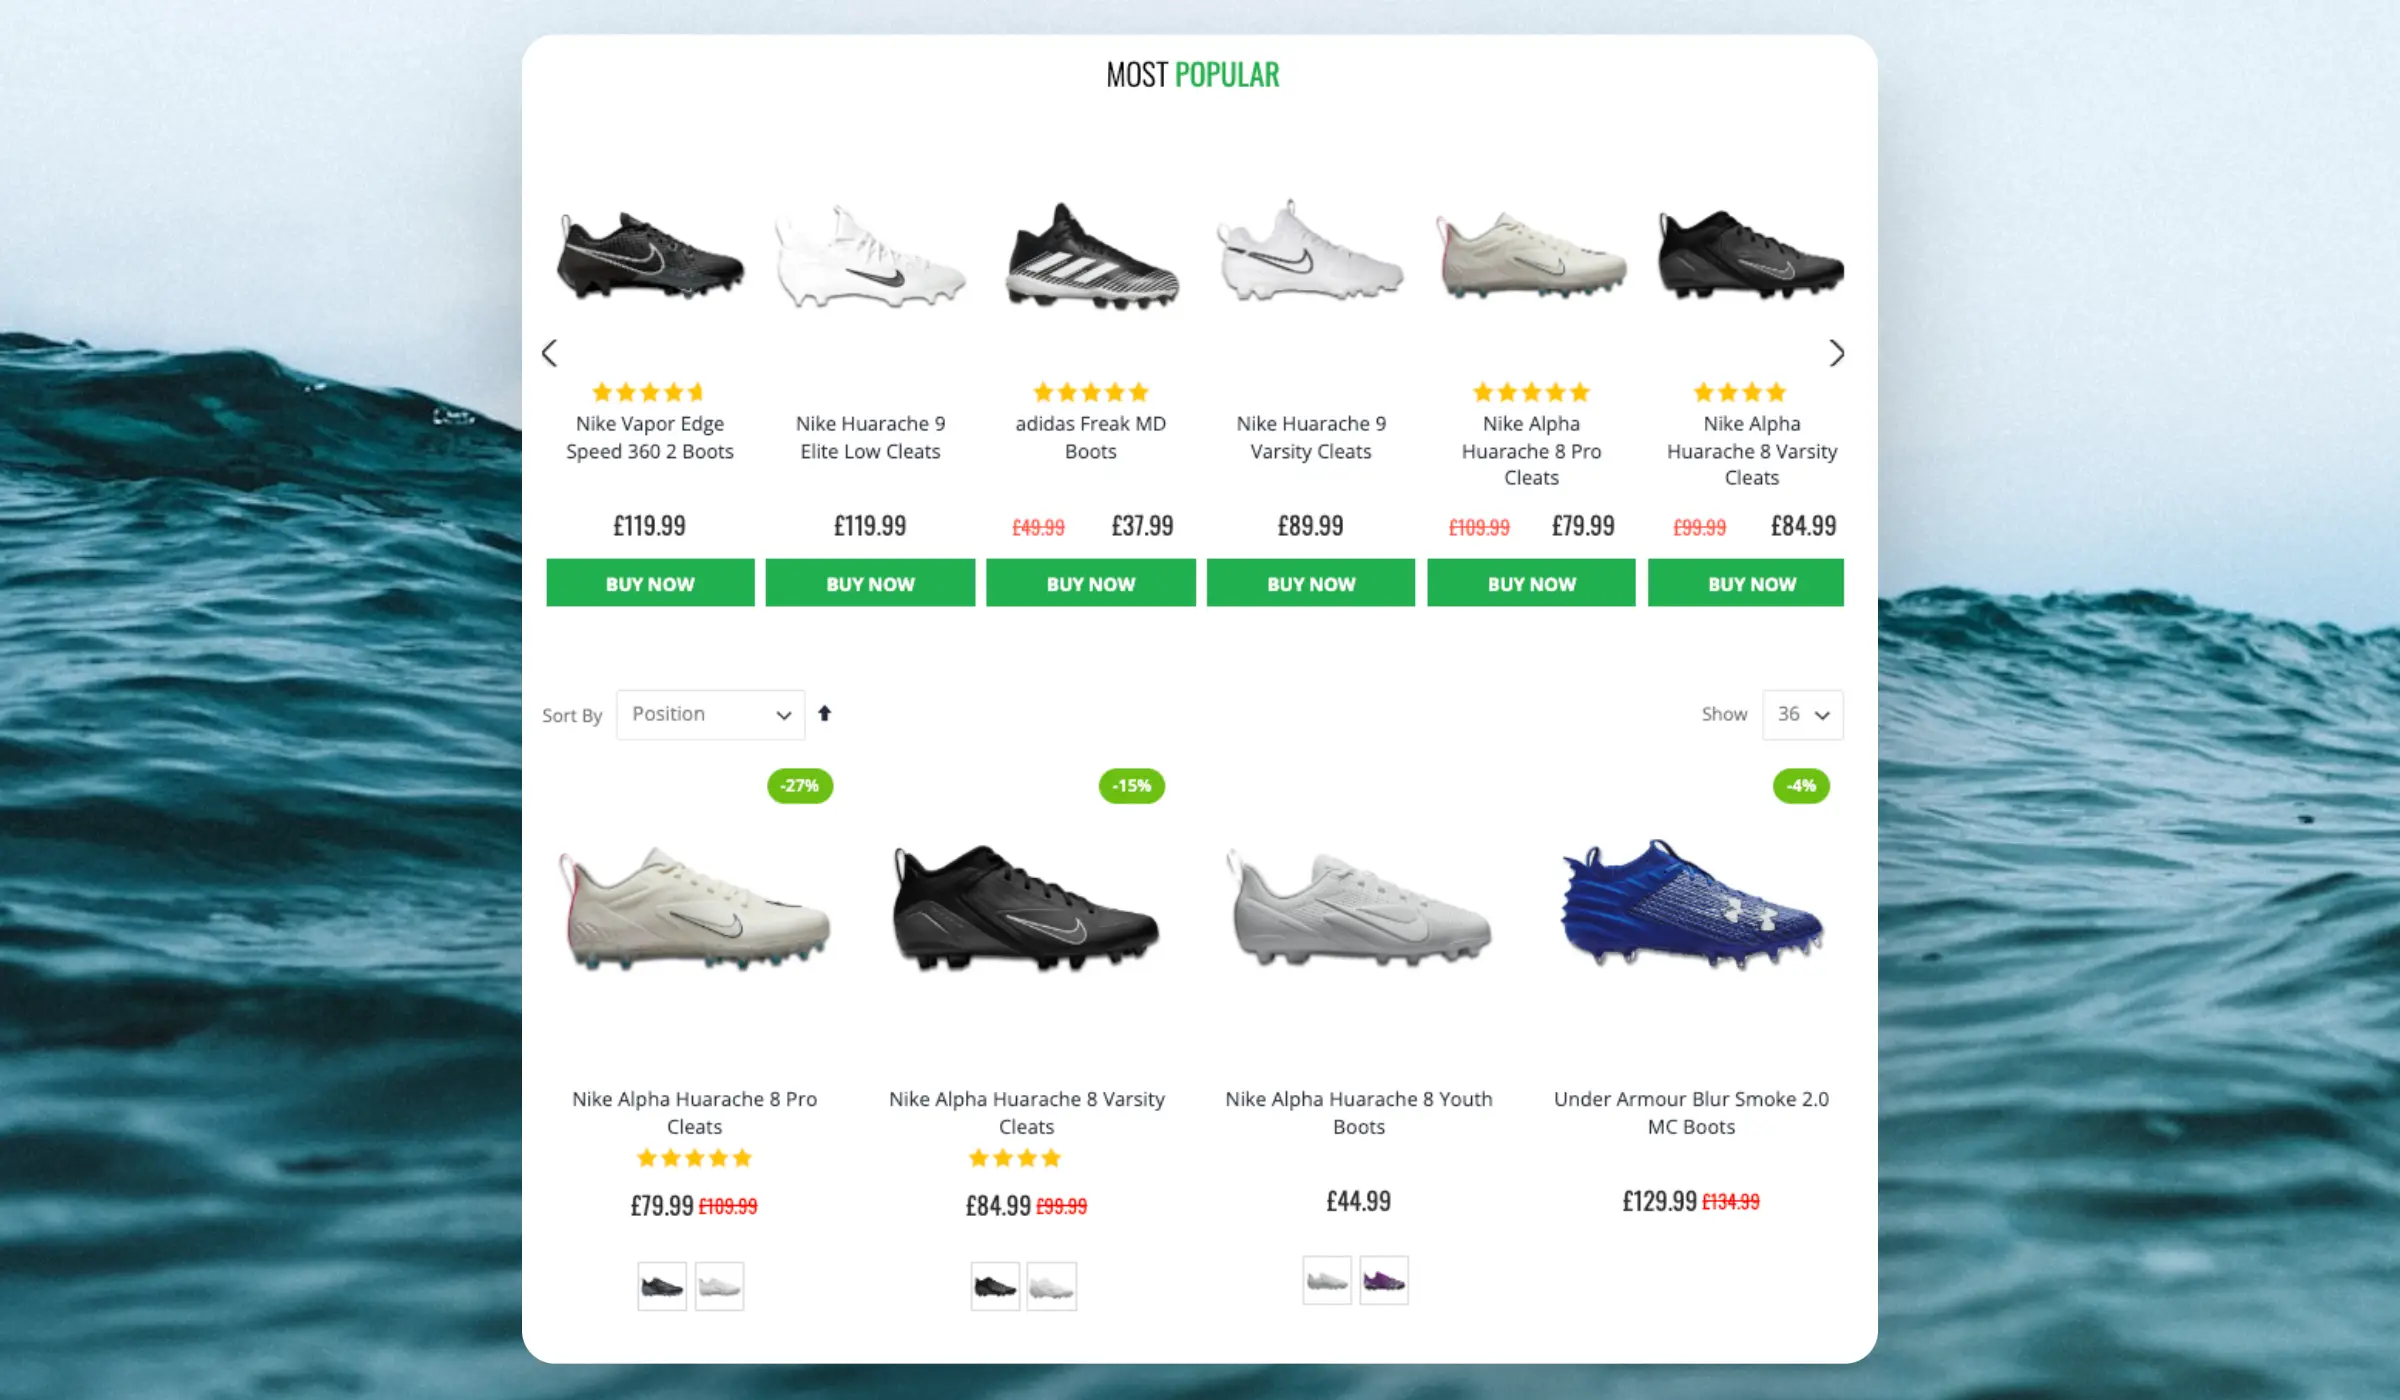
Slider #
Category pages are used when a customer is looking for a particular type of product, but not a specific product such as t-shirts, sofas or running shoes. If they had a specific product in mind, they most likely would have looked for it first using the search function.
Categories tend to have many products, so it can be hard to navigate them but many customers are looking for the same few products in the categories.
These select products tend to be the same for each customer, so they will likely be the best-sellers. This is because best-sellers offer the customer a sense of security - if the product was popular amongst others there is some proof of value.
By placing these items at the top of the category page as a group of recommendations, it makes it much easier for your customers to navigate.
It is likely that these products will pique new customers’ interests and therefore increase the chances for conversion.
Full category page #
Clerk can be used to render all results on a category page, allowing for smart sorting of results, and using Merchandising for a high degree of control over which products are prioritised.
This article describes the use of our API and Clerk.js library as two different ways of handling this rendering.
Using API #
Our category recommendations endpoints work exactly the same as our search page endpoint. The only difference is that these endpoints rely on a category ID rather than a search query.
Due to this, they can be used to render all products on category pages by replacing any existing webshop logic for fetching products, with Clerks API.
If using a serverside API setup, you can usually keep the existing styling by simply getting the product data from Clerk, while rendering the visuals through the webshops code.
These are the two available endpoints:
- recommendations/category/popular
(Ranked by best selling items - changes occassionally) - recommendations/category/trending
(Ranked by products that are trending in sales - changes often)
The best endpoint to use depends on the type of business.
Many fashion stores with inventory that changes often, generally gets the most out of trending products.
Stores with catalogues where customers tend to purchase the same items multiple times, like supplements or food stores, should generally use bestsellers.
API endpoint parameters #
Here is a breakdown of what each argument does when making a call to a category endpoint.
| Argument | Description |
|---|---|
key | The public key for the store |
limit | The amount of products to return |
category | The ID of the category currently browsed |
offset | The index to start the result set from. Used with limit for pagination. |
orderby | An attribute to sort the results on. If not sent, Clerk will order by best selling items |
order | Can be either asc or desc. Sorts the products in ascending or descending order |
attributes | A list of attributes that Clerk should return. Useful for speedy setups where all product data is returned from Clerk. If not set, Clerk only returns product IDs |
filter | A string that configures Clerk to only return a subset of products. Used with existing filters on the page or Clerks facets to allow customers to narrow down results |
facets | A list of attributes to be returned as product options that can then be converted to a filter when a visitor selects it |
labels | The label(s) associated with the category page. Used for identifying performance in my.clerk.io |
visitor | The visitor ID of the current visitor browsing |
Filtering results #
- When sending
facetsin the request, Clerk will return a list of the possible filter options for that result set.- E.g. if the cheapest product in the category is €10 and the most expensive one is €500, the lowest price bucket could be €10-50, and the highest €450+ or similar.
- One category might have 10 different brands and another only 3 in the facets.
- When a visitor selects an option, it should be converted into a filter that is sent in the next API call.
- E.g.
filter=’(price > 10 and price < 100) and brand=”Swarovski"'
- E.g.
- We recommend creating a graphical interface based on Clerks facets and listing them as selectable options as this automatically keeps track of which options are available in each category.
- It can also be done using an existing filter GUI, as long as the visitors choices can be converted to a filter string
You can read more about filters in our developer docs.
Paginating results #
- The
limitandoffsetparameters are used together for pagination limitcontrols the amount of products to return for each calloffsetcontrols the starting point in the full list of results- The first call should have
offset: 0, and each consecutive calloffset: offset + limit- Page 1:
limit: 60,offset: 0 - Page 2:
limit: 60,offset: 60 - Page 3:
limit: 60,offset: 120 - … and so on.
- Page 1:
- The
countkey from the API response contains the total amount of products in the category, regardless oflimit. It can be used to calculate the amount of pages by dividingcountwithlimitand rounding up. E.g:pages = ceil(count / limit)
Full API request & response example #
Here is a full example of a call and response to display products on a category.
It’s configured display:
- Products from the category with ID 13
- 50 products on the second page using limit and offset of 50
- Products with the type “Star Wars” using filters
- Ordered by price low-high using orderby price with ascending order
- Facets for the price and category
// Request
curl --request POST \
     --url 'https://api.clerk.io/v2/recommendations/category/popular' \
     --header 'accept: application/json' \
     --header 'content-type: application/json'
     -d '{"key": "Ipkv9tKfxRdpLv3mpMhqxfWGNdqugE0c",
          "limit": 3,
          "category": 13,
          "offset": 50,
          "orderby": "price",
          "order": "asc",
          "attributes": ["id","name","image","price", "url"],
          "filter": "type = \"Star Wars\"",
          "facets": ["price", "category"],
          "labels": ["Category Page Grid - Popular"],
          "visitor": "xfgu47fd2"
        }'

// Response
{
  "status": "ok",
  "result": [
    27988,
    25629,
    22482
  ],
  "count": 11,
  "facets": {
    "categories": [
      {
        "type": "unit",
        "name": "Home Accessories",
        "value": 81,
        "count": 1
      },
      {
        "type": "unit",
        "name": "Swarovski",
        "value": 3436,
        "count": 5
      }
    ],
    "price": [
      {
        "type": "range",
        "name": "50 - 99",
        "min": 50,
        "max": 99.99,
        "count": 1
      },
      {
        "type": "range",
        "name": "100 - 149",
        "min": 100,
        "max": 149.99,
        "count": 3
      },
      {
        "type": "range",
        "name": "200 - 249",
        "min": 200,
        "max": 249.99,
        "count": 1
      },
      {
        "type": "range",
        "name": "300 <",
        "min": 299.99,
        "max": 383,
        "count": 6
      }
    ]
  },
  "product_data": [
    {
      "id": 27988,
      "image": "https://warstars.com/images/star_wars_tie_fighter_ornament.jpg",
      "name": "Swarovski Star Wars Tie Fighter Ornament ",
      "price": 76,
      "url": "https://warstars.com/products/star_wars_tie_fighter_ornament"
    },
    {
      "id": 25629,
      "image": "https://warstars.com/images/swarovski_star_wars_mandalorian_the_child.jpg",
      "name": "Swarovski Star Wars Mandalorian, The Child",
      "price": 112.5,
      "url": "https://warstars.com/products/star_wars_mandalorian_the_child"
    },
    {
      "id": 22482,
      "image": "https://warstars.com/images/swarovski_star_wars_master_yoda.jpg",
      "name": "Swarovski Star Wars Master Yoda",
      "price": 131.52,
      "url": "https://warstars.com/products/star_wars_master_yoda"
    }
  ]
}
Using Clerk.js #
Clerk.js is a library that makes it easy to call the Clerk.io API, apply tracking and handle styling.
Overview #
Clerk.js lets you render a complete category page from the frontend using HTML snippets.
- Include the Clerk.js script in your header so you can use embed codes on your website.
- Clerk.js scans the website for elements with the
clerkclass and reads theirdata-parameters. - Use the Liquid templating language in a Code Design to control the product grid’s HTML and styling.
- Clerk.js can handle pagination without extra coding by loading more results when a visitor clicks a button, using this function:
Clerk('content', '#SNIPPET_ID', 'more', LIMIT); - Facets HTML is generated by configuring the embed code with the facets, their translations and a target HTML block to insert them in. Read more about Clerk.js facets.
Before adding the code to your webshop, create the Category Page standard design and Element in my.clerk.io.
Create a design #
For a standard full category page, create the Category Page standard design:
- Go to Recommendations > Designs and click New Design.
- Choose Grid Design, then select the Category Page standard design.
- Save the design.
For a custom layout, choose a blank Code Design under Grid Design and follow the Code Design instructions below.
Create an Element #
- Go to Recommendations > Elements and create a new Element.
- Name the Element Category Page Grid.
- Select Bestsellers In Category as the product logic.
- Select the design you created under Create a design.
- If the selected design supports facets, enable Facets, set the Limits as you would for Omnisearch, and select the facets you want to display.
- Set the product limit to at least 40.
- Save the Element.
Add to your website #
There are two ways to add the Category Page Element to your website. Injection is the easiest option. For more control over where the filters and product grid appear, use embedded code and follow the custom implementation below.
Injection #
Open the Element’s Insert into website tab and select Using injection.
Configure a unique CSS selector for the category-page product grid and choose where the Element should be inserted. Because this Element uses a category logic, also configure the Category ID CSS selector so Clerk.js can read the current category ID and show the correct products for that category.
When the selected design supports facets, the injected Element includes them automatically.
Read more about using injection.
Custom implementation #
The custom implementation needs one HTML element for the filters and one Clerk.js embed code for the products. The filters are inserted into the first element, while the products are rendered inside the embed code.
- Open the Element’s Insert into website tab and copy the embed code.
- In the category page template, add an empty
<div>where the filters should appear. Give it the IDclerk-category-filters. - Add the copied embed code where the product grid should appear. Give its outer element the ID
clerk-category-productsand keep theclerkclass. - Replace
INSERT_CATEGORY_IDwith the ID of the category currently being viewed. Your webshop must output the correct ID for every category page. - Set
data-templateto the value that matches the ID of the Element you created. If in doubt, open the Element and go to Insert into website > Using embedded code to check or copy the correct value. - Make sure
data-facets-targetpoints to the filters element:#clerk-category-filters. - In
data-facets-attributes, list the product attributes that visitors should be able to filter by. The example includes price, categories and brand; replace these with attributes that exist in your catalogue. - Use
data-facets-titlesto provide the labels that visitors should see for each attribute. - Set
data-facets-in-url="true"if selected filters should be added to the URL, so visitors can share or return to a filtered category page.
If Clerk.js is not already installed on your webshop, add the
Clerk.js script to your page before using the embed code. The data-category value, the data-facets-target selector and the two category page IDs must match the values in your template.
Code Design #
If you created a blank Code Design under Grid Design, paste the following HTML into its HTML panel. It provides a product grid, a sorting dropdown and a load more button. The sorting dropdown updates the Element’s orderby and order parameters without leaving the category page. The order value must be either asc or desc.
<div class="clerk-category-page">
  <div class="clerk-category-toolbar">
    <label for="clerk-category-sort-{{ content.id }}">Sort by</label>
    <select
      id="clerk-category-sort-{{ content.id }}"
      onchange="var sort = this.value.split(':'); Clerk('content', '#{{ content.id }}', function (content) { content.param({ orderby: sort[0], order: sort[1] }); });">
      <option value="price:asc">Price: Low to high</option>
      <option value="price:desc">Price: High to low</option>
      <option value="name:asc">Name: A-Z</option>
      <option value="name:desc">Name: Z-A</option>
    </select>
  </div>

  <div class="clerk-category-grid">
    {% for product in products %}
      <article class="clerk-category-card">
        <a href="{{ product.url }}" class="clerk-category-card-link">
          <img
            src="{{ product.image }}"
            alt="{{ product.name }}"
            class="clerk-category-card-image">
          <div class="clerk-category-card-details">
            <div class="clerk-category-card-brand">{{ product.brand }}</div>
            <h2 class="clerk-category-card-name">{{ product.name }}</h2>
            <div class="clerk-category-card-price">{{ product.price | money }}</div>
          </div>
        </a>
      </article>
    {% endfor %}
  </div>

  {% if count > products.length %}
    <button
      type="button"
      class="clerk-load-more-button"
      onclick="Clerk('content', '#{{ content.id }}', 'more', 40);">
      Load more products
    </button>
  {% endif %}
</div>
The design only controls the product grid. Add the filters container and the Element embed code to the category page template as shown below. Read more about rendering and updating Clerk.js Elements.
Embed code #
Below is a separate example for the category page template. The data-template value must match the ID of the Element you created, regardless of the Element’s name. The selected Element and design determine how the product grid looks, while the data-facets-* attributes control which filters are shown.
<!-- Facets are inserted here. -->
<div id="clerk-category-filters"></div>

<!-- Products are rendered here using the selected Element and design. -->
<span
  id="clerk-category-products"
  class="clerk"
  data-template="INSERT_ELEMENT_TEMPLATE"
  data-category="INSERT_CATEGORY_ID"
  data-limit="40"
  data-facets-target="#clerk-category-filters"
  data-facets-attributes='["price","categories","brand"]'
  data-facets-titles='{"price": "Price", "categories": "Categories", "brand": "Brand"}'
  data-facets-price-prepend="€"
  data-facets-in-url="true"
  data-facets-view-more-text="View More"
  data-facets-searchbox-text="Search for ">
</span>
Replace INSERT_ELEMENT_TEMPLATE with the value from Insert into website > Using embedded code on the Element page.