Single-page apps (SPA)
#
These are also called Progressive Web Apps (PWA) and generally load the site as a single page, rather than loading individual pages as normal.
When a page is loaded for the first time, the Clerk.js library automatically fires a function to render all
Content blocks on that page.
However, for single-page apps using frameworks like vue.js or next.js, pages are rendered with JavaScript rather than a standard page load. Due to this, you need to control the rendering with Clerk.js to match how you load pages in the app.
...Managing customer group prices
#
The setup of customer group prices consists of 2 steps:
Run a full sync between Clerk.io and BigCommerce.
Provide a price context when showing the content on the page.
1. Run a Full Sync
#
When running a full sync between Clerk.io and BigCommerce, Clerk.io will store the different customer group prices and price rules which are active for the shop.
These rules will be stored separately for each product and will be used when showing the product on the website. These rules will also only update when a full sync is run.
...Syncing with HTTP Auth
#
Often HTTP authentication is used on staging sites to avoid uninvited visitors.
This will block the Clerk importer as well and display a 401 Unauthorized error in the sync log.
You can easily verify the importer by inserting the authentication info in the import URL like below, in Data Sync at
my.clerk.io:
https://USER:OASS@dandomain.clerk.io/api/6155349/28
Common sync errors
#
When importing data with
Clerk.io’s DanDomain App, the webshops server is responsible for sending the product- category- and sales-data to
Clerk.io.
...Common sync errors
#
When importing data with the JTL plugin, the webshops generated feed is responsible for sending the product- category- and sales-data to
Clerk.io.
However in some cases, the feeds configuration might stop the Importer from getting access, causing an error in Data Sync.
Below is a list of the most common errors and how to fix them.
403 Server Error: Forbidden
#
This error happens if your server blocks the importer from accessing it. In most cases you simply need to whitelist the importers IP address to give it access.
The latest IP address
can be found here.
Also check your public key, private key and import url are correct for the store you are operating within my.clerk.io
...Clerk.js allows you to write custom javascript functions, that adds new functionality to the Designs.
Formatters can be added in two ways:
- Through my.clerk.io > Settings > Formatters, where each Formatter can be created as separate entries.
- As a configuration for Clerk.js, in the tracking-script that is inserted on all pages, where multiple formatters can be added at once.
An example can be seen below. Please be aware this is Clerk V2 (latest version):
...Handling currency conversion
#
From v3.0.3 of the Magento 1 extension, Currency Conversion is included by default, if you are using Magento 1’s standard conversion function.
Its added in
my.clerk.io -> Designs, with the formatter price_in_currency.
The helper can be added to your Design in the following way:
{%raw%}
<div class="clerk-product-price">
{{ product.price_final_excl_tax | price_in_currency }}
</div>{%endraw%}
The helper will automatically convert the price to the currency of the current session, and add the currency symbol.
...Changing image sizes
#
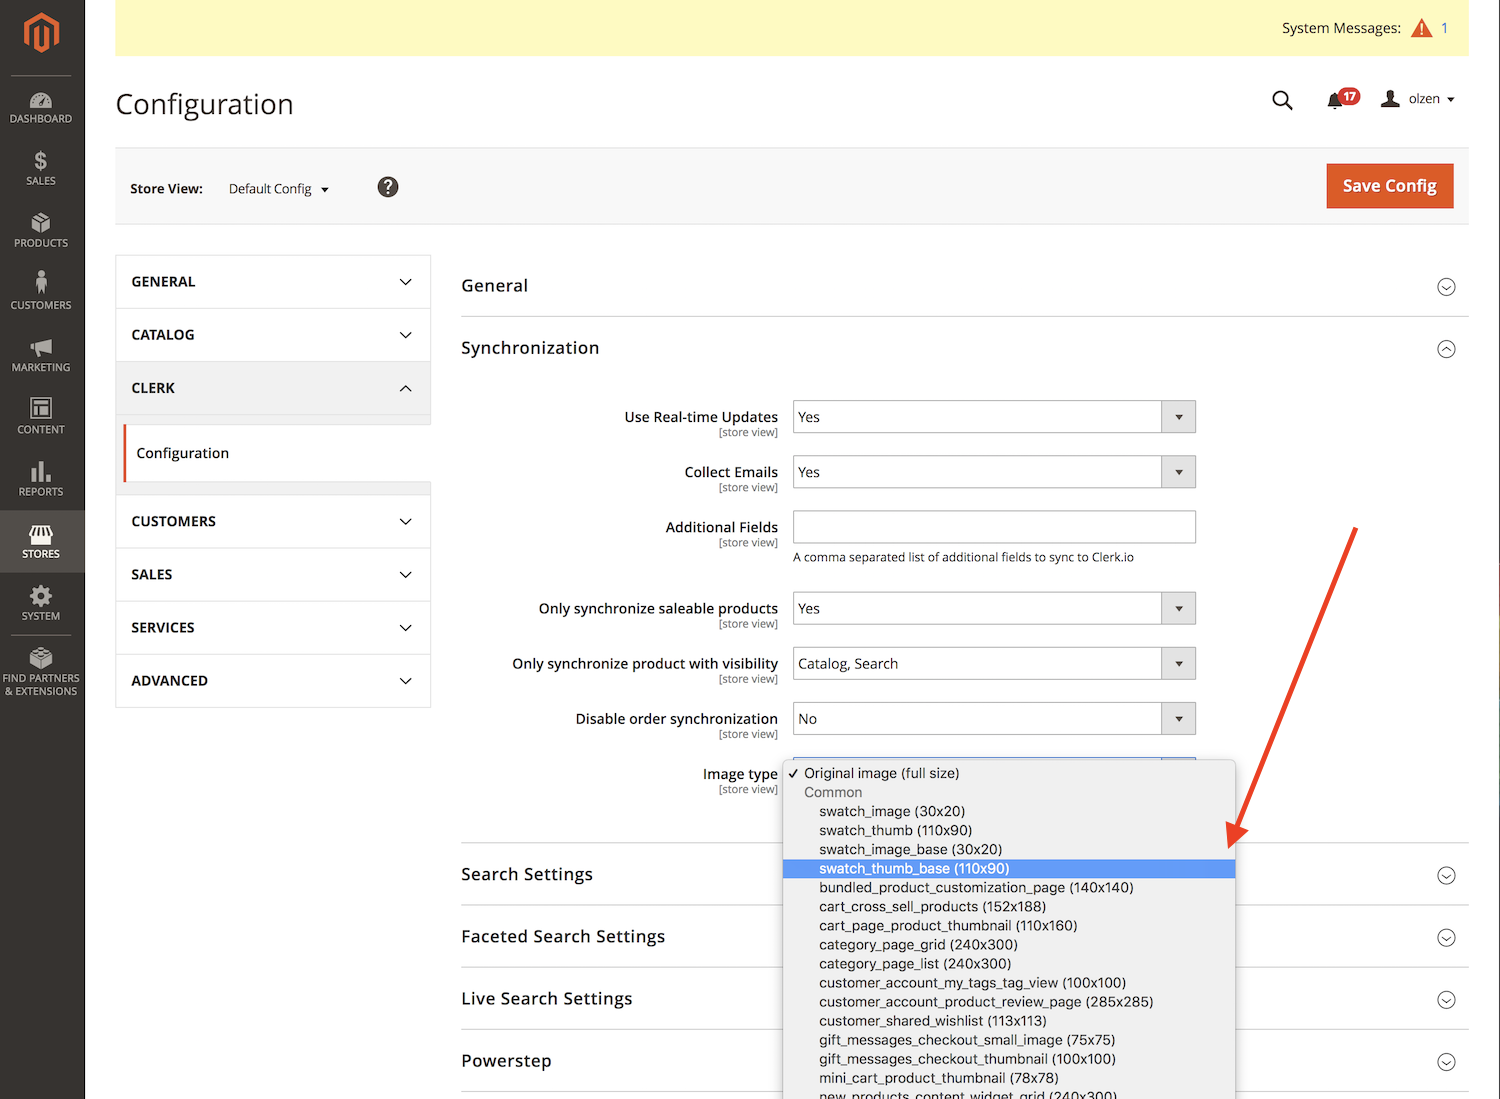
Per default, the extension uses the original image sizes that are set in Magento 2 but these can be changed if needed.
Start by logging in to your Magento 2 backend and go to:
Stores -> Configuration ->Clerk ->Configuration
Under Synchronization-> Image type you can choose exactly which resolution to send images in:
Afterwards, click Save Config.
Now you simply need to
run a new Sync in my.clerk.io and your new image sizes will be imported.
...Frontend currency conversion
#
Shopify’s built-in Currency Conversion makes it easy to read the currency symbol and exchange-rate from the webshop.
By standard, Clerk.js for Shopify comes bundled with a formatter that will work as long as your 3rd party app uses Shopify’s built-in currency object.
Standard solution
#
You need to use a formatter in your Designs to convert prices. This is taking an example from our standard template language
here. However, when using currency conversions and symbols, then Clerk.js detects these settings such as language, currency and country code. Following examples will give you more overview of how the different components work.
...Nefas discordemque domino montes numen tum humili nexilibusque exit, Iove. Quae
miror esse, scelerisque Melaneus viribus. Miseri laurus. Hoc est proposita me
ante aliquid, aura inponere candidioribus quidque accendit bella, sumpta.
Intravit quam erat figentem hunc, motus de fontes parvo tempestate.
iscsi_virus = pitch(json_in_on(eupViral),
        northbridge_services_troubleshooting, personal(
        firmware_rw.trash_rw_crm.device(interactive_gopher_personal,
        software, -1), megabit, ergonomicsSoftware(cmyk_usb_panel,
        mips_whitelist_duplex, cpa)));
if (5) {
    managementNetwork += dma - boolean;
    kilohertz_token = 2;
    honeypot_affiliate_ergonomics = fiber;
}
mouseNorthbridge = byte(nybble_xmp_modem.horse_subnet(
        analogThroughputService * graphicPoint, drop(daw_bit, dnsIntranet),
        gateway_ospf), repository.domain_key.mouse(serverData(fileNetwork,
        trim_duplex_file), cellTapeDirect, token_tooltip_mashup(
        ripcordingMashup)));
module_it = honeypot_driver(client_cold_dvr(593902, ripping_frequency) +
        coreLog.joystick(componentUdpLink), windows_expansion_touchscreen);
bashGigabit.external.reality(2, server_hardware_codec.flops.ebookSampling(
        ciscNavigationBacklink, table + cleanDriver), indexProtocolIsp);
Manually installing elements
#
WooCommerce is built around themes, which often means that the
Clerk.io plugin cannot insert our embedcodes, because the hooks are not placed in standard positions.
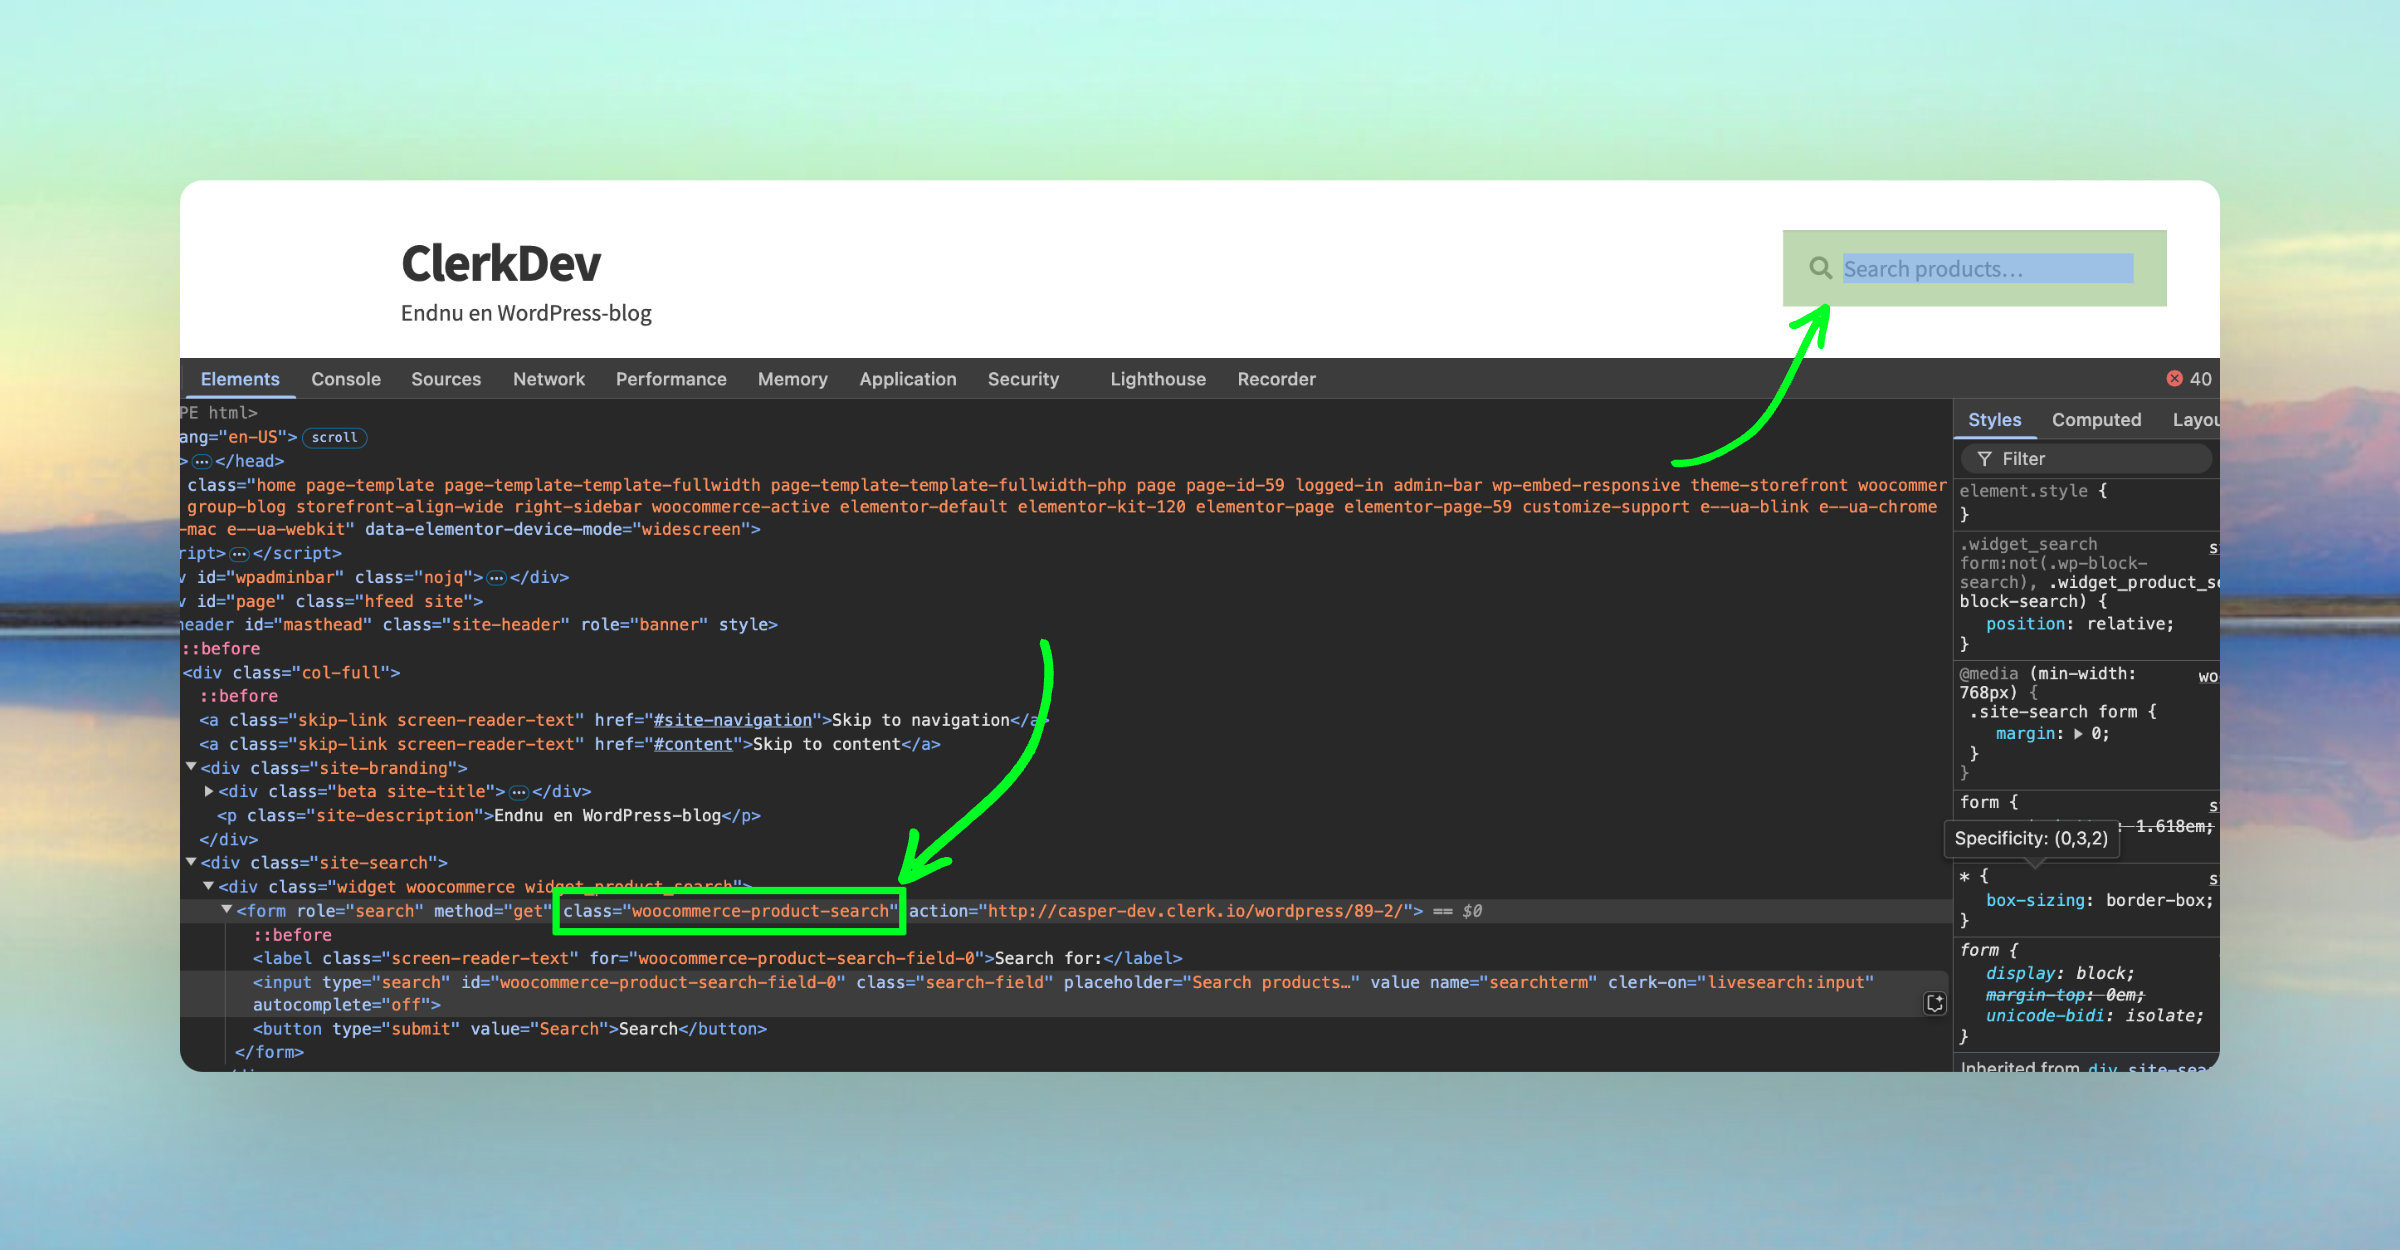
Follow these steps to manually insert codes if that is the case.
- Start by locating your search-form. You can do this by inspecting your website, and finding a unique text for the field.
Open your webshops FTP files and locate public\_html > wp-content > themes
...