An Overview Guide to Using Clerk.io Auto Email
Products:
Below is a guide to setting up Auto Email and connecting Auto Email with Audience, as well as highlights on best practices using Email Campaigns and Triggers.
1. Configuration
In my.clerk.io, head over to Settings > Email Configuration using the left-side menu.
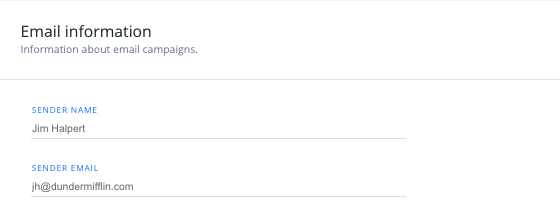
Email Information
Enter the sender details you’d like to appear for Auto Emails from your store in the Email Information section
Sender Name: The name you’d like to appear as the sender for your emails (e.g., Jim from ReallyCoolStore)
Sender Email: The email you’d like to appear as the sender email for your emails (e.g., announcements@reallycoolstore.com)
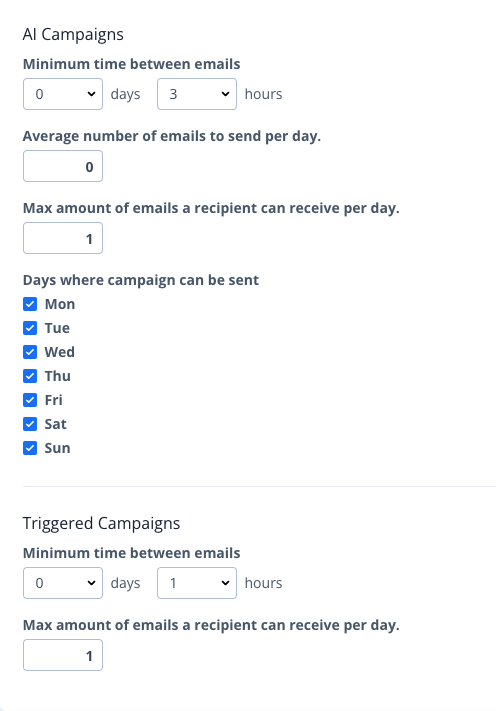
AI and Triggered Campaign Timings
Set the timing parameters for you emails to automatically send in this section.
To keep from emailing your customers too often, set the minimum time between Emails to be sent
Set the average number of Emails to send per day from your store’s email here
Set a maximum number of Emails a recipient can receive per day to avoid flooding your customers’ inboxes, in case customers qualify for more than one Email campaign you have live.
If you only want your Emails to be sent on specific days of the week, choose those in the “Days where campaign can be sent” section.
For Emails being sent via Triggers, you can also choose the minimum time between receiving emails from your store, and the maximum number of emails received by your customers per day.
Syncing Subscribers
Choose " Create New Exporter" to get started syncing your subscribers with Clerk.io to be used in Auto Email. This will lead you to Audience > Integrations, where you can follow the instructions to create an exporter with your chosen platform, then sync with Clerk.io.
For a step-by-step example of creating a new exporter, in this case with Google Adwords, click here.

Currently, we support the following Email Clients & Integrations for syncing subscribers:
ActiveCampaign
Hubspot
Klayvio
MailChimp
Salesforce
Ubivox
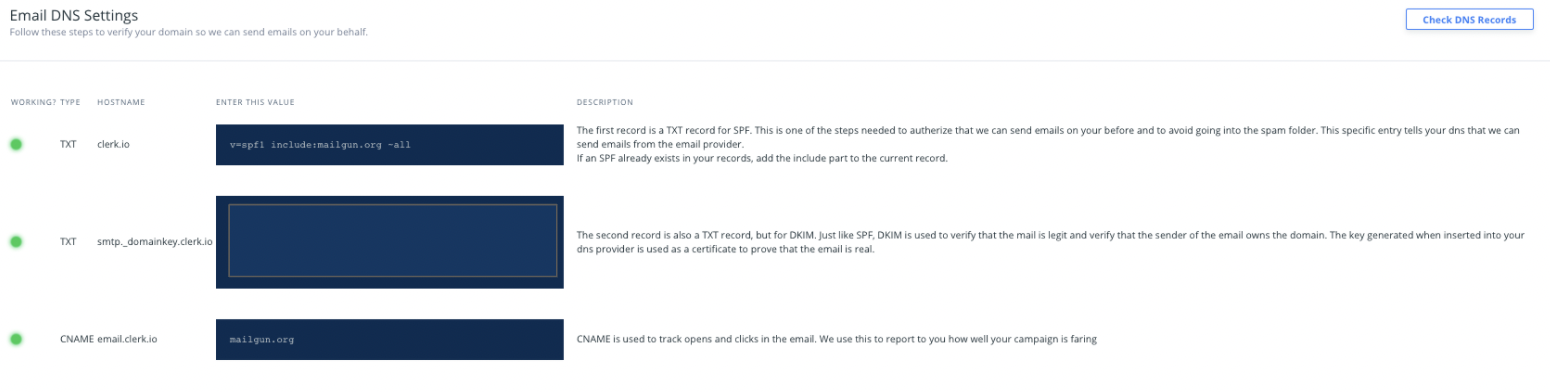
Choosing your Email Service Provider & Email DNS Settings
Once you’ve chosen your Email Service Provider and accepted the GDPR warning here…

…Your Email DNS settings will appear in the following section.
- The three DNS Records that appear (two TXT and one CNAME) need to be added to your host server to make sure Clerk.io is allowed to send out Emails on your webshop’s behalf. Follow the steps in the Description of each of these three settings to ensure they are properly added.
2. Creating your Email Design
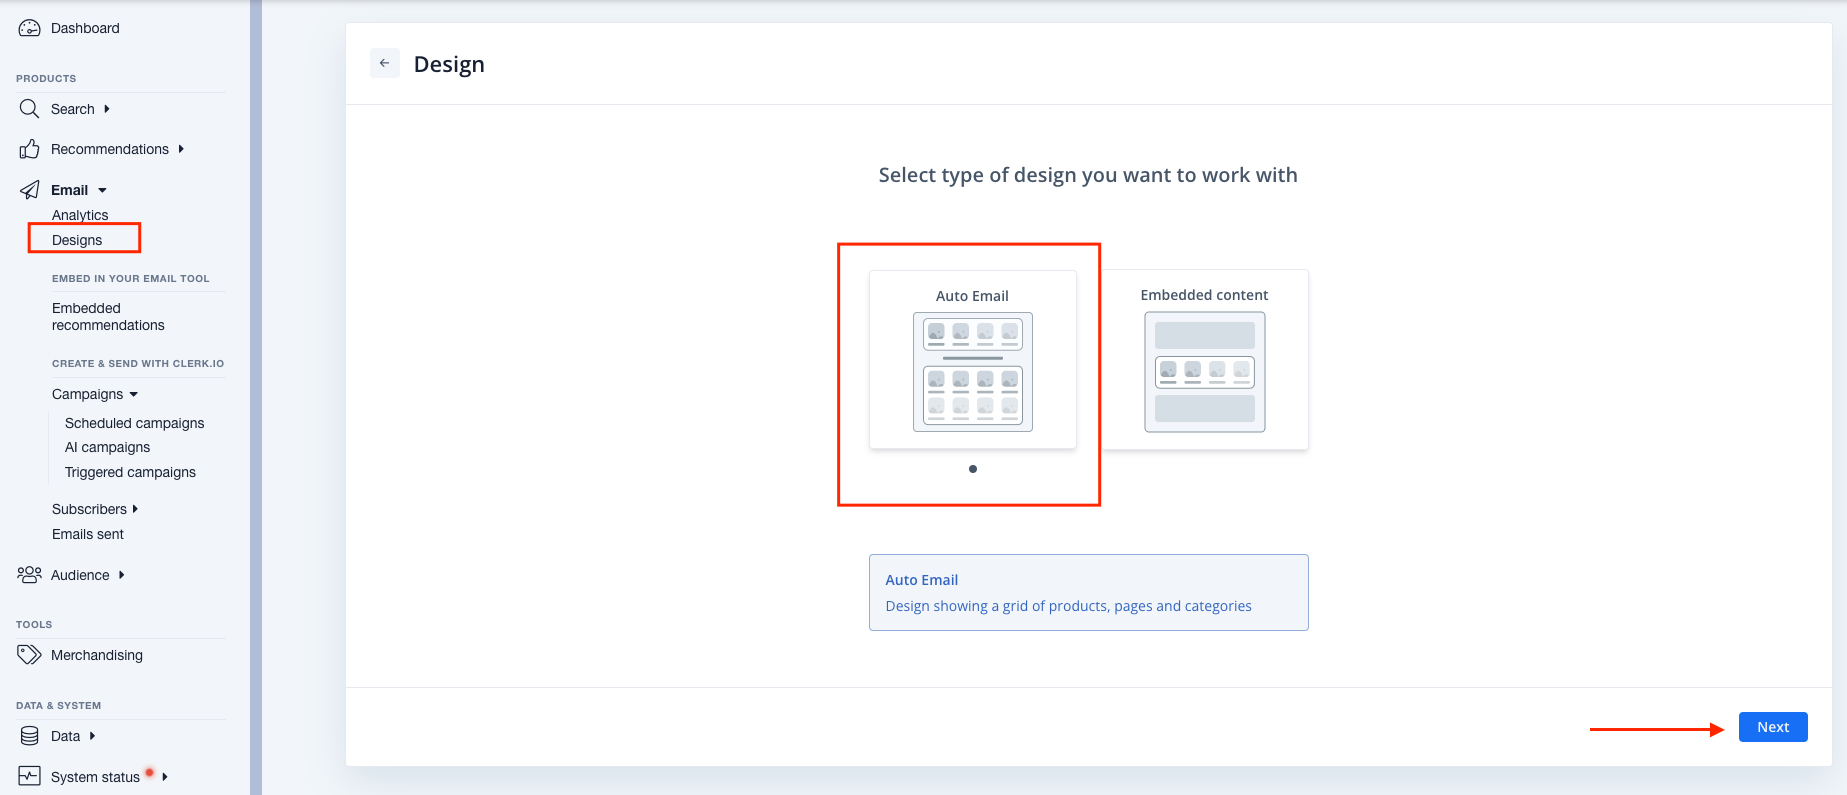
1. Go to Email -> Designs and New Design.
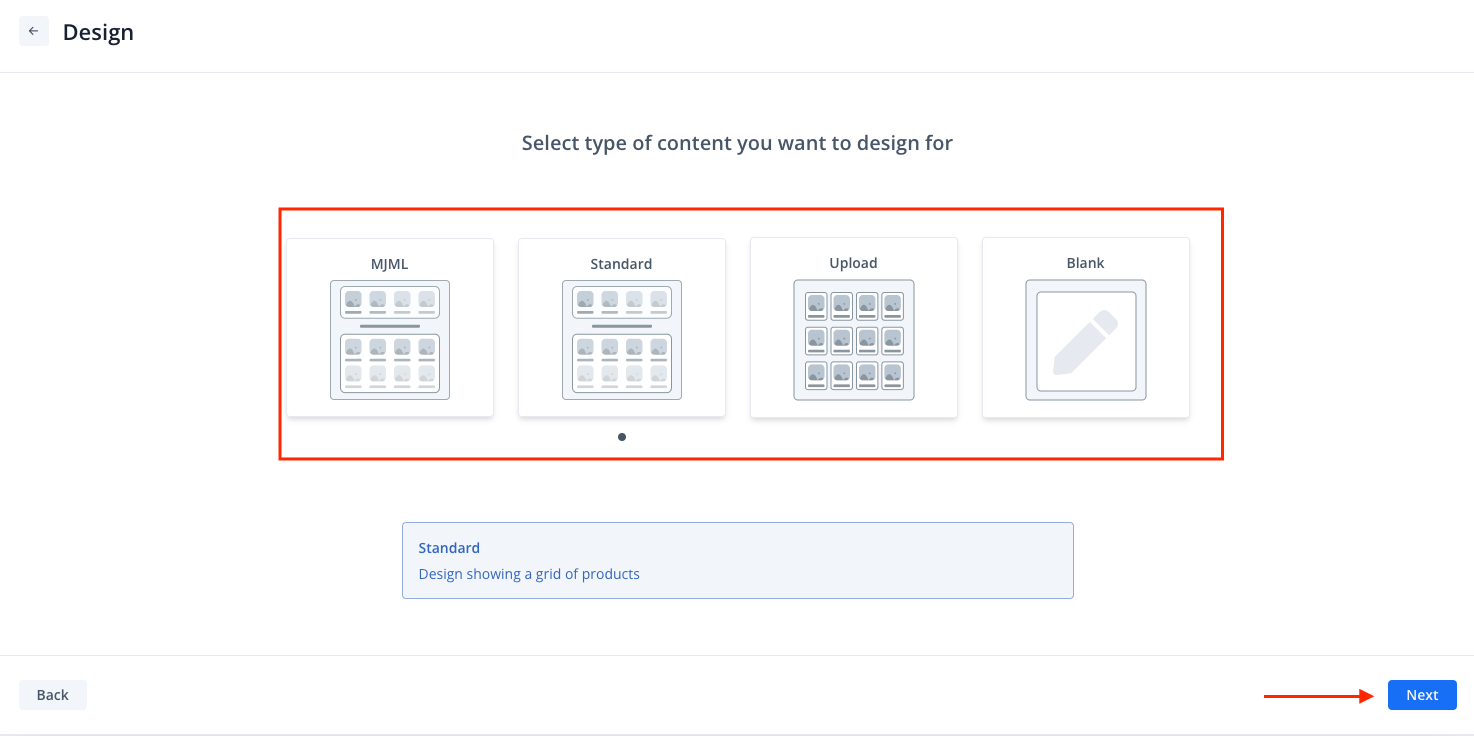
2. Choose Auto-Email and then select one of the starting designs. You can select between MJML, Standard, Upload and Blank. MJML is a email framework which gives you more flexibility and control over each element in the design campaign. Standard uses our standard design editor template. Upload is a feature where you can upload a figma file and generate a design from it. Blank will leave you a blank design editor template.
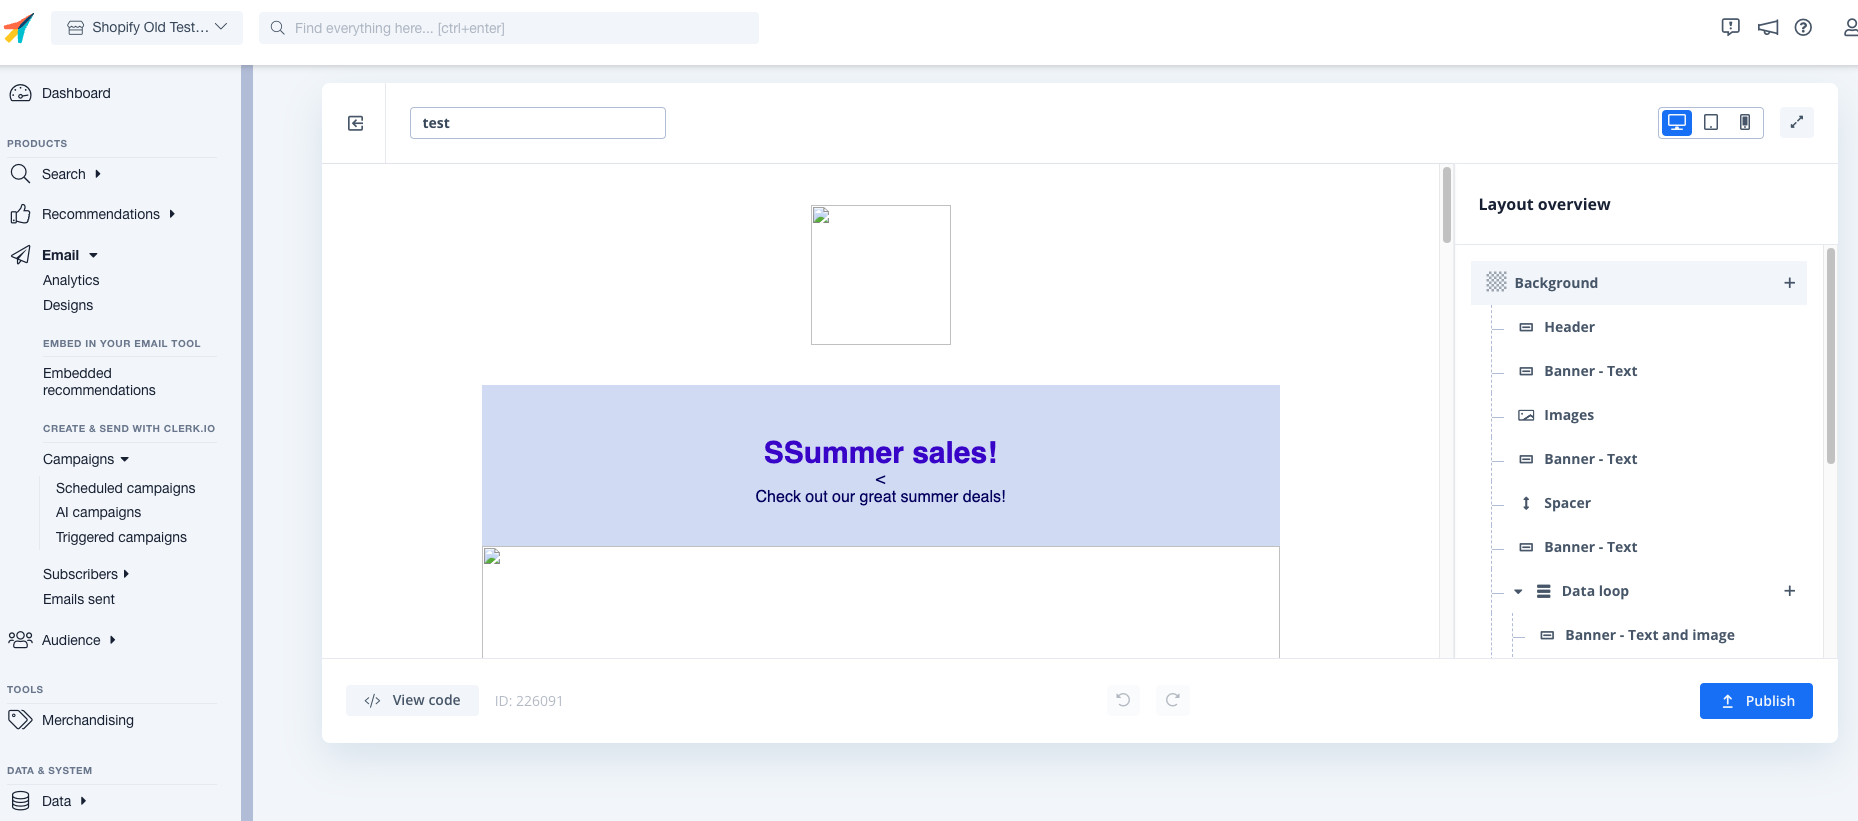
- This will give you a basic starting template you can use. Here, you can add elements like your webshop logo, and make any visual changes to the overall campaign that you want.
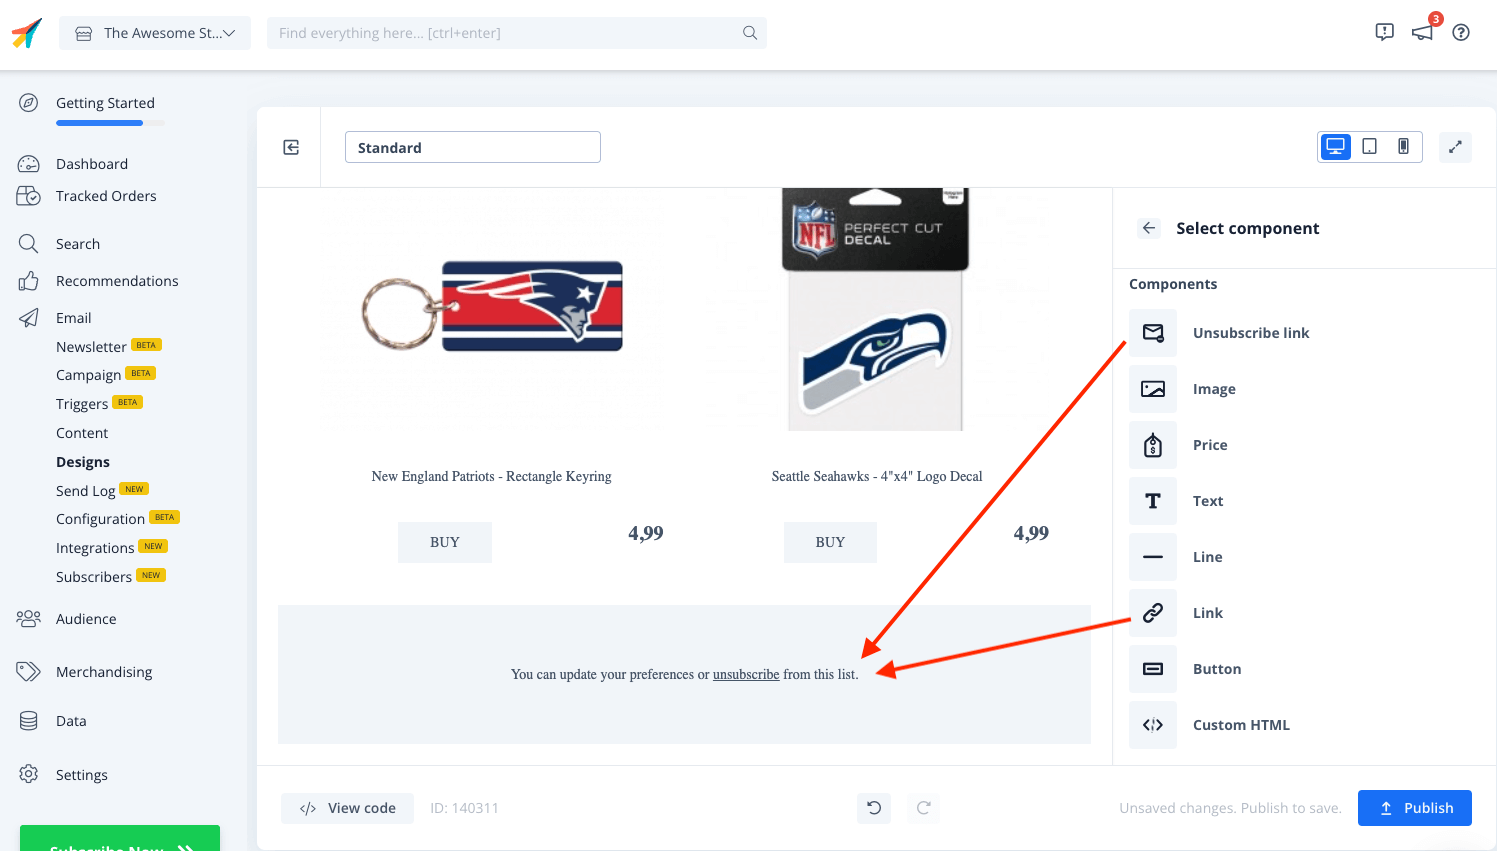
4. Its very important that you add the Unsubscribe link from your existing email client, in the bottom of the Design.
- If you use an external email client to sync subscribers, you can add it as a Link component
- If you use Clerk to host subscribers, you can use the Unsubscribe Link component
5. If you want to add text that can be configured directly on each email, you can use shortcodes in Text components like this: {{ headline }}.
- The headline part can be replaced by any other name, which will cause an input field with that name to be displayed on the chosen on the config of the email.
- The text you write will then be inserted when the email is rendered.
6. Scroll to the top and click Update Design
3. Auto Email Setup & Best Practices
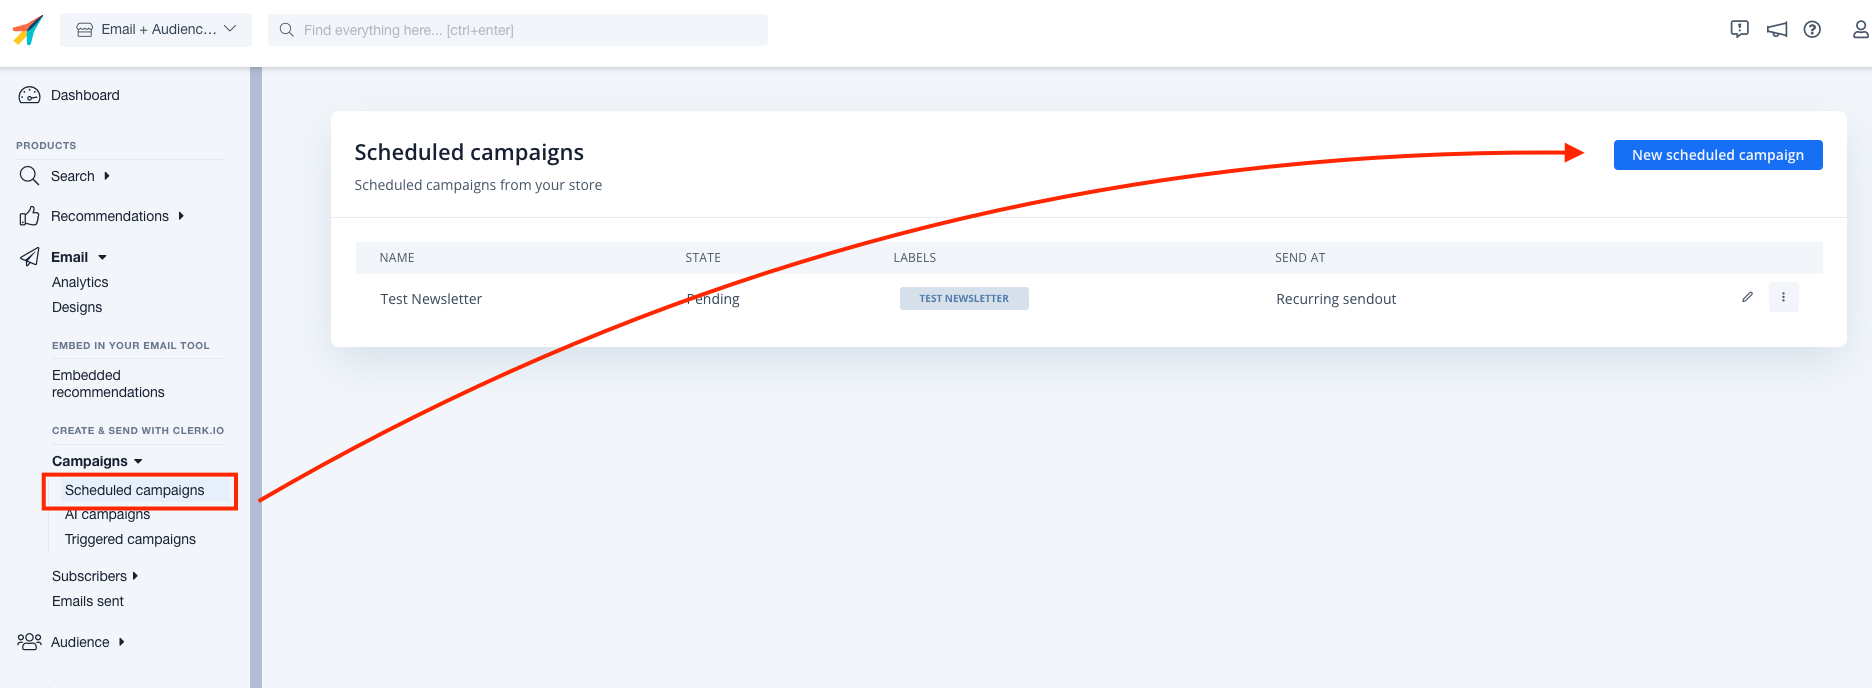
Schedule campaigns Overview
Choose Email > Schedule campaigns in the left-side menu in my.clerk.io, then click " New schedule campaign" in the top-right corner to add a new Email Campaign.
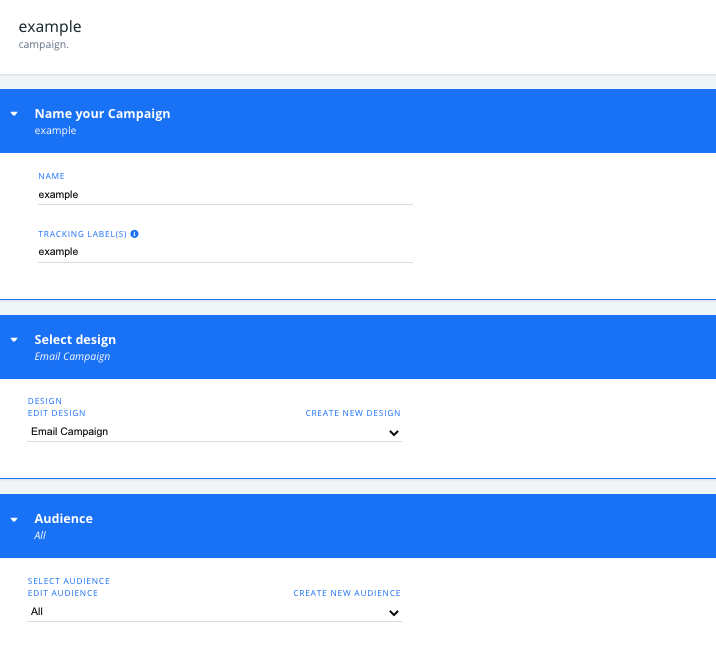
Type in the name and label for your campaign in the “Name your Campaign” section.
Under Select design , choose the Design you’ve created that you’d like to use for your Email Campaign from the dropdown menu.
In the Audience section, select the Audience you’d like to target with this campaign from the dropdown. You have the option to select “All” if the campaign is for all subscribers, not just specific audience groups.
- Next, choose the appropriate Product Logic for your Email Campaign in the following section:
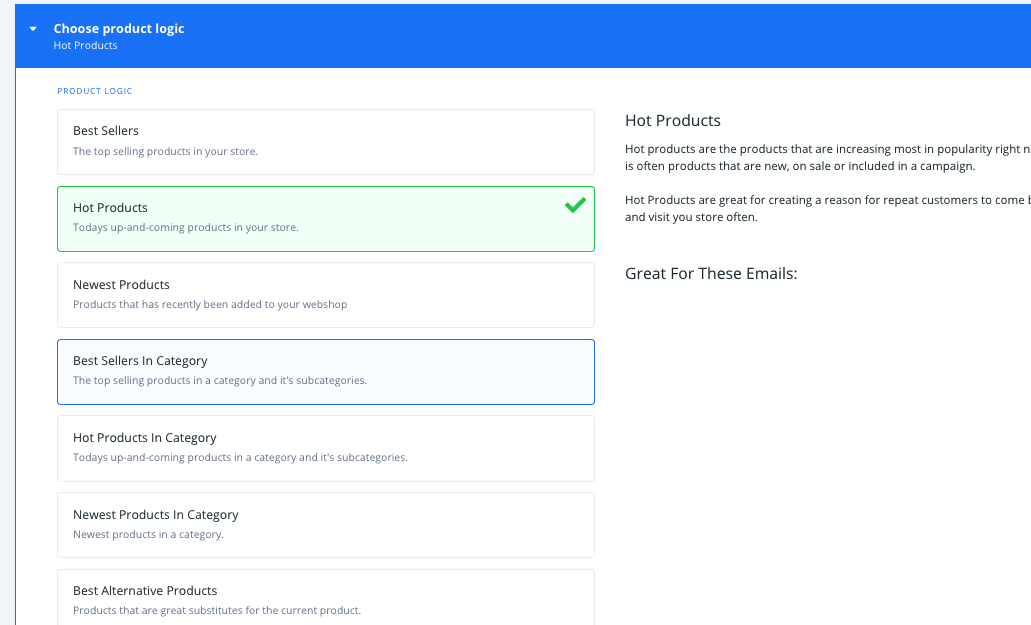
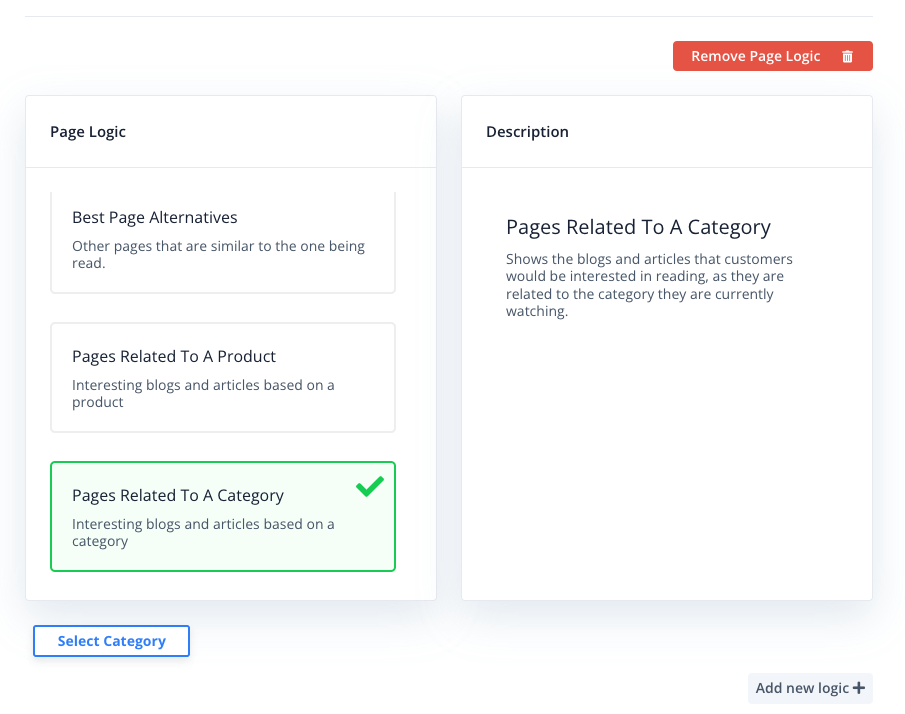
If you want to not only show products, but also Pages and/or Categories, you can add extra logics by clicking Add new logic +. Make sure that your Design is set up to show the extra logic as explained in Step 2.
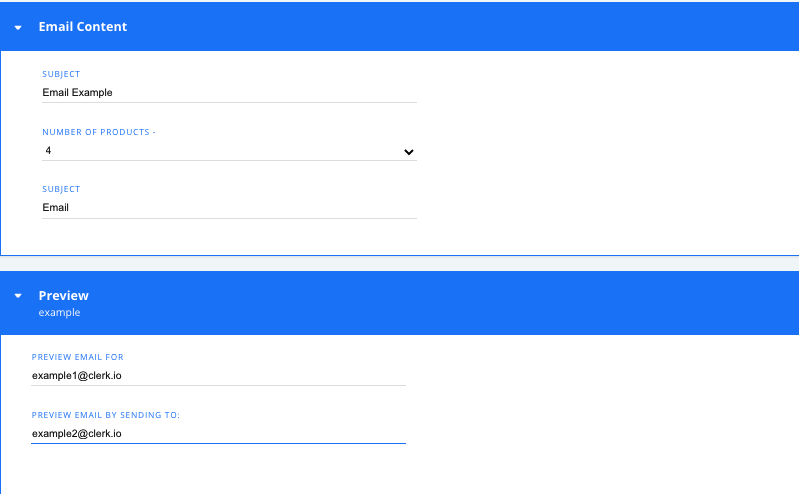
Under Email Content, set the subject line for your Email, as well as the number of products to be shown in your email Content
To preview your email, type in the email address of the recipient you’d like to preview (to test the visitor or audience-related logic), and provide the email address to send the preview Email.
Select “Update Campaign” to save any changes, and toggle to green to set your Campaign live.

Scheduled- Audiences + Logic
Setting up your campaigns for Auto Email should be pretty similar to other marketing and conversion campaigns you likely run with your advertising partners.
Below are some best practice campaign types you can run with Auto Email, often pairing Email with Audience for even more powerful personalization:
| Name | Audience | Product Logic |
|---|---|---|
| Best Sellers | All | Best Sellers |
| Personal Recommendations | All | Recommendations based on Orders |
| Popular for visiting customers | All | Visitor Recommendations |
| Personal Offers | All | Recommendations based on Orders + Filter “on_sale” is true |
| On Sale | All | Best Sellers + Filter “on_sale” is true |
| New | All | Visitor Recommendations + Filter Product Age < 30 |
| Hot New Products | All | Hot Products + Filter Product Age < 30 |
Triggered campaigns Overview
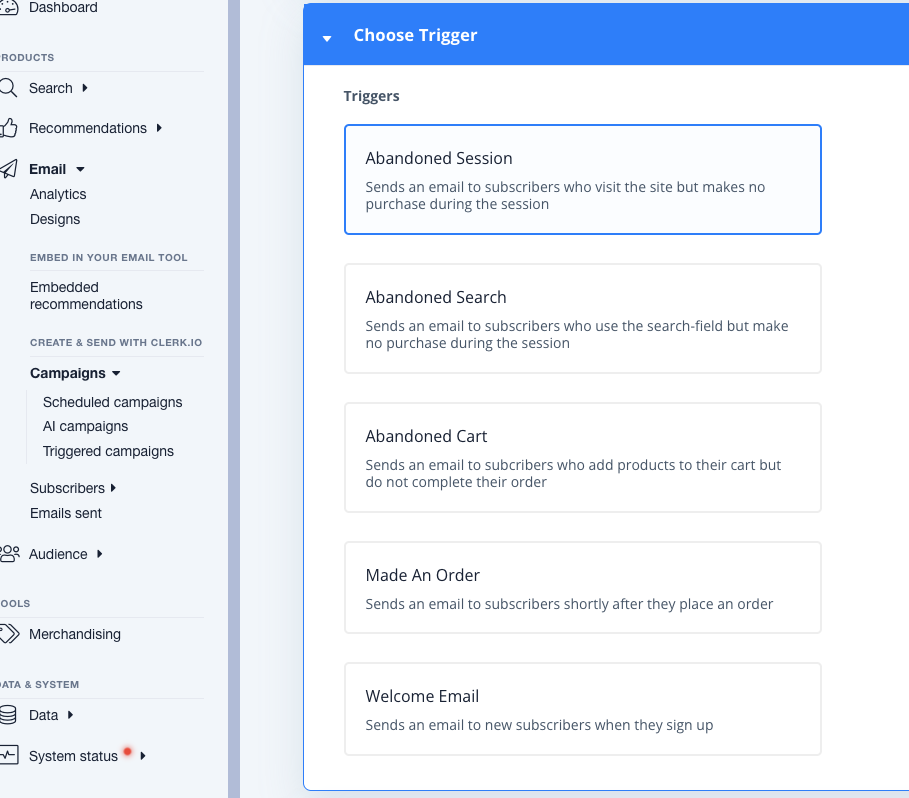
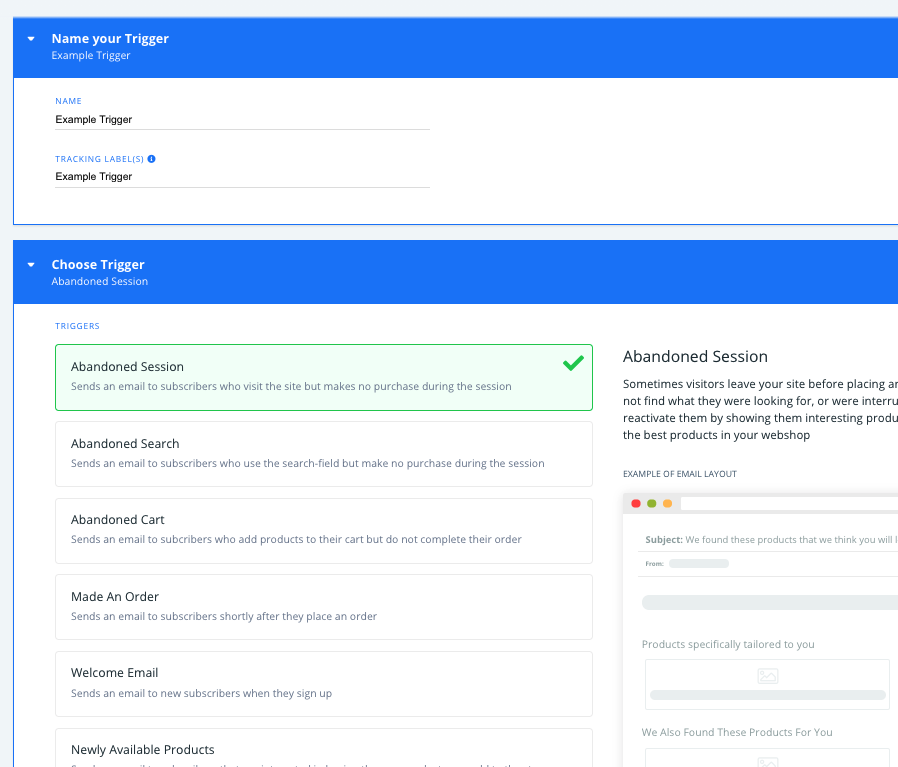
After selecting Email > Campaigns > Triggered campaigns in the left-side menu in my.clerk.io, click " New triggered" in the top-right corner to add a new Email Trigger.

Name your new Trigger with the text box below, then click " Create Trigger".

Next, check and modify your Trigger name and tracking labels as needed, then select the logic to set the even that triggers your Email.
Trigger Logics include:
Abandoned Session sends an email when a user browses the webshop without placing an order.
Abandoned Search sends an email based on the last search that a user made, if they did not place an order.
Abandoned Cart sends an email if a user adds at least 1 product to the cart, but does not convert..
Made An Order sends an email a short time after each order that is placed by customers.
Welcome Email sends an email as soon as a user becomes a subscriber
Newly Available Products sends an email to any recipient that is interested in any new product you add, based on our AI’s knowledge of the customer interests through Audience.
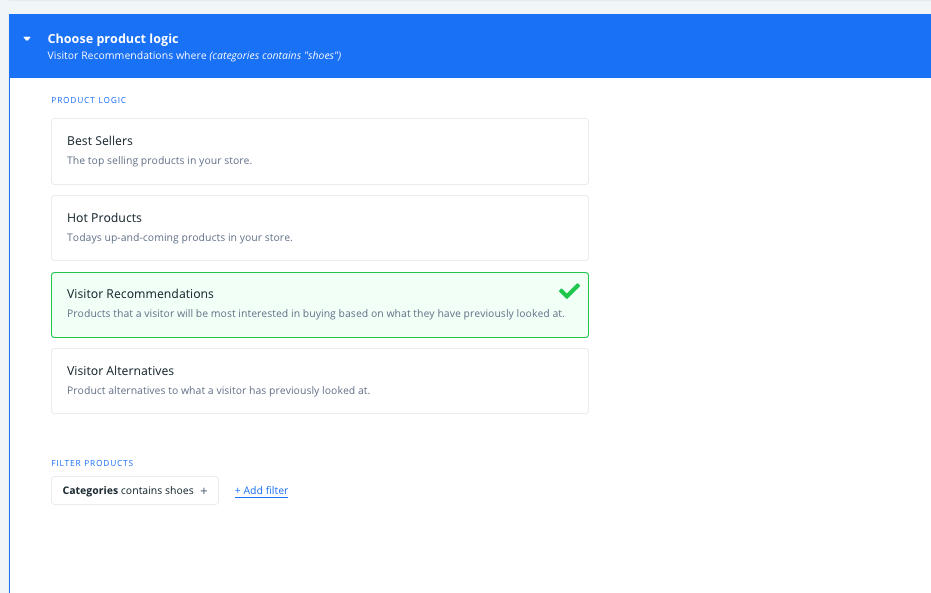
In the " Choose Product Logic" section, choose the logic for the products to be shown in your Email, and add any filters you’d like to apply to the products to be shown:
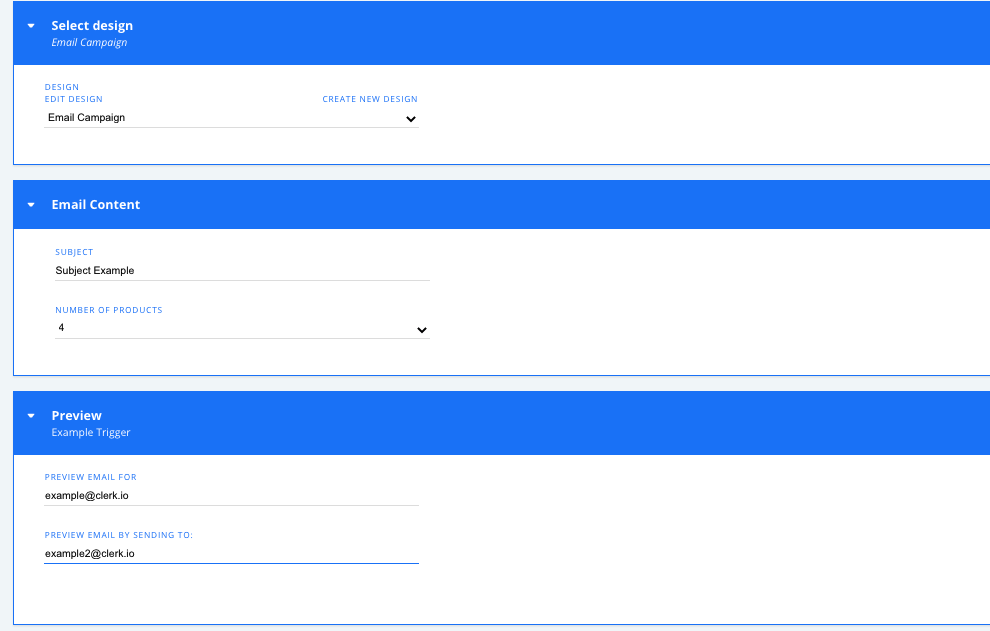
Select the Design to be used for your triggered Email from the dropdown below, or create a new one.
Under Email Content, set the subject line for your Email, as well as the number of products to be shown in your email Content
To preview your email, type in the email address of the recipient you’d like to preview (to test the visitor or audience-related logic), and provide the email address to send the preview Email.
Finally, select “Update Trigger” to save any changes, and toggle to green to set your Trigger live.

Triggers - Audiences + Logic
Two key Triggers to use with Triggered Campaign Email are around webshop visitors who have abandoned cart , and customers who have previously made an order in your store.
Below are descriptions of the logic behind Triggered Campaign Emails sent to customers based on these triggers: