FAQ
Running into issues with your custom integration? This FAQ covers the most common problems and their solutions, from single-page apps to tracking sales.
Single-page apps #
These are also called Progressive Web Apps (PWA) and generally load the site as a single page, rather than loading individual pages as normal.
When a page is loaded for the first time, the Clerk.js library automatically fires a function to render all Element blocks on that page.
However, for single-page apps using frameworks like vue.js or next.js, pages are rendered with JavaScript rather than a standard page load.
Due to this, you need to control the rendering with Clerk.js to match how you load pages in the app.
Include Clerk.js #
Clerk.js only needs to be loaded once, when the site is initially loaded.
After this, the library will be available throughout the session.
Include it just before the </head> in your HTML:
<!-- Start of Clerk.io E-commerce Personalisation tool - www.clerk.io -->
<script type="text/javascript">
    (function(w,d){
    var e=d.createElement('script');e.type='text/javascript';e.async=true;
    e.src='https://cdn.clerk.io/clerk.js';
    var s=d.getElementsByTagName('script')[0];s.parentNode.insertBefore(e,s);
    w.__clerk_q=w.__clerk_q||[];w.Clerk=w.Clerk||function(){w.__clerk_q.push(arguments)};
    })(window,document);

    Clerk('config', {
    key: 'INSERT_PUBLIC_API_KEY'
    });
</script>
<!-- End of Clerk.io E-commerce Personalisation tool - www.clerk.io -->
Control rendering #
By default, Clerk.js renders any elements that have the class clerk, regardless of whether it’s inserted during initial page load or when the DOM mutates.
You can control the timing by inserting the element when it’s ready to be rendered.
Alternatively, you can control rendering with the function Clerk("content", "SELECTOR").
Every time a page is loaded, do these steps in order:
Add the Clerk snippet to the HTML with a unique selector you can target.
Run
Clerk("content", "SELECTOR")to render it.
When the visitor leaves the page, destroy the snippet, and render it again if the visitor returns to the same page.
This is to ensure Clerk.js does not see the snippet as previously rendered, causing it to not visualize.
Example:
<span
  id="clerk-custom-snippet"
  data-template="@home-page-visitor-recommendations">
</span>

<script>
  Clerk("content", "#clerk-custom-snippet")
</script>
Clerk.js can also be configured to automatically initialize Elements with your custom selectors after the first time you render it.
Pagespeed impact #
Adding an external tool like Clerk.js will increase the time it takes to load your site, but it is negligible compared to the additional conversions it will provide.
Below you can see how it impacts your site’s performance.
Performance #
The Clerk.js library is only 37.5kb in size, so it loads very quickly.
Also, it loads elements asynchronously, which means that the rest of the page loads while Clerk.js renders content.
An increase in the load time of a page most often comes from loading more images than previously, since Clerk’s search results and recommendations work best when they are visually appealing.
To minimize the extra load time, we recommend using images in webp format that have a resolution matching the size they have in the Clerk elements.
For example, if images in recommendations have a resolution of 400x400px in desktop view, send images in a resolution of maximum 420x420px or similar.
Google Page Speed #
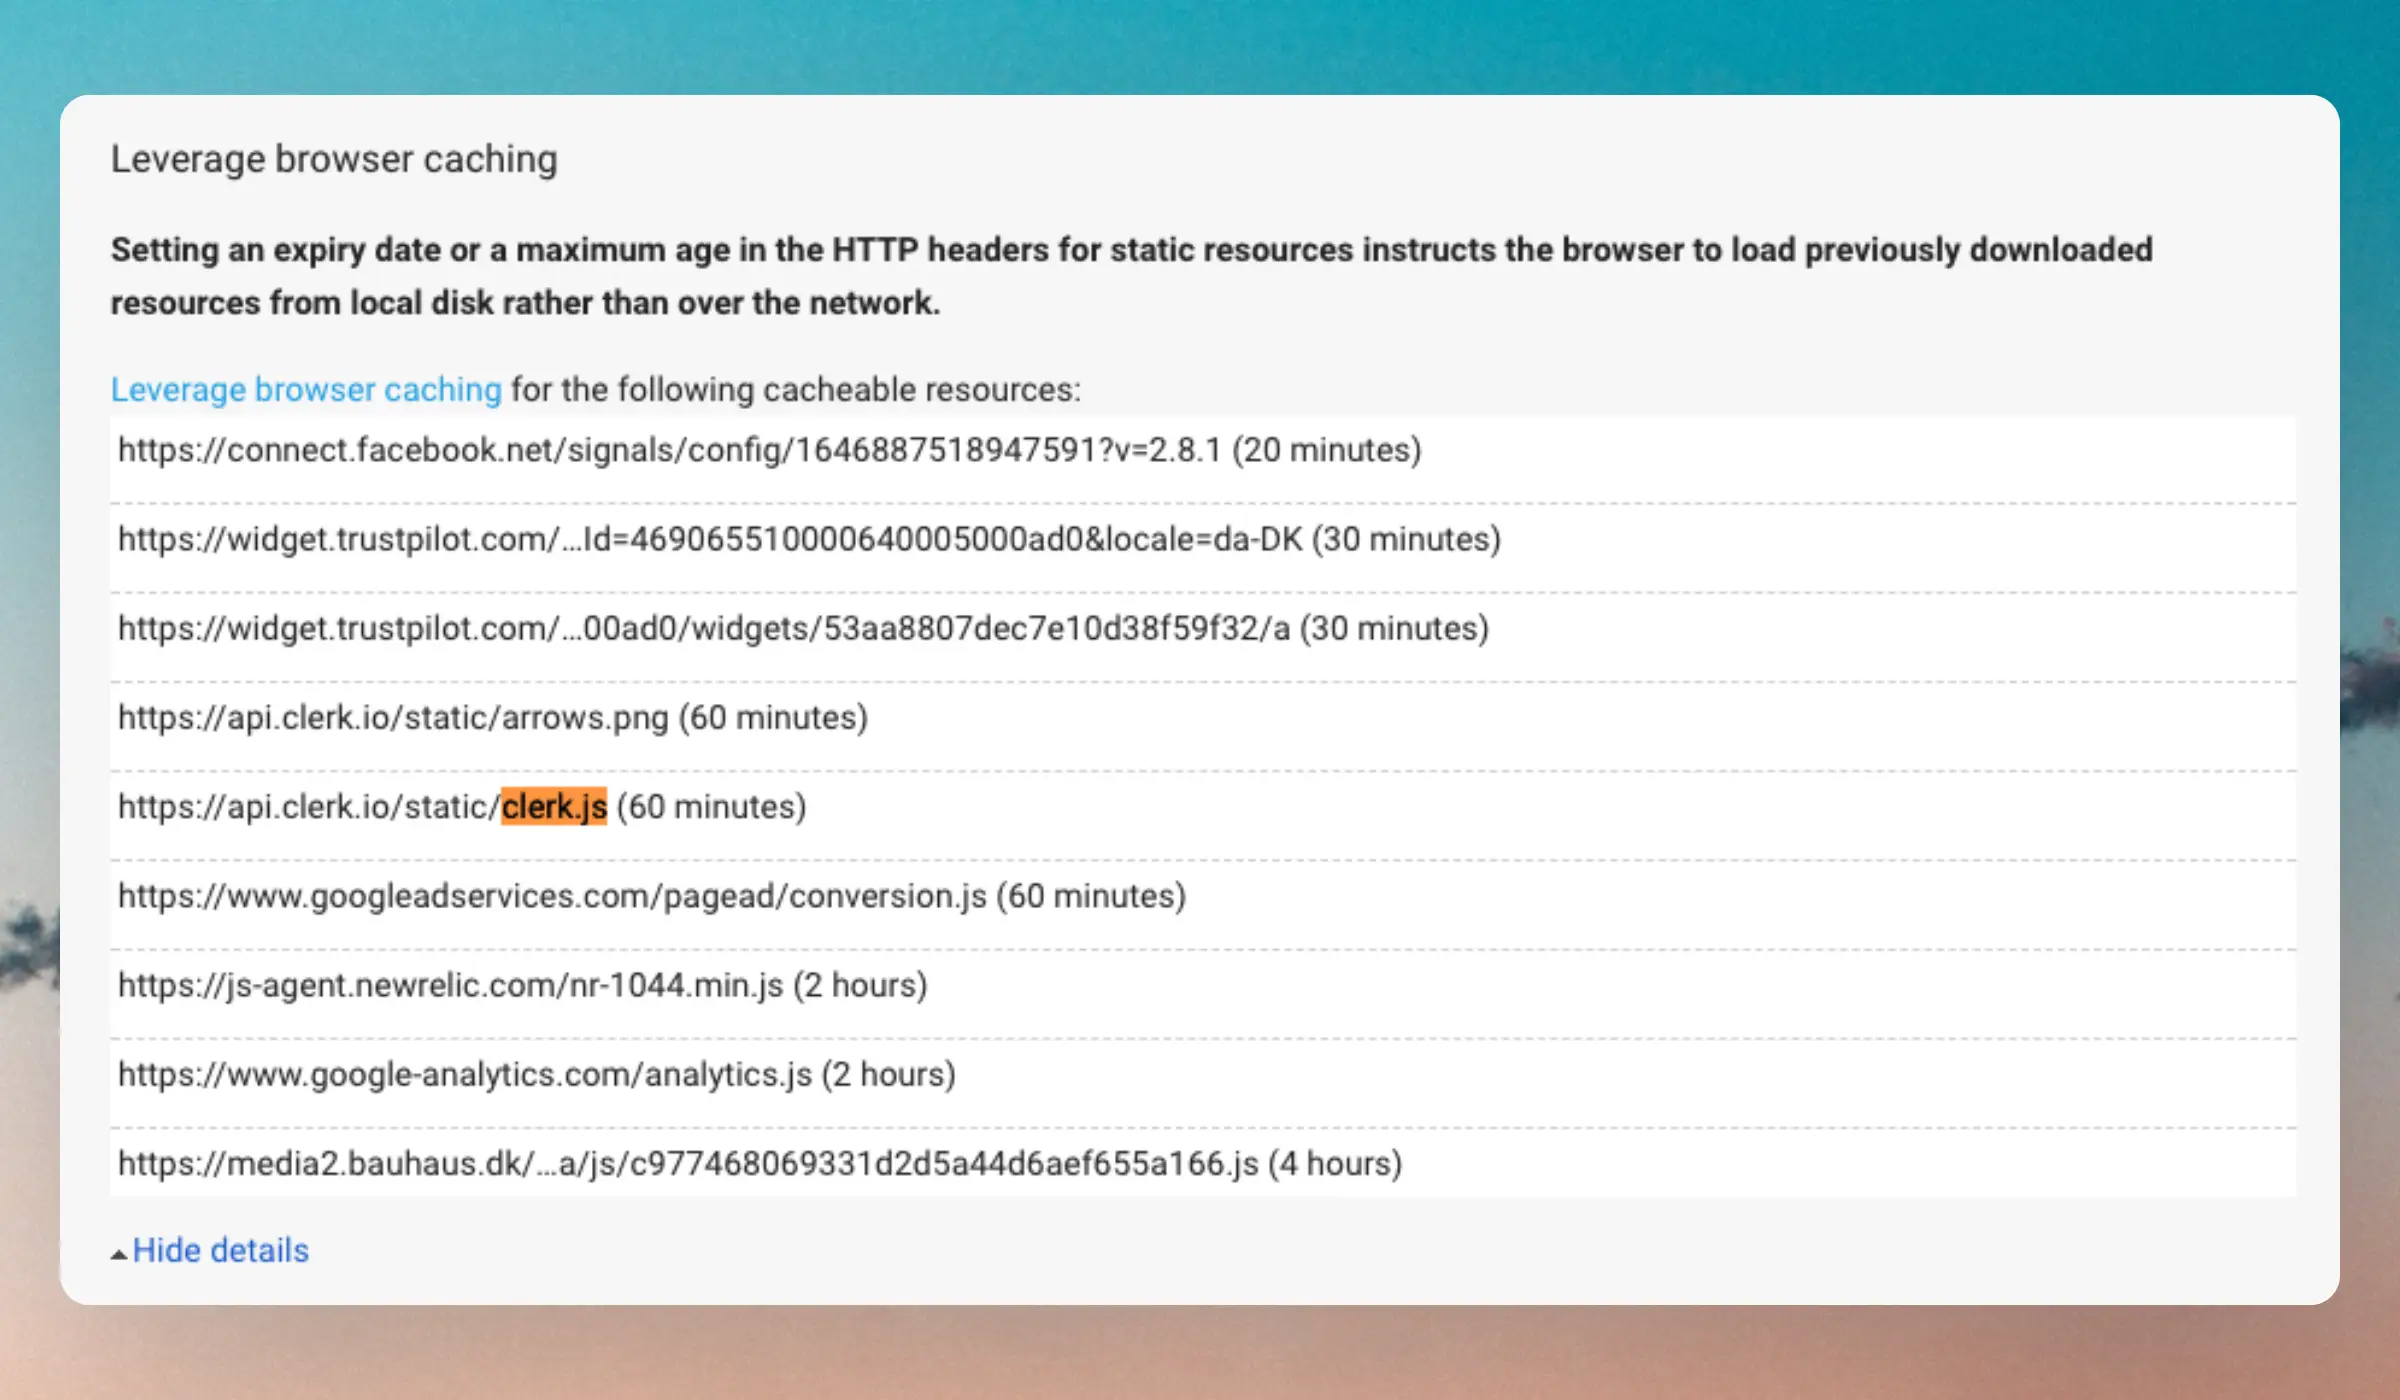
If you use Google Page Speed Insights or a similar tool to analyze your site’s performance, you might see Clerk.js listed under Leverage browser caching.
The purpose of Clerk.js is to make it super simple to insert results from Clerk into any website.
Clerk.js contains many features to handle tracking and UI components such as Instant Search, sliders, popups and more.
When we add new UI features or make improvements to existing ones, they are included in Clerk.js and must be downloaded by the end user in order to use them.
Having a cache expiry of 60 minutes means that when we release new features they will be available to everyone within a maximum of 60 minutes.
The longer the cache time, the longer it takes for everyone to have access to the newest features.
The important thing is that end users only have to download Clerk.js once when new features are available.
The 60 minute cache expiry just means that the end user’s browser will check in with Clerk every 60 minutes.
If no changes have been made to Clerk.js, nothing will be downloaded.
The cache expiry time of 60 minutes is thus a tradeoff between minimizing web requests and seeing new features and improvements.
Most sessions are shorter than 60 minutes and so the request will only be made once per session.
As you can see in the screenshot, this is a normal practice that (as well as Clerk) is used by Google Analytics, Facebook, Trustpilot and many others.
CLS impact #
Cumulative Layout Shift (CLS) can negatively impact SEO and user experience when dynamically injected content shifts elements on a page.
In some cases, among other factors, Clerk can contribute to the CLS score.
You can read more about CLS here.
Follow this guideline only in the case your CLS score is higher than 0.2 and Clerk elements are above the fold.
In order to prevent content from shifting, there is a need of reserving a placeholder for Clerk recommendations before Clerk.js inject them.
To do so, we need to add a minimum height based on expected content height.
Example of code:
.clerk-slider-wrapper {
    min-height: 300px; /* Adjust based on expected content height */
    width: 100%;
}
Making API calls #
You can use Clerk.js to make API calls, by using the built in function Clerk("call").
This function takes 3 arguments:
An API endpoint
A JSON dictionary of parameters
A callback function to handle the response
Requests #
Below is an example script that requests the 10 most popular products and logs the response to the console.
The response contains a JavaScript object with the status of the API call, and the result.
Script #
function popularProducts(){
  Clerk("call",
    "recommendations/popular",
    {
      limit: 10,
      labels:["Home Page / Bestsellers"]
    },
    function(response){
      console.log(response);
    },
    function(response){
      console.error(response);
    }
  );
}
Response #
__clerk_cb_1(
  {
    "status":"ok",
    "count":72,
    "facets":null,
    "result":[399,410,551,338,403,439,425,402,406,456]
  }
);
Callbacks #
When you make API calls, you can use callback functions to handle the response as you see fit.
The functions take response as an argument which contains all data returned by the API.
Below is an example that creates a list of HTML elements linking to categories matching the query “men”.
Clerk("call",
  "search/categories",
  {
      'query': "men",
      'limit': "10"
  },
  function(response) {
      var cat = response.categories;
      if (cat.length > 0) {
          let heading = document.createElement('h3');
          heading.textContent = 'Related Categories';
          document.querySelector('#your-target').append(heading);
      }
      for (var index in cat) {
          var clerkName = cat[index].name;
          var clerkUrl = cat[index].url;
          let link = document.createElement('a');
          link.href = clerkUrl;
          link.textContent = clerkName;
          document.querySelector('#your-target').append(link);
      }
  }
)
Add-to-cart buttons #
These buttons work differently for each platform and the functionality can change depending on plugins you use.
Because Clerk’s designs consist of HTML & CSS, you can usually add this functionality if you understand how it works on your site.
General approach #
Some add-to-cart buttons require JavaScript to run, in order for them to work.
In these cases, you can add the functionality to Clerk’s existing cart method.
Check how to do this in our developer docs here.
Inspect the add-to-cart button to identify the code associated with it, e.g. on a category page.
The code will usually be a <div> or a button element.
Copy the whole button HTML.
Copy and paste this code into your Design.
Now you need to identify the variables in the code.
Most often, you need to find where the code uses:
Product ID
Product quantity
Replace the values for the product ID with the Liquid variables for these data points.
The ID will always be {{ product.id }} and the quantity will differ depending on how you are sending the data.
For this example it could be {{ product.qty }}.
Paste your code into the HTML of your Design and test it to make sure it works.
Example #
The add-to-cart button below is a <div> that has the class button-container:
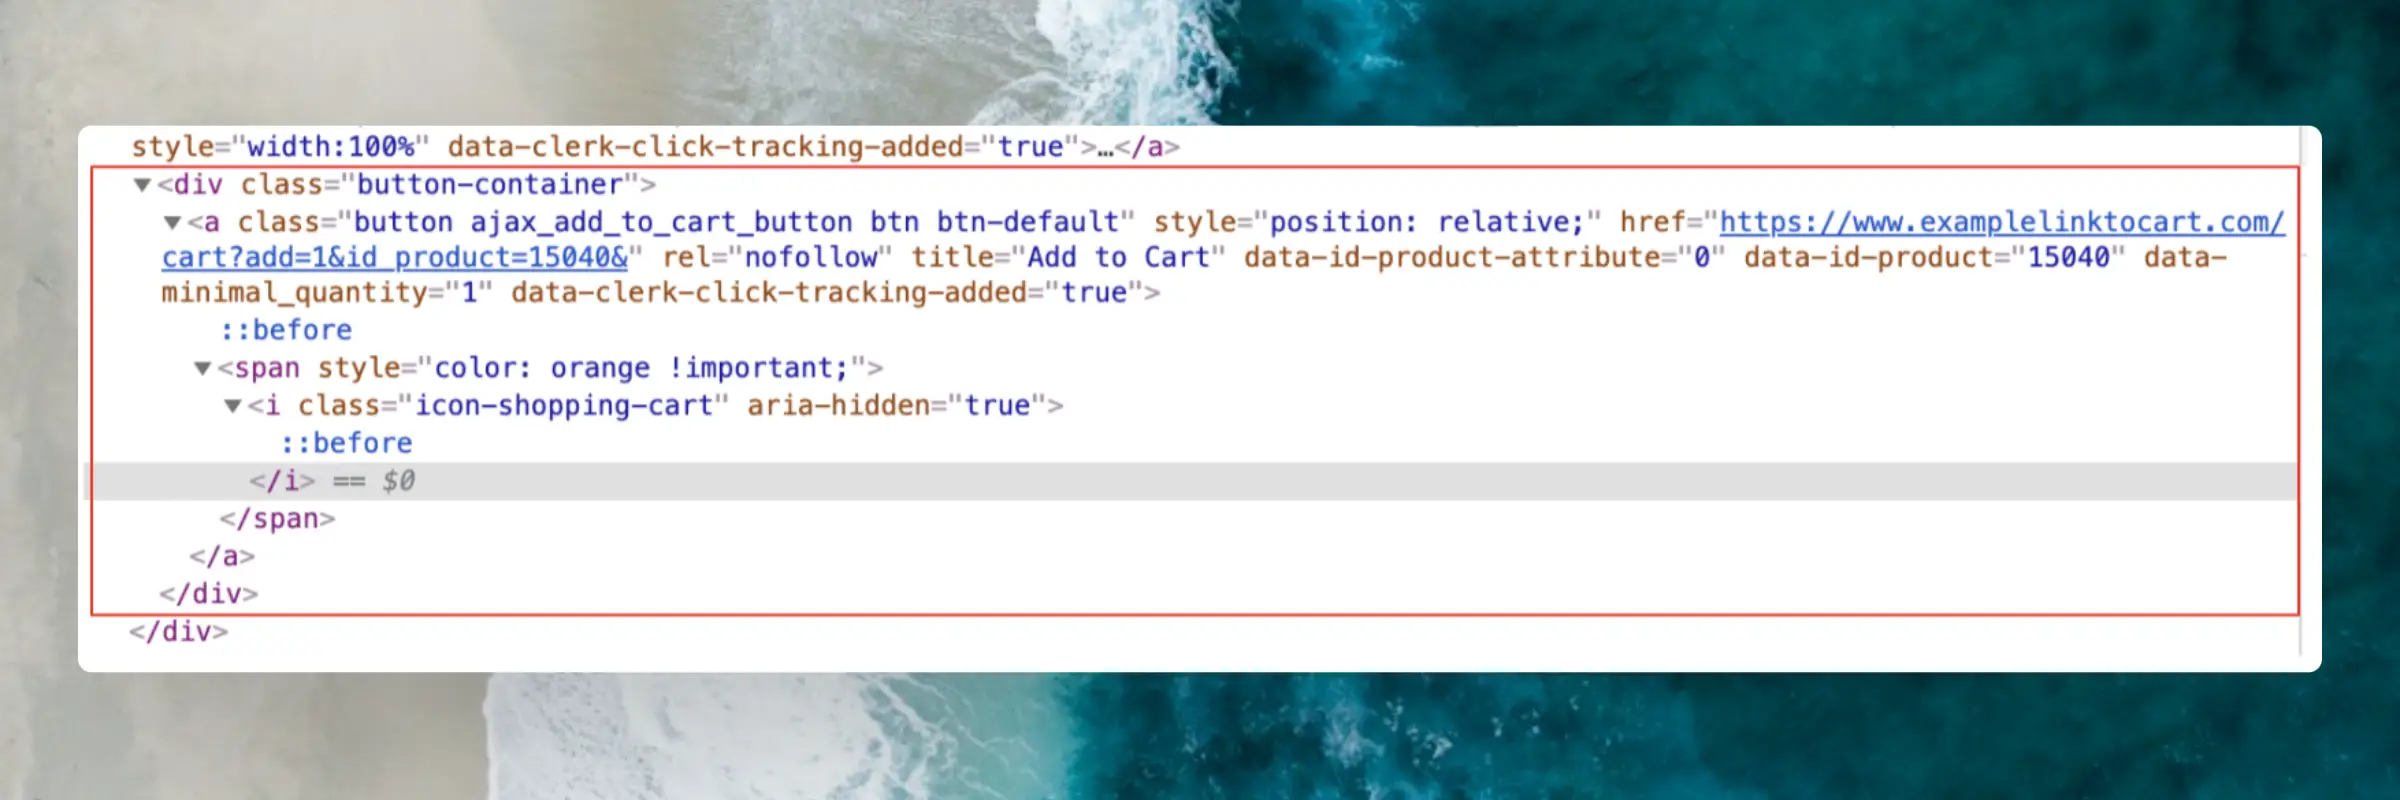
The quantity is found inside the cart link after /cart?add= and the Product ID is found just after &id_product=.
The product ID is also referenced in data-id-product, and the product quantity is referenced in .data-minimal_quantity.
These values should be replaced with Liquid tags in the Design so the appropriate product IDs and quantities are used in the HTML output.
With these changes, the final add-to-cart button will look like this:
<div class="button-container">
<a
class="button ajax_add_to_cart_button btn btn-default"
style="position: relative;"
href="https://www.examplelinktocart.com/cart?add={{ product.qty }}&id_product={{ product.id }}&"
rel="nofollow"
title="Add to Cart"
data-id-product-attribute="0"
data-id-product="{{ product.id }}"
data-minimal_quantity="{{ product.qty }}">
<span style="color: orange !important">
<i class="icon-shopping-cart" aria-hidden="true"></i>
</span>
</a>
</div>
Console errors #
Clerk.js logs many errors to the console, which you can use to debug issues.
By clicking the error link you will get more information about what went wrong, which you can use to debug the error yourself, or to send to our support team who will help you out.
Below you will find a list of the most common errors.
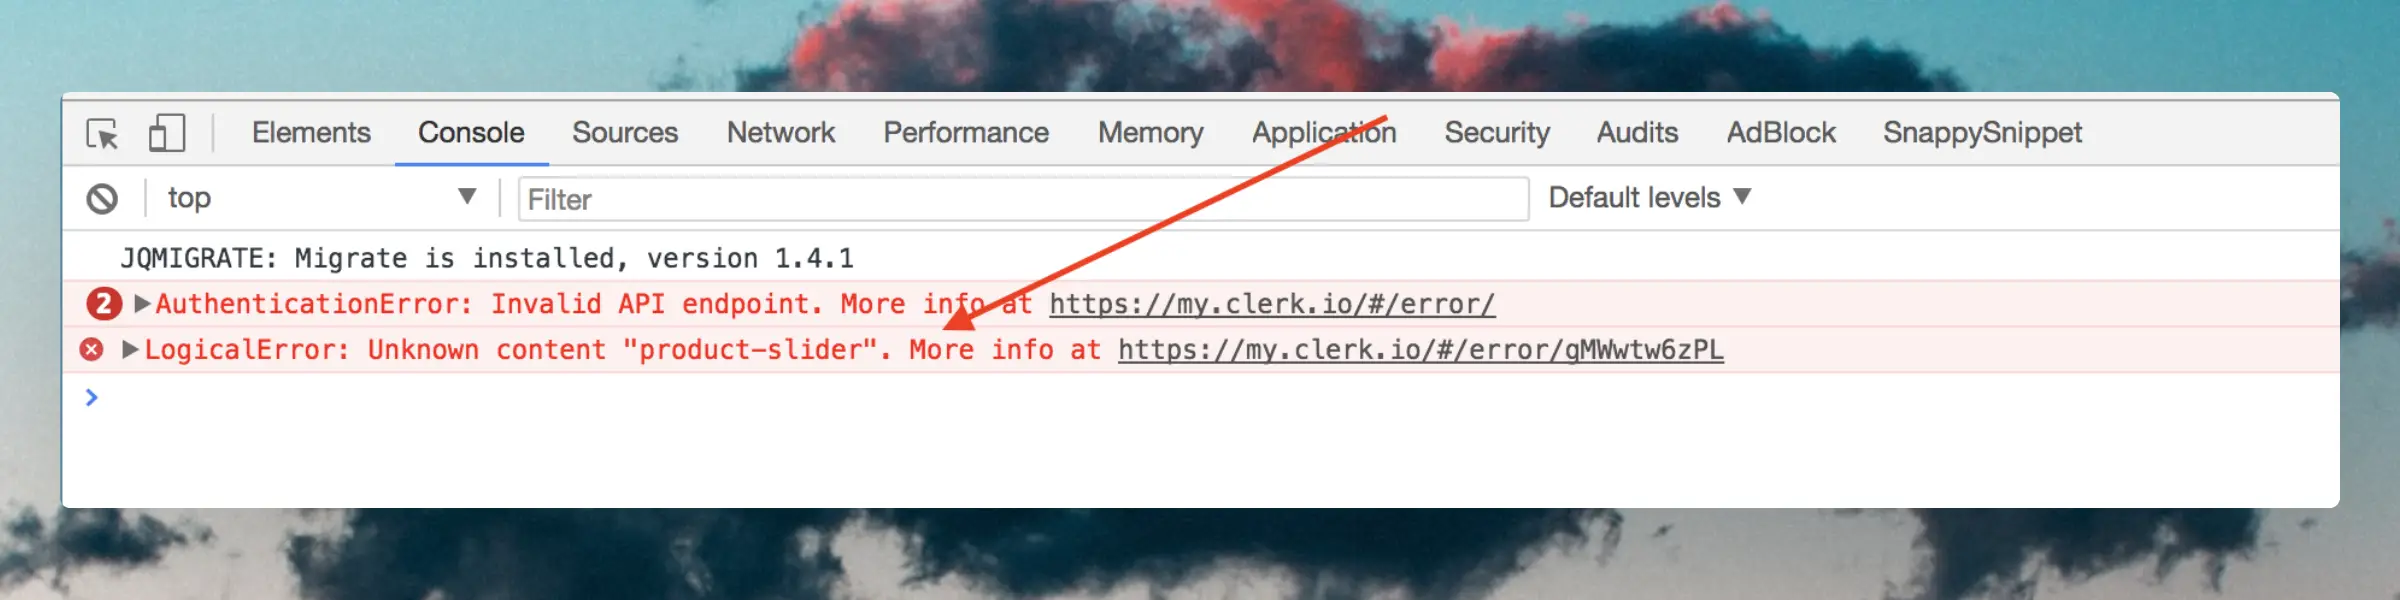
Unknown content #
This error will show if the snippet you inserted is referencing an
Element that does not exist, in the data-template attribute.
To fix it, make sure that the name in the embed code matches an Element block you have created in my.clerk.io.
You can click Edit Element for any Element, to see what the reference should be.

Invalid API endpoint #
This error happens if you have used the class clerk in your HTML somewhere.
This class is reserved for use with our snippets, as Clerk.js uses this class to identify the elements to render.
To fix it, make sure that you name the class something else, like clerk-product.
Invalid product argument #
This error means that the supplied ID for a product has a wrong type or syntax.
For example, if your product IDs are integers they also need to be so in the embed code.
Also, remember the brackets around the ID, to make it a list.
<span
  class="clerk"
  data-template="@product-page"
  data-products="[123]">
</span>
Invalid category argument #
This error means that the supplied ID for a category has a wrong type or syntax.
In most cases, it happens if the placeholder in the category embed code has not been replaced by an actual ID:
<span
  class="clerk"
  data-template="@category-page"
  data-category="INSERT_CATEGORY_ID">
</span>
The output of the code should contain the ID of the category:
<span
  class="clerk"
  data-template="@category-page"
  data-category="257">
</span>
If you copied the snippet manually, make sure to select your shop system in the Choose your platform dropdown before copying the snippet.
It will then change to include your platform’s logic to select the correct category ID.
If your platform is not listed, you need to manually add the logic to select the correct category ID based on your webshop’s functionality.
Incorrect API key #
This error will show if the public API key you have provided does not match any account in Clerk.
To fix this, login to my.clerk.io, and go to Developers > API Keys.
Here you can find the Public API Key which you can then add to your Clerk.js tracking script either directly in the code, or in the settings for your integration, depending on your platform.
POS/ERP sales data #
For some webshops, it’s relevant to upload sales data from other systems than the actual webshop.
For example, if you want to optimize the algorithm based on sales from a physical store, or B2B store.
Clerk does not differentiate between orders from various sources—as long as you can provide an ID, a timestamp and a list of products that were bought, they can be uploaded to Clerk.
The recommended approach is to use the CRUD API as that allows you to automate the task entirely.
By implementing these API calls, you can send order data directly to your Store in Clerk.
Simply create a POST call to the /orders endpoint in your ERP system or webshop, run the job at regular intervals, e.g. once a month, and you will be able to use offline orders to boost your online recommendations and search results.
Alternatively, you can upload a CSV file manually, without the need to code anything.
You can read more about CSV files here.
Currency conversion #
There are multiple ways of working with currency conversion in Clerk.
A simple way to make it work is outlined below.
Translate currencies #
If visitors use Google Translate on your webshop, price values can be translated in ways that break formatting or change the currency display.
To prevent this, wrap price output in elements that should not be translated.
Recommended markup #
Use both translate="no" and the notranslate class on the price element:
<span class="clerk-price notranslate" translate="no">
  {{ product.price | money }}
</span>
If you show list price and sale price, apply the same pattern to each price value:
<span class="clerk-old-price notranslate" translate="no">
  {{ product.list_price | money }}
</span>
<span class="clerk-new-price notranslate" translate="no">
  {{ product.price | money }}
</span>
Apply locations #
- In your Clerk Design where prices are rendered.
- In any custom HTML wrappers that output price values.
This keeps the rest of the page translatable while preserving correct price and currency formatting.
Send price objects #
Clerk needs to know the prices of each product in the different currencies.
The easiest way to do this is to send them as a string-encoded JSON object of formatted prices, with the currency ISO as their key, in your Data Feed.
"products": [
  {
    "id": 1,
    "name": "Cheese",
    "description": "A nice piece of cheese.",
    "price": 100,
    "list_price": 50,
    "categories": [25, 42],
    "image": "http://example.com/images/products/1.jpg",
    "url": "http://example.com/product/1",
    "on_sale": true,
    // String-encoded JSON examples
    "prices_formatted": "{\"USD\":\"$100\", \"EUR\":\"€87.70\", \"GBP\":\"£68.68\"}",
    "list_prices_formatted": "{\"USD\":\"$120\", \"EUR\":\"€97.70\", \"GBP\":\"£78.68\"}"
  },
  {
    "id": 2,
    "name": "A pound of nuts",
    "description": "That's a lot of nuts!",
    "price": 150,
    "categories": [1],
    "image": "http://example.com/images/products/2.jpg",
    "url": "http://example.com/product/2",
    "on_sale": false,
    // String-encoded JSON example
    "prices_formatted": "{\"USD\":\"$150\", \"EUR\":\"€142\", \"GBP\":\"£120\"}",
    "list_prices_formatted": "{\"USD\":\"$150\", \"EUR\":\"€142\", \"GBP\":\"£120\"}"
  }
]
Create formatter #
In Clerk.js you can define JavaScript functions, that can be used with your Designs.
Here you can define a function that takes your price-dict as argument, and returns the price for a specific currency, based on frontend logic of your choice.
Make sure to replace currency with the currently chosen currency from the frontend.
Clerk('config', {
  key: 'Your_API_Key',
  formatters: {
      currency_selector: function (price_list) {
      const currency = "EUR";
      price_groups_obj = JSON.parse(price_list)
        return price_groups_obj[currency];
      }
  }
});
Use formatter #
After defining the formatter, it can be used in your design with the below syntax:
<div class="price">
   <span class="price">
      {{ product.prices_formatted | currency_selector }}
   </span>
</div>
Customer-specific prices #
To display completely unique prices based on which customer is logged in, create an Event in Clerk that inserts the correct price before the products are rendered.
Events are JavaScript functions that are run before or after Clerk shows products.
This method is possible to use if you can look up prices from your server, directly from a JavaScript function, in the frontend based on a product ID and a customer ID.
For showing individual customer prices, the code should run right after the response.
Below is an example of a simple event.
<span class="clerk" data-template="@home-page-popular"></span>

<script>
  Clerk('on', 'response', function(content, data) {
     console.log(data.result);
  });
</script>
The function takes the argument data which is the entire response that Clerk sends back from the API.
Individual customer prices #
If you need to display completely unique prices based on which customer is logged in, you need to setup an Event that inserts the correct price after the products are rendered.
Events are JavaScript functions that are run before or after Clerk shows products.
This approach assumes that you can look up prices from your server with an AJAX call in the frontend based on e.g. a product ID and a customer ID.
The best way is to first create a placeholder price container in your design, and then replace it with the price returned from your AJAX call.
An example:
<div class="clerk-price-container">
   <span class="clerk-price">
      Loading price...
   </span>
</div>
You can then use the Clerk event to wait for the products to be rendered, make a request to your price server using the product ID and the ID of the customer, before replacing it in the HTML.
Here is an example of doing this:
<script>
  var customer_id = INSERT_CUSTOMER_ID;
  Clerk("on", "rendered", function(content, data){
    for (i = 0; i < data.product_data.length; i++) {
        var product = data.product_data[i];
          var custom_price = FETCH_PRICE_FROM_SERVER(product.id,customer_id);
          let price_container = document.querySelector(`[data-clerk-product-id='${product.id}'] .clerk-price`);
          price_container.innerText = custom_price;
      }
  })
  </script>
The above code assumes that you can identify a logged in customer with INSERT_CUSTOMER_ID and that you have a function like FETCH_PRICE_FROM_SERVER that returns the price for the product based on the customer.
price_container is used to target the right product based on the ID that’s available in data-clerk-product-id, which is appended to all products by Clerk.js.
Finally it replaces the inner text, “Loading price…” in this example, with the price returned from your AJAX call.
Customer group prices #
The setup of customer group prices consists of 4 steps:
Include the various prices in the data feed.
Include a global variable fetching the current customer group ID.
Create a function to fetch the relevant price.
Show the price in the Design.
Include price objects #
Start by adding an attribute to all products which contains all of the various pricing options, making sure to correlate each price to a particular customer group.
This should be sent as a JSON object. For example:
"customer_group_prices": {
  "GROUP1": 100,
  "GROUP2": 202,
  "GROUP3": 309
}
Customer ID variable #
Add a dynamic global variable to Clerk.js which fetches the customer-group ID of the current customer and adds it as the value.
The Customer Group ID value must be equivalent to the key of its corresponding price in the Data Feed.
For example, a user that should see the price for group 2, then the ID should be “GROUP2”.
Clerk('config', {
  globals: {
    customer_group: "GROUP2"
  }
});
Fetch price #
You can now create a Formatter, which takes the customer_group as an argument and returns the relevant price.
Do this by writing a function that fetches the price from the specific customer group as the key in the price-dict based on the customer_group ID.
Add this in the Clerk.js config. Below is an example called getPrice:
Clerk('config', {
  globals: {
    customer_group: "GROUP2"
  },
  formatters: {
    getPrice: function (prices, customer_group) {
      return prices[customer_group];
    }
  }
});
Show price #
When the getPrice formatter has been created, you can name it directly in your Design, along with the customer_group_prices list that you created in step 1:
<li style="text-align: center; width: 180px;">
	<a href="{{ product.url }}">
		<img src="{{ product.image }}" />
		{{ product.name }}
	</a>
	<div class="price">
		{{ product.customer_group_prices | getPrice customer_group }}
	</div>
</li>
HTTP authentication #
HTTP authentication is often used on staging sites to avoid unwanted visitors.
This will, in many cases block the Clerk importer as well and typically display a 401 Unauthorized error in the sync log.
You can fix this by inserting the authentication info in the import URL.
In my.clerk.io > Data > Configuration, update your import URL like this:
http://USER:PASS@www.ewoksRus.com/JSONFEED
No tracked orders #
In my.clerk.io, Tracked Orders and Order Details are merged into a single Orders page.
Clerk needs to continuously track sales from the webshop to keep results up-to-date with your customers’ behaviour.
However, some settings in a webshop may cause the sales-tracking to fail.
Below, you can find out how to debug the sales-tracking when using a Clerk.js setup and see what the most common issues and solutions are.
Before you start #
Make sure that you have installed:
The Clerk.js tracking script on all pages.
The Sales-tracking script on your Order Success page.
These are required to track sales in general when you use a Clerk.js setup.
Check logs #
In most cases, sales tracking fails due to errors in the visitor IDs or product IDs of the sale call that is sent to Clerk after a purchase has been completed.
To debug this, you’ll have to make a test order.
However, in some cases it might be related to the sales tracking script itself and can be debugged by looking at the logs in my.clerk.io > Developers > Logs.
If the sales-tracking is failing because of an error in your script, you will often be able to see the error in this page.
Click Details to see more.
If you cannot see any errors in logs, the easiest way to identify other sales-tracking issues is to place a test order.
Test order debugging #
In this example, we use Chrome to show how to debug sales tracking with a test order, but other browsers have similar features.
On your webshop, put a couple of products in the basket.
Proceed to Checkout.
Before placing the order, open your browser’s Console.
Find Network, and search for “clerk”.
Place the order, so you see the order confirmation page.
Click the call that starts with sale (normally sale?key=…).
Here you will see the data that is sent to and received by the sales-tracking API endpoint.
Click Preview to identify any errors that can cause sales to not be tracked.
Below are common errors associated with sales-tracking.
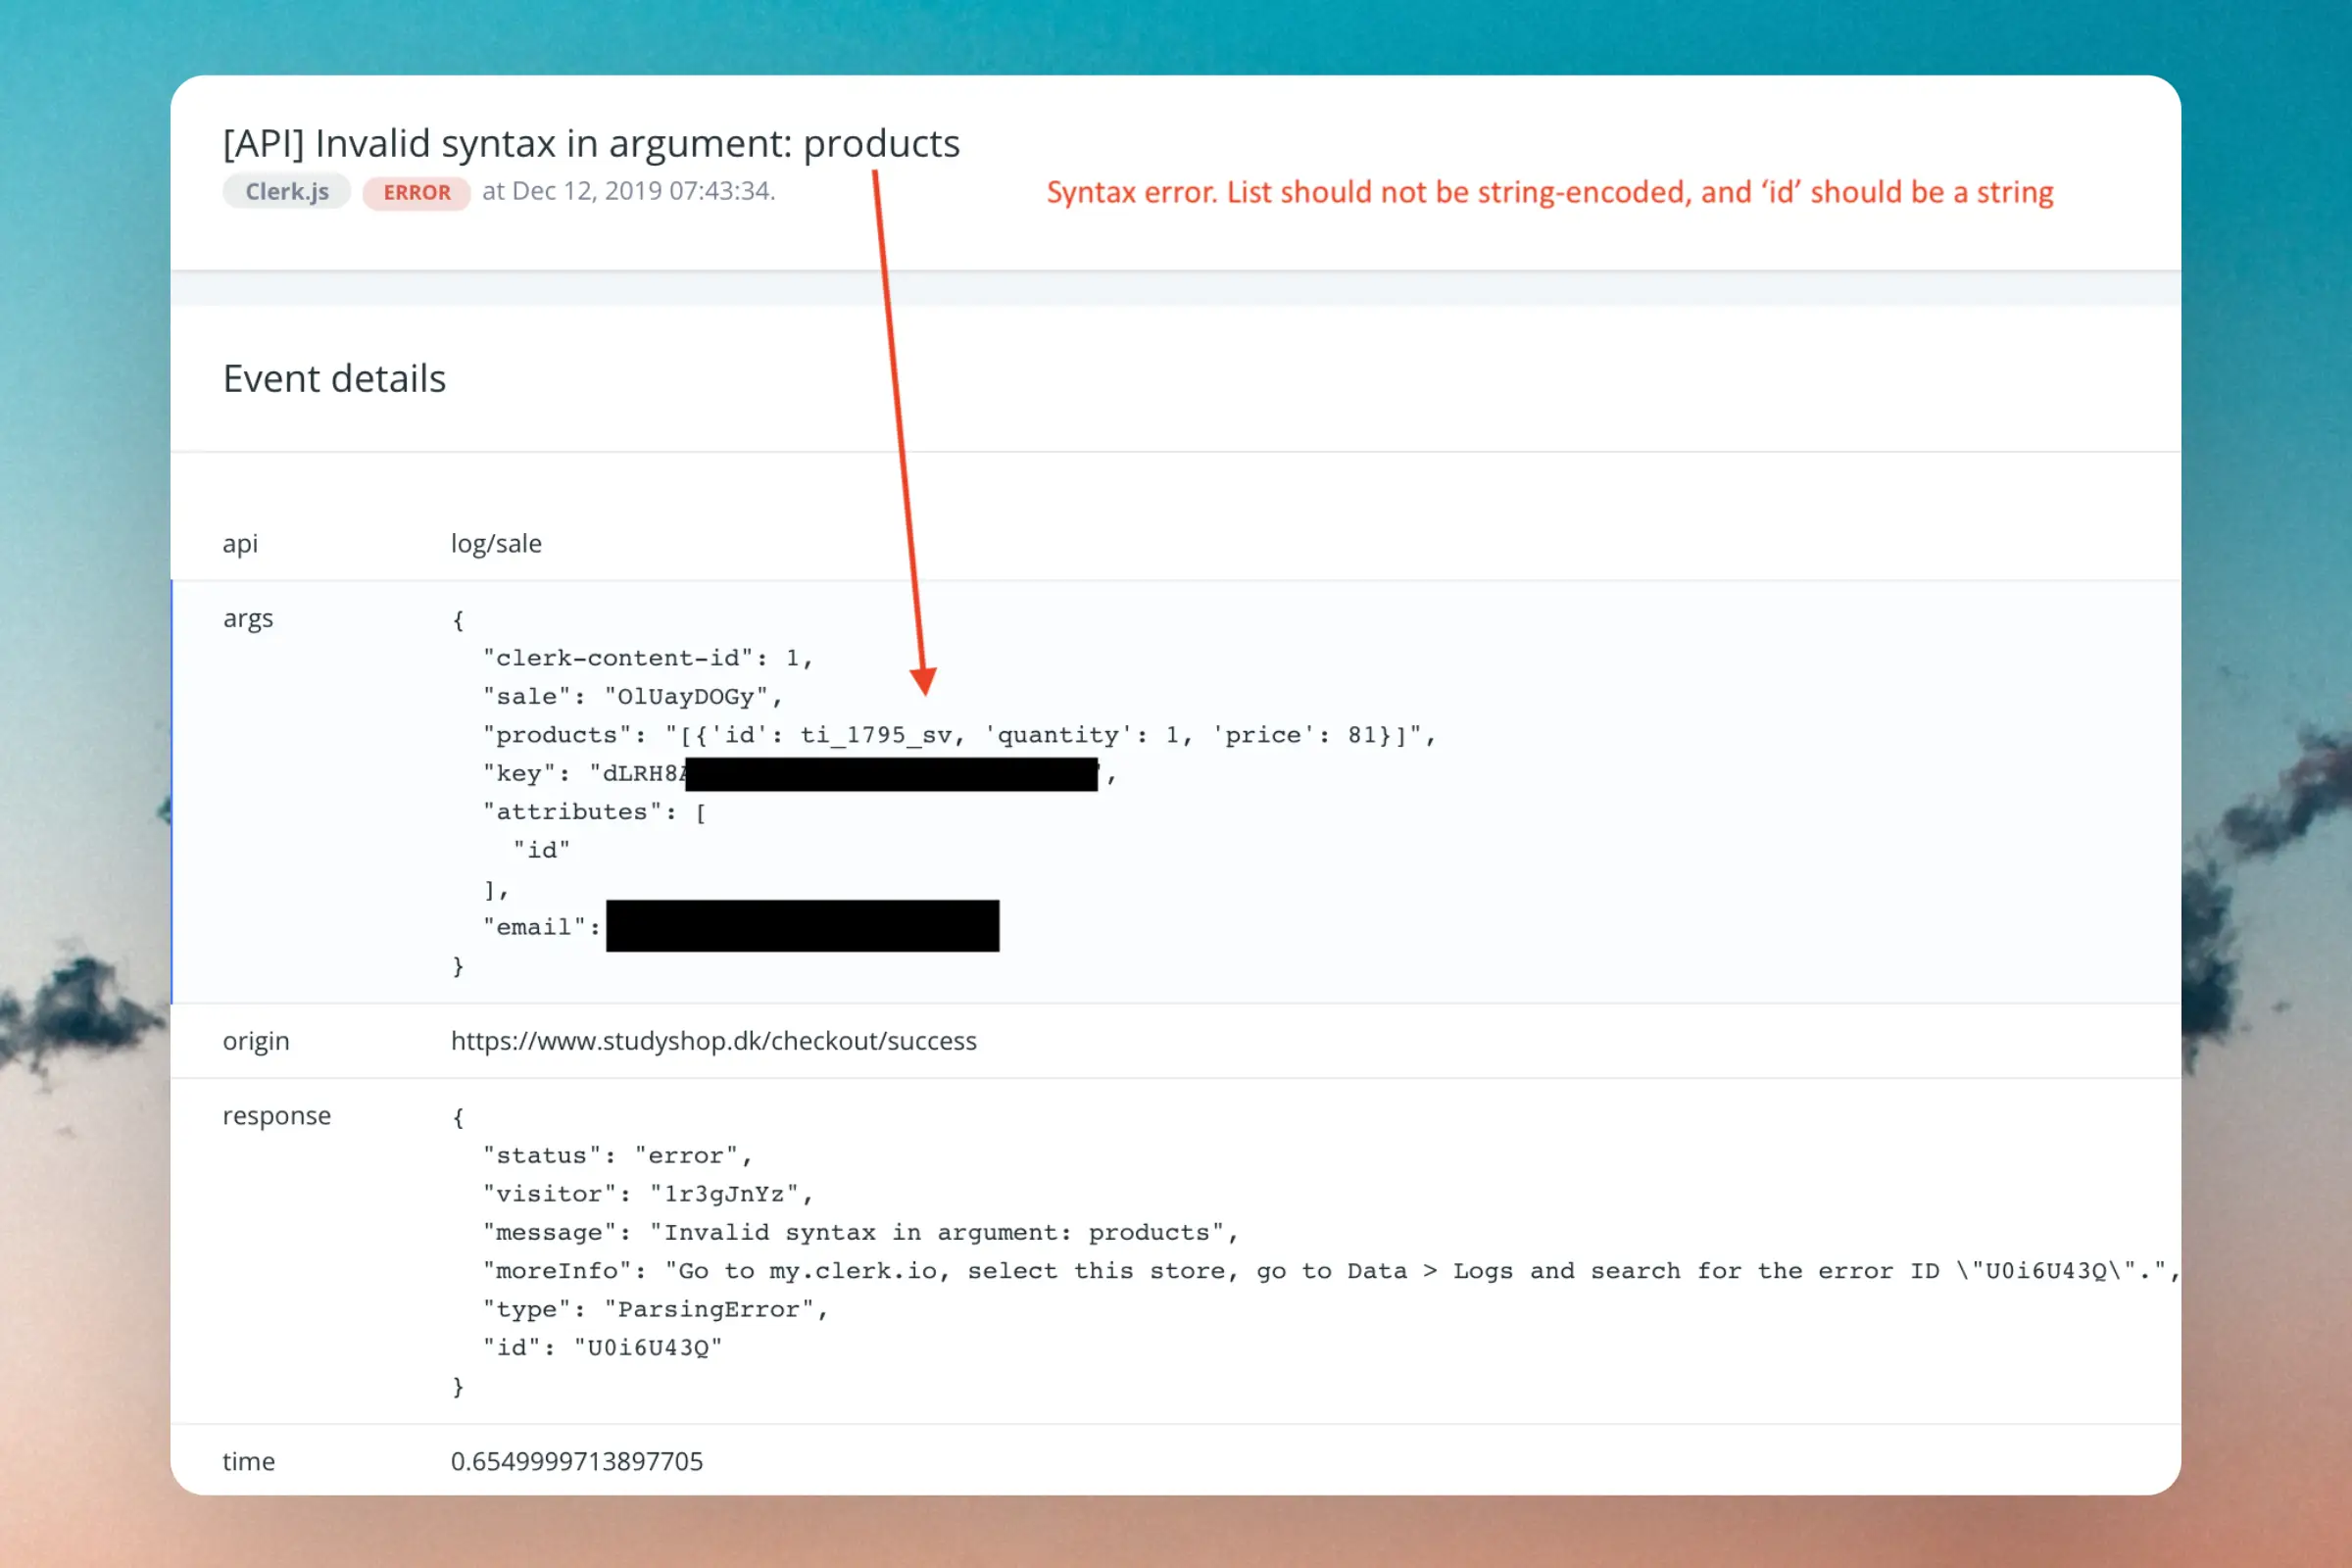
Invalid products syntax #
This error happens if the product IDs you send have a wrong syntax.
The most common errors are:
The product-IDs are string-encoded in the sales-tracking, but you are using Integers in Clerk or vice-versa.
The list of product IDs contain text-formatting characters instead of pure JSON:
"products":\[\\"id"\\:\\"123-m"\\\].
Missing argument #
This means that you are not sending all the data Clerk needs to track the sale.
Make sure you include all the necessary data attributes in the sales-tracking.
No call made #
If you can’t see the call to sale even with both scripts installed, then something has caused the Clerk.js script to be loaded incorrectly.
Test this by following these steps:
Open the Console in your browser.
Type in “Clerk”.
If Clerk.js has not been loaded correctly, you will see a ReferenceError:
Uncaught ReferenceError: Clerk is not defined
If this is the case, you need to check your Clerk.js setup:
Make sure Clerk.js is installed on all pages.
Make sure it’s not blocked by other JavaScript functionality.
Iubenda blocking #
If you use iubenda for cookie consent (especially with Automatic blocking) and a visitor rejects cookies, iubenda can block Clerk’s scripts or requests.
This typically means that:
- The
salerequest is never sent, so the order is not tracked or not attributed in Clerk. - Clerk elements may not render at all, or Clerk.js may log a console error about being loaded multiple times (because iubenda rewrites/defers scripts).
Fix: allowlist Clerk.io in iubenda #
In iubenda, allowlist Clerk so it is not blocked when the visitor rejects cookies.
As a minimum, make sure these domains are allowlisted:
cdn.clerk.io(Clerk.js)api.clerk.io(tracking and sales requests)
The exact UI labels vary in iubenda, but this is usually found under your iubenda project’s Cookie Solution settings for Automatic blocking (allowlist/whitelist/ignore list).
For iubenda’s own guidance, see their article on over-blocking in automatic blocking mode: https://www.iubenda.com/en/help/153445-what-to-do-when-the-automatic-blocking-mode-is-blocking-too-much/.
Verify the fix #
After updating iubenda’s settings:
- Load the webshop, reject cookies, and open the browser console.
- Confirm Clerk.js is available (for example,
typeof Clerkshould not be"undefined"). - Run
Clerk("debug"), place a test order, and confirm that asalerequest is sent to Clerk and returnsstatus: "ok".
No Clerk impact #
If you successfully track sales in my.clerk.io, but none of them are shown as impacted by Clerk, you might have an error in your visitor-tracking / click-tracking setup.
Start by making sure that visitor-tracking works, by doing the following:
Click on any product through Clerk’s Search or Recommendations.
Proceed to place an order containing this product.
Log in to my.clerk.io and go to Orders.
Wait for the Order to show up.
If visitor-tracking is working, you will see the value added by Clerk in the order details on the Orders page:
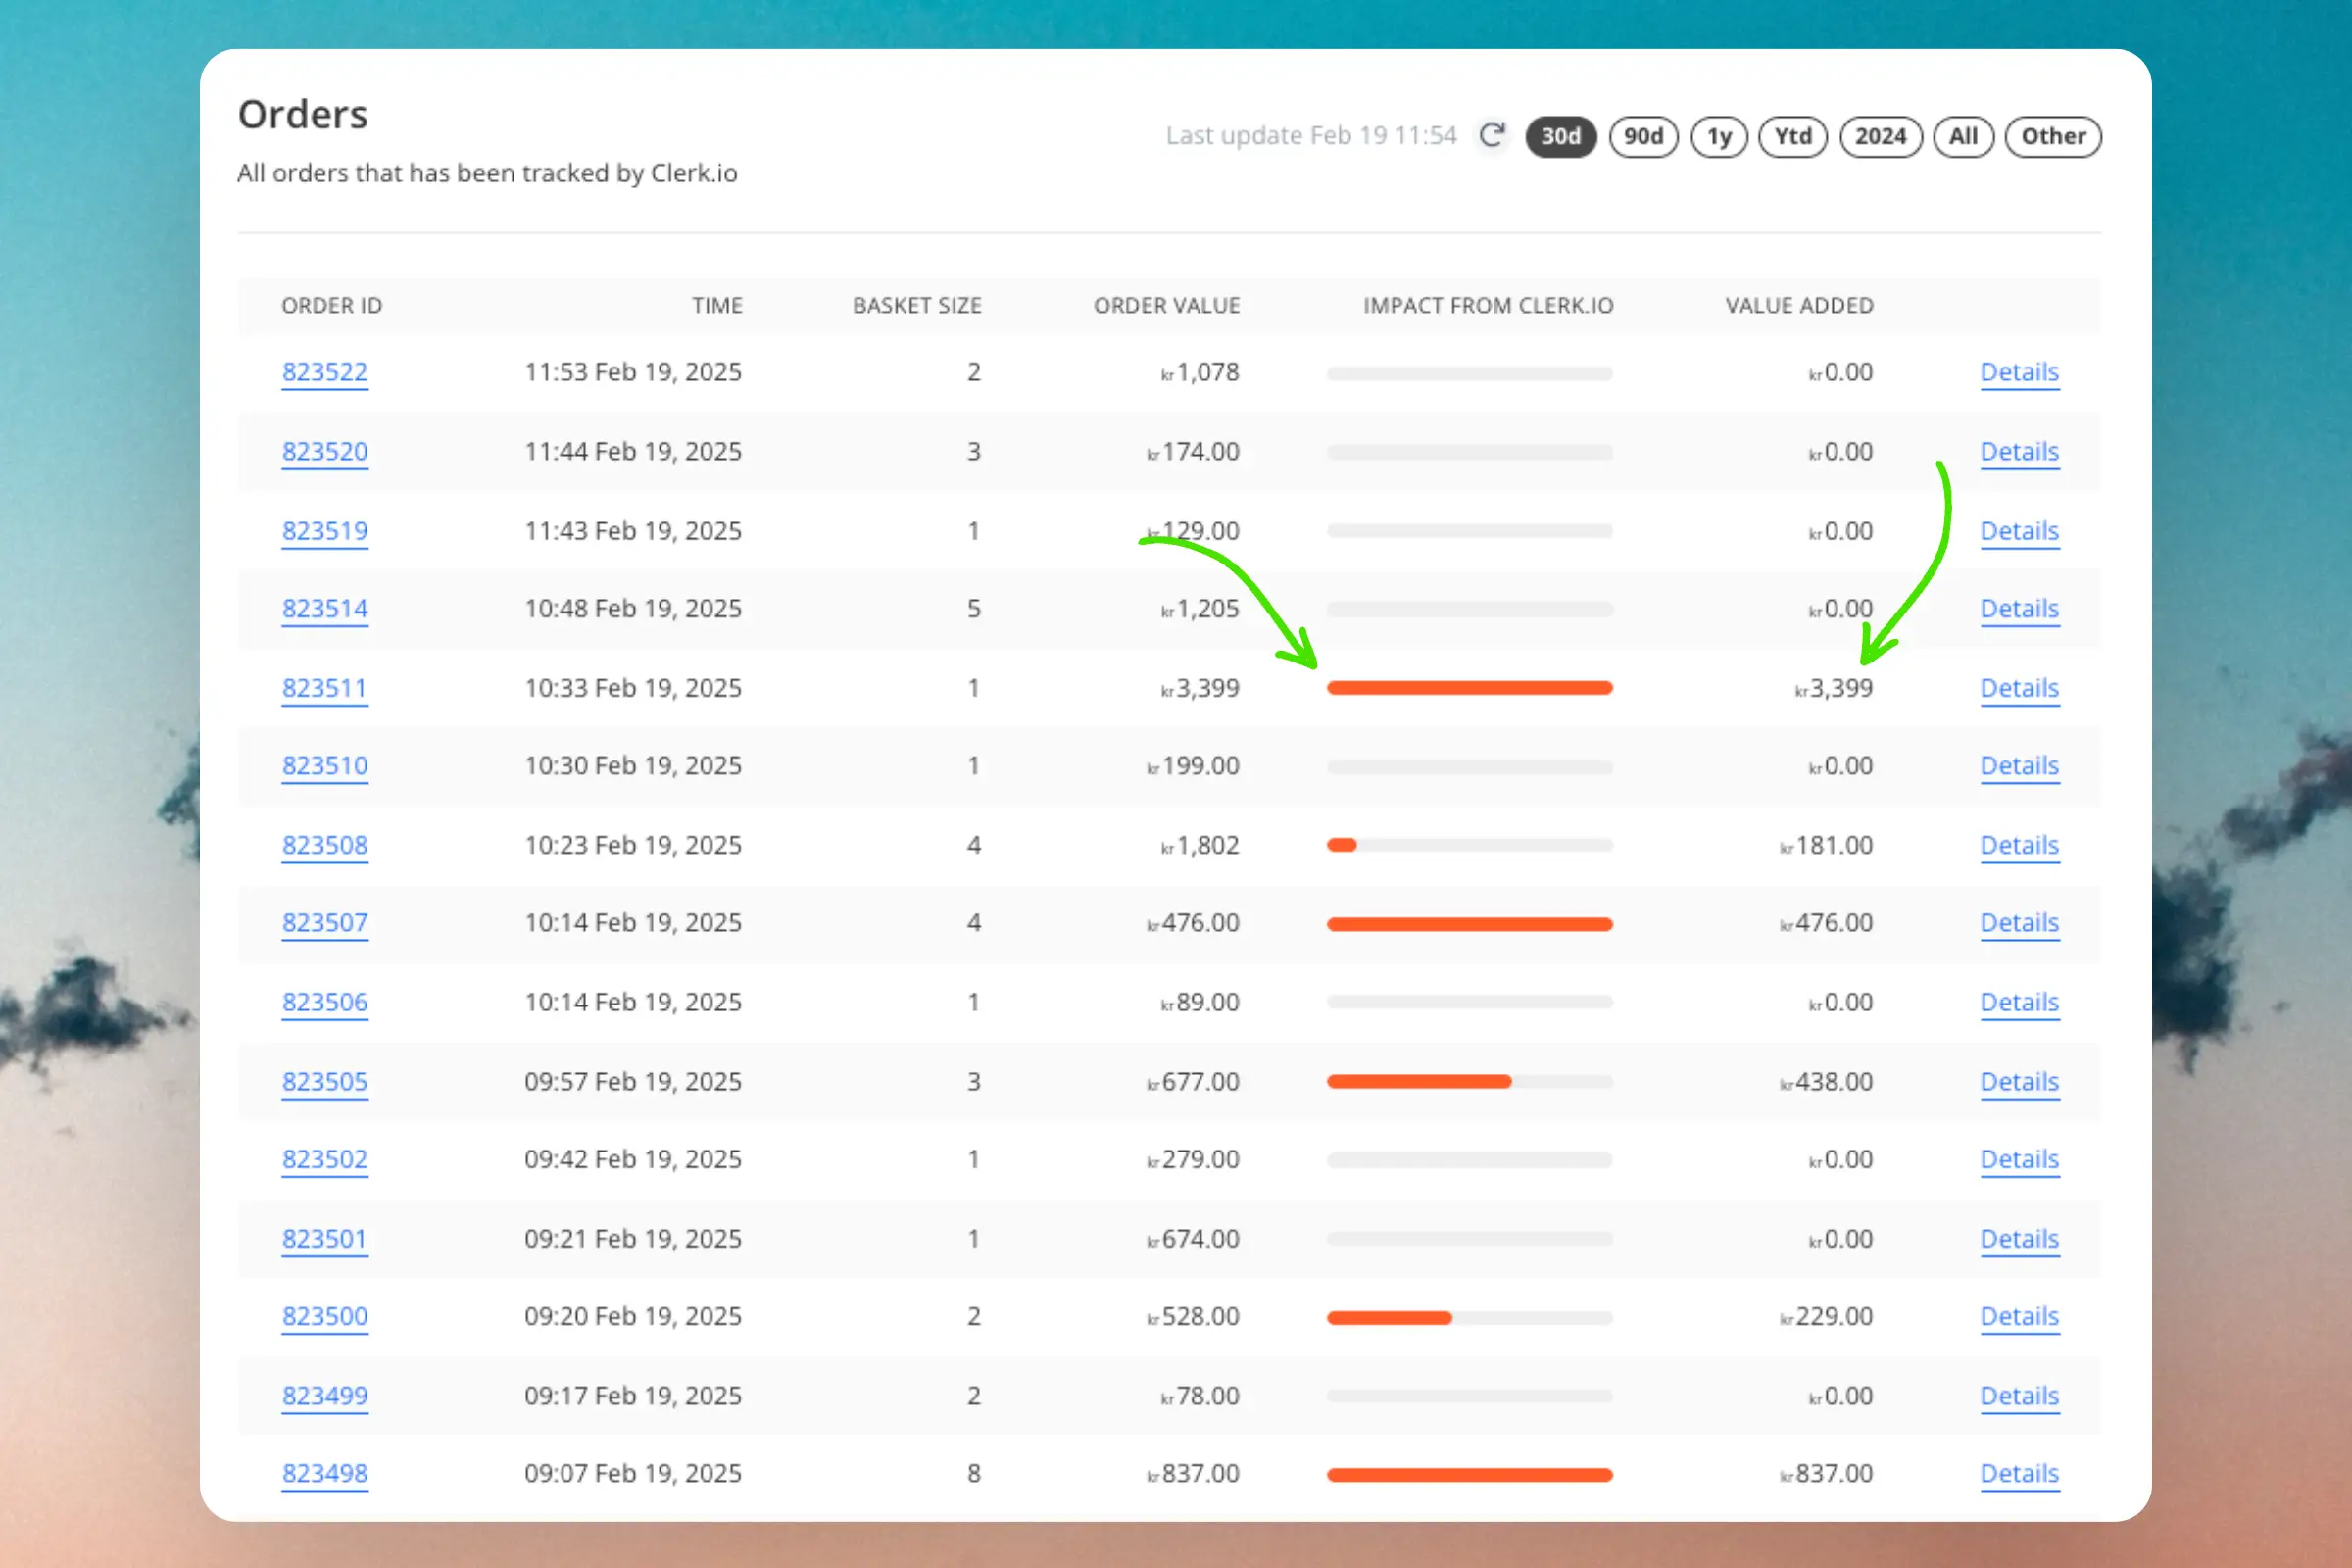
If you see no value added in the order you placed, the following sections show common errors that could cause this.
API setups #
If you set up Clerk with a custom integration directly with the API, you need to actively enable visitor-tracking.
Read how to do in this API article.
Wrong product IDs #
For visitor-tracking to work, the click- and sales-tracking must track the same product IDs as the ones we receive in the importer.
Usually if this doesn’t work it’s because you are tracking variant IDs instead of parent IDs or the SKU instead of the ID.
To check if this is the issue do the following:
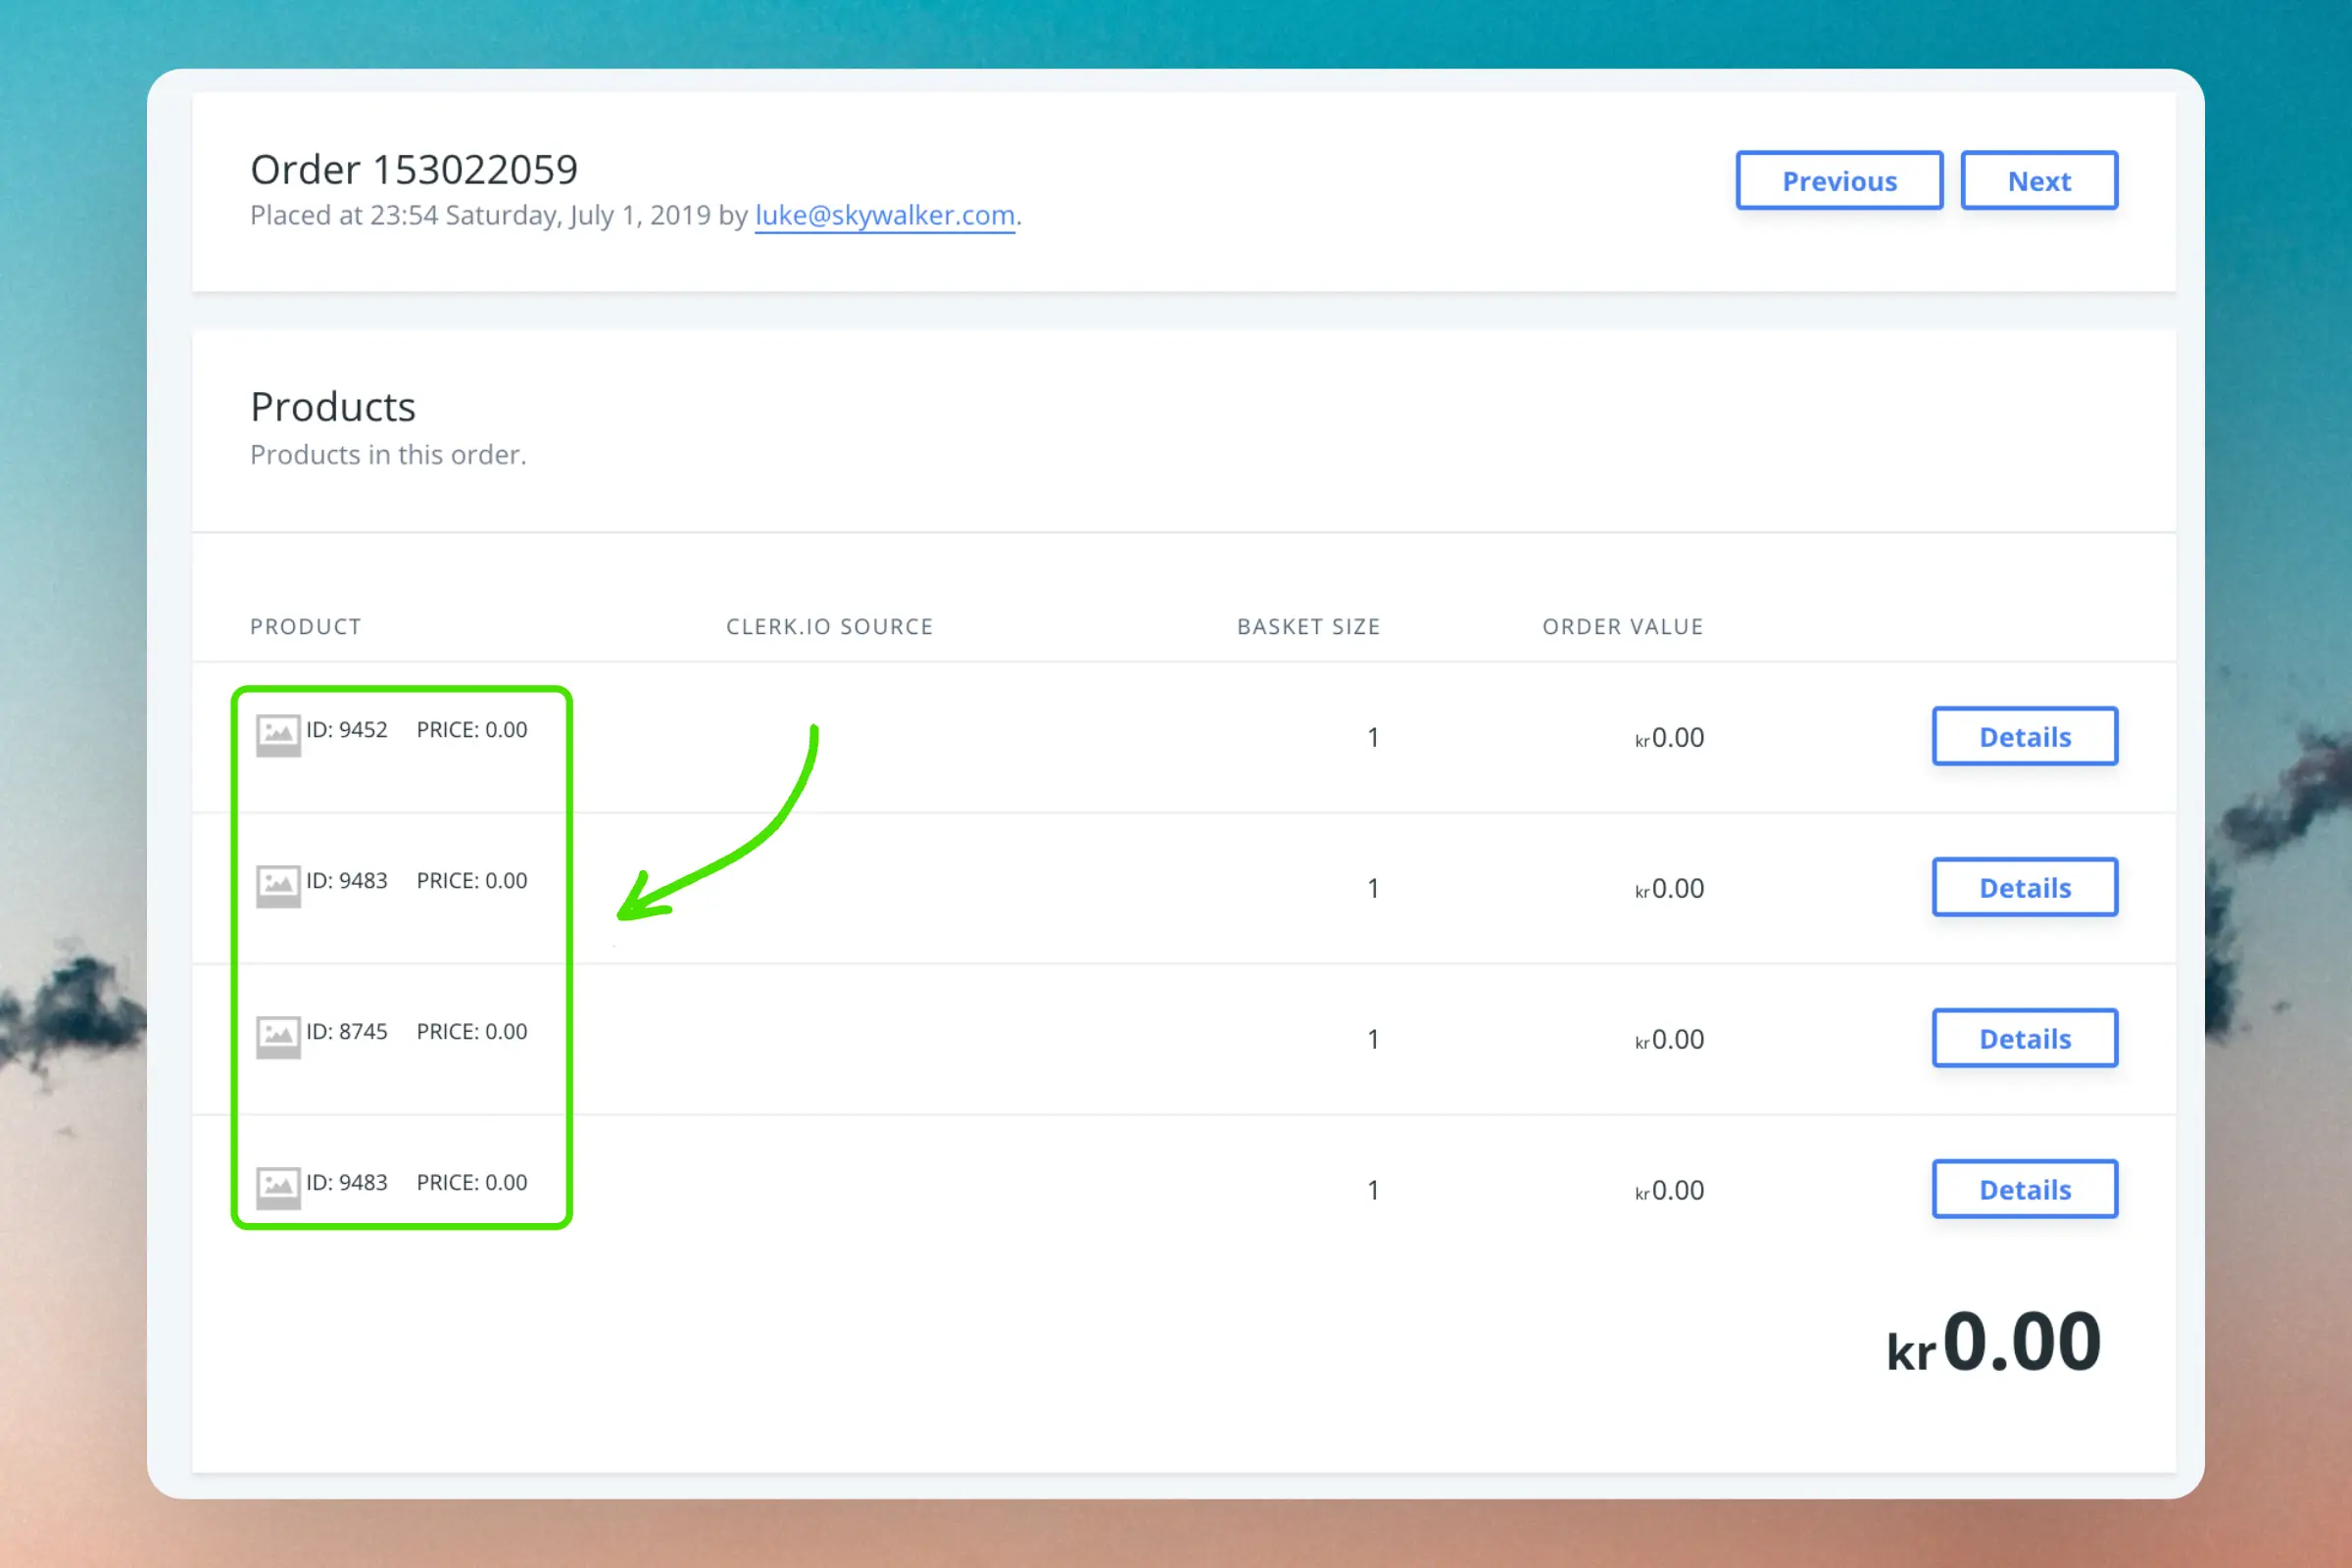
In my.clerk.io, go to Data > Orders and click the ID of an order you placed.
If Clerk cannot identify the product, you will see an ID and image placeholder.
Go to Data > Products and search for the name of the product you added. Here you will be able to see the expected ID for the product.
Use this to configure your sales-tracking to use the correct product IDs.
Visitor ID changes #
Clerk uses a visitor ID to identify each individual session, including the products they click and buy.
Due to this, the IDs should stay the same throughout at least the entire session, and preferably across multiple ones as well.
This visitor ID is created automatically when using Clerk.js to do the setup, but if you use an API setup, or customize your visitor IDs, you might accidentally change it.
This error is rare, but you can check the visitor ID by following these steps:
Open up your Network settings in the browser, and narrow down results to “clerk”.
Start by checking any of the
undefinedcalls which are related to search or recommendations.In
payloadyou can check the current Visitor ID. You will be able to do this for all calls associated with Clerk.Proceed to click the product, and place an order with this product.
On the Order Success page, check your Network again, and find the call to
sale?.Make sure that
visitorin thepayload, matches the Visitor ID you saw in step 3.
If the visitor IDs mismatch, you need to find out why they change.
A common cause for visitor IDs changing could be if you regenerate the IDs for each new page that is loaded.
Update your code to use the same visitor ID for each page.
Hide sliders with few products #
If a category has very few products, a slider can look empty or repetitive.
There are two ways to handle this:
Clerk Design conditional #
Use a conditional around the slider markup so it only renders when enough products are returned.
{% if products.length >= 6 %}
  <div class="clerk-slider">
    {% for product in products %}
      <!-- product card -->
    {% endfor %}
  </div>
{% endif %}
This is quick to implement, but it still relies on the Clerk response to decide whether the slider should be visible. This means it still costs you a call to the API to do it, even when the slider is not shown.
Server-side conditional #
If your platform already knows the category product count, decide in your template whether to output the Clerk embed code at all.
{% if category.product_count >= 6 %}
  <span class="clerk" data-template="@category-page-slider"></span>
{% endif %}
This is the preferred approach because the slider is only initialized when there are enough products, and the behavior stays fully aligned with your webshop’s own category count logic.
Upgrade to Clerk.js 2 #
Clerk.js 2 is a faster and more flexible version of our JavaScript library.
It makes installing Clerk on any webshop easier.
However, since the two versions work slightly differently, you need to follow these steps to successfully upgrade.
The two main differences in Clerk.js 2 are:
The Designs in my.clerk.io use the Liquid, but can also easily be created using the Design Editor.
The script must be inserted just before the
</head>tag in your webshop’s template.
Create designs #
Since Clerk.js 2 has a different approach to Designs, you need to create new ones.
You can create your Clerk.js 2 Designs either by redoing them in the Design Editor, or by converting your old code Designs to Liquid, which the below guide explains how to do.
Below is a description for how to convert your old code Designs to Liquid.
Design Editor option #
Go to my.clerk.io > Recommendations/Search > Designs > New Design.
Select a design type other than Blank and give it a name. We recommend adding “V2” so it’s obvious that you are using Clerk.js 2 designs.
In the Design Editor, click any of the existing elements like the name, image, button, etc. to edit it, or add new elements to the Design.
Click Publish Design when you are done, and go to Step 2 in the guide.
Go to Recommendations/Search > Elements and change your Clerk Element to use your new Design, then click Update Element.
This will temporarily cause them to not show up on your webshop, until you have inserted Clerk.js 2 as described further down in this guide.
Converting designs #
Since Clerk.js 2 uses the more flexible template language Liquid, you need to convert the Designs into this language.
Go to my.clerk.io > Recommendations/Search > Designs > New Design.
Select Blank > Code and give it a name. We recommend adding “V2” so it’s obvious that you are using Clerk.js 2 designs.
Click Create Design.
This will give you a blank design with Product HTML and CSS that you can use.
Go back to the design overview and click Edit Design for your Clerk.js 1 Design. We recommend doing this in a new tab so you can easily copy the code.
Copy over the old Clerk.js 1 Design to your new Clerk.js 2 Design.
You will notice that there is no Container Code in your new one.
This is because Liquid uses for loops to render all the products.
Copy your old Product HTML inside the for-loop, your old Container Code around it and copy the CSS as well.
Convert the Design into Liquid’s syntax. The main difference is that the old Designs used the syntax
{{ formatter attribute }}while v2’s syntax is{{ product.attribute | formatter }}.Go through all of your attributes and change them to the new format.
If you are using
{{#if}}or{{#is}}statements, these need to be converted as well. Use the syntax{% if product.attribute %}{% else %}{% endif %}.Delete
id="{{ $id }}"and the class:targetfrom the container code in the Clerk.js 2 version as they are no longer supported.Below is an example of a Clerk.js 1 design, and the fully converted version:
Clerk.js 1 Design #
// Product HTML
<li class="clerk-product">
    <a href="{{ url }}">
        <img src="{{ image }}" />
        <div class="clerk-product-name">{{ name }}</div>
        <div class="clerk-price-wrapper">
            {{#if list_price}}
                <div class="clerk-old-price">
                    <s>Price {{ money_eu list_price }}</s>
                </div>
                <span class="clerk-new-price">Price {{ money_eu price }}</span>
            {{else}}
                <div class="clerk-product-price">Price {{ money_eu price }}</div>
            {{/if}}
        </div>
    </a>
    <div class="clerk-cta-button btn button">Buy Now</div>
</li>

// Container Code
<h2>{{ headline }}</h2>
<ul id="{{ $id }}" class=":target clerk-slider"></ul>

<!-- This code creates the slider by its ID. -->
<script type="text/javascript">
    Clerk.ui.slider("{{ id }}").init();
</script>
Clerk.js 2 Design #
<h2>{{ headline }}</h2>

<ul class="clerk-slider">
    {% for product in products %}
    <li class="clerk-product">
        <a href="{{ product.url }}">
            <img src="{{ product.image }}" />
            <div class="clerk-product-name">{{ product.name }}</div>
            <div class="clerk-price-wrapper">
                {% if product.list_price %}
                    <span class="clerk-old-price"><s>Price {{ product.list_price | money_eu }}</s></span>
                    <span class="clerk-new-price">Price {{ product.price | money_eu }}</span>
                {% else %}
                    <div class="clerk-product-price">Price {{ product.price | money_eu }}</div>
                {% endif %}
            </div>
            <div class="clerk-cta-button btn button">Buy Now</div>
        </a>
    </li>
    {% endfor %}
</ul>
Click Update Design to save the changes.
Go to Recommendations/Search > Elements and change your Element block to use your new Design.
Click Update Element. This will temporarily cause them to not show up on your webshop, until you are done with Step 2. Choose the new Design for all Elements that should be updated.
Replace script #
Locate the template file that is used to show all pages of the webshop, and where the original Clerk.js script is found near the bottom.
Remove the old Clerk.js script from the file. It will look something like this:
<!-- Start of Clerk.io E-commerce Personalisation tool - www.clerk.io -->
<script type="text/javascript">
    window.clerkAsyncInit = function() {
        Clerk.config({
            key: 'public_api_key'
        });
    };
    (function(){
        var e = document.createElement('script'); e.type='text/javascript'; e.async = true;
        e.src = document.location.protocol + '//api.clerk.io/static/clerk.js';
        var s = document.getElementsByTagName('script')[0]; s.parentNode.insertBefore(e, s);
    })();
</script>
<!-- End of Clerk.io E-commerce Personalisation tool - www.clerk.io -->
Go to my.clerk.io > Developers > Tracking Code. This contains the Clerk.js 2 code.
Copy this code, insert it just before the
</head>tag in the template, then save it.
Congratulations! You are now running on the much-improved Clerk.js 2 setup!
You can see the full documentation for Clerk.js 2 here.
Handling require.js #
This section only applies when using Clerk.js 1.
In some setups, Require.js stops Clerk.js from loading, which means that no sliders or search results will be shown.
When this happens, the following error will be shown in your console:
Uncaught ReferenceError: Clerk is not defined
There are two ways to handle Require.js. Both approaches require you to make changes to the tracking-script, that you have inserted in the bottom of all pages.
Include in Require.js #
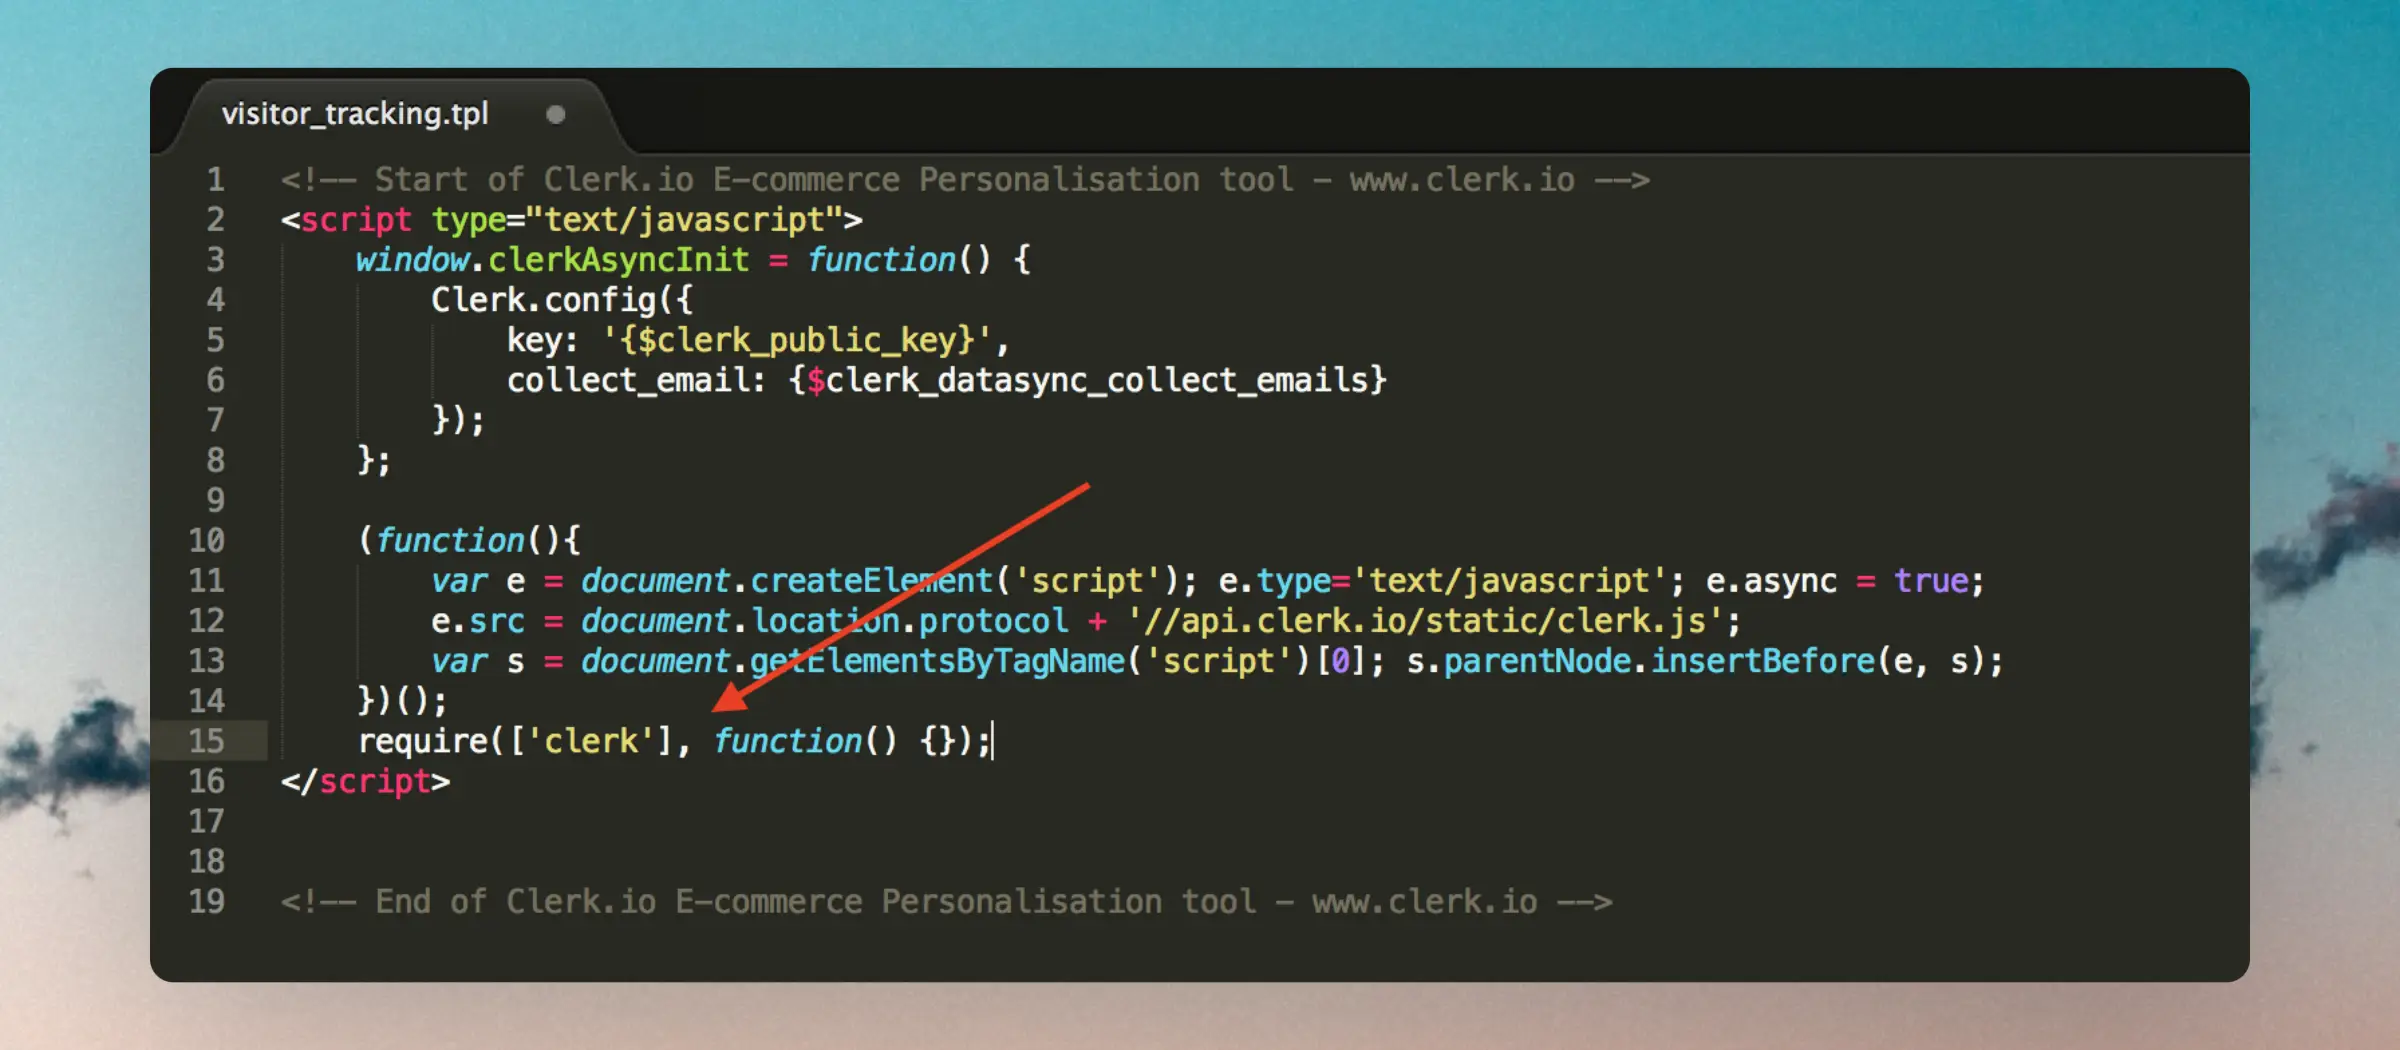
The best approach is trying to get Require.js to recognize Clerk.
You can do this by inserting require(['clerk'], function() {}); in the bottom of the tracking script:
Ignore Require.js #
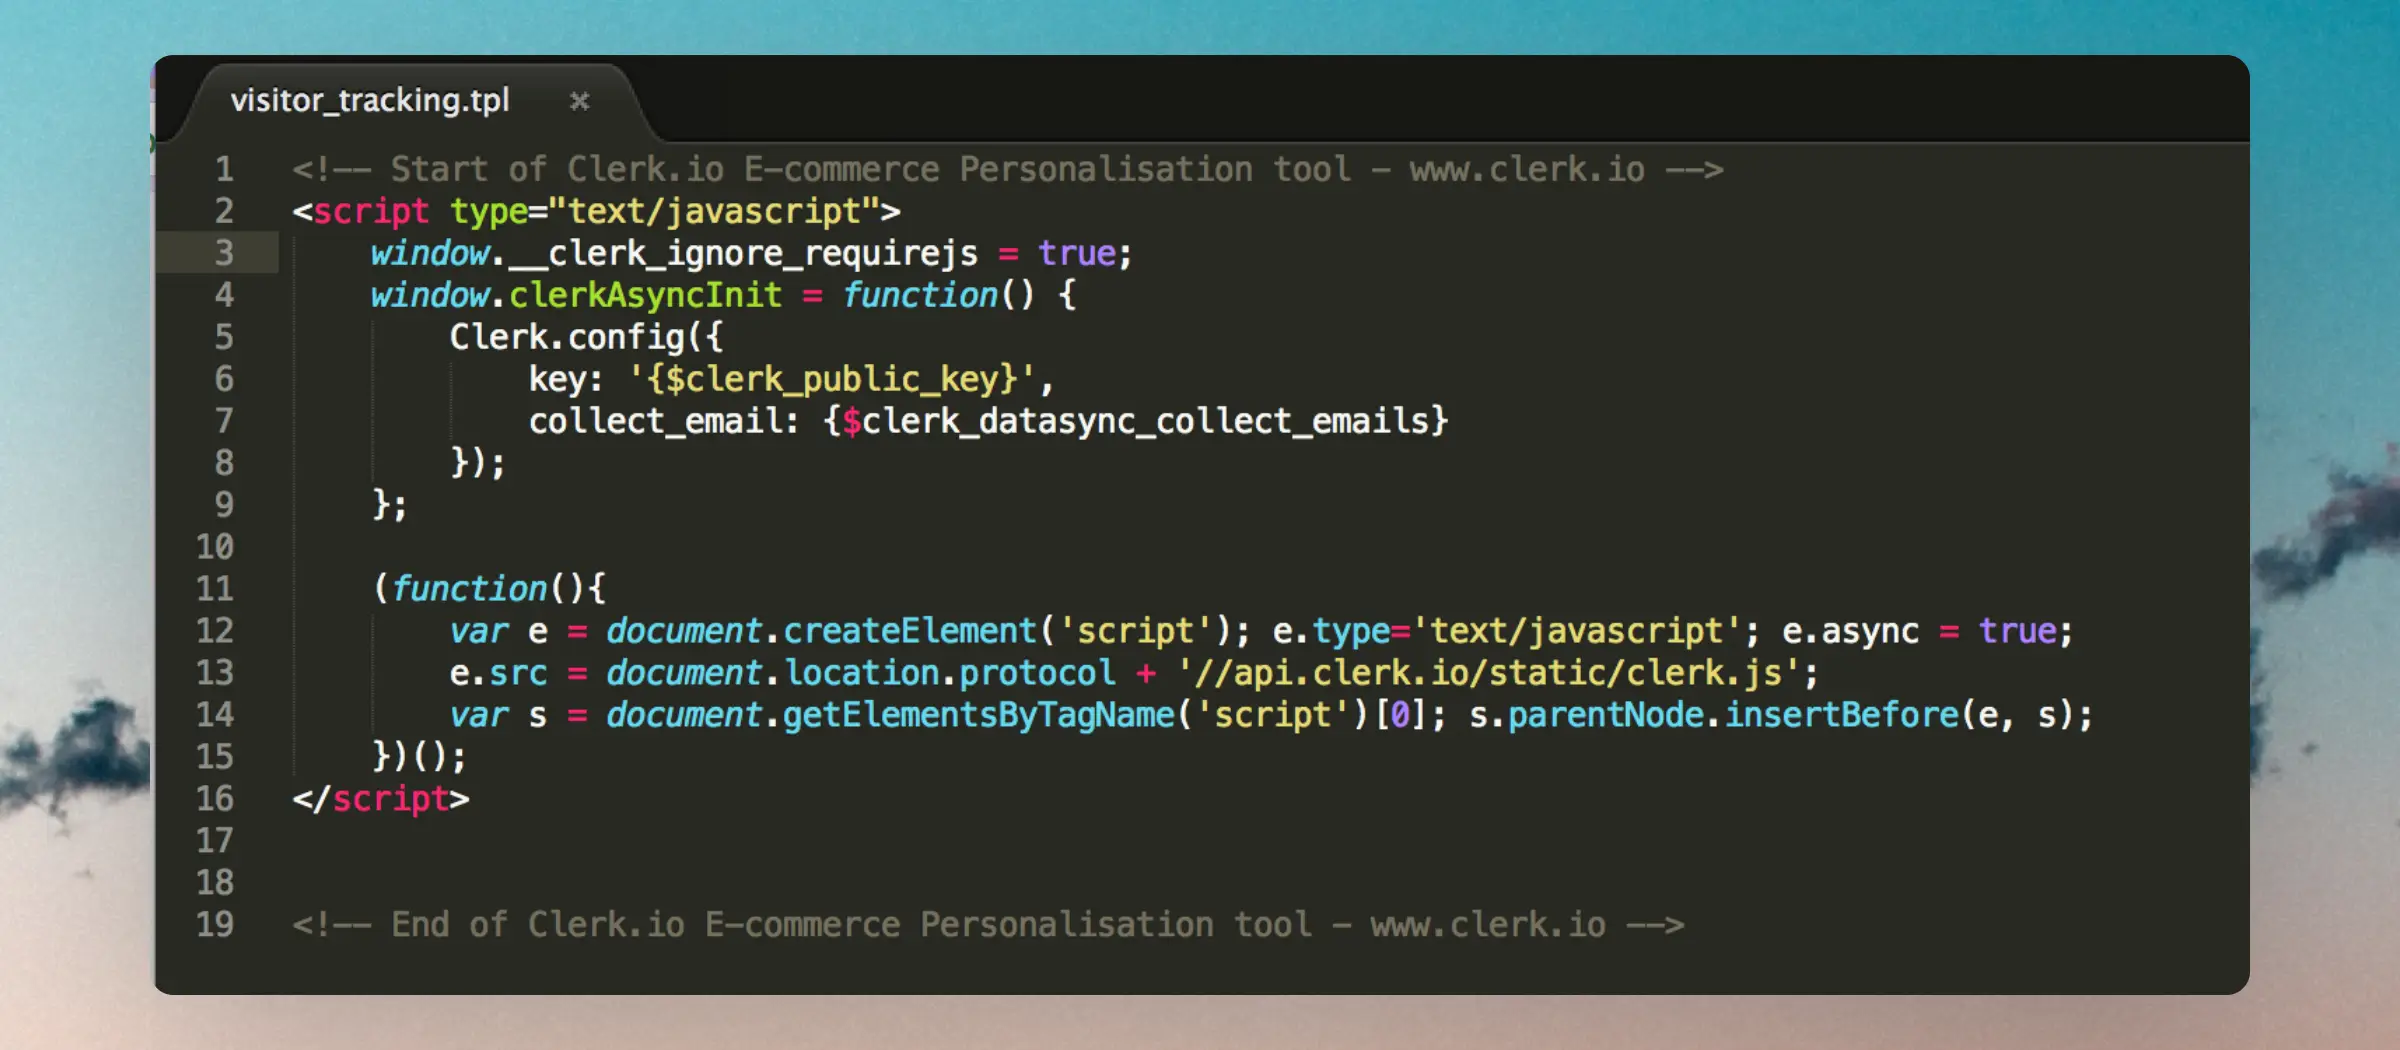
If the above solution doesn’t work, it’s possible to ignore Require.js.
You can do this by inserting window.__clerk_ignore_requirejs = true; in the top of the tracking script:
After using one of these approaches, Require.js will now be compatible with Clerk.