Recommendations
Clerk.io offers more than 23 different types of product logics, making it possible for you to display completely automated products on any page. This article explains how to get started when using a Clerk.js setup in Magento 1.
For our full Best Practices, read this article on which Recommendations to use.
Slider Setup #
Recommendations are created with Elements that reference a Design. Below is the basic guide for setting up an Element.
Following the steps in my.clerk.io > Settings > Setup Guides will automatically create the Elements for our Best Practices.
Create Design #
Recommendations are shown as a slider by default. This allows customers to see more products with fewer clicks. You can either use the Design Editor to configure it visually, or use code designs.
A design can be reused for any number of Recommendations elements you create.
Design Editor #
- Go to Recommendations > Designs and click New Design.
- Choose Product Slider
- From the list of design templates, choose the one you want to start with.
- Give it a name and click Create design.
- Make any changes you want to the design.
Code Design #
- Go to Recommendations > Designs and click New Design.
- Choose Other designs > Blank > Code.
- Give it a name and click Create design.
- Create a code design from scratch using Liquid code.
If you want a starting design, check the Slider template further down.
Create Element #
This contains all the settings used to display the Recommendations, and make it embeddable in your website. Follow these steps for each Recommendations banner you want to create.
- Go to Recommendations > Elements.
- Click New Element.
- Give it a descriptive name. We recommend naming it based on the page and logic you want to use. E.g., “Home Page / Visitor Recommendations”.
- In Element type, select the product logic you want to use from the dropdown. You can see an overview of all the product logics here.
- In Design select the design you created from the dropdown and choose the number of products you want to show.
- Click Save at the top of the screen.
Add to Website #
To add Clerk Recommendations on your website, you have two options: Injection and Embedded code.
- Open the Insert into website tab.
- Here you have two options:
- Using injection allows you to insert the code by using a CSS selector.
- Using embedded code allows you to insert the code into your website manually.
- Pick the option that is easiest for you to use.
- For some Logics you will see the Choose your platform dropdown. Select Magento 1 in these cases. This will prefill the embedcode with the correct Magento 1 shortcodes.
To add sync details or start a sync, go to my.clerk.io > Data > Configuration.
Extension Setup #
Use the Magento extension to enable sliders on key pages:
- In Magento, go to System > Configuration > Clerk settings and choose the correct Store View.
- For each page section, enable and populate the templates/contents:
- Product Page Settings: set Enable to Yes and ensure the templates field contains your Slider IDs (comma-separated, without “@”).
- Category Page Settings: set Enable to Yes and add your Slider IDs.
- Cart Settings: set Enable to Yes and add your Slider ID.
- Click Save Config.
my.clerk.io Setup #
Go to Recommendations > Elements.
Select the slider you want to insert.
Open the Insert into website tab.
Choose one of the following:
- Using injection inserts the code using a CSS selector.
- Using embedded code inserts the code manually.
For embedded code on Magento 1, typical placements are:
- Homepage: CMS > Pages > Home page under Content.
- Product page:
app/design/frontend/TEMPLATE_NAME/default/template/catalog/product/view.phtmlwithdata-productsset to<?php echo Mage::registry('current_product')->getId(); ?>. - Category page:
app/design/frontend/TEMPLATE_NAME/default/template/catalog/category/view.phtmlwithdata-categoryset to<?php echo Mage::getModel('catalog/layer')->getCurrentCategory()->getId(); ?>. - Cart page: in your cart template, set
data-productsto the current cart product IDs, e.g.:
data-products="[<?php $i = 0; foreach(Mage::getSingleton('checkout/session')->getQuote()->getAllVisibleItems() as $_item) { if ($i > 0) { echo ','; } echo $_item->getProductId(); $i++; } ?>]"
Pages #
Below are the specific pages where you should insert Recommendations, and which types you should use, in order to follow our Best Practices.
Homepage #
- In my.clerk.io, create 3 Elements with the following logics:
- Visitor Recommendations
- Bestsellers
- Hot Products
- Insert the embedcodes to your homepage template/block.
Category Page #
- In my.clerk.io, create an Element with the logic Bestsellers In Category.
- In the Insert into website > Choose your platform dropdown, select Magento 1, and copy the embedcode.
- Go to Magento 1’s theme files and find the file that generates your Category pages. This is most often
app/design/frontend/TEMPLATE_NAME/default/template/catalog/category/view.phtml. - Insert the embedcode somewhere below the title and description. Set
data-categoryto<?php echo Mage::getModel('catalog/layer')->getCurrentCategory()->getId(); ?>.
Product Page #
- In my.clerk.io, create 2 Elements with the following logics:
- Best Alternative Products
- Best Cross-Sell Products
- In Insert into website > Choose your platform dropdown, select Magento 1 for each of them and copy the embedcodes.
- In the Magento 1 theme files, find the file that generates your product pages. This is most often
app/design/frontend/TEMPLATE_NAME/default/template/catalog/product/view.phtml. - Insert the embedcodes somewhere below the product description. Set
data-productsto<?php echo Mage::registry('current_product')->getId(); ?>.
Add-To-Basket Step #
- In my.clerk.io, create an Element with the logic Best Cross-Sell Products.
- Give it the name “Add-To-Basket / Others Also Bought”. This is important for the embedcode to work properly.
- Click Save in the top of the page.
- To activate the add-to-basket Powerstep using the Magento extension:
- Go to System > Configuration > Clerk.
- Under Power step settings, add your Element IDs (comma-separated) in Templates.
- Set Enable to Yes and click Save Config.
Cart Page #
- In my.clerk.io, create an Element with the logic Best Cross-Sell Products.
- In the Insert into website > Choose your platform dropdown, select Magento 1, and copy the embedcode.
- Go to Magento 1’s theme files and find the file that generates your Cart pages.
- Insert the embedcode somewhere below the cart items and checkout button. Set
data-productsto the current cart product IDs.
Exit Intent #
- In my.clerk.io, create an Element with the logic Visitor Recommendations.
- You can activate it through the extension or manually. Below are the steps for both options.
Extension Setup #
Using the extension:
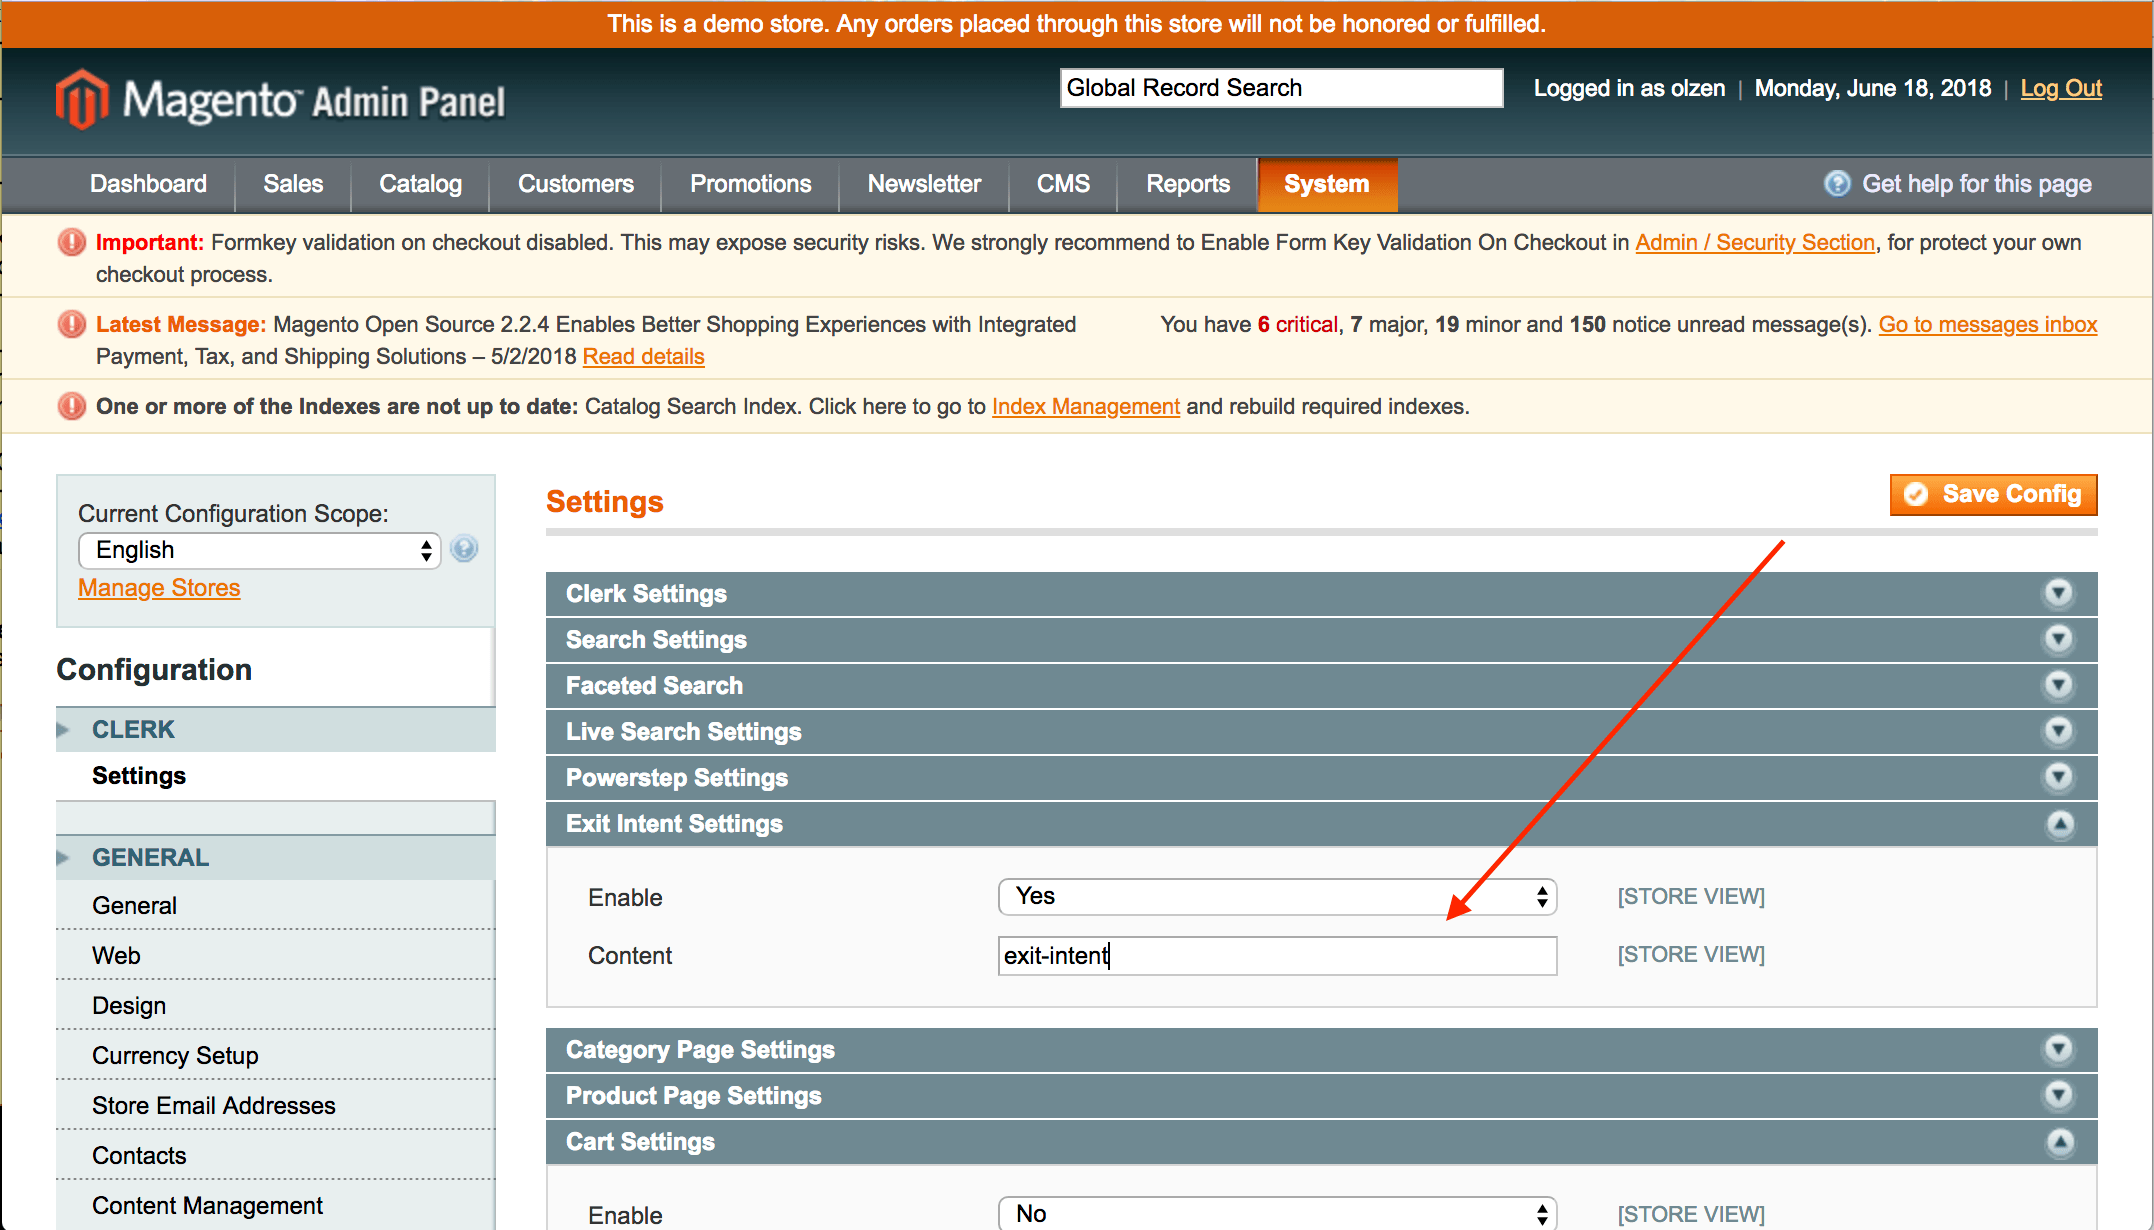
- Go to System > Configuration > Clerk Settings and select the correct Store View.
- Under Exit-Intent Settings, set Enable to Yes and ensure the Element/Templates field contains your Element ID(s) (e.g.,
exit-intent). - Click Save Config.
Manual Setup #
Manual embed (older extension versions): add the following to app/design/frontend/base/default/template/clerk/tracking.phtml:
<span class="clerk"
  data-template="@exit-intent"
  data-exit-intent="true">
</span>
Starting Templates #
If you want to use code designs, these templates can get you started.
Slider Code #
This template will render a standard slider with common product information that you can tailor to your needs.
HTML #
<div class="clerk-recommendations">
    <h2 class="section-title" style="text-align:center; text-transform: uppercase;"><span>{{ headline }}</span></h2>

    <div class="clerk-slider">
         {% for product in products %}
            <div class="clerk-slider-item">
                <div class="clerk-slider-product">
                    <a href="{{ product.url }}">
                        {% if product.price < product.list_price %}
                            <div class="clerk-slider-badge">On Sale</div>
                        {% endif %}
                        <div class="clerk-slider-image" style="background-image: url('{{ product.image }}');"></div>
                        <div class="clerk-slider-brand">{{ product.brand }}</div>
                        <div class="clerk-slider-name">{{ product.name }}</div>

                        <div class="clerk-slider-pricing">
                            {% if product.price < product.retail_price %}
                                <div class="clerk-slider-list-price">{{ product.retail_price | money }}</div>
                            {% endif %}

                            <div class="clerk-slider-price">{{ product.price | money }}</div>
                        </div>
                    </a>
                    {% if product.stock == 0 %}
                        <a class="clerk-not-in-stock" href="{{ product.url }}" data-event-type="product-click">
                            <div class="clerk-slider-button-not-in-stock">Out of Stock</div>
                        </a>
                    {% else %}
                        <a class="clerk-view-product" href="{{ product.url }}" data-event-type="product-click">
                            <div class="clerk-slider-button">View Product</div>
                        </a>
                    {% endif %}
                </div>
            </div>
        {% endfor %}
    </div>
</div>
CSS #
.clerk-recommendations {
    margin: 1em 0;
}

.clerk-recommendations-headline {
    font-weight: bold;
    font-size: 2em;

    text-align: center;
}

.clerk-slider-item {
    margin: auto;
}

.clerk-slider-product {
    position: relative;
    overflow: hidden;

    margin: 1em;
    padding: 1em;

    background-color: white;

    border: 1px solid #eee;
    border-radius: 1em;

    box-shadow: 0 .1em .2em 0 rgba(0,0,0,.08);

    text-align: center;
}

.clerk-slider-badge {
    position: absolute;
    top: 5px;
    right: -35px;

    display: inline-block;

    width: 120px;

    margin: 10px auto;
    padding: 5px 0;

    border-radius: 3px;

    background-color: #fbc531;

    font-size: 10px;
    color: white;

    text-align: center;
    letter-spacing: 1px;

    transform: rotate(45deg);
}

.clerk-slider-tags {
    position: absolute;
    top: .8em;
    left: .8em;
}

.clerk-slider-tag {
    display: inline-block;

    padding: .2em .8em;

    border-radius: .3em;

    background-color: gray;

    font-size: 10px;
    color: white;

    letter-spacing: 1px;
}

.clerk-slider-image {
    width: 100%;
    height: 8em;

    margin-bottom: 1em;

    background-position: center center;
    background-repeat: no-repeat;
    background-size: contain;
}

.clerk-slider-brand {
    font-size: 0.9em;
    color: #757575;
}

.clerk-slider-name {
    height: 3em;
    overflow: hidden;
    color: #4a3b40;
    font-weight: bold;
    font-size: 15px;
    margin-bottom: 1em;
}

.clerk-slider-pricing {
    display: flex;

    margin-bottom: 1em;
}

.clerk-slider-price {
    flex: 1;
    color: #757575;
    font-weight: bold;
}

.clerk-slider-list-price {
    flex: 1;

    opacity: .8;

    font-weight: normal;
    text-decoration: line-through;
    color: gray;
}

.clerk-view-product, .clerk-view-product:hover {
    color: white;
}

.clerk-not-in-stock, .clerk-not-in-stock:hover {
    color: #4a3b40;
}

.clerk-slider-button-not-in-stock {
    display: block;

    margin: 0 auto;
    padding: .6em 2em;

    border: none;
    border-radius: .5em;

    background-color: white;
    color: #4a3b40;

    text-transform: uppercase;
    text-align: center;

    white-space: nowrap;

    font-weight: bold;

    cursor: pointer;
}

.clerk-slider-button {
    display: block;

    margin: 0 auto;
    padding: .6em 2em;

    border: none;
    border-radius: .5em;

    background-color: #b6c254;
    color: white;

    text-transform: uppercase;
    text-align: center;

    white-space: nowrap;

    font-weight: bold;
}


.clerk-load-more-button {
    display: block;

    width: 20em;

    margin: 1em auto;
    padding: .6em 2em;

    border: none;
    border-radius: .5em;

    background-color: #b6c254;
    color: white;

    text-transform: uppercase;
    text-align: center;

    white-space: nowrap;

    font-weight: bold;
    font-size: 1.2em;
}

@media screen and (min-width: 1100px){
    .clerk-slider-item {
        width: 20%;
    }
}

@media screen and (min-width: 900px) and (max-width: 1100px){
    .clerk-slider-item {
        width: 25%;
    }
}

@media screen and (min-width: 414px) and (max-width: 900px) {
    .clerk-slider-item {
        width: 50%;
    }
    .clerk-slider-button, .clerk-slider-button-not-in-stock {
        font-size: 0.8em;
    }
}

@media screen and (max-width: 413px) {
    .clerk-slider-item {
        width: 100%;
    }
}