Showing Customer Group Prices with Clerk.io
Platforms:
The setup of customer group prices consists of 4 steps:
Include the various prices in the feed
Fetch the current customer groups ID
Create a function to fetch the relevant price
Show the price in the Design
1. Include Prices in the Feed
Start by adding an attribute to all products which contains all of the various pricing options, making sure to correlate each price to a particular customer group.
This can be sent as a string-encoded JSON dict
For example:
Prices
customer_group_prices = '{"GROUP1":179, "GROUP2": 140, "GROUP3": 100, "GROUP4":70}'
2. Fetch the Customer Group ID
Implement a small script somewhere on the page which fetches the customer-group ID of the current customer to a JS variable.
The Customer Group ID should be equivalent to the list indice that its matching price is contained within. For example, if the price is located in customer_group_prices[2], then the ID should also be 2. For example:
Customer Group ID
<script type="text/javascript">
    const customer_group = GROUP2;
</script>
3. Create a Function to Fetch the Price
After including the price in the feed and fetching customer_group variable, you can create a TemplateFormatter which takes the customer_group_prices list as an argument and returns the relevant price.
As described above, you can now fetch the price from the specific customer group as the key in the price-dict based on the customer_group ID.
The function should be put directly into the _visitor-tracking script_, and in this example it is called final_price:
Formatters
    <!-- Start of Clerk.io E-commerce Personalisation tool - www.clerk.io -->
  <script type="text/javascript">
    (function(w,d){
      var e=d.createElement('script');e.type='text/javascript';e.async=true;
      e.src=(d.location.protocol=='https:'?'https':'http')+'://cdn.clerk.io/clerk.js';
      var s=d.getElementsByTagName('script')[0];s.parentNode.insertBefore(e,s);
      w.__clerk_q=w.__clerk_q||[];w.Clerk=w.Clerk||function(){w.__clerk_q.push(arguments)};
    })(window,document);

    Clerk('config', {
      key: 'O7UITkJIXqXibeQF9ONobiGGKYYKtbvh',
      formatters: {
          final_price: function (customer_group_prices) {
              price_groups_obj = JSON.parse(customer_group_prices)
              var return_price = price_groups_obj[customer_group_key];
              return return_price;
          }
      });
    };
  </script>

    <!-- End of Clerk.io E-commerce Personalisation tool - www.clerk.io -->
4. Show the Price in the Template
When the final_price formatter has been created, you can name it directly in your Design, along with the customer_group_prices list that you created in step 1:
Template function call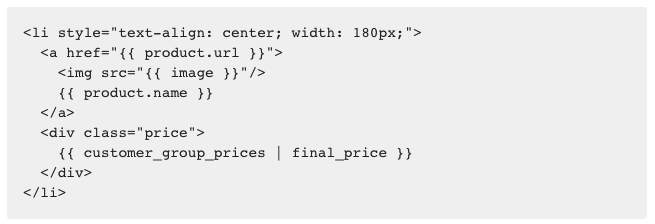
5. Creating Customer Group Pricing by Extending Clerk.js
Putting together some of the steps in the above solutions, you have the option to create customer group pricing to reference in your designs by including them in your Clerk.js extension file.
You can create globals for your customer groups, and formatters to reference these groups in your Clerk.io Designs using code like the example below. Be sure to replace INSERT_GROUP_ID_HERE with your group IDs.
globals: {
customer_group_id: INSERT_GROUP_ID_HERE
},

formatters:{
final_price: function(standard_price,group_price1, group_price2){

var customer_group = INSERT_GROUP_ID_HERE;

if (customer_group = 1){
return group_price1;
}
else if (customer_group = 1){
return group_price2;
}
else (){

return standard_price;

}
}
}