Using the Clerk.io Plugin with WooCommerce
Platforms:
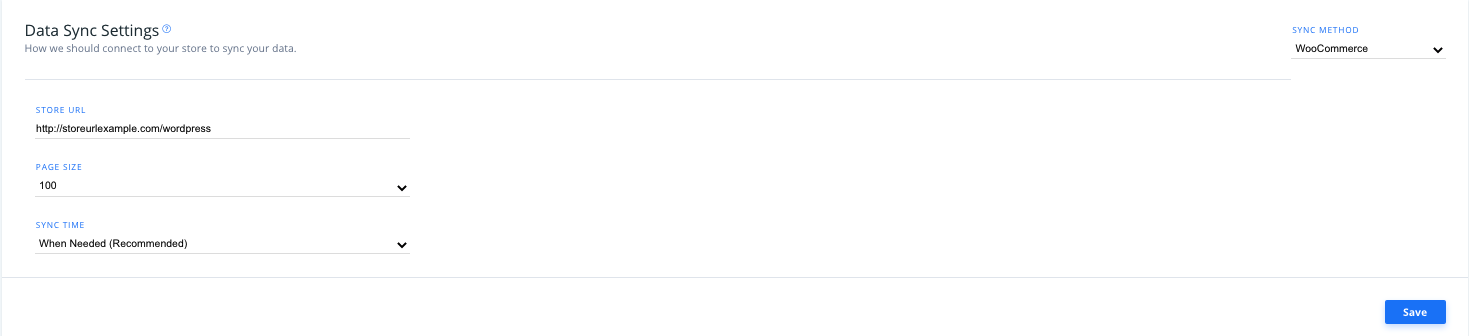
Data Sync Settings in my.clerk.io
In my.clerk.io, click “Data” in the left-side menu and scroll down to “Data Sync Settings” to set and adjust your Clerk.io backend settings with WooCommerce.
Here, you enter your Store URL, the page size of your synced data, and sync time(the time of day your data syncs, default is whenever needed).
Plugin Settings
If you are using v3.8.0 or a later version of the extension, you will be able to access the below settings in two ways after adding your Public and Private Keys to the plugin:
- Through the WooCommerce backend in Plugins > Clerk
- Through my.clerk.io, under Settings > Extensions
It does not matter where you make the changes, as the extension will sync with any changes made in my.clerk.io and vice versa.
In my.clerk.io you will also be able to see your current version of the extension, your platform, and the PHP version.
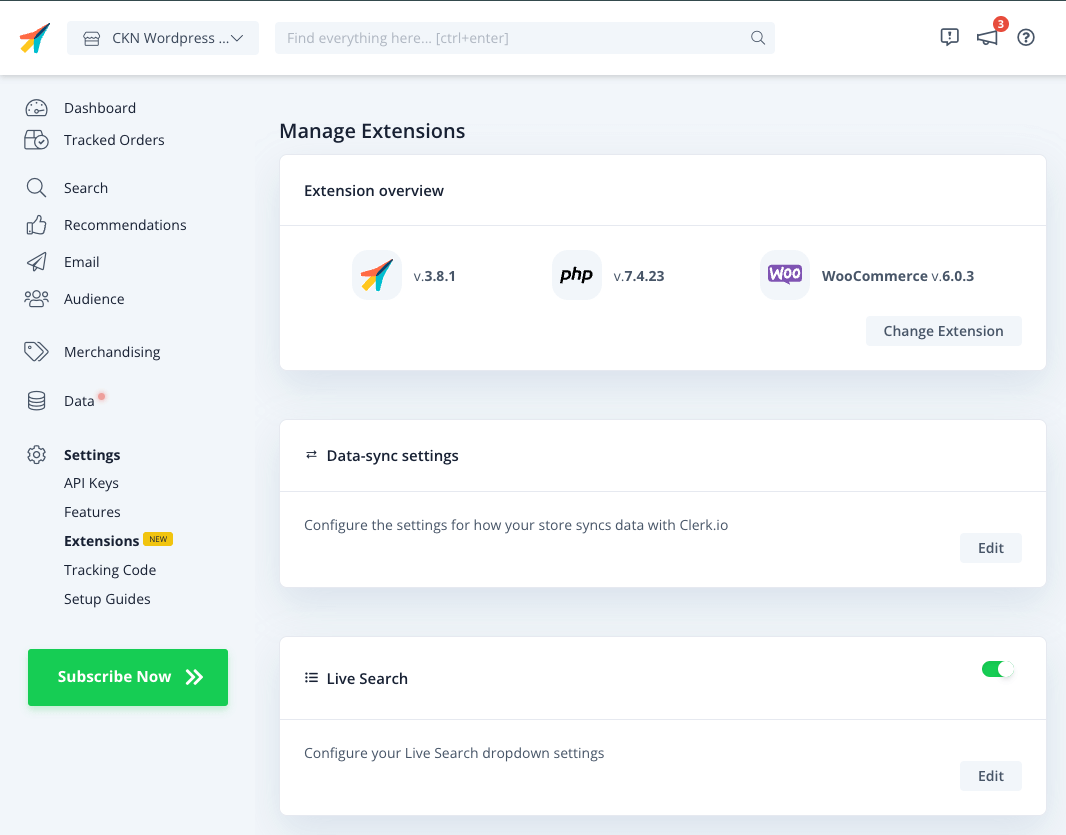
Simply click “Edit” on any setting, to see the available options:
Plugin Settings in WooCommerce
After downloading the Clerk.io plugin, you can access this from your main left-side menu in your WooCommerce admin page by clicking " Clerk".
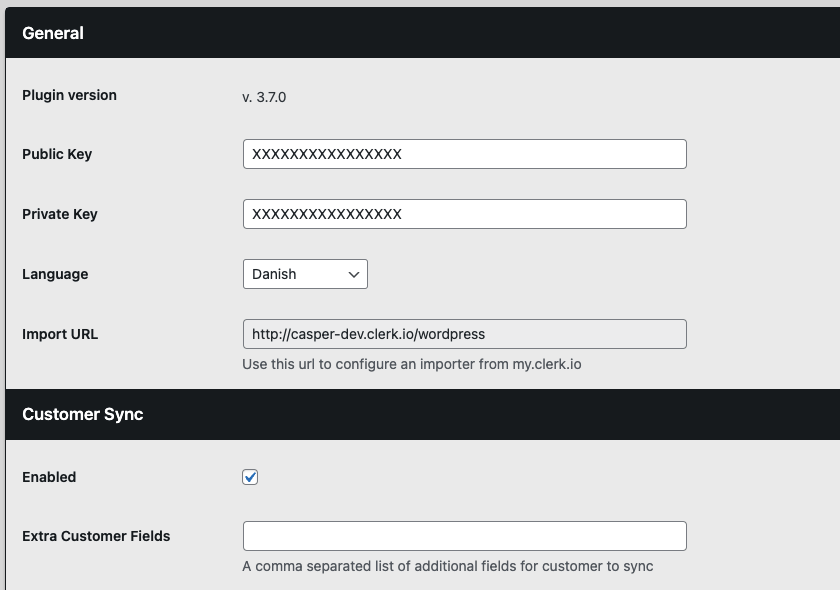
General & Customer Sync
In the General section, after adding your Public and Private Keys, you can choose the language for the Clerk.io plugin. Your Import URL, which you added to your my.clerk.io Data Settings, is also located here for reference.
Under Customer Sync, you have the option to add customer data fields that you use in your store. Be sure to check the “Enabled” box to sync things customer details with Clerk.io.
Data Sync
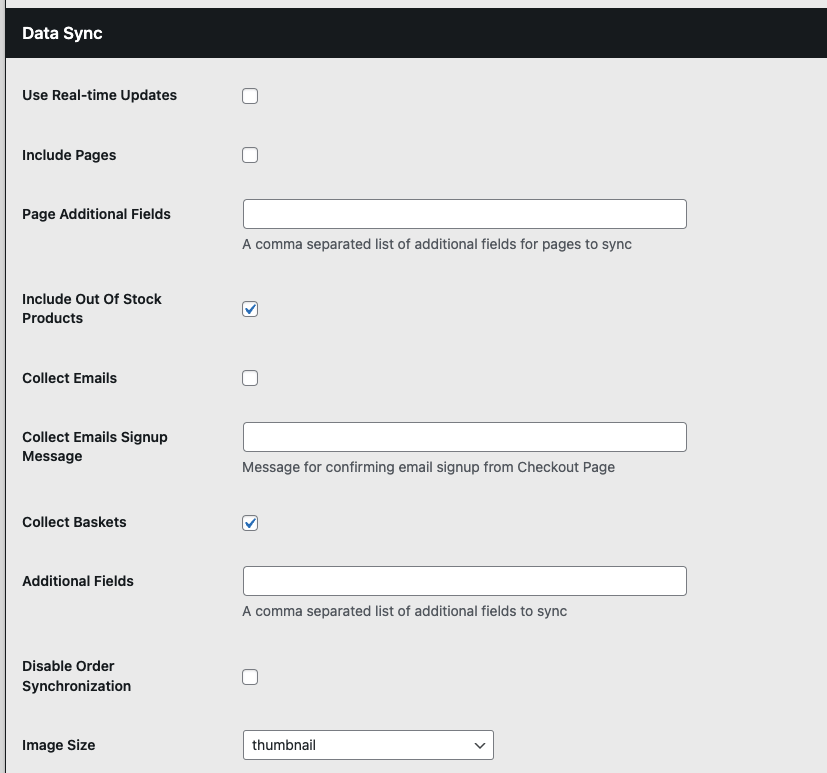
In the Data Sync section, you have the option to:
Use Real-Time Updates to sync your data to Clerk.io in real-time once changes are made.
Include Pages: Checking the box next to “Include Pages” allows the different pages in your store to be synced along with your Product data.
- Type in the data fields you’d like to sync from your pages under " Pages Additional Fields", separated by commas. This could include “URL” or “images” for example.
Check the appropriate boxes to Include Out of Stock Products, Collect Emails, and/or Collect Baskets data to sync with Clerk.io.
Additional Fields: Here, you can add a comma-separated list of any additional Product Data fields you’d like to sync to Clerk.io from your WooCommerce store.
You can also check the box to Disable Order Synchronization with Clerk.io if needed.
With Image Size you can control the size of the images that Clerk imports
Search Settings
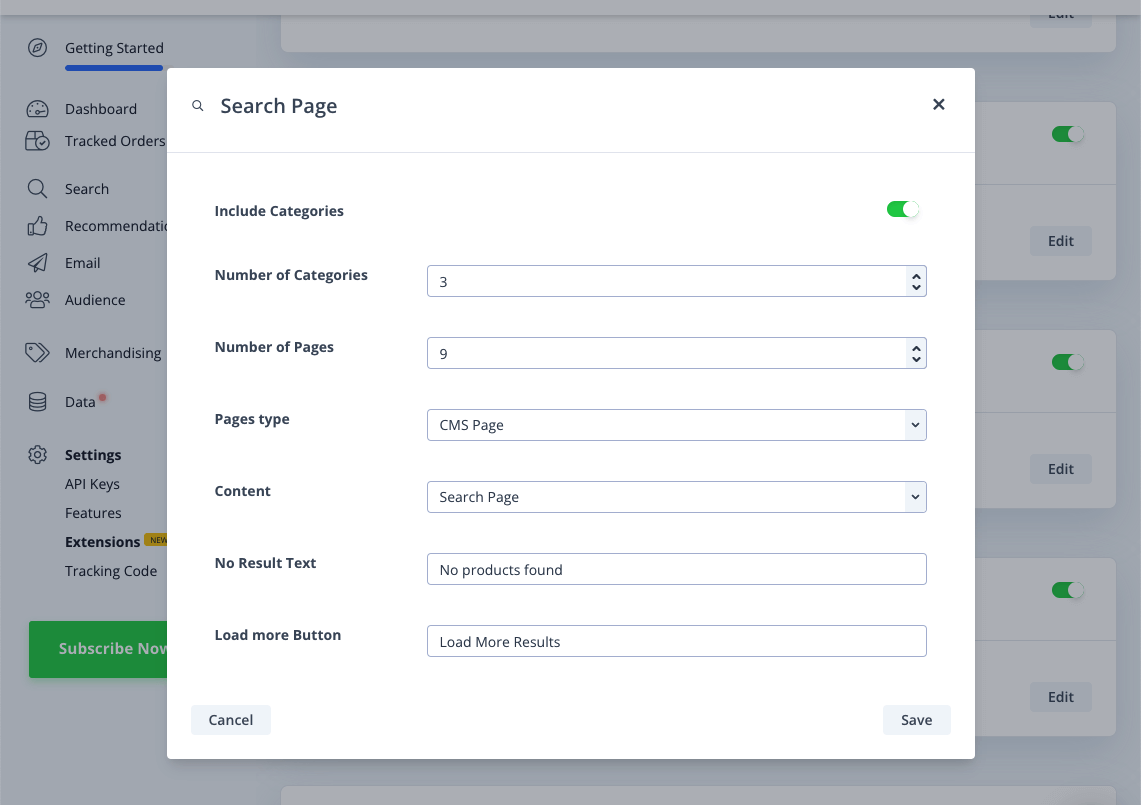
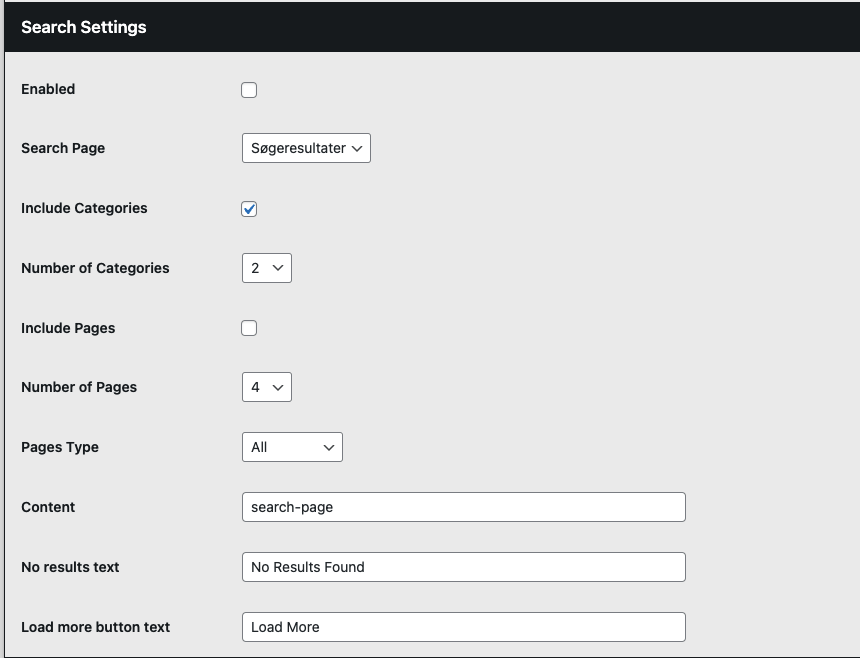
In this section of the plugin, you’ll set the different options for your Clerk.io Search Page.
Choose your page type for your Search Page from the dropdown, like “Example Page” in the example here.
Content: Enter the name of your Clerk.io Search Page Content here, found in embed code for that Content in your store’s my.clerk.io backend, often something like search-page.
No results text: Enter the text you’d like to display on the Search Page if a search returns no results here, and set the text for the “Load More” button in the following field.
Include Categories / Pages: This let’s you control whether Clerk should find matching Categories or Pages to show on the Search Page.
Number of Categories / Pages: This let’s you decide how many possible matches to return for each type.
Note: You are now able to call the data for categories and pages in your Search page in the same way you would in your Live search, giving you a larger range of information to engage your customers with. For more information you can check here.
Live Search Settings
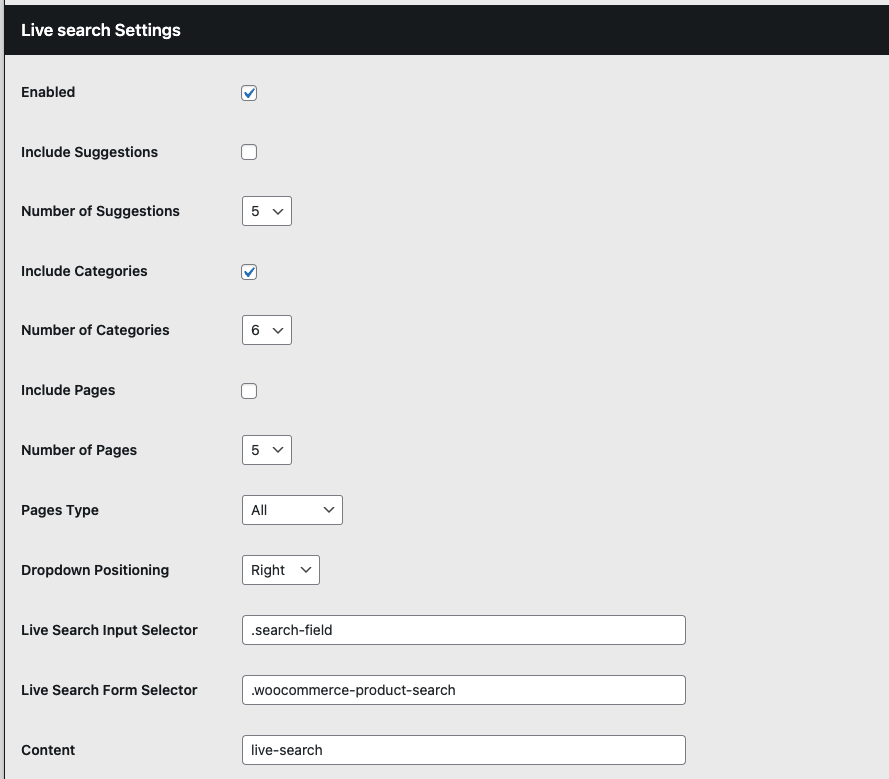
Enable your Clerk.io Live Search by checking the first box in this section.
Include Suggestions/ Categories / Pages: This let’s you control whether Clerk should find matching Categories or Pages to show on the Search Page.
Number of Suggestions / Categories / Pages: This let’s you decide how many possible matches to return for each type
Select the Pages type you’d like to return as page results in the next dropdown, such as Blog Posts or CMS Pages.
Choose the position of the Live Search dropdown results, then enter the Input Selector and Form Selector for your live search found in your store by inspecting the Search box with your browser.
Finally, enter the name of your Live Search Content from the Content embed code in my.clerk.io, often something like “live-search”.
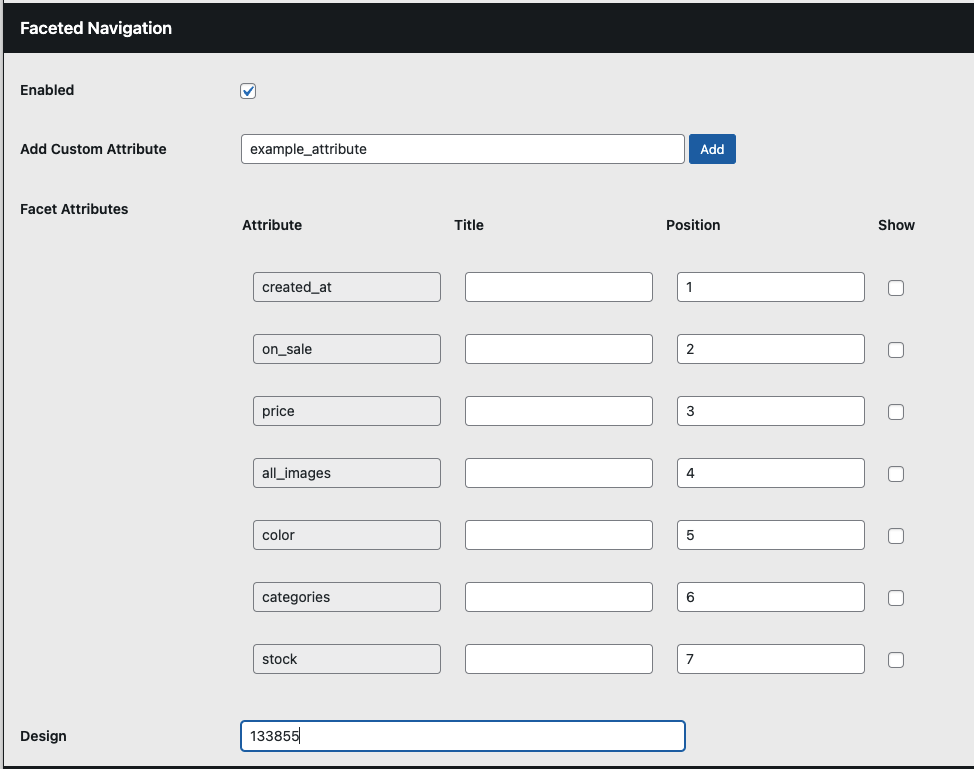
To add facets to your Search Page, first be sure to check the “Enabled” box under Faceted Navigation.
Faceted Navigation
Type in the value of an attribute you’d like to include in your facets in the “Add Custom Attribute” box, then click “Add”.
Once added, your added attributes will appear under Facet Attributes. In this section, you can create the Title to be display for that facet, and what position in the list of facets you’d like that attribute to appear. Check the box under “Show” to show that attribute in your facets.
Customising Your Search Page Facets
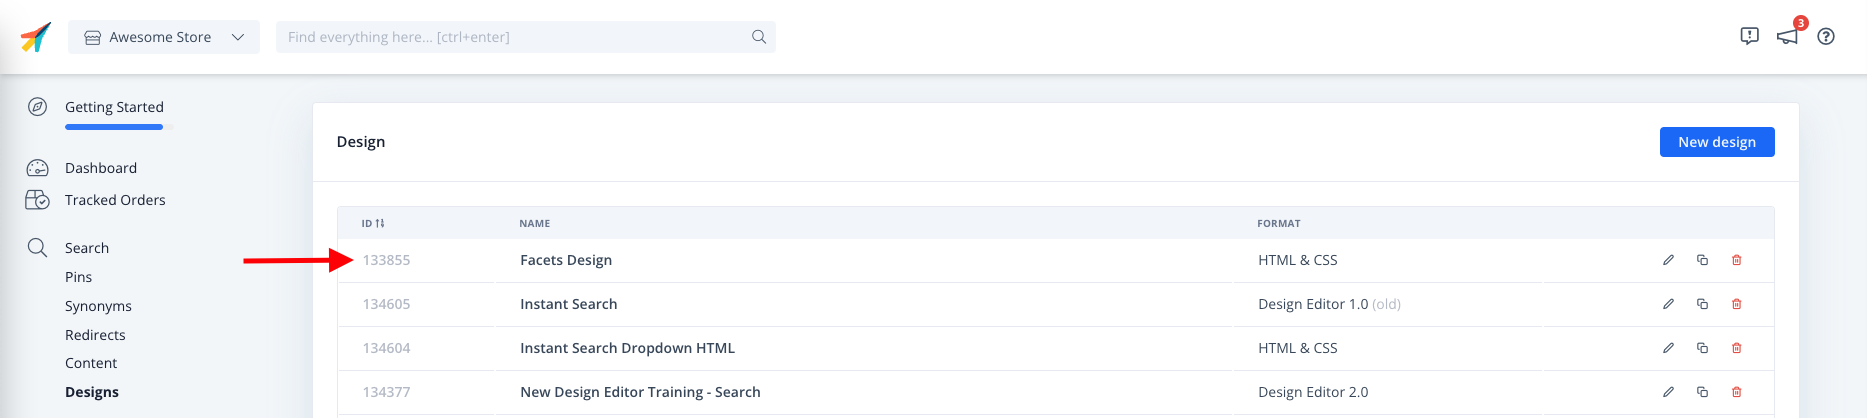
- Clerk.io allows you to style your search page facets from within the design and you can display this by referencing it with the Design field in the plugin
- The design ID can be found in the Clerk.io backend, on the far left column of each design on the design overview page and in the bottom left of the page once you enter the design to edit.
Powerstep & Exit Intent Settings
In the Powerstep Settings section, you can enable the Clerk.io Powerstep by first checking the box, then set:
Powerstep Type: Choose the type of powerstep you’d like to enable from the dropdown menu, like “page” or “popup”.
Powerstep Page: Choose the page for the Powerstep to appear, between “Front Page”, “Example Page”, “Cart”, etc.
Contents: Here, you’ll enter the Content you’ve created for your Powerstep in my.clerk.io, which is listed within the Content embed code as your data template name, which looks something like: “data-template= YOUR-CONTENT-NAME”
Filter Duplicates: Activating this will ensure that each banner shows completely unique products, at the cost of a slightly longer load time.
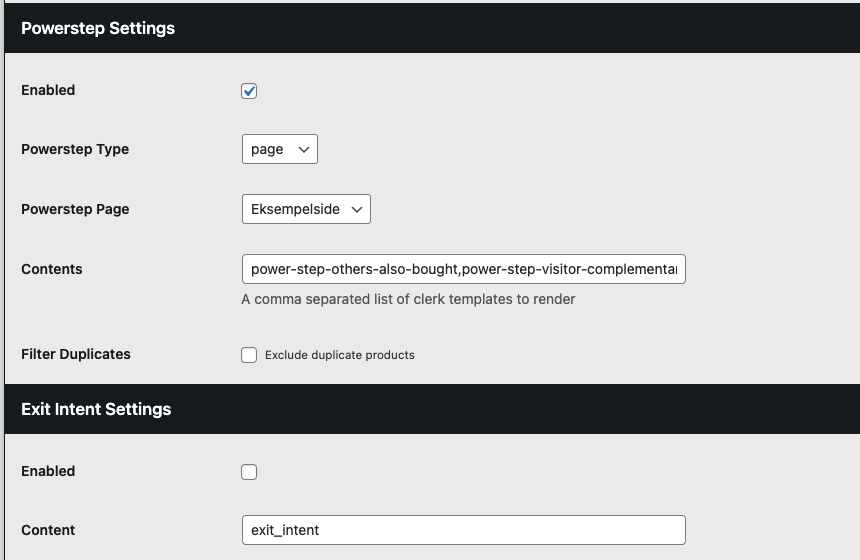
Under Exit Intent Settings, you can enable your Clerk.io exit intent content by checking the box, then enter the name of the exit intent Content you’ve created for your store, which can be found the same way as your Powerstep Content.
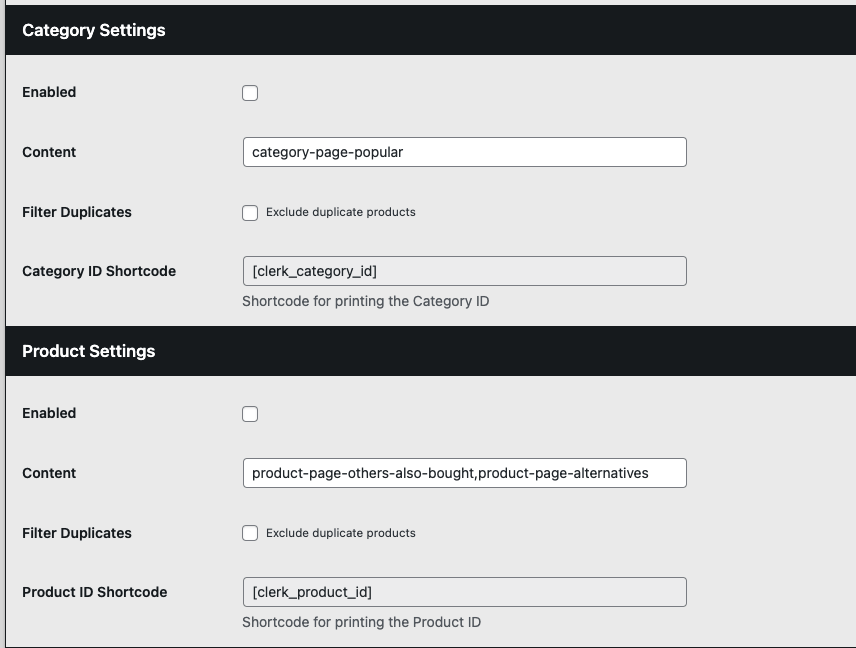
Category, Product, and Cart Settings
In these sections, you’ll enable and add the Content names for Recommendations content you’d like to add to your Category, Product, and Cart pages.
Check the " Enabled" box under the appropriate page section, and paste the Content name in the “Content” box to include that content on the page. In this example, we’ve added category-page-popular in the Category content.
- Filter Duplicates: Activating this will ensure that each banner shows completely unique products, at the cost of a slightly longer load time.
- Category / Product / Cart ID Shortcode: These shortcodes allow you to easily insert Clerk embedcodes if you want to customise their placements with editors like WPBakery and Elementor. The shortcodes needs to be inserted in order to add the relevant ID’s from the categories, product pages or cart. E.g:
<span class="clerk"
   data-template="product-page-alternatives"
   data-products="[[clerk_product_id]]">
</span>
 _
_
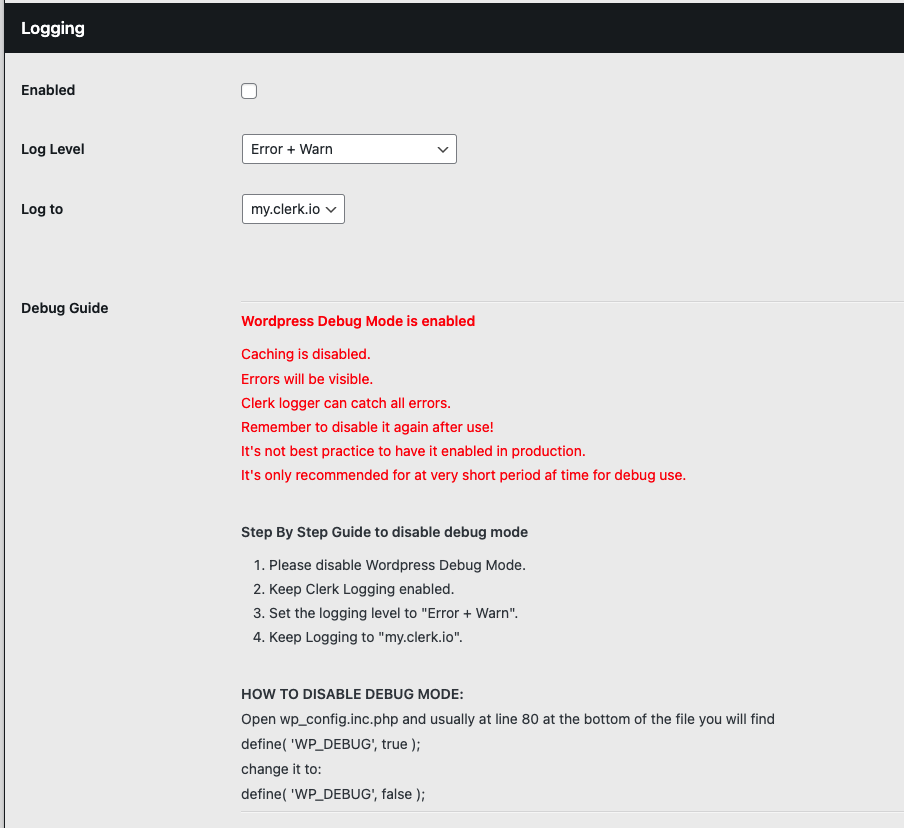
Logging
You can log plugin Errors, Warnings, and Debugging to my.clerk.io. In the Logging section, check the box next to “Enabled” to enable logging, then select the desired Log Level from the drop down menu.
Log Levels include Errors and Warnings, Only Errors, and Errors + Warnings + Debug Mode.
Finally, choose where you’d like these logs to show up. In this example, Errors and Warnings log to my.clerk.io.