Configuration
Open my.clerk.io > Chat > Configuration to configure Chat. Settings are arranged in sections on one page. Use the preview to check your changes, then click Save.
Your shopping assistant #
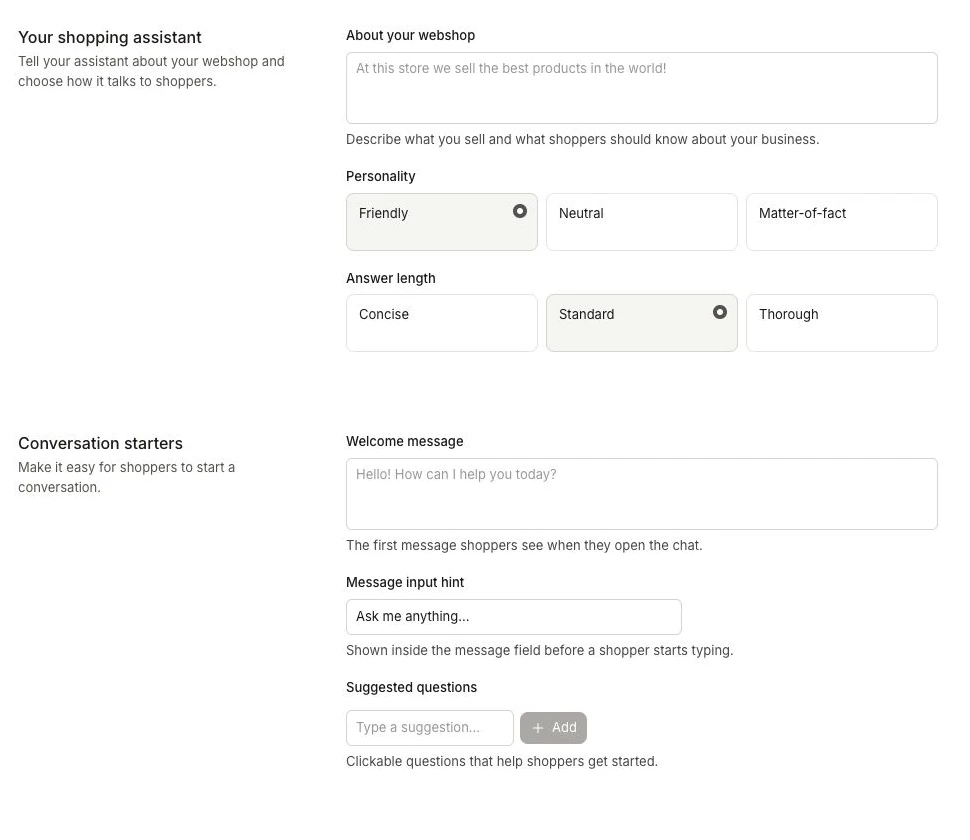
Tell Chat about your webshop and choose how it talks to shoppers.
About your webshop #
Enter or edit About your webshop to explain what you sell and what shoppers should know about your business. You can ask Ask Clerk.io for help with this text.
When Chat is first enabled, a description is generated automatically from your homepage and store metadata, including its name, platform, language and currency.
The generated description contains 2–4 sentences in your store’s language.
A useful description includes your store name, the products you sell and what makes your business helpful to shoppers.
For example: “Awesome Store sells supplements, vitamins and protein powder. We help shoppers find products that fit their needs, with a broad catalogue and competitive prices.”
Personality #
Choose Friendly, Neutral or Matter-of-fact to match how your brand speaks to shoppers.
Answer length #
Choose how detailed Chat’s answers should be: Concise, Standard or Thorough.
Conversation starters #
Make it easy for shoppers to start a conversation.
Welcome message #
Set Welcome message to the first message shoppers see when they open Chat. For example: “Welcome! I can help you find products and answer questions about our store. What are you looking for?”
Message input hint #
Set Message input hint to the text shown inside the message field before a shopper starts typing.
Suggested questions #
Use Suggested questions for clickable examples such as “How long is delivery?” or “Do you sell shoes in size 43?”.
To change their order, grab a suggestion’s dotted handle and drag it to the position you want. A dashed box shows where it will land. Release the row to move it.
For keyboard ordering, focus a suggestion row and press Alt + ↑ or Alt + ↓. Screen readers announce the move.
Human support #
Set Escalation email to the address where your team should receive conversations that need human help. Chat sends the conversation to this address so your team can follow up with the shopper.
Order tracking #
Turn on Allow order tracking to let shoppers check delivery status using your synced parcel data. If tracking is on and no parcels have been synced, follow the Data > Parcels link to set up parcel tracking.
They will always need to provide their email address and order ID, to confirm that its their order. Once confirmed, Chat will write a brief summary of the order and delivery status, and provide the link for tracking their parcel.
Shopify and Lightspeed users can enable this in their native importers: use the Shopify importer setting or the Lightspeed importer setting.
For other platforms, you must provide the Order status and Parcels data via API calls.
Tracking availability #
- Before a carrier receives the parcel: If your integration sends order statuses (for example, CONFIRMED/PAID/FULFILLMENT_PENDING), the Chat can confirm that the order was received and is being prepared. A carrier tracking link is not shown yet because no parcel with a tracking code exists.
- After a parcel is created with a tracking code: As soon as Clerk.io receives a parcel with
carrierandtracking_code, the Chat includes a one‑click tracking link and summarizes the latest delivery status. - While waiting for the first carrier scan: Some carriers first create a label and only add events after pickup. In this period the Chat will state that the parcel is awaiting pickup or label was created, and it will still share the tracking link if available.
Customers can see order confirmation right away (if you send order statuses), and full parcel tracking becomes available once a tracking code is present in Clerk.io.
Voice chat #
Let shoppers speak their questions instead of typing. In Available on, choose On for all devices, Mobile only or Off.
Transcription uses the browser’s language and requires permission to use the microphone. Shoppers click the microphone icon in Chat to start speaking and can say “send” to send the message.
Privacy and consent #
Use Consent message for the message shown above Chat’s input field. Leave it empty to hide it. You can use HTML to add links to your terms or privacy policy:
By messaging the AI assistant, you agree to our <a href="https://example.com/terms">Terms</a> and have read our <a href="https://example.com/privacy">Privacy Policy</a>.
Chat appearance #
Use Brand color for the header background, buttons and accents. Under Chat heading, set Heading text and adjust the font family, size, weight and text color.
Message appearance #
Choose the font family, font size, background color and text color for messages inside the conversation.
Chat button and invitation #
Choose where shoppers open Chat and how you invite them to try it.
Under Chat button, set a Custom icon link or use Choose from Library. Adjust Size, Position and Distance from the edge.
Under Chat invitation, set Message text and an Emoji or icon, then adjust colors and font size. Shoppers can dismiss the invitation by clicking X or opening Chat. It stays dismissed for that session.
Product information #
Choose the product attributes Chat can use when answering questions. For example, weight, categories and delivery_time help it answer questions about weight, related products and delivery.
Product search filters #
Choose the attributes Chat can use to narrow down product results, such as price, on_stock, on_sale, _category_name, color, size or product_type. Include attributes shoppers would naturally use to refine a search.
Describe each filter’s purpose and use Maximum values to set how many values Chat can filter by at once.
Product card template #
Use Product card template to customize the HTML and Liquid content of products shown in Chat. Product variables insert details such as the name, image and price. See Code Designs for syntax and product attributes.
Add CSS classes to the template’s HTML, then put the styling rules in
Custom styling. Keep CSS in that field instead of adding <style> blocks or inline style attributes to the template.
Custom styling #
Use Custom styling to style Chat and its product cards, including colors, fonts, spacing, borders and layout.
Add CSS rules directly to this field without <style> tags. Target the classes used in Product card template with specific selectors.
For example, add a class to the product name in Product card template:
<div class="clerk-chat-product-card__name">{{ product.name }}</div>
Then add its styling in Custom styling:
.clerk-chat-product-card__name {
  font-size: 16px;
  font-weight: 600;
  margin-bottom: 8px;
}
Check the result in Live Preview and click Save when you are happy with it.
Visibility #
Use the page header’s mode control to choose who can see Chat. Keep it in Preview mode while testing, then use the live mode when it is ready for visitors. Disable Chat to hide it while keeping your configuration.
Click Open site in preview to check it on your webshop. You can also add ?clerk_content_mode=preview to your webshop URL to see Chat in preview mode.