Setup
This guide covers everything you need to set up before Clerk.io can send emails on your behalf.
These steps only apply when you want to send emails through Clerk.io — campaigns, flows, and automated triggers like Abandoned Cart. If you only want to add personalised product recommendations to emails you already send through Klaviyo, Mailchimp, or another platform, none of this is needed. Head straight to Embeds instead.
Configuration #
These steps get Clerk.io authorised to send emails from your domain, give it a list of people to send to, and get your first email design ready. You will need access to my.clerk.io, your domain’s hosting provider, and your existing email platform.
Setup Status #
The Setup Status tab at Email > Configuration > Setup Status gives you a live overview of whether your email setup is complete and healthy.
Each item in the list displays a coloured dot — green means everything is in order, red means something is missing or broken, and orange is a warning worth investigating. The tab header itself shows a count of any missing required steps so you can see at a glance whether action is needed.
The checks are grouped into three areas:
Configuration covers the core setup requirements — whether your store and company are enabled, whether email sending access is active, which sender domain is configured, how many subscribed recipients are available, and whether your active flow steps all have email designs assigned.
On-site tracking shows whether visitor tracking is running and how many visitors or baskets have been linked to an email address in the last seven days. Low numbers here usually point to a missing email collection setup.
Flows & sending shows whether active flows are configured, how many flow events are pending and how many emails have been sent recently, and whether the send queue is healthy. If emails are not going out as expected, this section is the first place to check.
DNS Setup #
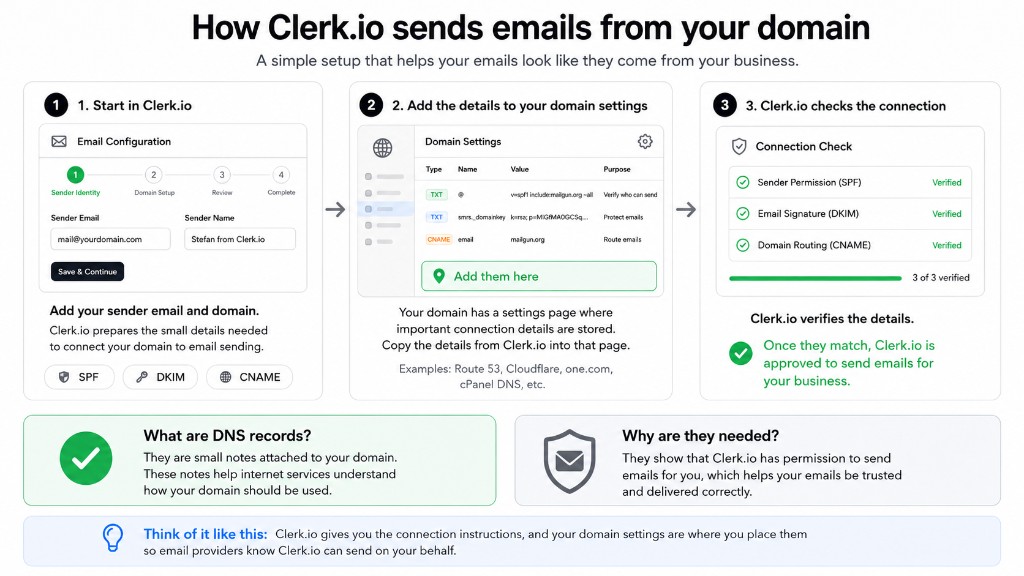
DNS setup is required for all stores using Clerk.io Email. Before Clerk.io can send any emails, you need to authenticate your sending domain by adding DNS records to your domain’s hosting provider.
Think of it like this: when Clerk.io sends an email on your behalf, it needs to prove to the recipient’s mail server that it is actually authorised to do so. Without that proof, the email looks suspicious — like someone claiming to be you without any ID. Mail servers don’t like that, and will either reject the email or send it straight to spam.
DNS records are how you grant that authorisation. You add a few records to your domain’s settings (wherever you manage your domain — Route 53, Cloudflare, GoDaddy, etc.), and those records tell the internet: “Clerk.io is allowed to send emails as us.”
There are three record types you need to add:
- SPF — Declares which services are authorised to send email from your domain.
- DKIM — Adds a cryptographic signature to outgoing emails so recipients can verify they genuinely came from you and haven’t been altered in transit.
- CNAME — Used for tracking opens and clicks in your campaigns.
SPF records: A domain can only have one SPF TXT record. If you already have one, you must merge the directive, e.g. include:mailgun.org into it rather than creating a second record.To find your DNS records, go to Email > Configuration > Domain Setup and follow the step-by-step guide for your hosting provider.
Once you have entered your Sender Email and Sender Name, Clerk.io will generate the exact record values you need to add. After adding them to your hosting provider, return to Email > Configuration > DNS Records and click Verify Now. Clerk.io will check that all three records are correctly configured.
Subscriber Sync #
Subscriber sync is required for all stores using Clerk.io Email. A subscriber is an email address that has opted in to receive email marketing. Clerk.io needs to know who these people are before it can send campaigns.
If you already have subscribers in a platform like Klaviyo or MailChimp, you can sync them directly into Clerk.io. This gives you a full subscriber list from day one.
To set up a sync, go to Settings > Integrations and connect your email platform. Once the integration is saved, go to Email > Configuration > Sync Subscribers and enable the toggle next to the integration you want to use.

To find the setup guide for your specific email platform, look it up in the integrations menu in the sidebar and follow its Sync Data guide.
If you don’t use an external email platform, you can import subscribers via a CSV file or include them in your
data feed using the subscribed: true attribute on customer records.
Personalization #
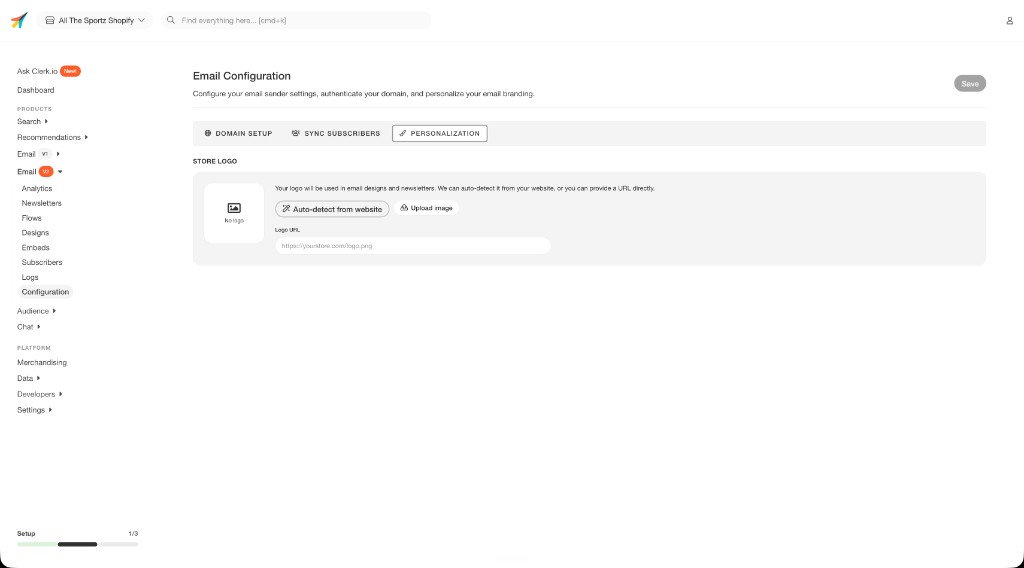
The Personalization tab at Email > Configuration > Personalization lets you set a store logo that Clerk.io will use across your email designs.
You can either upload an image directly or use Auto-detect from website to have Clerk.io find and pull in the logo automatically from your storefront. This is the fastest option if your logo is already visible on the site — Clerk.io will locate it and apply it without any manual upload needed.
The logo set here is used as the default logo in Clerk.io-built email designs. If you build your designs manually, you can still reference it using your logo URL directly in the template markup.
Email Design #
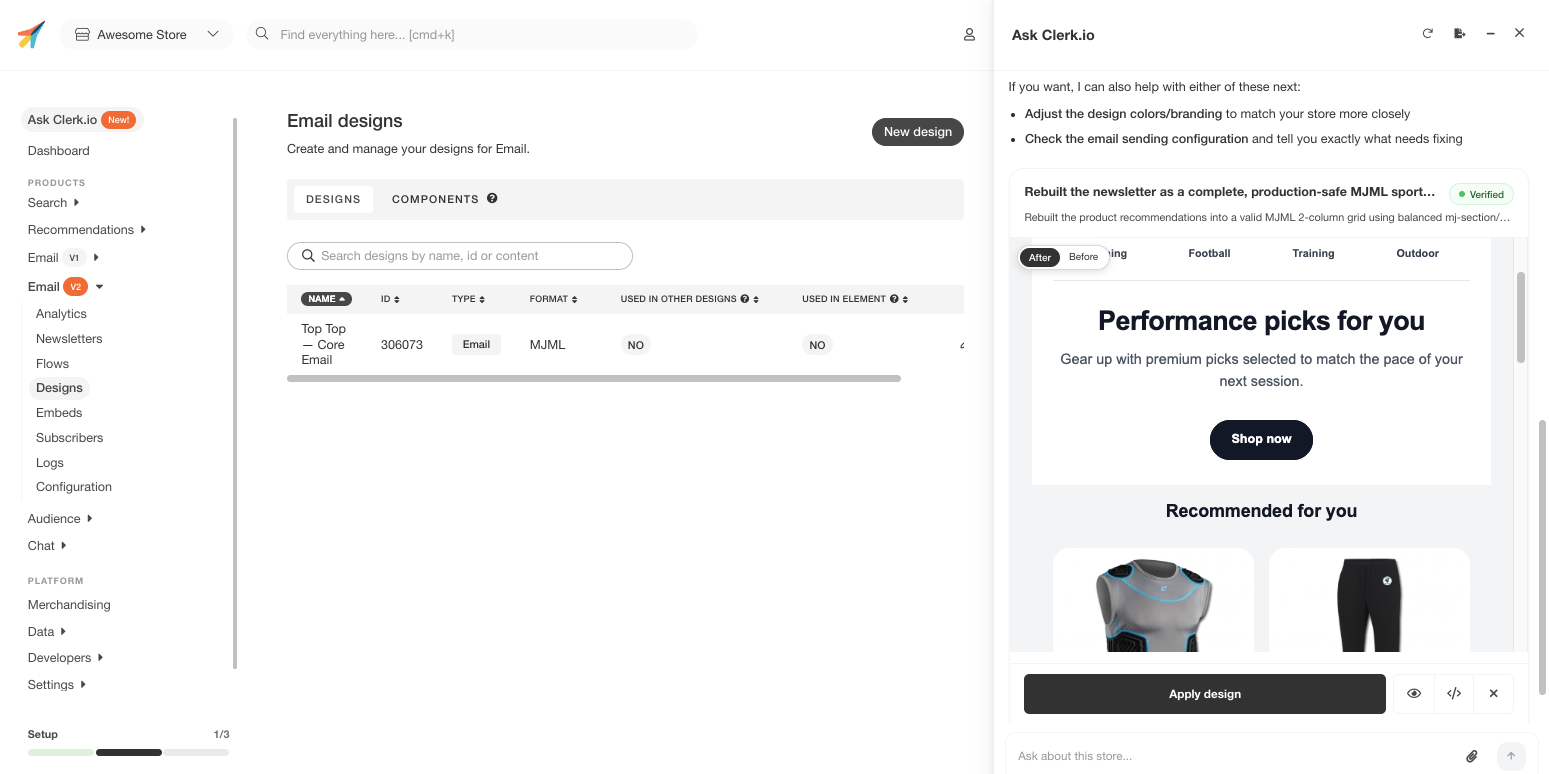
Every campaign and automated flow needs an email design — the visual template Clerk.io uses to build the actual email it sends.
The easiest way to create one is through Ask Clerk.io Design Studio. Describe what you want in plain language — layout, colours, which products to show, how sale prices should look — and it builds a preview inline in the chat for you to review and refine. You can also point it at your site or attach a screenshot and it will match your existing style. Read more in the Design Studio guide.
For more control, Clerk.io’s built-in MJML editor lets you write designs as structured markup. MJML compiles to HTML that renders consistently across Gmail, Outlook, and Apple Mail. See the MJML Designs guide for a full walkthrough and examples.
All email designs in Clerk.io are responsive — they adapt automatically to any screen size, so they look good on desktop, tablet, and mobile without any extra work.
If you want to include static images in your designs — banners, logos, seasonal headers — you can host them directly on Clerk.io’s servers using the
Media Library. Images uploaded there get a template reference like {{ media.your-image }} that you can drop straight into any design. You can also attach an image directly in Ask Clerk.io and ask it to upload the image and use it in the design it creates — it will handle the rest.
Unsubscribe Links #
Every marketing email must include a way for recipients to opt out. How you handle this depends on how you are sending emails.
Using an external platform (Klaviyo, Mailchimp, etc.) — Keep using your existing platform’s unsubscribe link. It handles the opt-out and keeps your subscriber list in sync automatically.
Sending all emails through Clerk.io — Add Clerk.io’s unsubscribe link to your design. If you use Ask Clerk.io to build the email, just tell it to include an unsubscribe link and it will handle the rest.
For designs you build manually, use the link below. The {{ email }} variable is replaced with each recipient’s address at send time. Replace YOUR_PUBLIC_API_KEY with the Public Key from Developers > API Keys.
<a href="https://api.clerk.io/v2/subscriber/unsubscribe?key=YOUR_PUBLIC_API_KEY&email={{ email }}&redirect=true">Unsubscribe</a>
To unsubscribe from a specific list only, add list_id:
<a href="https://api.clerk.io/v2/subscriber/unsubscribe?key=YOUR_PUBLIC_API_KEY&email={{ email }}&list_id=FSY27248&redirect=true">Unsubscribe from this list</a>
To redirect to your own confirmation page after unsubscribing, add redirect_url:
<a href="https://api.clerk.io/v2/subscriber/unsubscribe?key=YOUR_PUBLIC_API_KEY&email={{ email }}&redirect=true&redirect_url=https://yoursite.com/unsubscribed">Unsubscribe</a>
On-Site Setup #
These steps require changes on your store and unlock personalisation, automated flows, and Abandoned Cart. Not all of them are needed by every store — which ones you need depends on what you want to send.
Email Collection #
Required for all automated flows — browse abandonment, welcome series, and Abandoned Cart.
Every visitor on your site is assigned a visitor ID. Clerk.io uses this to track what they view, search, and add to their cart.
The problem is that the visitor ID starts out anonymous — Clerk.io has no way to email that visitor unless it knows their address. Email collection is the step that connects the two.
Once a visitor’s email is linked to their visitor ID, all of their session behaviour can be used to trigger and personalise emails.
There are two situations where this connection needs to be made:
When a visitor types their email — If a visitor enters their email anywhere on the site (a checkout field, a newsletter sign-up, a login form), Clerk.io can detect it and log it automatically. This is handled by the collect_email feature, which can be enabled in your Clerk.js config or from Developers > Clerk.js Config in my.clerk.io.
When a customer is already logged in — If a customer returns to the site already authenticated, their email is available immediately. In this case, a small script on every page can log the email once per session, so the connection is made without the customer needing to type anything.
Cart Tracking #
Required for Abandoned Cart.
When a visitor leaves without purchasing, Clerk.io can send them an email showing the exact products they left behind — but only if it knows what was in their cart.
Cart tracking needs to be called whenever the cart changes: when a product is added, removed, or when the cart is fully updated. Without it, the Abandoned Cart flow has no product data to work with.
Subscriber Forms #
Optional — only needed if you are collecting new sign-ups directly through Clerk.io.
If you are using Clerk.io as your primary email platform, you need a way for new visitors to sign up directly from your site. This keeps your subscriber list growing inside Clerk.io without relying on an external platform for sign-ups.
If you prefer to keep collecting subscribers in Klaviyo or another platform, keep the subscriber sync running continuously so new sign-ups are regularly brought into Clerk.io. In that case, subscriber forms are not needed — you can skip this section.
See the implementation section below for a ready-to-use sign-up form.
With Clerk.js #
DNS setup and subscriber sync are always done through Email > Configuration and Settings > Integrations in my.clerk.io — they do not require any code.
Auto-detecting email inputs #
If you are using one of Clerk.io’s installable plugins (DanDomain Classic, Magento 1, Magento 2, PrestaShop, Shopware 6, VTEX, or WooCommerce), activate collect_email directly from the plugin settings. Otherwise, enable it in your Clerk.js config. Clerk.js will then monitor all email input fields on the page and log the address automatically when a visitor types one in.
Clerk('config', {
  key: 'your-public-api-key',
  collect_email: true
});
This works for checkout fields, newsletter sign-ups, login forms, and any other <input type="email"> element on the page.
Logged-in customers #
If a customer is already logged in when they arrive on the site, log their email once per session. The exact implementation depends on your platform, but the important part is using Clerk('call', 'log/email') to send the email address to Clerk.io as soon as the user can be identified in the session.
Here is an example using sessionStorage to avoid making the call on every single page load:
if (!sessionStorage.getItem('clerk_email_logged')) {
  Clerk('call', 'log/email', {
    email: 'CUSTOMER_EMAIL'
  });
  sessionStorage.setItem('clerk_email_logged', '1');
}
Replace CUSTOMER_EMAIL with the actual email address from your platform. Make sure to only render the logging script on pages where an email address is available — skip it entirely for guest visitors.
Cart Tracking #
If you are using the Magento 1, Magento 2, PrestaShop, or WooCommerce plugin, cart tracking is handled automatically — no additional code needed.
For all other setups, notify Clerk.io of the current cart contents using the set method. Call it whenever the cart changes, passing the current list of product IDs. Each call is automatically tied to the current visitor session.
Clerk('cart', 'set', [1234, 5678, 42]);
Read more about the Shopping Cart integration here.
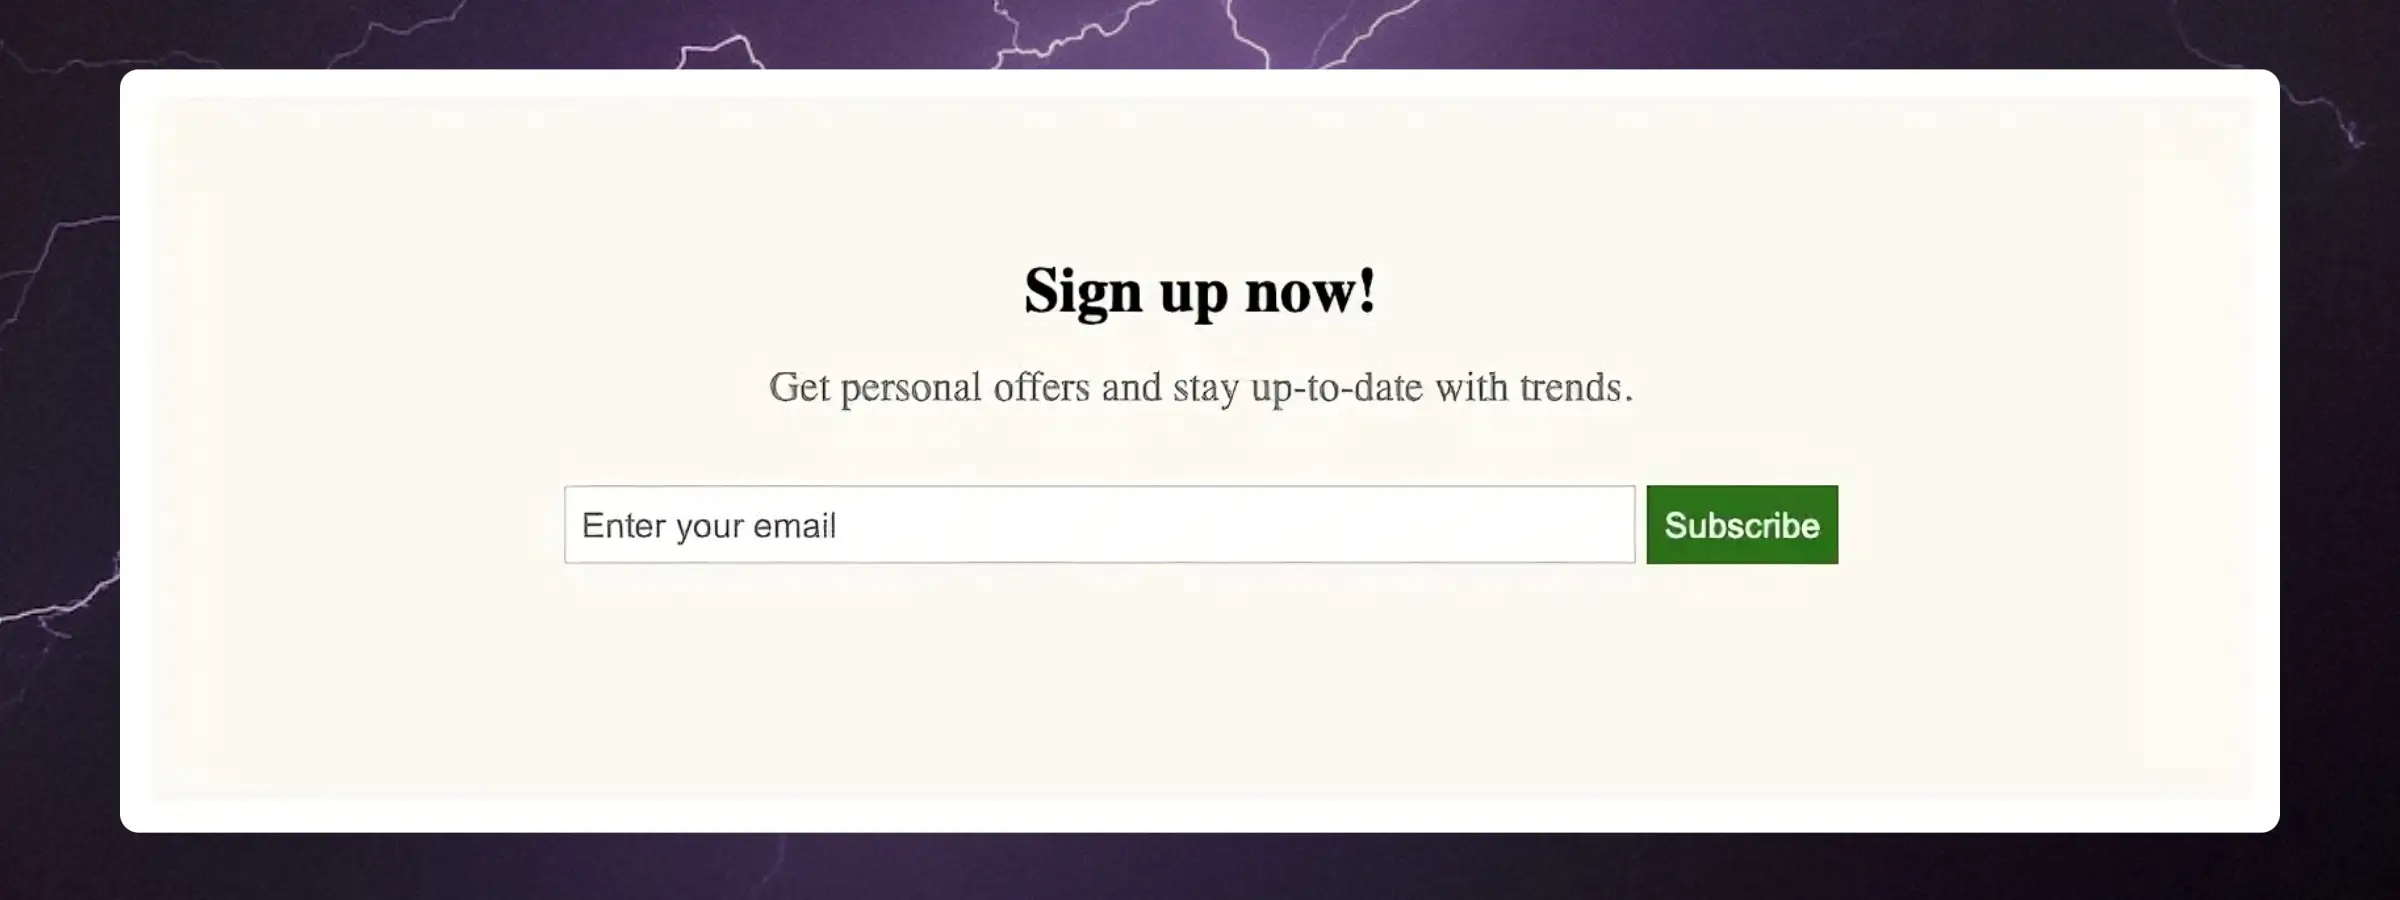
Subscriber Forms #
Below is a ready-to-use sign-up form you can drop into your site — footer, homepage, a popup. Style it however you like.
<div class="clerk-sign-up">
   <h2 class="clerk-sign-up-headline">Sign up now!</h2>
   <div class="clerk-sign-up-subtitle">Get personal offers and stay up-to-date with trends.</div>
   <div class="clerk-input-wrapper">
      <input type="text" id="clerk-add-subscriber-input" placeholder="Enter your email">
      <button id="clerk-add-subscriber-btn" onclick="add_subscriber()">Subscribe</button>
   </div>
   <div id="clerk-subscribe-message"></div>
</div>

<script>
   function add_subscriber() {
      var clerk_btn = document.getElementById("clerk-add-subscriber-btn");
      var clerk_input = document.getElementById("clerk-add-subscriber-input");
      var clerk_message = document.getElementById("clerk-subscribe-message");
      Clerk("call", "subscriber/subscribe", {
         email: clerk_input.value
      },
      function(response) {
         clerk_message.style.color = "#008001";
         clerk_message.innerText = "You are now subscribed!";
         clerk_btn.innerText = "Subscribed!";
         clerk_btn.style.opacity = "0.5";
         clerk_btn.disabled = true;
      },
      function(response) {
         clerk_message.style.color = "#EE360E";
         clerk_message.innerText = "Could not subscribe. Please try again.";
      });
   }
</script>

<style>
   .clerk-sign-up {
      width: 50%;
      padding: 60px 0;
      max-width: 800px;
      min-width: 500px;
      margin: 40px auto;
      background-color: #FEFAF4;
   }
   .clerk-sign-up-headline {
      margin: 0 14px 14px;
      text-align: center;
   }
   .clerk-sign-up-subtitle {
      margin: 14px 14px 28px;
      text-align: center;
      color: #808080;
   }
   .clerk-input-wrapper {
      margin: 10px auto;
      text-align: center;
   }
   #clerk-add-subscriber-input {
      height: 28px;
      width: 50%;
      padding: 0 0 0 6px;
      border: 1px solid #D3D3D3;
   }
   #clerk-add-subscriber-btn {
      height: 30px;
      background-color: #008001;
      border: 1px solid #008001;
      color: white;
      cursor: pointer;
   }
   #clerk-subscribe-message {
      height: 20px;
      margin: auto;
      text-align: center;
   }
</style>
To subscribe to a specific list instead of globally, add a list_id to the call. List IDs are found in Email > Subscribers > Lists.
Clerk("call", "subscriber/subscribe", {
  email: "customer@example.com",
  list_id: "FSY27248"
});
Read more about managing subscribers and lists here.
With the API #
This section covers the same setup using direct API calls. This is relevant for server-side integrations that do not use Clerk.js.
When using the API, you are responsible for generating and maintaining the visitor ID for each session. See the Tracking guide for details on how to do this.
Log Email #
Use log/email to associate a visitor ID with an email address. Call this once per session when an email address is available — both when a customer actively logs in and when they return already logged in.
curl -X POST https://api.clerk.io/v2/log/email \
  -H 'Content-Type: application/json' \
  -d '{
    "key": "your-public-api-key",
    "email": "customer@example.com",
    "visitor": "SESSION_VISITOR_ID"
  }'
Replace SESSION_VISITOR_ID with the visitor ID for the current session. Skip this call entirely for guest visitors where no email is known.
Cart Tracking #
Use log/cart/update to set the cart to its current state. Call it whenever the cart changes, passing the full list of products currently in the cart.
curl -X POST https://api.clerk.io/v2/log/cart/update \
  -H 'Content-Type: application/json' \
  -d '{
    "key": "your-public-api-key",
    "visitor": "SESSION_VISITOR_ID",
    "products": [
      {"id": 1234, "quantity": 2},
      {"id": 5678, "quantity": 1}
    ]
  }'
You can also pass email instead of (or in addition to) visitor if the email address is already known at the time of the call.
Subscriber Forms #
Use subscriber/subscribe to add an email address as a subscriber when a visitor signs up on your site.
curl -X POST https://api.clerk.io/v2/subscriber/subscribe \
  -H 'Content-Type: application/json' \
  -d '{
    "key": "your-public-api-key",
    "email": "customer@example.com"
  }'
To subscribe to a specific list, include list_id:
curl -X POST https://api.clerk.io/v2/subscriber/subscribe \
  -H 'Content-Type: application/json' \
  -d '{
    "key": "your-public-api-key",
    "email": "customer@example.com",
    "list_id": "FSY27248"
  }'
Read the full reference at docs.clerk.io/reference/subscriberssubscribe.
Unsubscribing #
Use subscriber/unsubscribe to unsubscribe an email address programmatically — for example from a custom unsubscribe page or a backend workflow.
curl -X POST https://api.clerk.io/v2/subscriber/unsubscribe \
  -H 'Content-Type: application/json' \
  -d '{
    "key": "your-public-api-key",
    "email": "customer@example.com"
  }'
This unsubscribes globally. To unsubscribe from a specific list only, include list_id:
curl -X POST https://api.clerk.io/v2/subscriber/unsubscribe \
  -H 'Content-Type: application/json' \
  -d '{
    "key": "your-public-api-key",
    "email": "customer@example.com",
    "list_id": "FSY27248"
  }'
Read the full reference at docs.clerk.io/reference/subscribersunsubscribe.