Clerk.js
Overview #
Clerk.js is a JavaScript library that simplifies the integration of our API with the frontend. At just 37.7kb, it is a super lightweight solution.
There are three benefits to using Clerk.js:
- It’s robust, as it’s loaded asynchronously. This means that the rest of the page is not dependent on an API response before loading.
- It’s often faster, as your server can start rendering the page in parallel with Clerk.js making calls and rendering results.
- Visitor- and click-tracking is handled automatically for any results shown by Clerk. This requires no cookies, as we generate a hashed value of the visitor’s IP and useragent, combined with a unique store salt that rotates every 30 days.
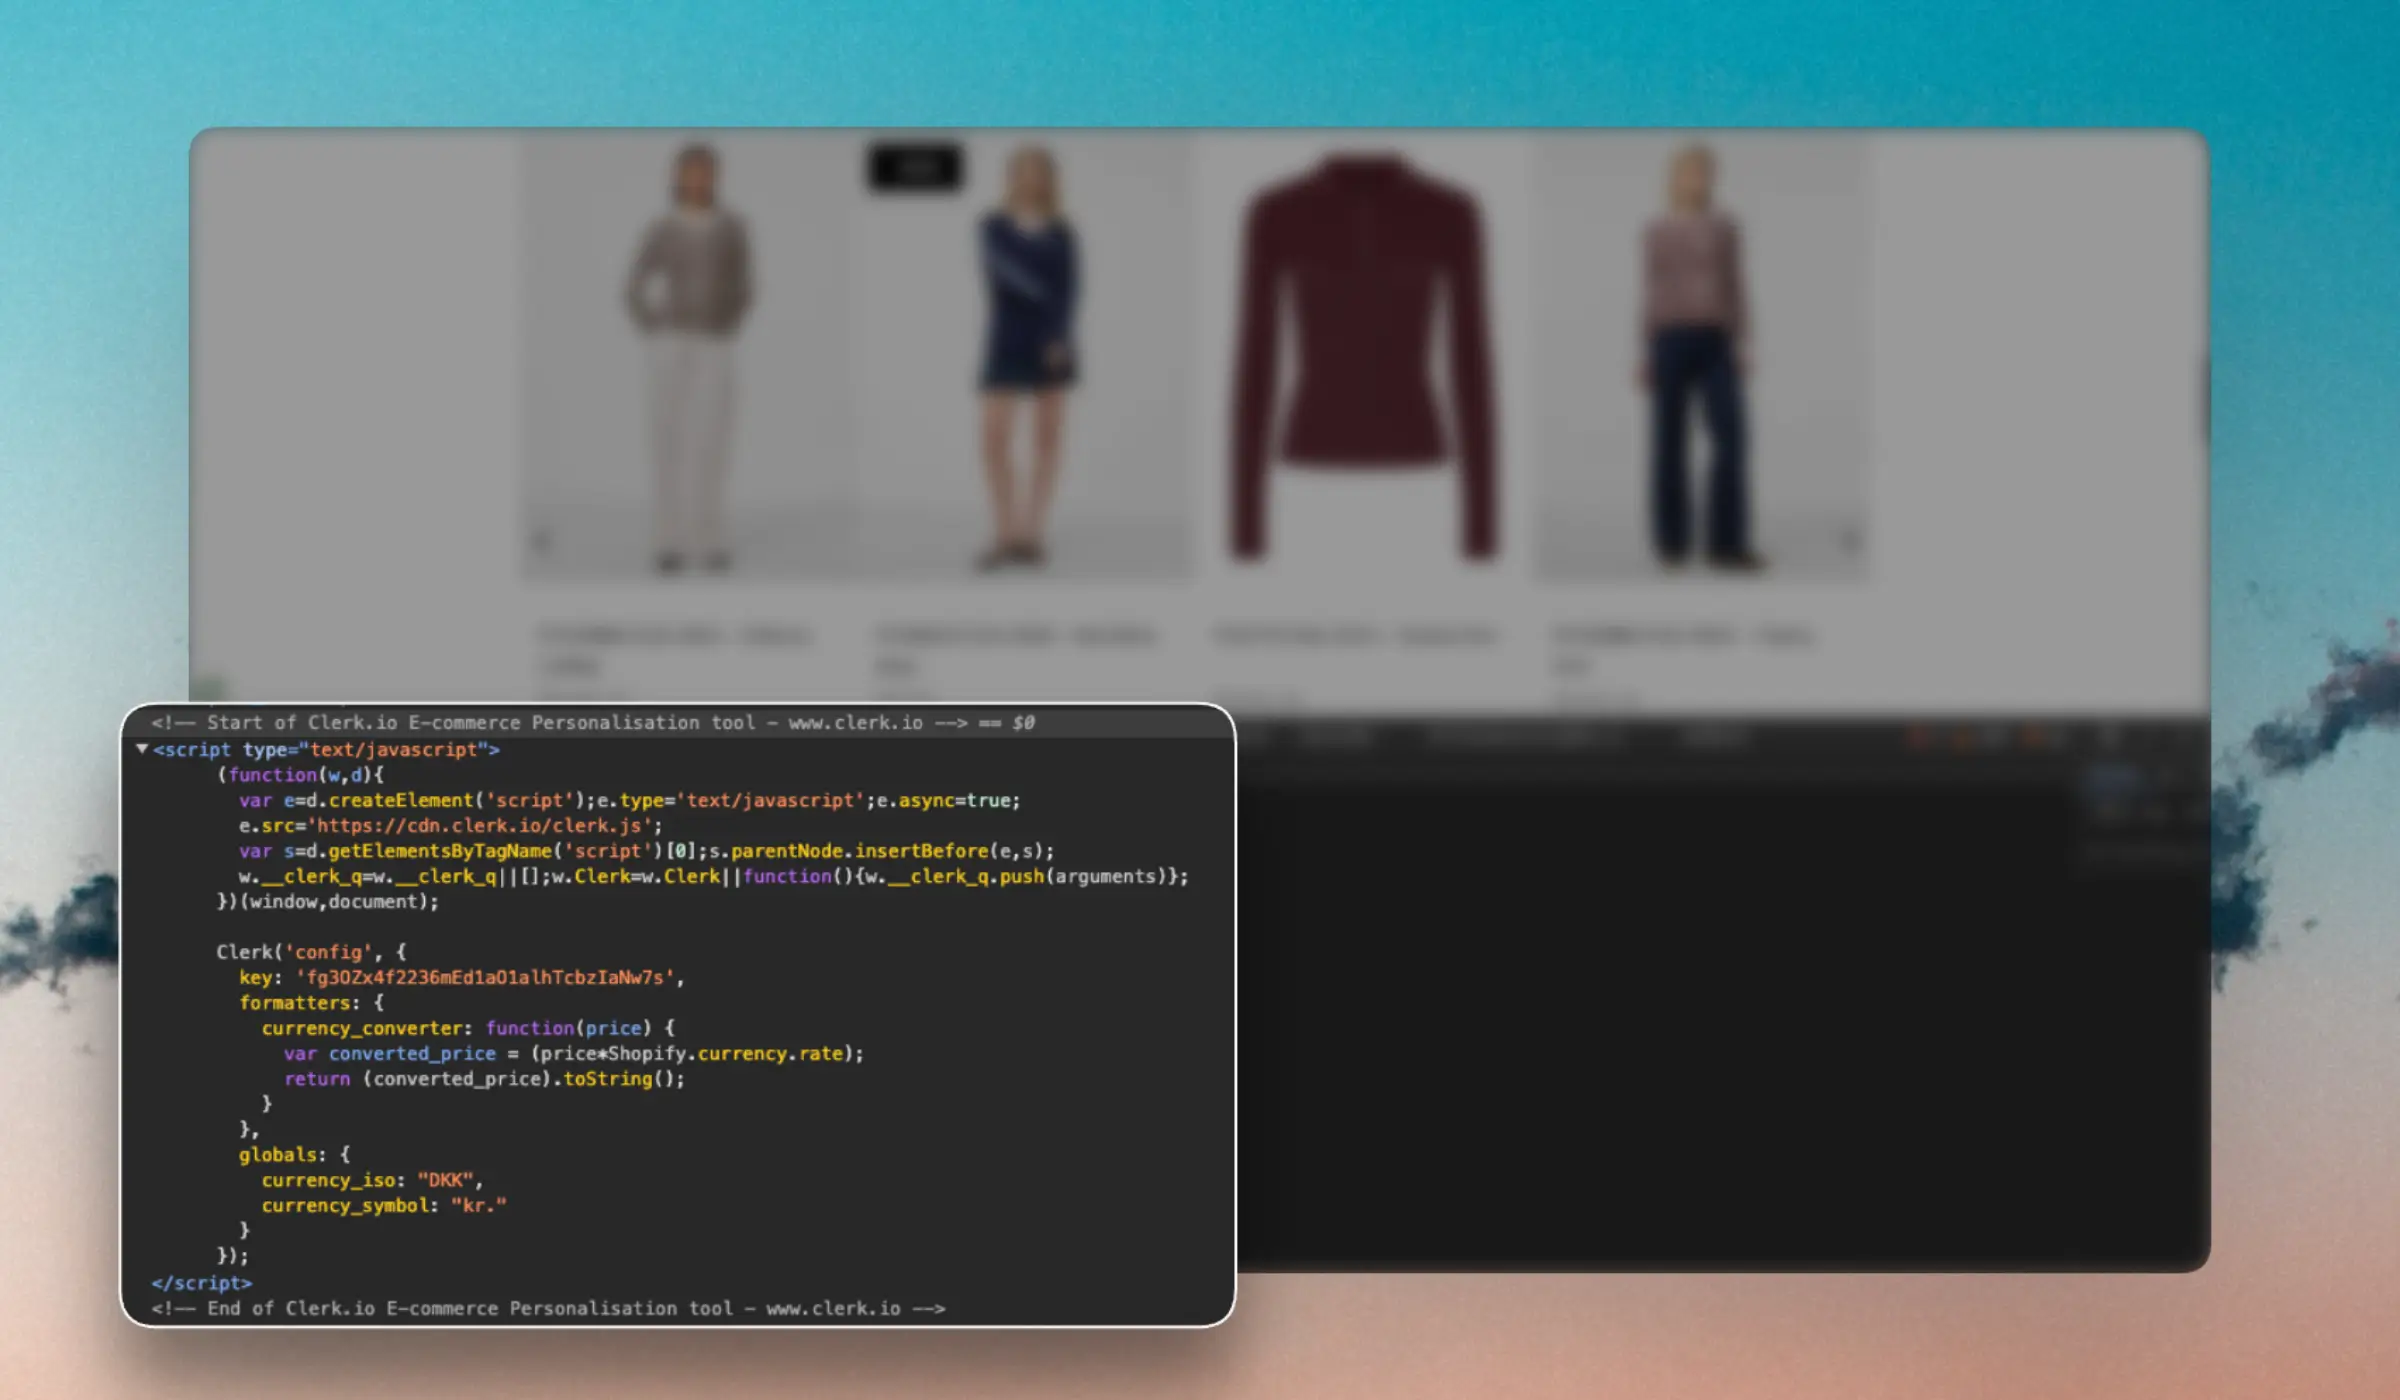
Clerk.js loads with an initialization script added to the header of the website:
<!-- Start of Clerk.io E-commerce Personalisation tool - www.clerk.io -->
<script type="text/javascript">
  (function(w,d){
    var e=d.createElement('script');e.type='text/javascript';e.async=true;
    e.src='https://cdn.clerk.io/clerk.js';
    var s=d.getElementsByTagName('script')[0];s.parentNode.insertBefore(e,s);
    w.__clerk_q=w.__clerk_q||[];w.Clerk=w.Clerk||function(){ w.__clerk_q.push(arguments) };
  })(window,document);

  Clerk('config', {
    key: 'insert_api_key'
  });
</script>
<!-- End of Clerk.io E-commerce Personalisation tool - www.clerk.io -->
It loads the library from our CDN and lets you access its functionalities through the Clerk object, and configures Clerk.js with the API key so it already knows which Store it’s making API calls for.
Snippets #
When the page is loaded, Clerk.js scans it for any snippets with the class “clerk”.
It then uses the attributes from the snippet to build an API call while getting the API key from the config in the initialization script.
<span
  class="clerk"
  data-api="recommendations/popular"
  data-limit="10"
  data-template="@clerk-product-template">
</span>
The visuals are handled by the Design, which is also referenced by the snippet.
Clerk.js uses
Liquid designs to render HTML with the data returned by the API. These are formatted as scripts, referenced by their ID in data-template in your snippet.
<span class="clerk"
     data-api="search/search"
     data-query="jedi"
     data-limit="20"
     data-template="#clerk-template">
</span>

<script type="text/x-template" id="clerk-template">
  <h1>Search result for {{ query }}.</h1>
  {% for product in products %}
    <div class="product">
      <h2>{{ product.name }}</h2>
      <img src="{{ product.image }}" />
      <a href="{{ product.url }}">Buy Now</a>
    </div>
  {% endfor %}

  <a href="javascript:Clerk('content', '#{{ content.id }}', 'more', 20);">Load More Results</a>
</script>
Snippets can also be simplified to just include a reference to an
Element block, by using the syntax data-template="@element-block-id":
<span class="clerk"
     data-template="@product-page-alternatives"
     data-products="[12352]">
</span>
Designs are then handled with the Design Editor or with Liquid HTML code in a user-friendly way from my.clerk.io.
Your snippets will only need to contain the class clerk, any page-specific info like product ID’s, and a reference to the ID of an Element block in data-template.
Injection #
Injection is a feature that allows you to insert content snippets into your website without having to add it manually. Instead, you simply choose a CSS Selector to inject the snippet into, and Clerk.js will automatically add it on page load.
Read more about Injection here.
Configuration #
Clerk.js allows for a variety of configurations that change how it functions.
Visitor IDs #
By default, Clerk.js generates anonymous visitor IDs, used to track the sessions.
If customers agree to cookies, Clerk.js can be configured to place a persistent cookie with the visitor ID, which allows tracking over a longer period of time.
If you prefer managing session IDs manually, you can configure the visitor parameter that Clerk uses in API calls. Alternatively, you can turn off session tracking entirely by setting visitor to null.
// Persistent visitor ID
Clerk('config', {
  visitor: 'persistent'
});

// Custom visitor ID
Clerk('config', {
  visitor: 'ABC123'
});

// Disabling visitor tracking
Clerk('config', {
  visitor: null
});
Page Context #
Configures Clerk.js with the context of the page a visitor is currently viewing. This is used to enrich tracking data for personalisation features like Email Triggers, Audience segmentation, and Chat context.
Clerk('context', {
  product: null,  // Set product ID on product pages, e.g. 12345 or null
  category: null, // Set category ID on category pages, e.g. 67 or null
  page: null      // Set page ID or type on other pages, e.g. 'homepage' or null
});
Language #
Configures Clerk.js with the written language of the website. This is used for Clerk.io to properly handle grammar rules in Search, and for fetching the correct translations when you use multi-language feeds.
Clerk('config', {
  language: 'italian'
});
Accepted values are listed under the Supported languages.
Replace the placeholder values with your platforms logic to get the IDs dynamically. Each value should be set based on the type of page the visitor is on:
- product: The ID of the product being viewed on product pages. Set to
nullon non-product pages. - category: The ID of the category being viewed on category pages. Set to
nullon non-category pages. - page: A page identifier or type string on other pages like the homepage, cart, or checkout. Set to
nullif not applicable.
If your platform doesnt have a specific ID available for a page type, leave the value as null. Only set values for the page types that are relevant.
Design Functions #
Clerk.js supports adding Formatters and Globals, which can be used to create custom javascript functionality for your design scopes.
Formatters #
These are used to influence or change attributes. For example, you may only want to show the first 40 characters of a description, or you may need to calculate a specific discount percentage based on the type of customer who is logged in.
Globals #
These are meant to be used with frontend data that you want to access in designs. This could be examples like the remaining amount needed to achieve free shipping, the name of a logged-in customer, a currency symbol, or a conversion rate.
Below is an example of configuring formatters and globals.
Config #
Clerk('config', {
  formatters: {
    uppercase: function(string) {
        return string.toUpperCase();
    }
  },
  globals: {
    currency_symbol: '$'
  }
});
Design #
<div class="name">{{ product.name | uppercase }}</div>
<div class="price">{{ currency_symbol }}{{ product.price }}</div>
Output #
<div class="name">GREEN LIGHT SABER</div>
<div class="price">$1999.99</div>
Email Tracking #
Clerk.js can automatically collect emails in the customer’s session to be used for personalising email recommendations even if they haven’t placed an order yet.
Enable collect_email in your Clerk.js config:
<script type="text/javascript">
  Clerk('config', {
    key: 'insert_api_key',
    collect_email: true
  });
</script>
With this enabled, Clerk.js monitors email inputs and automatically sends log/email when a visitor enters an email address.
If you want to log an email manually, you can also add a snippet like this:
<span class="clerk" data-api="log/email" data-email="EMAIL@EXAMPLE.COM"></span>
How the association works #
When an email is logged, Clerk sends both the visitor ID and the email address to the API so they can be connected.
This lets Clerk identify what that visitor has done in their session history (for example viewed products, clicks, and searches) and associate that behaviour with the email address.
With that association in place, the same behaviour data can be used for email use cases (like triggered and personalised emails) and for onsite personalisation in recommendations for logged in customers.
Custom Rendering #
This is primarily used with Single Page Apps (SPA), Progressive Web Apps (PWA) and other applications that do not use traditional page loads.
Clerk.js renders any elements with the class clerk, but other classes can be used to customize the rendering as custom selectors.
By default, Clerk requires you to run Clerk("content", "SELECTOR") to render content every time it should be shown.
Adding auto_init_custom_selectors: true to the config, makes Clerk.js automatically initialise any custom selector elements as the DOM mutates, as long as they have already been rendered with Clerk("content", "SELECTOR") once.
This behaviour continues until a full page refresh happens.
Debugging #
Clerk.js has a built-in debug mode that logs diagnostic information to the browser console. It persists its configuration in sessionStorage under the key __clerk_debug, keeping debug mode active across page navigations within the same browser session.
By default, debug mode is enabled with level set to warn and collect set to true.
Activation Methods #
There are three ways to activate debug mode.
Console shorthand
The simplest way is to call Clerk('debug') from the browser console. It accepts several argument formats:
Clerk('debug');              // Enable with defaults
Clerk('debug', true);        // Enable
Clerk('debug', false);       // Disable
Clerk('debug', 'on');        // Enable
Clerk('debug', 'off');       // Disable
Clerk('debug', 'warn');      // Set log level directly
Clerk('debug', {             // Pass a full config object
  enable: true,
  level: 'log',
  group: true
});
Config path
Debug mode can also be configured through the standard config call:
Clerk('config', 'debug', {
  enable: true,
  level: 'log',
  collect: true,
  group: true,
  collapsed: false
});
URL hash
Debug mode can be activated by appending a hash fragment to the URL. This is useful for sharing debug links with colleagues:
https://yourwebsite.com/#clerkjs:debug.enable=true&debug.level=warn
When activated via URL hash, the configuration is also persisted in sessionStorage under the key __clerk_tmp_config.
Config Options #
| Option | Description | Type | Default |
|---|---|---|---|
enable | Enables or disables debug messages in the browser console. | bool | true |
level | Sets the log level. Accepted values are log, warn, or error. | string | warn |
collect | When true, log messages are stored in the browser’s storage. When false, temporary storage is used. | bool | true |
group | Groups related log messages in the console for easier reading. | bool | — |
collapsed | When true, grouped console messages are collapsed by default. Only applies when group is enabled. | bool | — |
clear | Clears all stored log messages. | bool | — |
Session Storage #
When debug mode is activated, the configuration is saved to sessionStorage under the __clerk_debug key. This ensures the debug settings persist as visitors navigate between pages, without affecting other browser tabs or lasting beyond the session.
Consent Management Platforms (CMPs) like Cookiebot may flag __clerk_debug as a storage item that requires documentation. It is a functional key used solely for developer debugging purposes. It does not contain personal data or tracking information.
For details on the structure of API debug responses, see Response debugging.
UI Kit #
Clerk.js includes a set of UI tools for important elements that can be used to enhance the user experience. These often save development time for custom setups.
Instant Search #
A key part of a great e-commerce search experience is getting results immediately as you start typing. Our Instant Search UI component makes this user experience swift and easy to build.
Any Clerk.io content can theoretically be made into an Instant Search component, but it works best as a dropdown showing search results.
<span
  class="clerk"

  data-api="search/predictive"
  data-limit="6"
  data-labels='["Instant Search"]'

  data-instant-search="INSERT_CSS_SELECTORS_HERE">

  <dl class="product-search-result-list">
    <dt>Products matching <i>{{ query }}</i></dt>

    {% for product in products %}
      <dd class="product clerk-instant-search-key-selectable">
        <h2 class="product-name">{{ product.name }}</h2>
        <img src="{{ product.image }}" title="{{ product.name }}" />
        <div class="price">${{ product.price | money }}</div>
        <a href="{{ product.url }}">Buy Now</a>
      </dd>
    {% endfor %}
  </dl>
</span>
Read more about the Instant Search UI tool here.
Search Page #
A key part of a great e-commerce search experience is getting good search results. Our Search Page makes this user experience swift and easy to build.
The Search Page let’s you create a full page showing the best possible matches for any given query.
<span
  class="clerk"

  data-api="search/search"
  data-limit="40"
  data-labels='["Search Page"]'
  data-query="INSERT_QUERY_HERE"
  data-orderby="INSERT_SORTING_ATTRIBUTE"
  data-order="asc_OR_desc">>

  <div class="product-search-result-list">
    <div>Products matching <i>{{ query }}</i></div>

    {% for product in products %}
      <div class="product">
        <h2 class="product-name">{{ product.name }}</h2>
        <img src="{{ product.image }}" title="{{ product.name }}" />
        <div class="price">${{ product.price | money }}</div>
        <a href="{{ product.url }}">Buy Now</a>
      </div>
    {% endfor %}
    {% if count > products.length %}
        <div class="clerk-load-more-button"
             onclick="Clerk('content', '#{{ content.id }}', 'more', 40);">
          		Show More Results
    		</div>
    {% endif %}
  </div>
</span>
Read more about the Search Page UI tool here.
Category Page #
A well structured category page is key to a successful eCommerce business. Our Category Page makes this user experience swift and easy to build. This let’s you create a full page showing the best possible results for any category.
<span
  class="clerk"

  data-api="recommendations/category/popular"
  data-limit="40"
  data-labels='["Category Page Grid"]'
  data-category="INSERT_CATEGORY_ID"
  data-orderby="INSERT_SORTING_ATTRIBUTE"
  data-order="asc_OR_desc">

  <div class="product-category-result-list">
    {% for product in products %}
      <div class="product">
        <h2 class="product-name">{{ product.name }}</h2>
        <img src="{{ product.image }}" title="{{ product.name }}" />
        <div class="price">${{ product.price | money }}</div>
        <a href="{{ product.url }}">Buy Now</a>
      </div>
    {% endfor %}
    {% if count > products.length %}
        <div class="clerk-load-more-button"
             onclick="Clerk('content', '#{{ content.id }}', 'more', 40);">
          		Show More Results
    		</div>
    {% endif %}
  </div>
</span>
Read more about the Category Page UI tool here.
Facets #
Clerk.js comes with built-in support for dynamic faceted navigation for both search and categories. Any product attributes you send to us can be used as facets.
Here’s an example of basic usage:
<div id="clerk-search-filters"></div>

<span
  class="clerk"

  data-template="@search-page"
  data-query="shoes"

  data-facets-target="#clerk-search-filters"
  data-facets-attributes='["price","categories","brand"]'
  data-facets-titles='{"price": "PRICE-TRANSLATION", "categories": "CATEGORIES-TRANSLATION", "brand": "BRAND-TRANSLATION"}'
  data-facets-price-prepend="€"
  data-facets-in-url="true"
  data-facets-view-more-text="View More"
  data-facets-searchbox-text="Search for "
  data-facets-design="133995">
</span>
Read more about the Facets UI tool here.
Exit Intent #
The exit intent popup reacts when a visitor tries to leave your site by hovering their mouse near the top of the browser window. It pops up and displays interesting products, possibly converting a leaving visitor to a buying customer.
Any Element block can be triggered upon a visitors intent to exit by adding the data-exit-intent="true" attribute to the snippet.
<span
  class="clerk"

  data-api="recommendations/visitor/complementary"
  data-limit="20"
  data-labels='["Exit Intent / Popup"]'

  data-exit-intent="true">
</span>
Read more about the Exit Intent UI tool here.
Popup #
The UI Kit contains a simple popup library to easily create simple but user-friendly popups with any content. Any HTML element on your website with the class clerk-popup will be displayed as a popup.
<div id="my-popup" class="clerk-popup">Hello, world!</div>

<script type="text/javascript">
  var my_popup = Clerk('ui', 'popup', '#my-popup');

  // show popup
  my_popup.show();
  /* or */
  Clerk('ui', 'popup', '#my-popup', 'show');

  // hide popup
  my_popup.hide();
  /* or */
  Clerk('ui', 'popup', '#my-popup', 'hide');
</script>
Read more about the Popup UI tool here.
Excluding Products #
Clerk.js has two different ways of excluding products, depending on whether you want to exclude specific IDs or avoid showing duplicate products between different sliders.
Excluding Specific IDs #
Simply add the attribute data-exclude to the snippet. The content of data-exclude should be a list of the product IDs you don’t want to be shown i.e. the products in the customer’s shopping cart or a list of products they are not allowed to see.
<span class="clerk"
  data-template="@clerk-complementary"
  data-exclude="[45654, 3244, 12352]">
</span>
Avoiding Duplicates #
This is done by adding the data-exclude-from attribute on the Clerk Block wherever you want to remove the duplicate from. The value of the attribute should be a CSS selector for the other snippet(s)to prevent duplicates from.
In the example below, .clerk-2 excludes any product that is in .clerk-1, and .clerk-3 excludes any products that are in either .clerk-1 or .clerk-2.
<span class="clerk clerk-1"
  data-template="@clerk-banner-1">
</span>

<span class="clerk clerk-2"
  data-exclude-from=".clerk-1"
  data-template="@clerk-banner-2">
</span>

<span class="clerk clerk-3"
  data-exclude-from=".clerk-1,.clerk-2"
  data-template="@clerk-banner-3">
</span>
Events #
When building more customised setups you will often need to react to or modify the results from Clerk before rendering them. This is where Events are useful.
Events allow you to set up event listeners that run code at specific times before, during, or after Clerk.js renders its results.
A common example is to load custom prices for a logged-in customer in a B2B setup. An event can run immediately after Clerk’s API is finished rendering, allowing you fetch custom prices for a customer, and append them to the product elements:
var customer_id = INSERT_CUSTOMER_ID;
Clerk("on", "rendered", function(content, data){
  for (i = 0; i < data.product_data.length; i++) {
      var product = data.product_data[i];
        var custom_price = FETCH_PRICE_FROM_SERVER(product.id,customer_id);
        let price_container = document.querySelector(`[data-clerk-product-id='${product.id}'] .clerk-price`);
        price_container.innerText = custom_price;
    }
})
Read more about the Events here.
SEO and Performance #
Clerk.js powers personalized shopping experiences without slowing down your site or hurting SEO. By using client-side rendering and optimized loading, it balances speed, performance, and search visibility.
SEO and Speed #
It’s a misconception that JavaScript features like Clerk.js harm performance or SEO. Automated tools often overlook optimizations such as caching, parallel loading, and server-side handling.
Clerk.js Integration Benefits #
- The Clerk.js script (≈ 37 - 38 KB) loads asynchronously, allowing your site to render while Clerk initializes.
- Clerk elements are client-rendered, meaning your base HTML remains cacheable, and dynamic components are injected only after load.
- This enables efficient server-side caching and non-blocking loading of Clerk.js assets.
Performance Impact #
- The lightweight and asynchronous nature of Clerk.js typically results in small impact on page load times.
- Real-world performance hit often stems from additional images rendered in recommendations, not the script itself. To minimize impact:
- Use appropriately sized, high-efficiency formats like WebP.
- Resize images to match display dimensions (e.g., 400×400 px → 420×420 px max).
- To avoid layout shifts (CLS), reserve space for injected Clerk content.
E.g.:
.clerk-slider-wrapper {
  min-height: 300px; /* adjust as needed */
  width: 100%;
}
SEO Considerations #
Understanding how Clerk.js interacts with search engines helps ensure your implementation supports both user experience and search visibility.
Linking and Crawlability #
- Clerk.js injects recommendation links dynamically on the client side.
- These links can improve internal linking by connecting related pages, if the search engines render and follow them correctly.
- Since they are JavaScript-injected, you should verify how search engine crawlers render and interpret them.
- Properly crawled links can improve crawlability and allow search engines to discover and index more pages.
PageRank Distribution #
- When search engines can crawl them, Clerk.js links may help distribute link equity (PageRank) across key pages.
- This supports improved visibility and ranking of product and category pages.
Observed Benefits #
- Correct Clerk.js integration can correlate with stronger internal linking structures, which may support improved visibility in search results.
- Clerk.io dashboards provide analytics on order influence, conversion lifts, and revenue contributions from Search, Recommendations, Email, and Audience features.
Recommended Best Practices #
- Optimize images (WebP format, correct resolution).
- Reserve layout space for dynamic elements to prevent layout shifts.
- Monitor real-world metrics instead of relying only on automated scores. Use Clerk’s dashboards to evaluate impact across channels.