Omnisearch
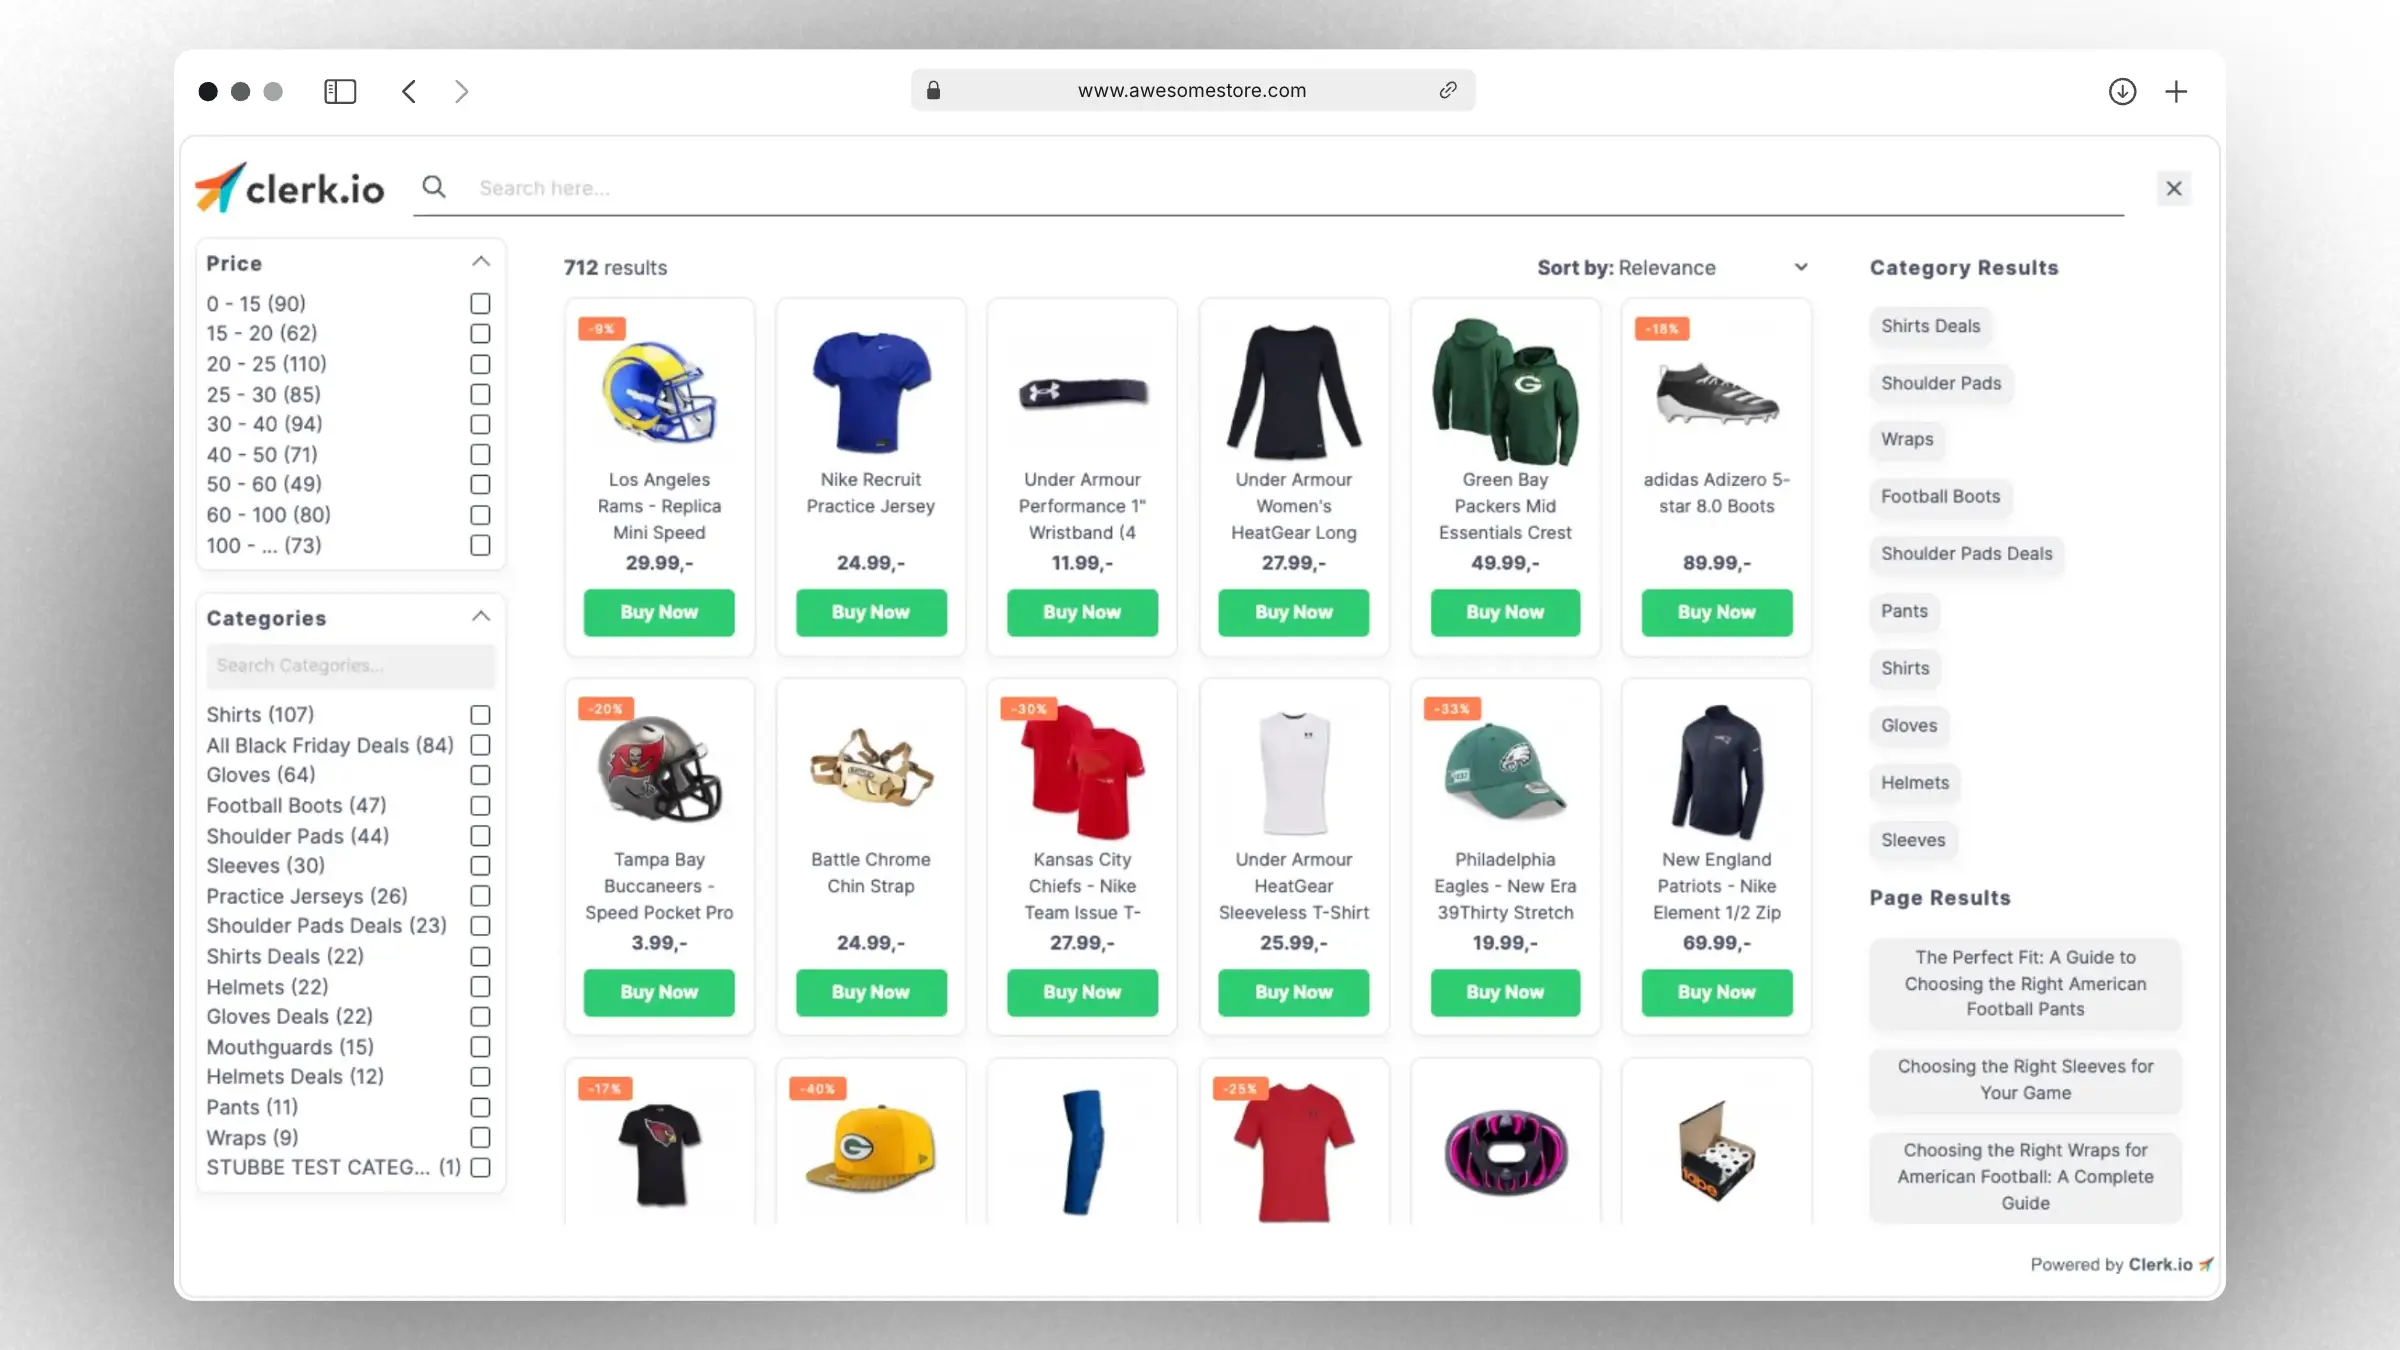
- Live results are shown to your visitors as they type, and include products, categories and pages.
- Sorting and filtering: to let your visitors refine their search in an intuitive an easy way.
- Easy to integrate in your site using one of our great starting templates.
- It matches your brand through changing a few standard settings like logo, fonts, colors and more.
- It’s fully customizable with HTML, CSS and Liquid for developers.
Getting started #
Omnisearch consists of a customizable Design for visuals and an Element block that allows it to be installed on your site.
Creating a design #
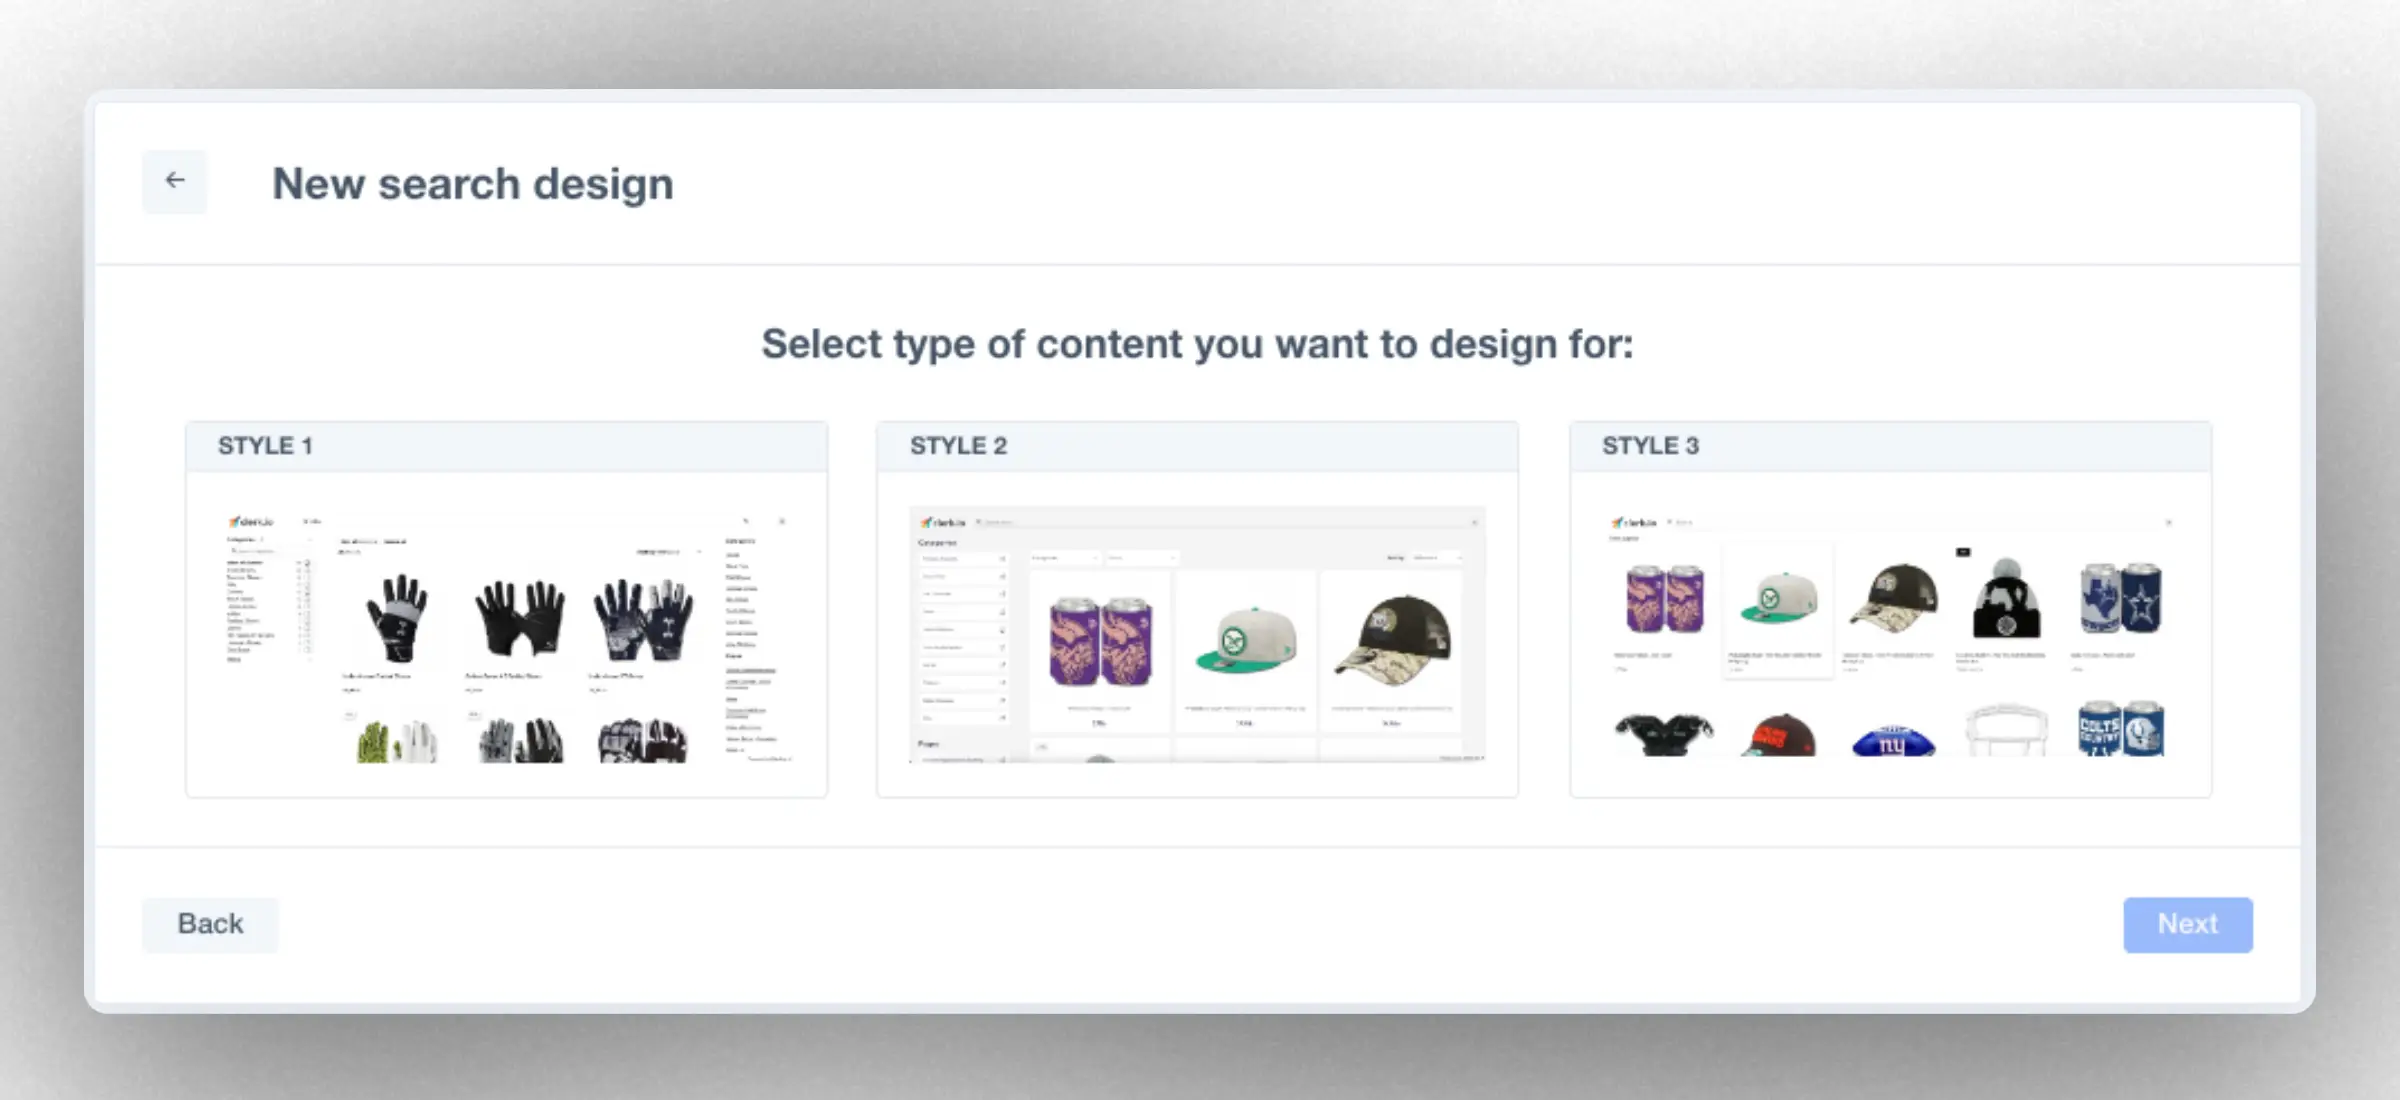
This is done in Search > Designs > New Design
Select the Omnisearch type, pick a starting design and give it a name.
Click Save & Close to finalise the standard design.
Our standard designs work out-of-the-box and can always be edited later. Editing requires knowledge of HTML, CSS and Liquid. Check Styling in this guide for more info.
Creating an Element #

This is done in Search > Element > New Element
Element blocks are containers for elements you create in your my.clerk.io account. They contain the logic to show results with and settings for how many results to show. Empty State Logic can also be manipulated through Rules.
Name helps you identify your element in case you want to create more than one. It can be modified later.
Element type is Omnisearch by default, and should not be changed. Here, you can also add filters if needed, but for most setups this is not needed.
Empty State Logic allows you to select the type of products to display when Omnisearch is opened initially, before any words are typed. By default this is Bestsellers but can also be personalised e.g. with Visitor Recommendations.
Finalise Design #
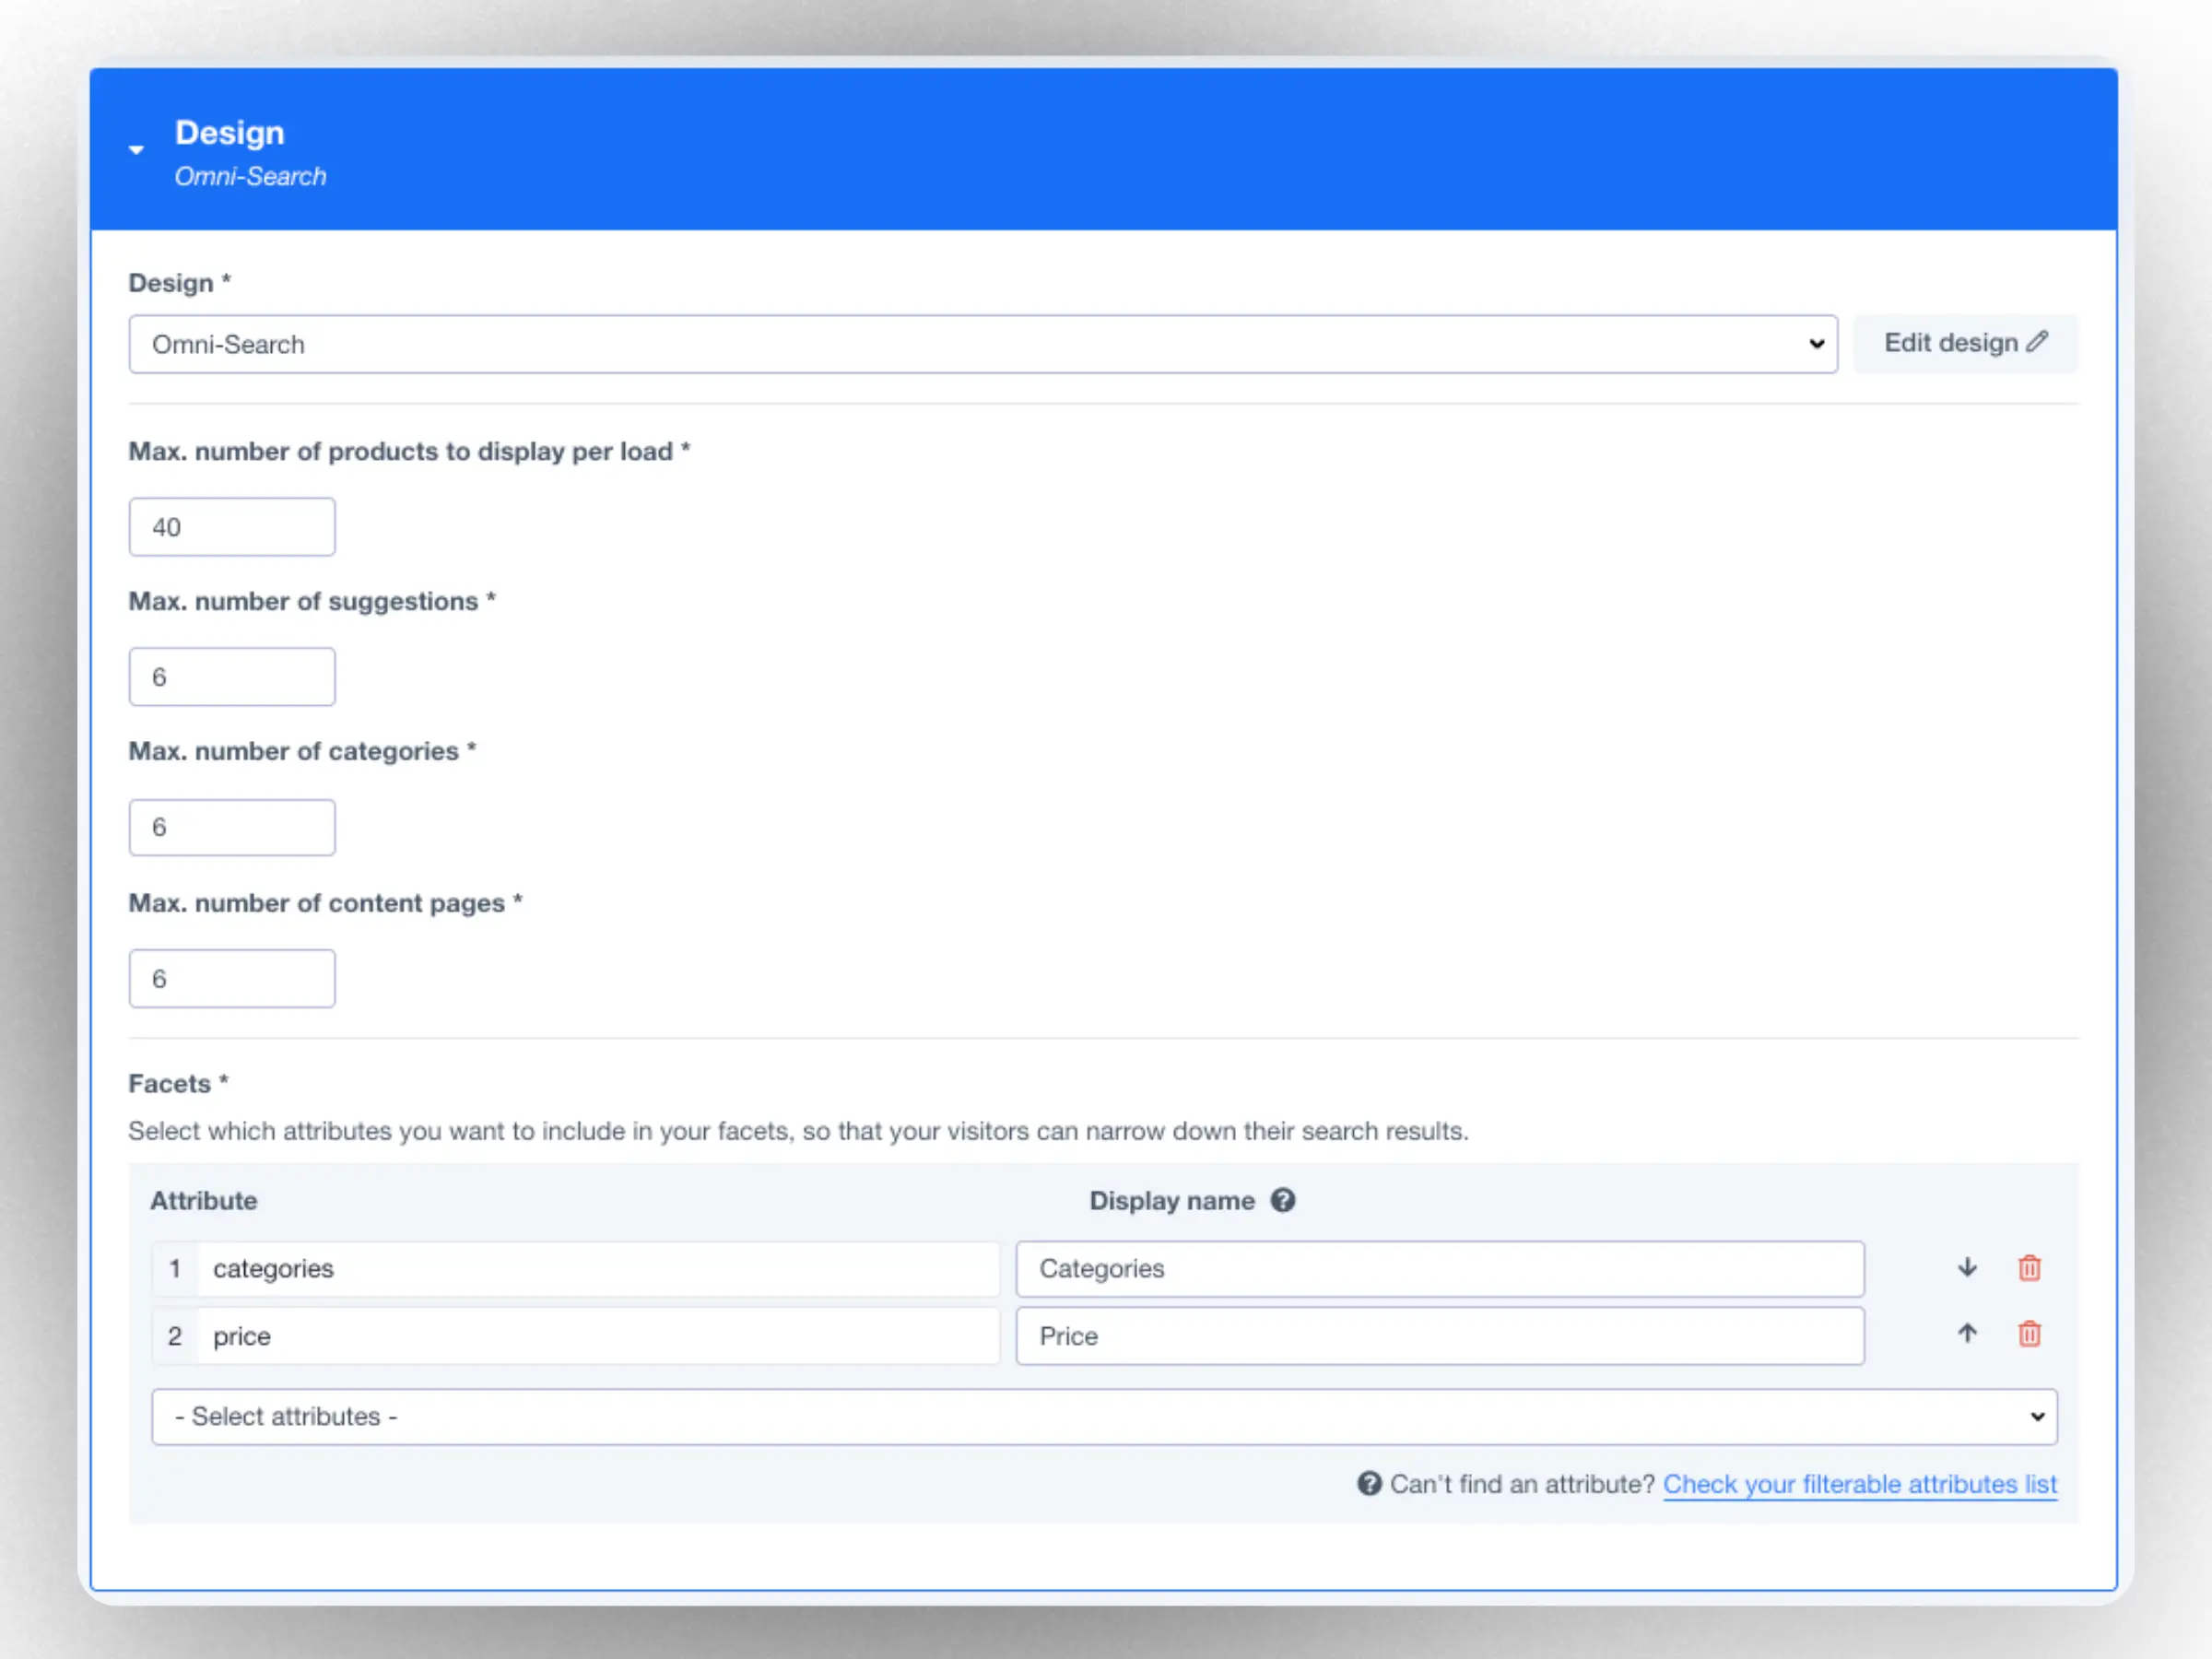
The design to render the Element block through. Select the design you created.
If your design includes any variables, they can be set here as well.
You can control the number of results to display for each type, every time a search is made. We generally recommend these amounts:
- Products: 20-60
- Suggestions: 5
- Categories & pages: 10
Lastly, choose the attributes you want to include as Facets and set the names they should be displayed as in the search results. If you cannot find a specific attribute in the list, add it in the “filterable attributes” list, in Search Configuration.
Inserting into site #
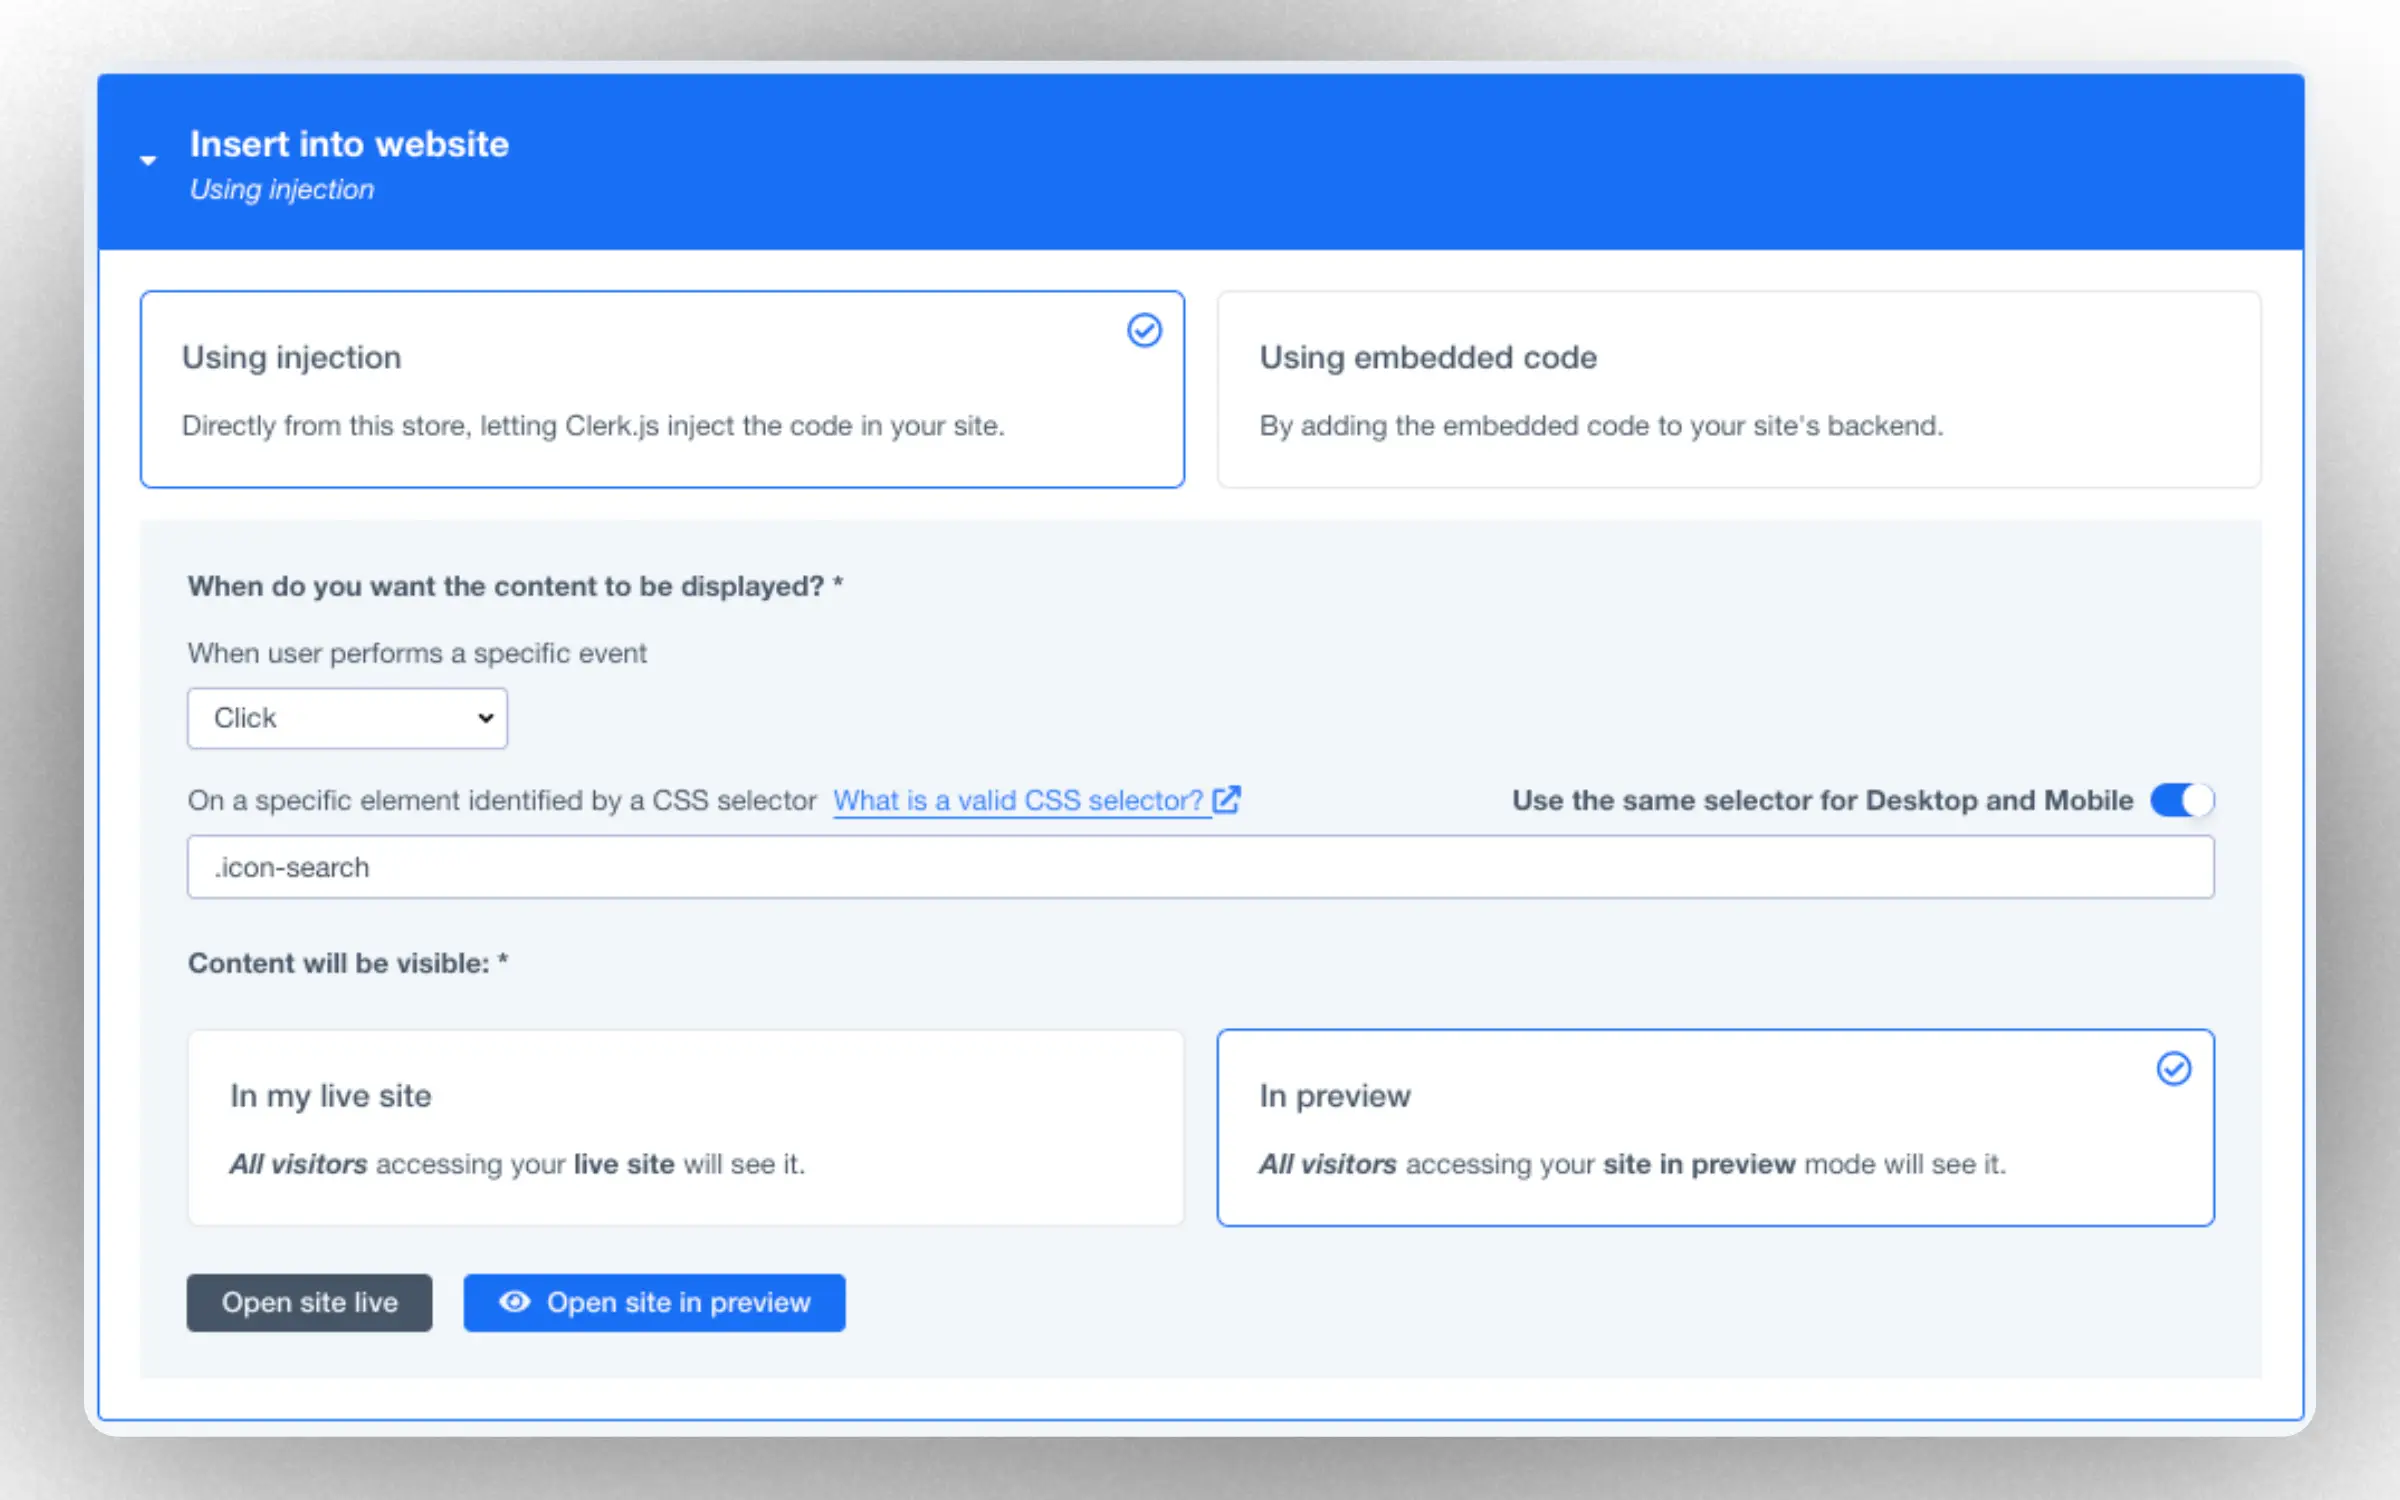
Visibility is used to control who can see the Omnisearch.
In preview allows you to test your element without impacting your live site. You can open your site in preview by clicking “Open site in preview” or by adding
?clerk_content_mode=previewto your site’s url.In my live site is used when you are done testing and ready to make it public.
Using injection #
This is the easiest way to install. Clerk will automatically add the Omnisearch code to your site, by targeting a search field of your choice, and triggering based on an event.
Event controls what the user should do to trigger the Omnisearch. Most likely you want it to display when your visitors click on your search icon or input field.
Element decides the part of the website that the user should interact with. For example, if you want your Omnisearch element to display only when your visitors interact with your search bar (click or focus over it), you just need to find the unique CSS selector applied to it. If you have different identifiers in mobile and desktop, add them both.
Find your unique CSS selector this way:
- Inspect your sites code. In most browsers you can right click anywhere on your page and choose Inspect or similar.
- Find the element you want to target
- Rigth click over it, and find the option copy > copy selector
Using embedded code #
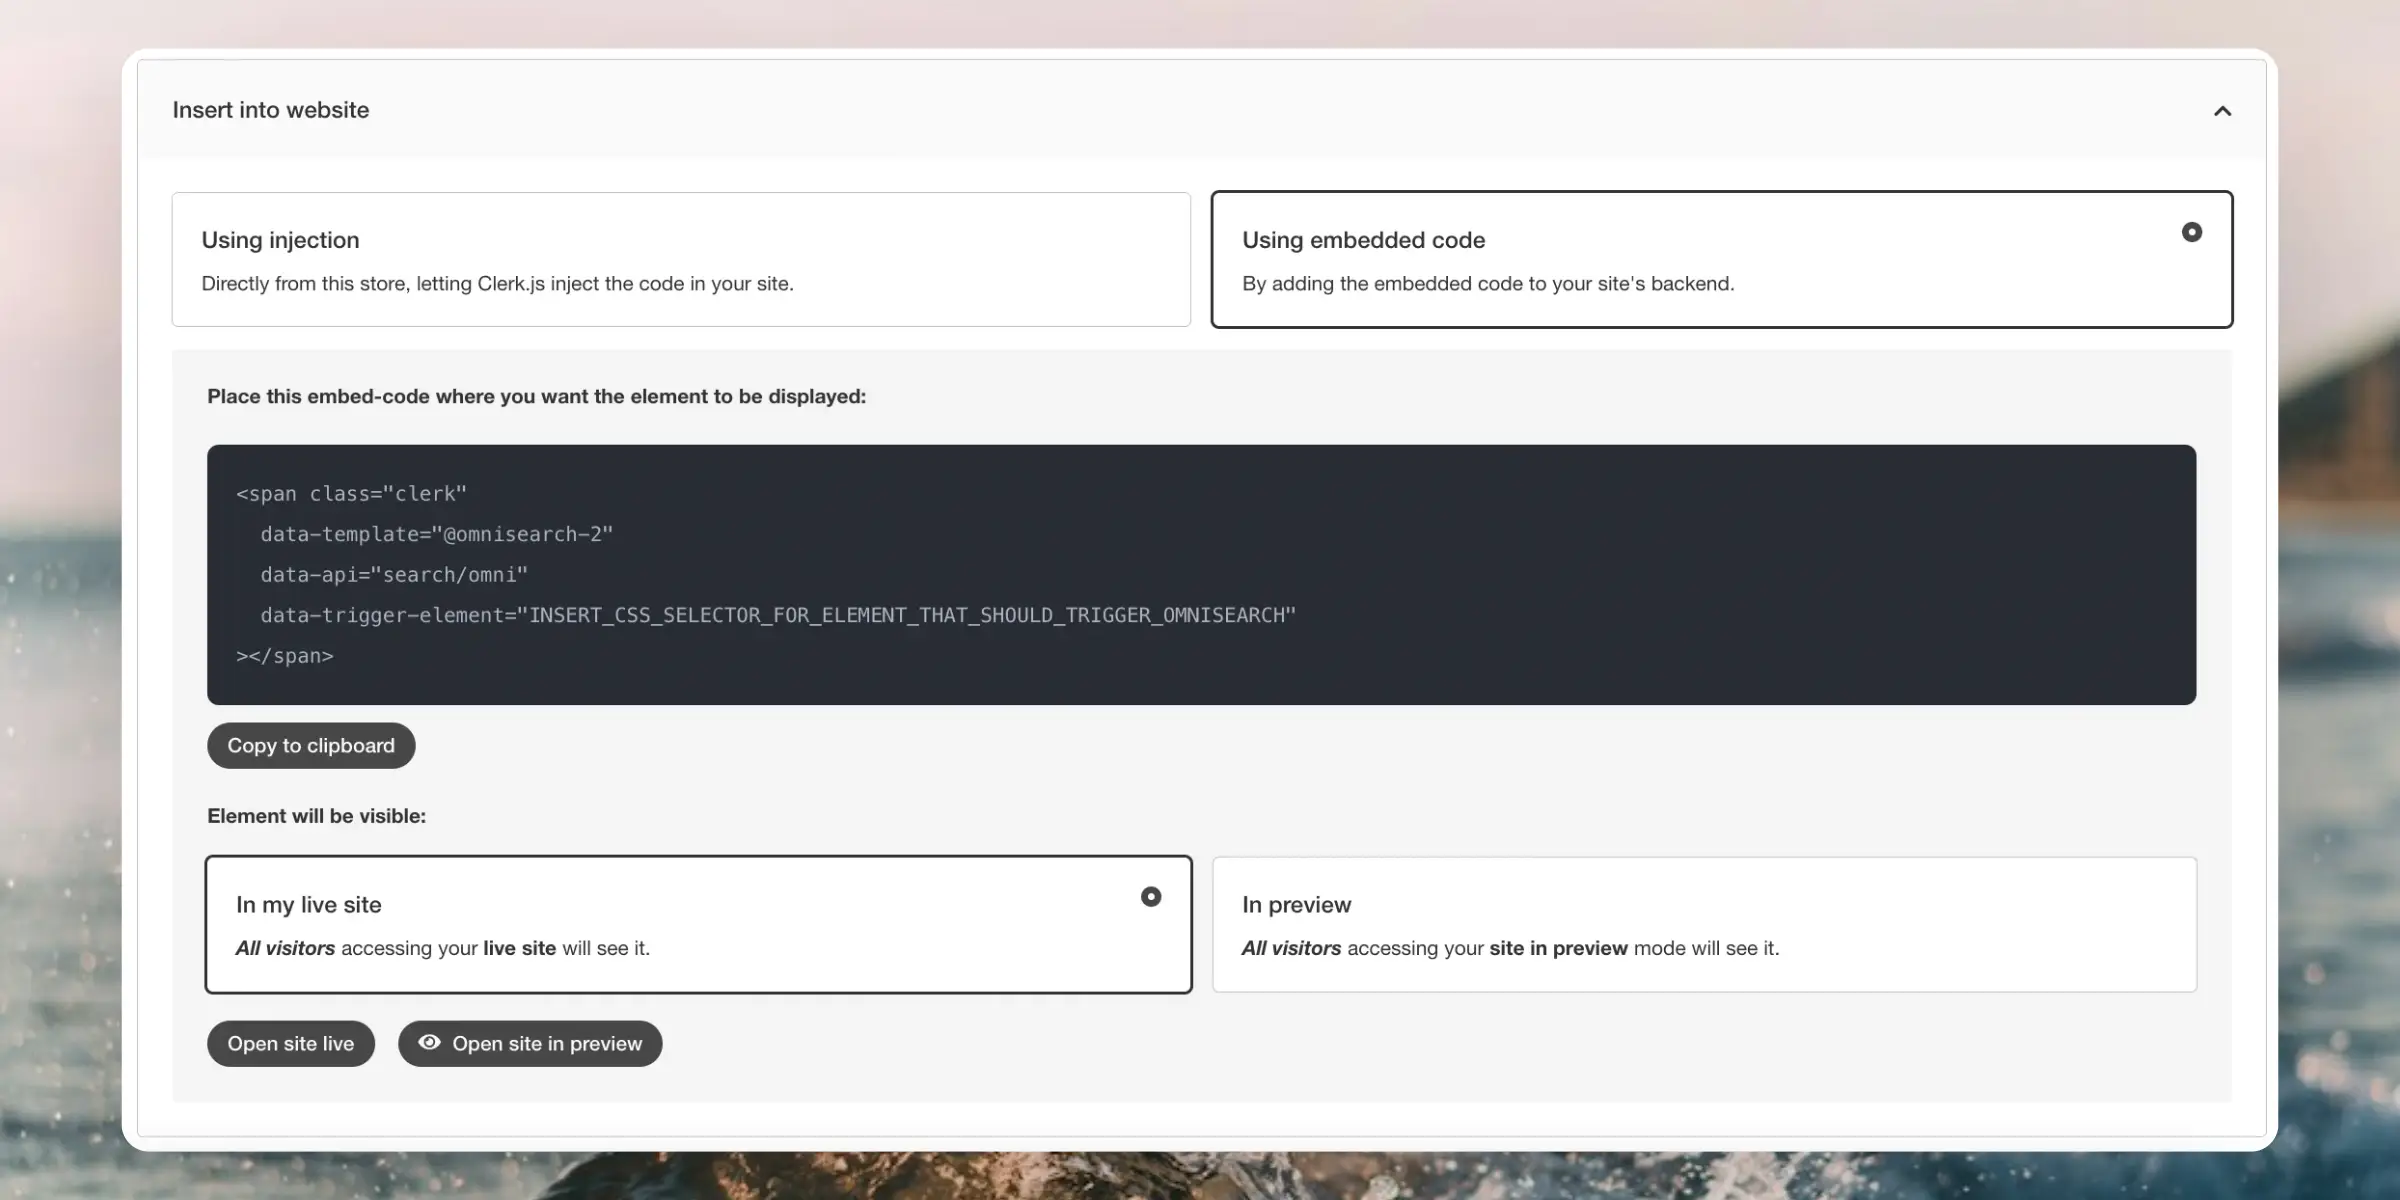
This allows you to add Omnisearch with a snippet. Using this requires you to be able to edit the HTML files of your webshop or add code with an editor.
If you have any unsaved changes, save them to generate the embedded code.
Copy this code and pase it in the file that generates all pages of the webshop, ideally near the end </body> tag.
Replace INSERT_CSS_SELECTOR_FOR_ELEMENT_THAT_SHOULD_TRIGGER_OMNISEARCH with the CSS selector of the html element that should trigger your Omnisearch.
Below is a full example of an Omnisearch embed code with all configuration options:
<span class="clerk"
    data-template="@omnisearch"
    data-api="search/omni"
    data-trigger-element="INSERT_CSS_SELECTOR_FOR_ELEMENT_THAT_SHOULD_TRIGGER_OMNISEARCH"
    data-limit="40"
    data-suggestions="6"
    data-categories="6"
    data-pages="6"
    data-omni-search-suggestions="6"
    data-omni-search-categories="6"
    data-omni-search-pages="6"
    data-omni-search-empty="recommendations/popular">
</span>
Display modes #
Omnisearch supports two display modes that control how the search interface appears on your site. Configure this in the Insert tab when editing your Omnisearch Element.
Full overlay #
This is the default mode. When triggered, Omnisearch covers the entire viewport with a full-screen overlay. The search interface takes over the page, providing a focused search experience.
Use this mode when you want:
- A distraction-free search environment
- Full control over the search layout
- The search interface to be completely independent from your site’s header
Partial overlay #
This mode integrates Omnisearch with your existing site header. Instead of covering the full screen, the search overlay appears below your header while keeping the header visible and functional.
Use this mode when you want:
- Your header and navigation to remain accessible during search
- A more seamless integration with your site’s existing layout
- The search experience to feel like a natural part of your site
Configuration options #
When Partial Overlay is selected, additional settings become available:
Header selector
The CSS selector for your site’s header element. Omnisearch uses this to position the overlay directly below your header, ensuring proper alignment.
Example selectors:
header.site-header#main-header
Search input selector
The CSS selector for your existing search input field. When provided, Omnisearch synchronizes with your header’s search field, creating a unified search experience where typing in your header’s search box updates the Omnisearch results.
Example selectors:
#search-input.header-search input[name="search"]
Width
Controls the horizontal size of the overlay:
- Full width: Spans the entire viewport width
- Content width: Matches the width of a container element you specify with a CSS selector
- Fixed width: A specific pixel width you define
Height
Controls the vertical size of the overlay:
- From header to bottom: Fills the space from below the header to the bottom of the viewport
- Viewport percentage: A percentage of the viewport height (e.g., 80%)
- Fixed height: A specific pixel height
- Max height: Sets an upper limit while allowing the overlay to be smaller if content requires less space
Horizontal alignment
Controls where the overlay appears horizontally:
- Left: Aligns to the left side of the viewport
- Center: Centers the overlay horizontally
- Right: Aligns to the right side of the viewport
Vertical position
Controls the vertical placement relative to the header:
- Below header: Positions the overlay directly beneath your header element
- Fixed from top: A specific pixel offset from the top of the viewport
Design configuration #
Most of the Omni-search can be configured by changing the variables that are in the design files.
In the liquid template language, a variable has a structure like this:
{% assign variable_name = "variable value" %}
As a rule of thumb, only the variable value should be changed to configure the Omni-search.
More technical users can of course still modify specific HTML and CSS lines, see this section.
Logo #
To add the logo to the Omni-search design, simply find the image URL, and put it in the value for the variable: os_brand_logo.
The variable is typically named something like os_brand_logo, and it should look like this once the logo has been pasted in:
Infinite/auto load #
If you want control whether the Omni-search should load more product results automatically, once the user has scrolled to the last row of products, the variable should be set to true or false.
The variable is typically named os_autoload.
In this example, the Omni-search does not load more product results automatically.

Translations #
By default, the template is in English. If you have a store that has a different language, you can translate the text elements by changing the variable values.
This example shows the variables for the sorting button:
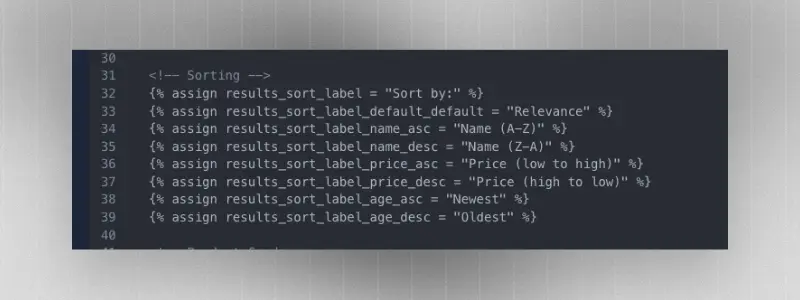
Protip: Use generative AI (e.g. chatGPT) to bulk translate by writing “Translate these variable values from English to Danish. Return the full code back so it can be copy/pasted to replace the existing code: PASTE_VARIABLES_HERE”
Styling #
To change any of the styling, configuration can be done in the CSS variables.
The templates use CSS variables which have a structure like this:
--variable_name: variable_value;
For more technical users, individual CSS rules can be modified to do more complex design changes.
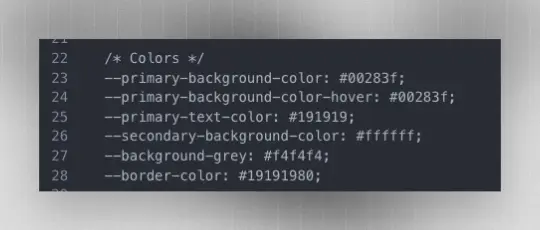
Colors #
The configurable colors can be identified and configured in the section under the “Colors” CSS comment
/* Colors */
Fonts #
Similar to the colors, the font variable can be found under the /* Font */ comment.
It typically has a variable like:
--font-family: 'Kumbh Sans', sans serif;
Standard design #
The standard design for Omnisearch includes:
Variants dropdown support: Let shoppers choose variant attributes (e.g. size, color) before adding to cart.
Quantity selector.
Native Add-to-Cart button that notifies Clerk.js, ensuring analytics and merchandising stay in sync.
Clean, well-structured markup with clear comments.
Centralized variables for styling and behavior, making it easy to adjust colors, spacing, labels, and common options without changing core code.
Price slider facet for quick range filtering.
Clickable suggestions that immediately trigger a search.
For developers #
Styling #
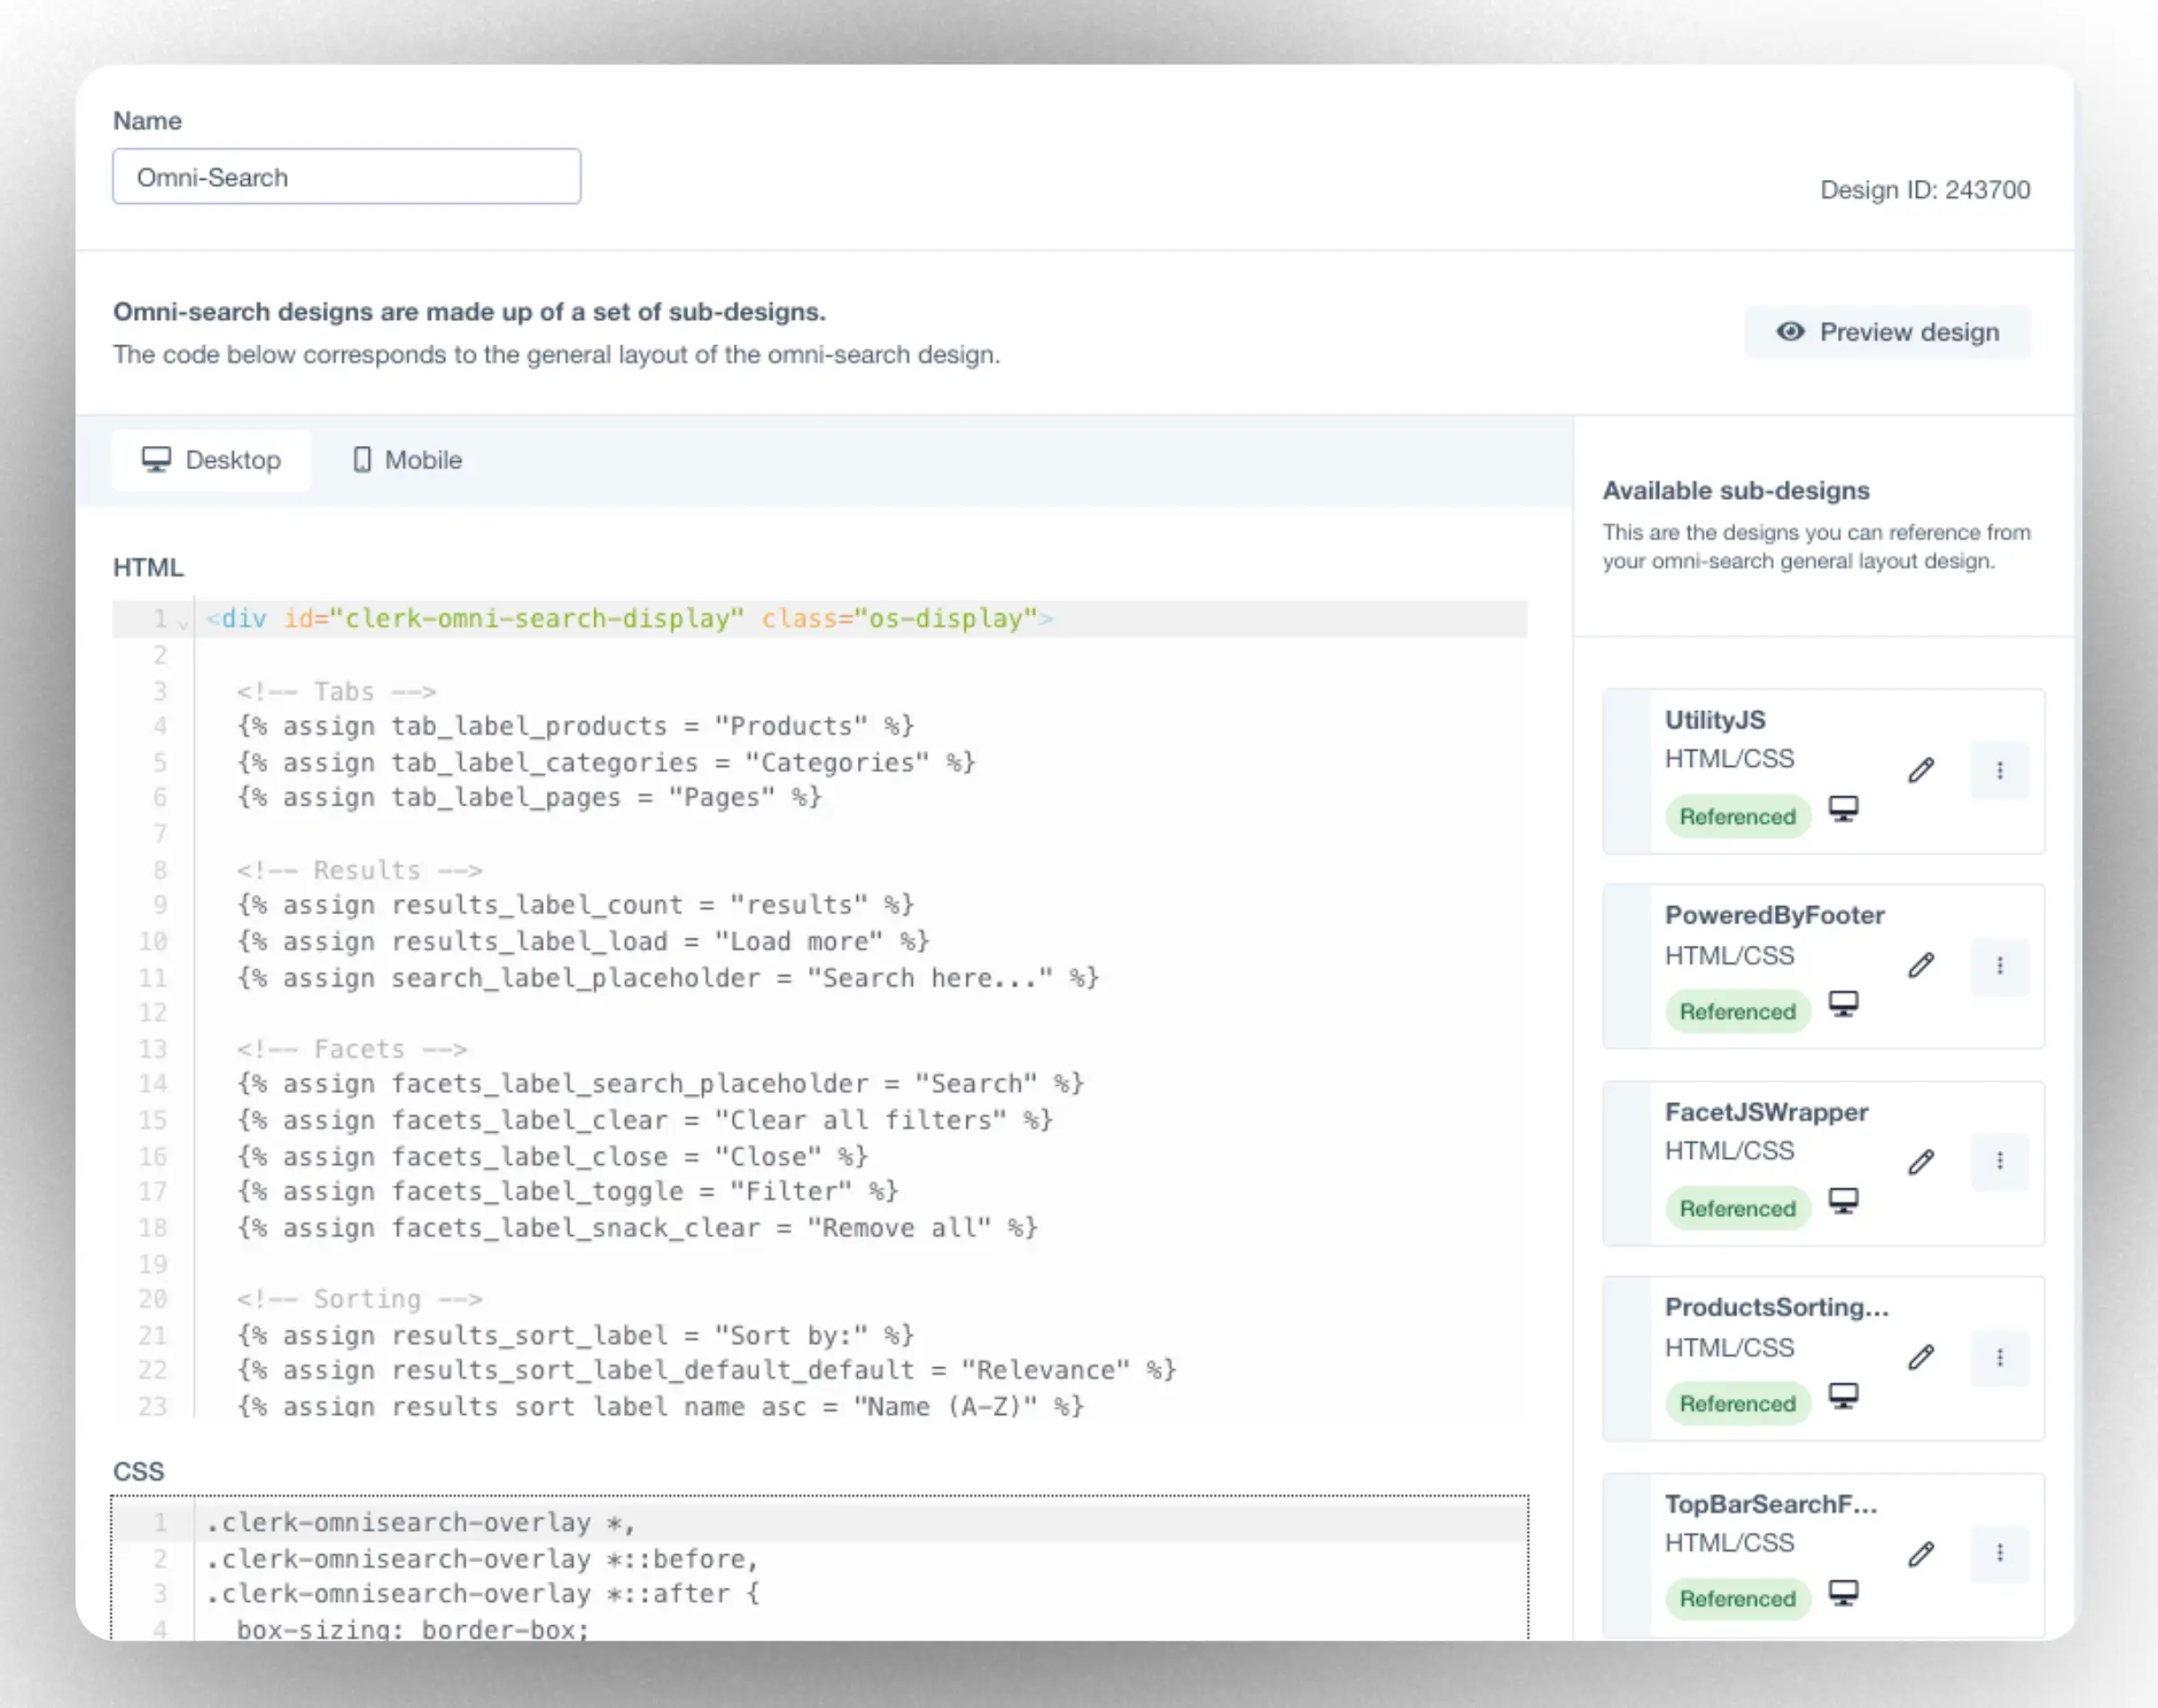
Designs consist of a main layout, CSS styling and a set of sub-designs that can be referenced in the main layout.
You can edit all of these for Desktop and Mobile seperately. By default, the Omni-search uses the same HTML for all screen sizes, and uses CSS to be fully responsive. This is why the Mobile tab has no code to start with.
If needed, you can create a completely different HTML markup for Mobile, which will be used on smaller screens.
Initially, you may want to only adjust a few things to make the design match your brand’s look and feel - You can always edit your design later.
HTML #
This is the main layout that controls placements of all elements. It uses Liquid as a templating language.
In our starting designs, the first section is dedicated to the most commonly changed elements, like sorting labels, currency and the various texts that you can translate to your language.
CSS #
Styling that will be injected with the HTML, giving you full control over the visuals in a contained way.
Available Sub-designs #
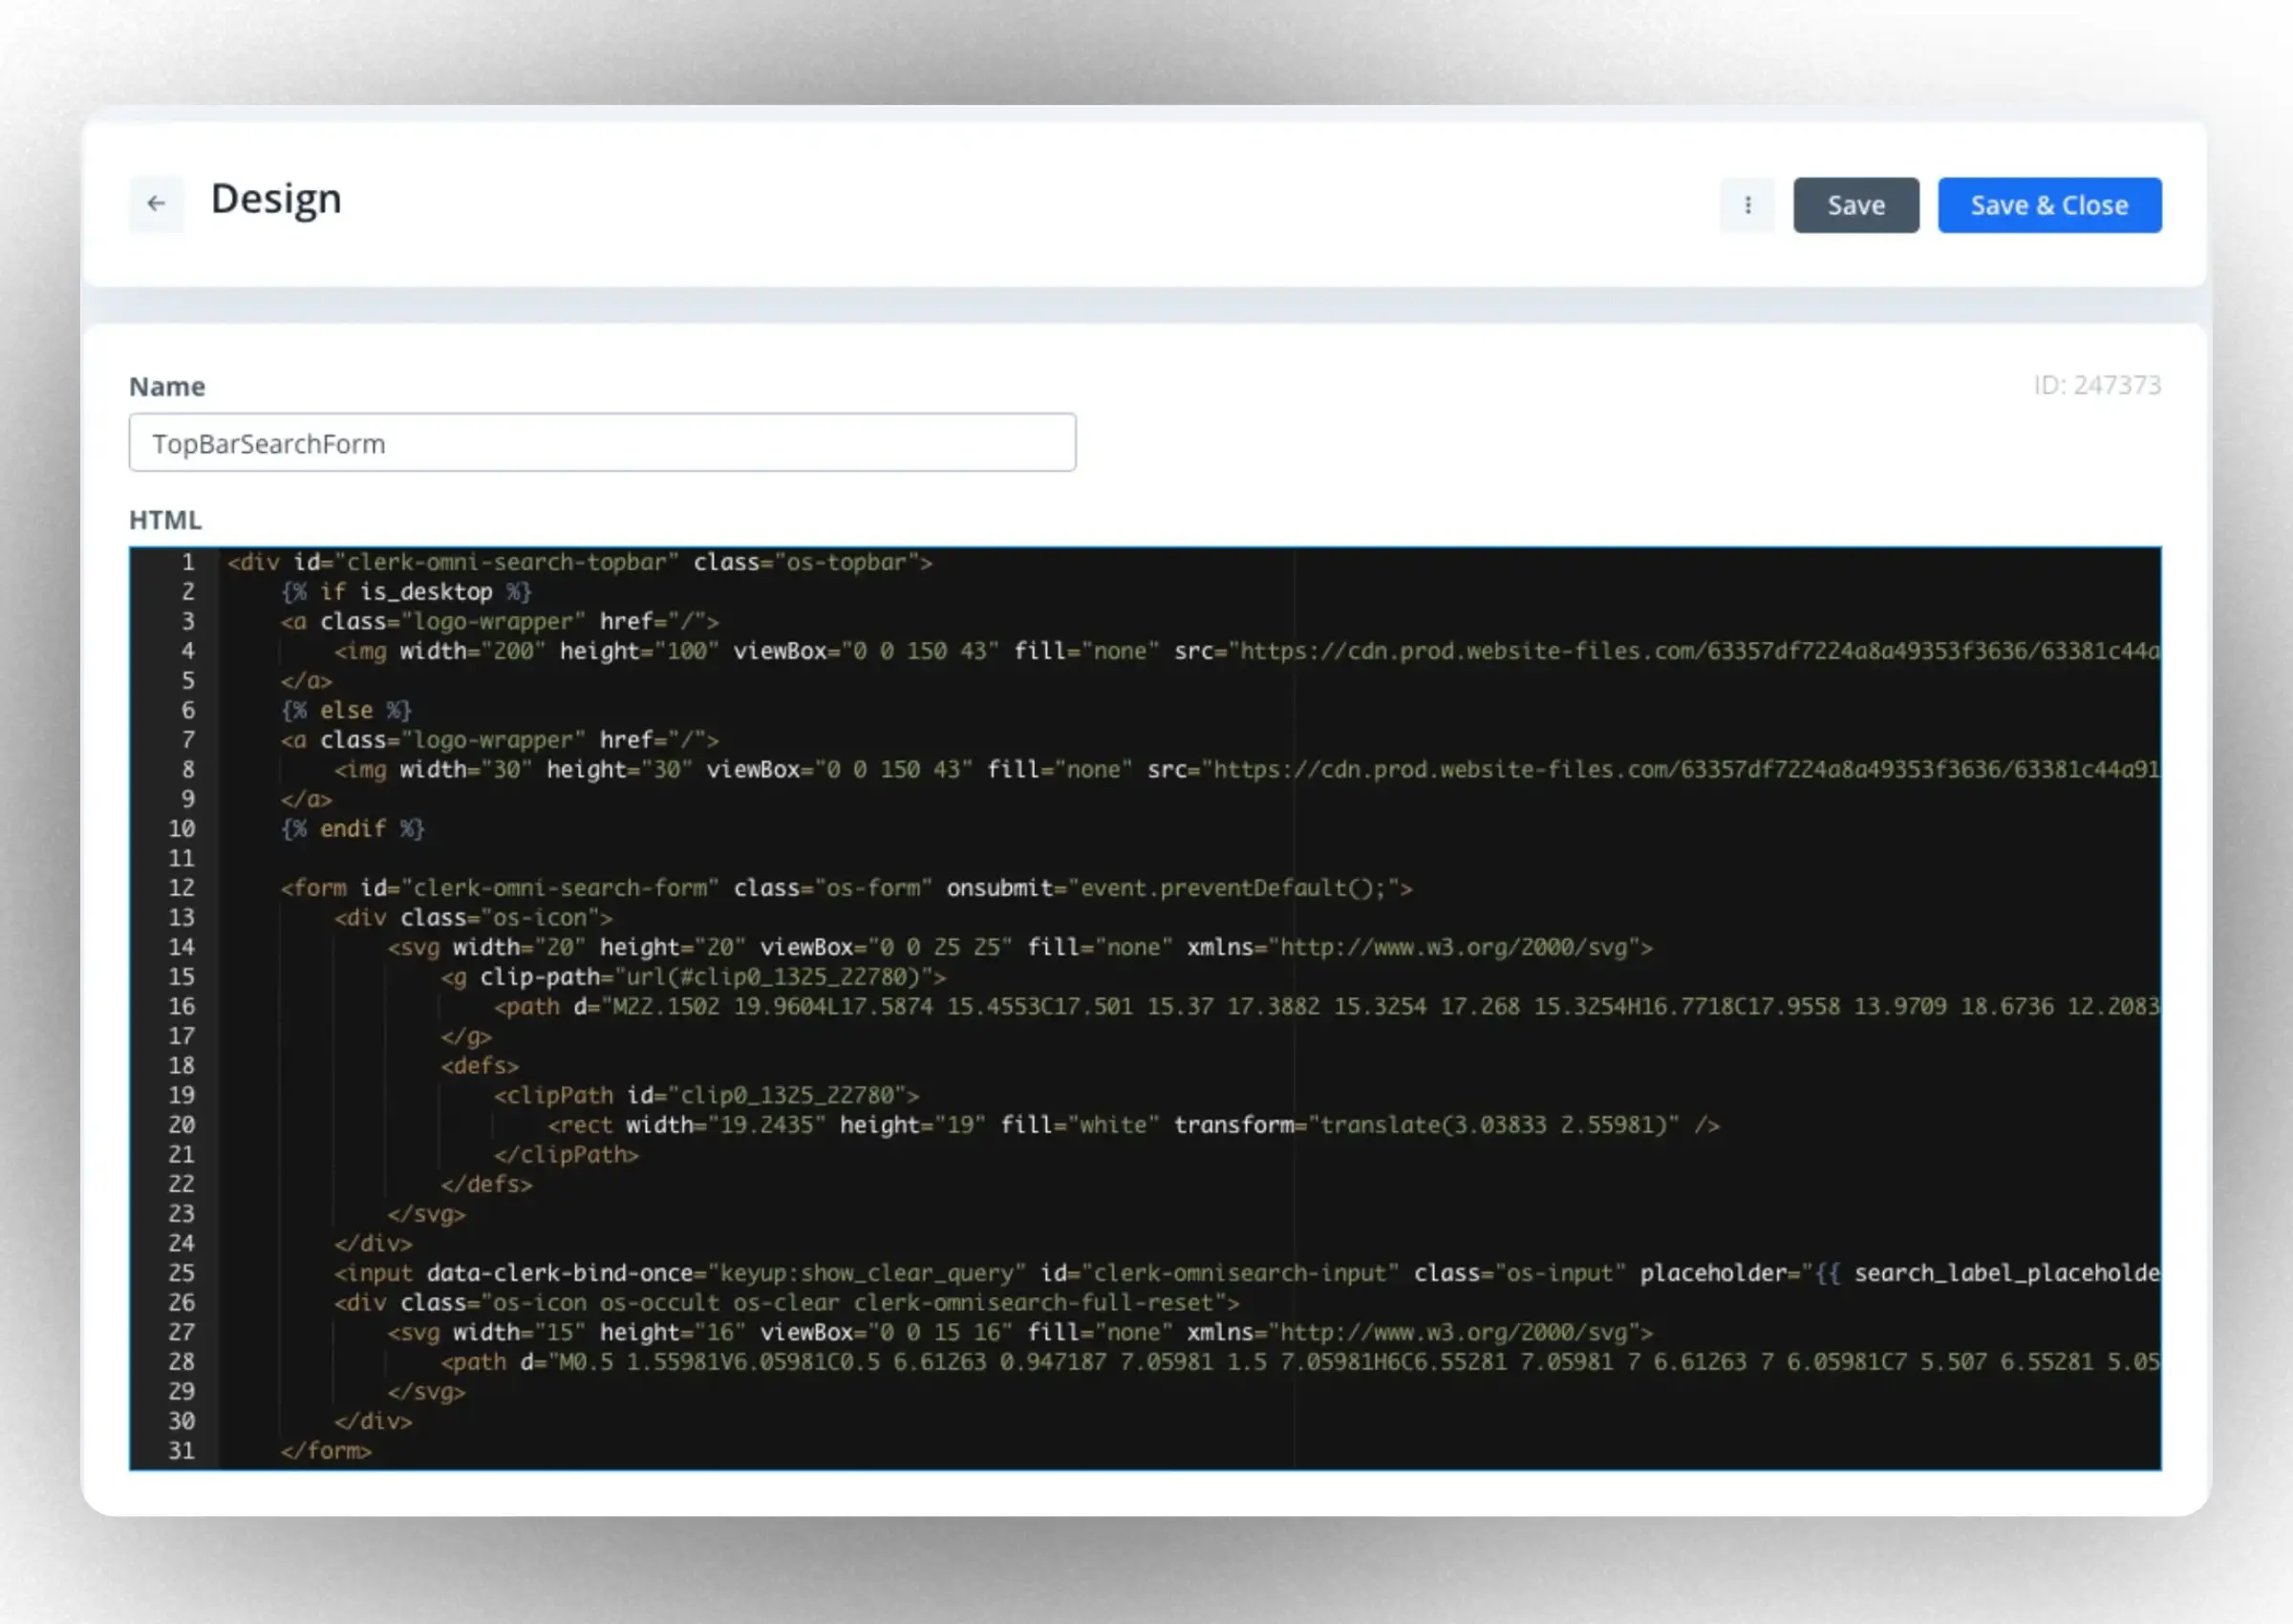
Any designs added here can be can be referenced in the general layout. They function as modules that are edited separately and are added with their ID and name: {{@247373 - TopBarSearchForm}}
You can delete, duplicate and copy the reference of any sub-design by clicking the three dots button.
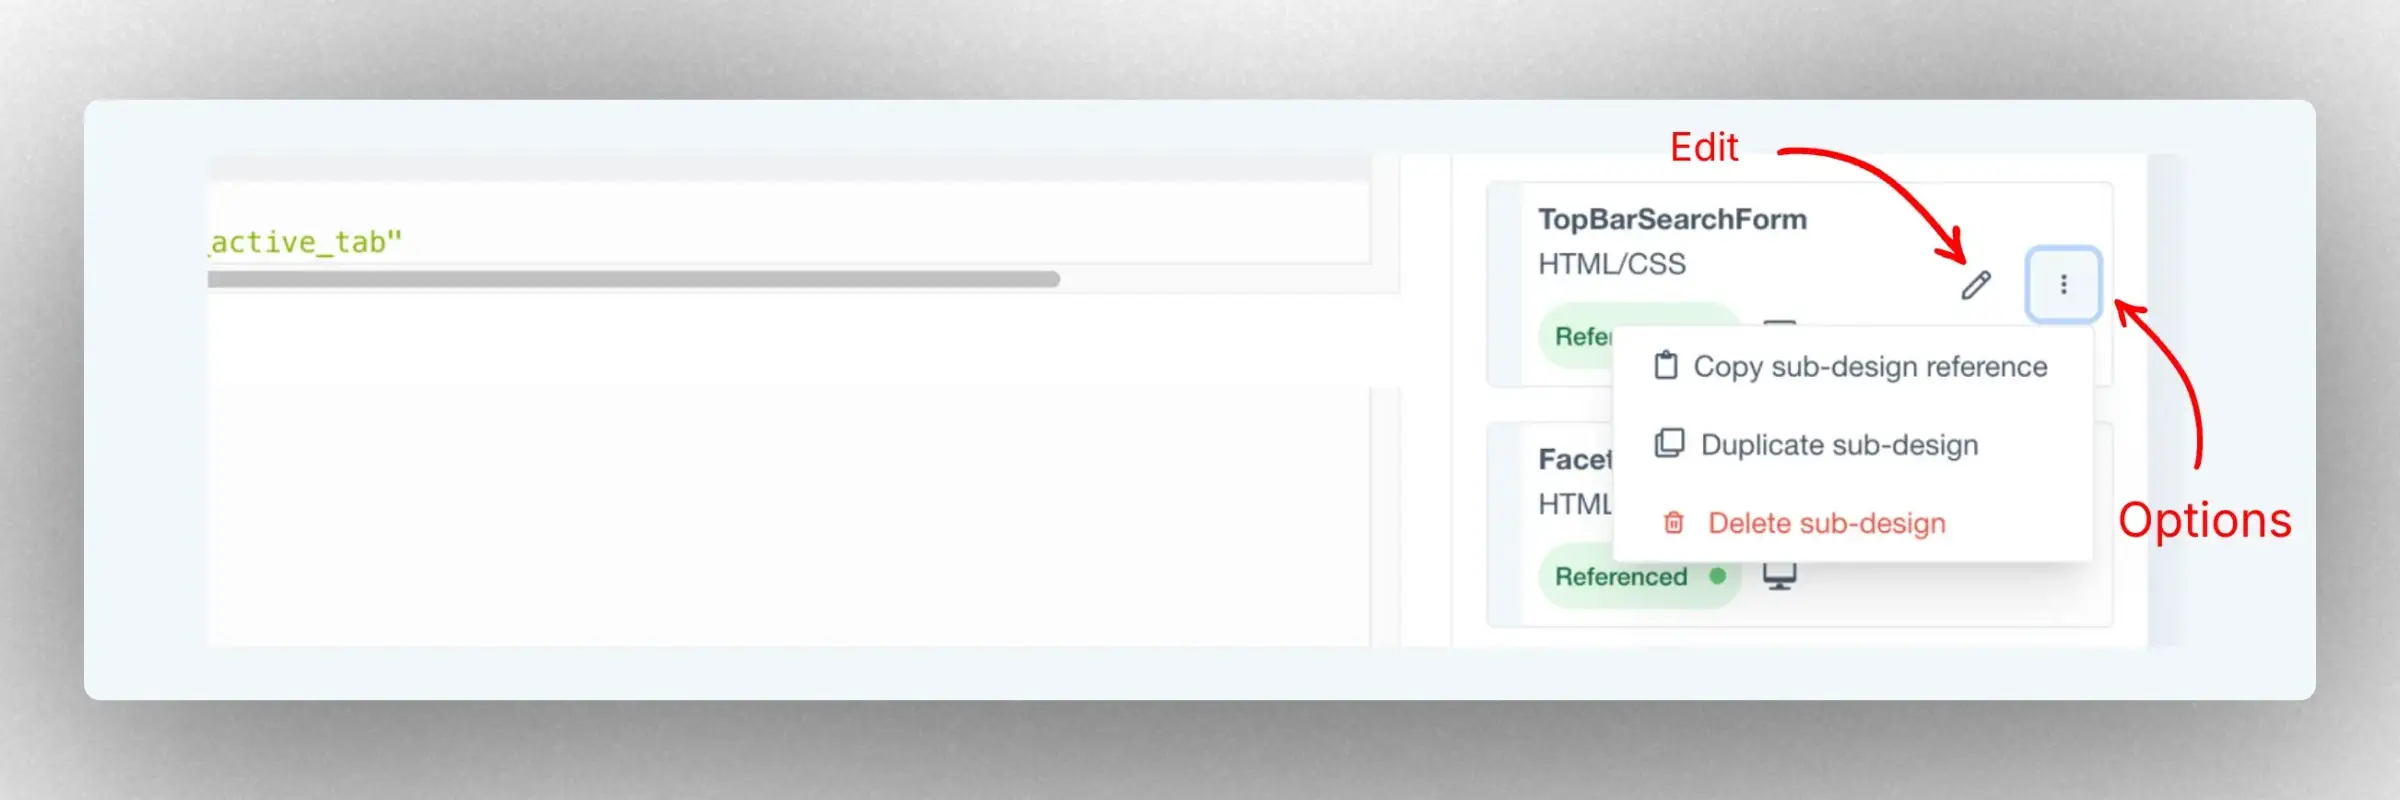
To edit a sub-design, click on its Edit icon. Once you’re finished editing, click Save & close, to return to the main layout editor.
Some elements need specific identifiers, such as:
- The input field
id="clerk-omnisearch-input" - The content wrapper
id="clerk-omnisearch-content"
Whenever you want to check your progress, you can do it by clicking the “Preview design” button.
The most often changes made to designs are these:
Logo: Access the TopBarSearchForm and replace the default logo with yours.
Fonts: If needed, adjust the fonts to match your site’s look and feel.
Colors: You can add your brand’s colors in those elements you want to emphasize or streamline with the rest of your site like buttons and tags.
Buttons and tag borders: You can adjust their color, radius, width…
Links: If you have a specific styiling for your links, you can also edit it.
Overlay structure #
When omnisearch is initiated, it creates an element with the class clerk-omnisearch-overlay and is injected into the bottom of the body.
This is where we will inject the design, as we have the input element as part of the design we need to have a structual demands to ensure we don’t re-render the input element on each load. The structure should look like the following underneath the overlay:
<div>
    <input type="text" id="clerk-omnisearch-input"/>
    <div id="clerk-omnisearch-content">
        Element!
    </div>
</div>
Input field #
To find the input field it needs to have the following identifier clerk-omnisearch-input. Once the trigger element has been fired, we are moving the cursor focus to this element, and add whatever query we have to it, so we can keep the user experience somewhat seamless.
Content Wrapper #
The content wrapper is where most of the things are happening, the wrapper around it needs to have the identifier clerk-omnisearch-content. In here should be the facets, the sliders and everything else that is not the input field.
Classes #
Functionality can be added to the design by adding specific classes to elements.
Close Button #
clerk-omnisearch-close
When attaching the class to an element inside the design, that element will hide the overlay.
Sorting #
clerk-omnisearch-sort
Finds sorting dropdowns and adds listeners to them.
To get a sorting element in the design, add this to the selecting element, e.g. a dropdown. To work, the element needs to be the following value:[desc|asc], so the value we want to sort, with a colon and then either desc or asc.
Optionally you can add a data-sort-type attribute if you want it to sort categories or pages.
Search Facet #
clerk-facet-search
If there is a facet search present, creates a listener and hides facets that do not match the query.
The class, when present in a webpage, checks for the existence of any facet search elements. Facet searches provide a way for users to search in the facets. For it to work, the element need to have a string value.
Full Clear #
clerk-omnisearch-full-reset
When clicked, elements with the class will clear all selected facets and reset the query.
Facets Clear #
clerk-omnisearch-facet-full-reset
When clicked, elements with the class will, deselect all of the active facets. This would be typically seen on a ‘Clear all’ style button within a group of facets, allowing users to reset their selected filters in one easy action.
Group Clear #
clerk-omnisearch-facet-group-reset
When clicked, elements with this class will deselect all child elements within the group.
To provide the feature of deselecting an entire group of facets, an element can be given the class. Once the element is activated (e.g., clicked), all elements within its group become deselected, resetting that facet group. For it to work, the element must have the group we want to clear as an attribute with the name data-facet-group.
Facet Clear #
clerk-omnisearch-facet-reset
Elements with this class need to deselect a single element with the given group/value attribute pair.
This class is designed for scenarios where it’s necessary to deselect a single facet. An element with the class can be associated with a specific facet in a group by giving it both an data-facet-group and a data-facet-value. Upon activation, it will only deselect its associated facet based on the given group/value attribute pair, leaving other selected facets unchanged.
Facet Click #
clerk-facet
Elements with this class will be treated as a selectable facet.
All facets should have a class with the data-facet-group and a data-facet-value attributes, so we know what the customer is pressing.