FAQ
Running into issues with your Shopify integration? This FAQ covers the most common problems and their solutions, from currency conversion to theme file locations.
Currency conversion #
Shopify’s built-in Currency Conversion makes it easy to read the currency symbol and exchange rate from the webshop.
By default, Clerk.js for Shopify comes bundled with a formatter that works as long as your 3rd party app uses Shopify’s built-in currency object.
Standard solution #
You need to use a formatter in your Designs to convert prices.
This example uses our standard template language here.
When using currency conversions and symbols, Clerk.js detects settings such as language, currency, and country code.
The following examples show how the different components work.
| Formatter | Description | Example Output |
|---|---|---|
| currency_symbol | Currency symbol for the given country or region. This can range based on what you have set up in your configuration of the shop | €, £ and kr. |
| currency_converter | A conversion formatter based on the currency setting and rate of the shop’s configuration | Let’s say you have 10 euros on a product. If a user switches to another currency like Danish kroner (depending on the setting), then it will convert it to the corresponding conversion |
Design Editor #
Create a Text component where you want the price to show.
Add the following Liquid code to show the price based on the currency converter inside the text component:
{{ currency_symbol }}{{ item.price | currency_converter }}
Code mode #
In my.clerk.io, go to Search/Recommendations > Designs and click Edit Design for your design.
Replace the existing money or money_eu formatter for prices with currency_converter.
Click Update Design.
You will now be able to see the converted prices and currency symbol in your design.
Custom API solution #
Disclaimer: This is a very custom solution to get price conversions if there are no data from the Shopify API. Only use this if you are using a specific and custom setup for price conversions based on geo-IP changes.
This is the frontend solution documentation in Github.
This section covers how to get contextual data in real time for showing within content returned from the Clerk API.
The design pattern is composed of the following parts:
A collection containing all products.
An alternate layout for rendering collection information as JSON.
A JavaScript Class which collects the data made available in the collection.
A JavaScript Snippet which consumes the data for the relevant product IDs in a given result and places them within a div in the template.
Create collection #
In order to ensure you have a collection with all possible products, create a collection with a condition met by all products.
The collection should be named Clerk api, as this will result in it receiving the route /collection/clerk-api frontend.
The condition for the collection should be something like price > -1000000.
Create alternate layout #
Create an alternate layout for showing your data using the collection.
To do this, first edit the theme code for the theme you wish to use.
Under the templates section on the left-hand side, press Add new Template.
In the popup, select collection for the resource type.
Select liquid for the file type.
Write json in the bottom-most field, so that the name of the created template is collection.json.liquid.
The contents of this file should be the collection.json.liquid file found in the liquid folder for this project.
You are welcome to add fields to the product in this template as required.
Add JS class #
In order to grab the data from your collection and prepare it so it can be used, place the entire contents of index.js in the class folder in this project, inside the script tag containing Clerk.js which you have placed in theme.liquid.
It should look something like this:
<script>
  // Clerk.js Injection Code
  // Clerk Config with Key and Formatters
  // Class from this project
  clerk_shopify_api.init()
  // Finally init() for the class to make sure it runs when the page loads.
</script>
This class will invalidate data based on timestamps and currencies, without you needing to change the code.
The time before invalidation is 12 hours since last building data.
Any change in currency context also invalidates the data.
Add template function #
Include the template.js in the design template used.
The function grabs the data when available and places it in specific child elements within each product tile.
The example includes the list_price and price fields.
Things to Note: If you need to use fields which are different from price and list_price, you would add them in collection.json.liquid and then edit the template.html and template.js to also consume those fields. You should never need to edit the Class described in step 3.
Finding theme files #
Shopify houses over 100 different themes to style and customize your webshop.
Each theme works in the same way—you customize the theme files to get a given result on your store.
However, the theme file names change from theme to theme.
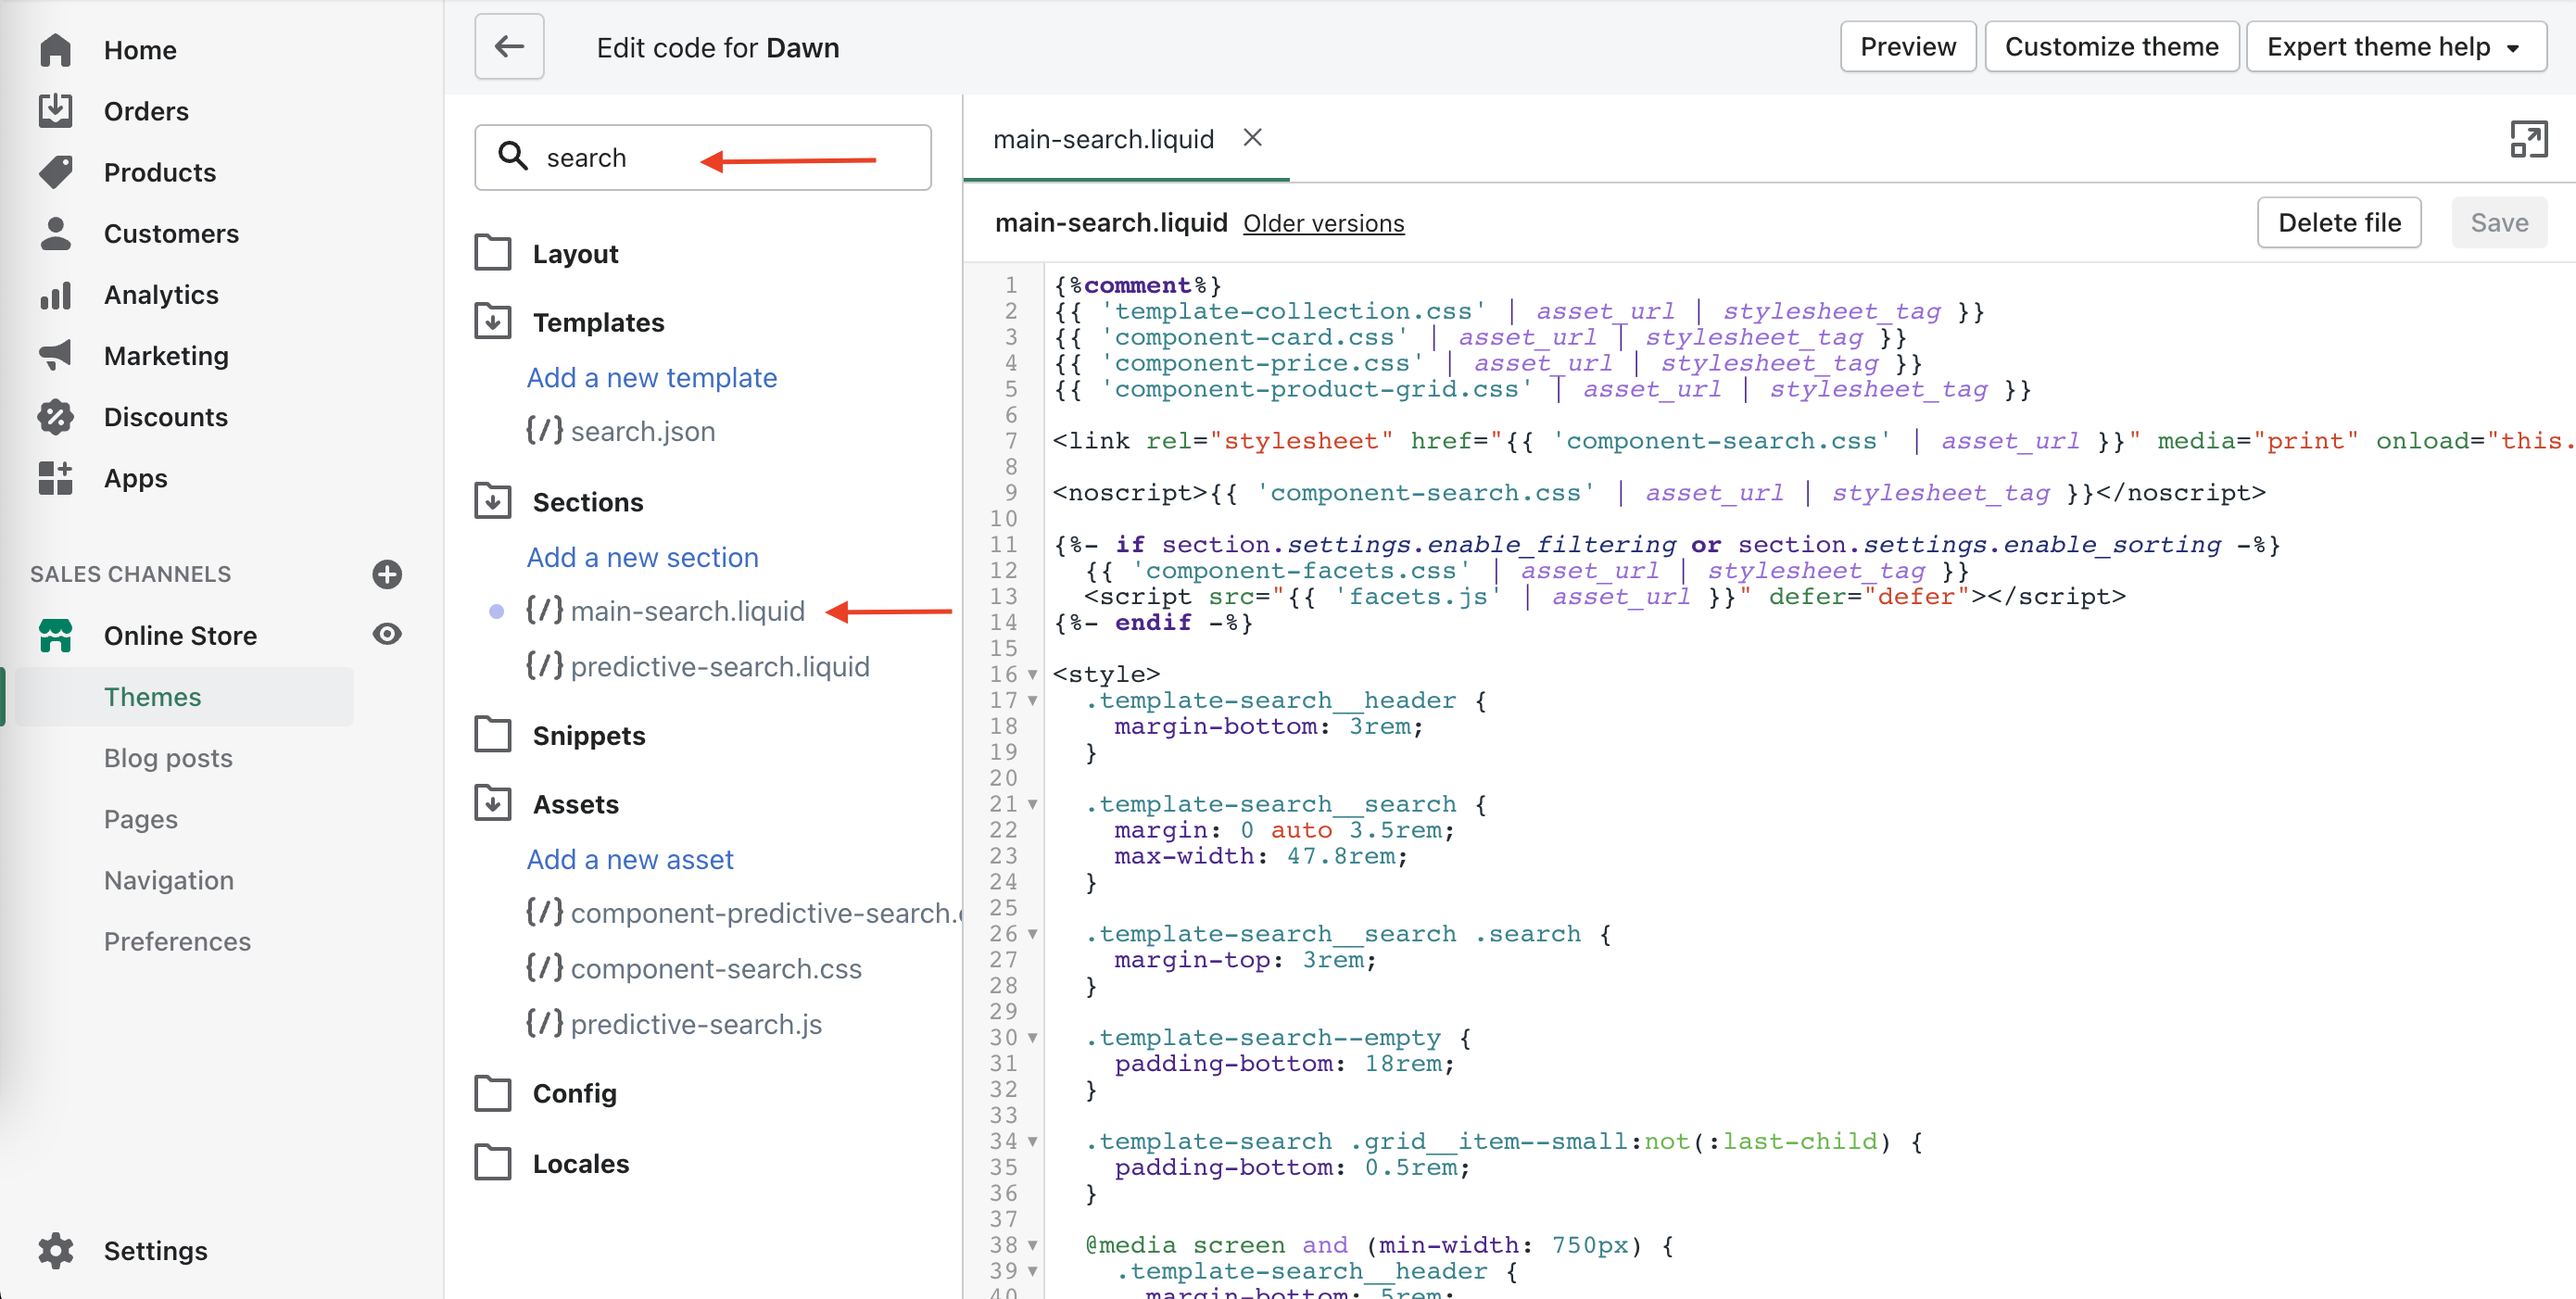
Shopify gives you a search field to easily and quickly find the theme file you are looking for.
If you do not know the name of the file you are looking for, you can use the search field to help locate it.
For example, if you are looking for the file that has the code for the search page, it is likely to have ‘search’ in the file name.
If you are unsure of whether you have found the correct file, you can compare the HTML in the theme file to the HTML on the relevant page to see if they match.
This can be done on Google Chrome by right-clicking on any section of the page and selecting ‘Inspect’.
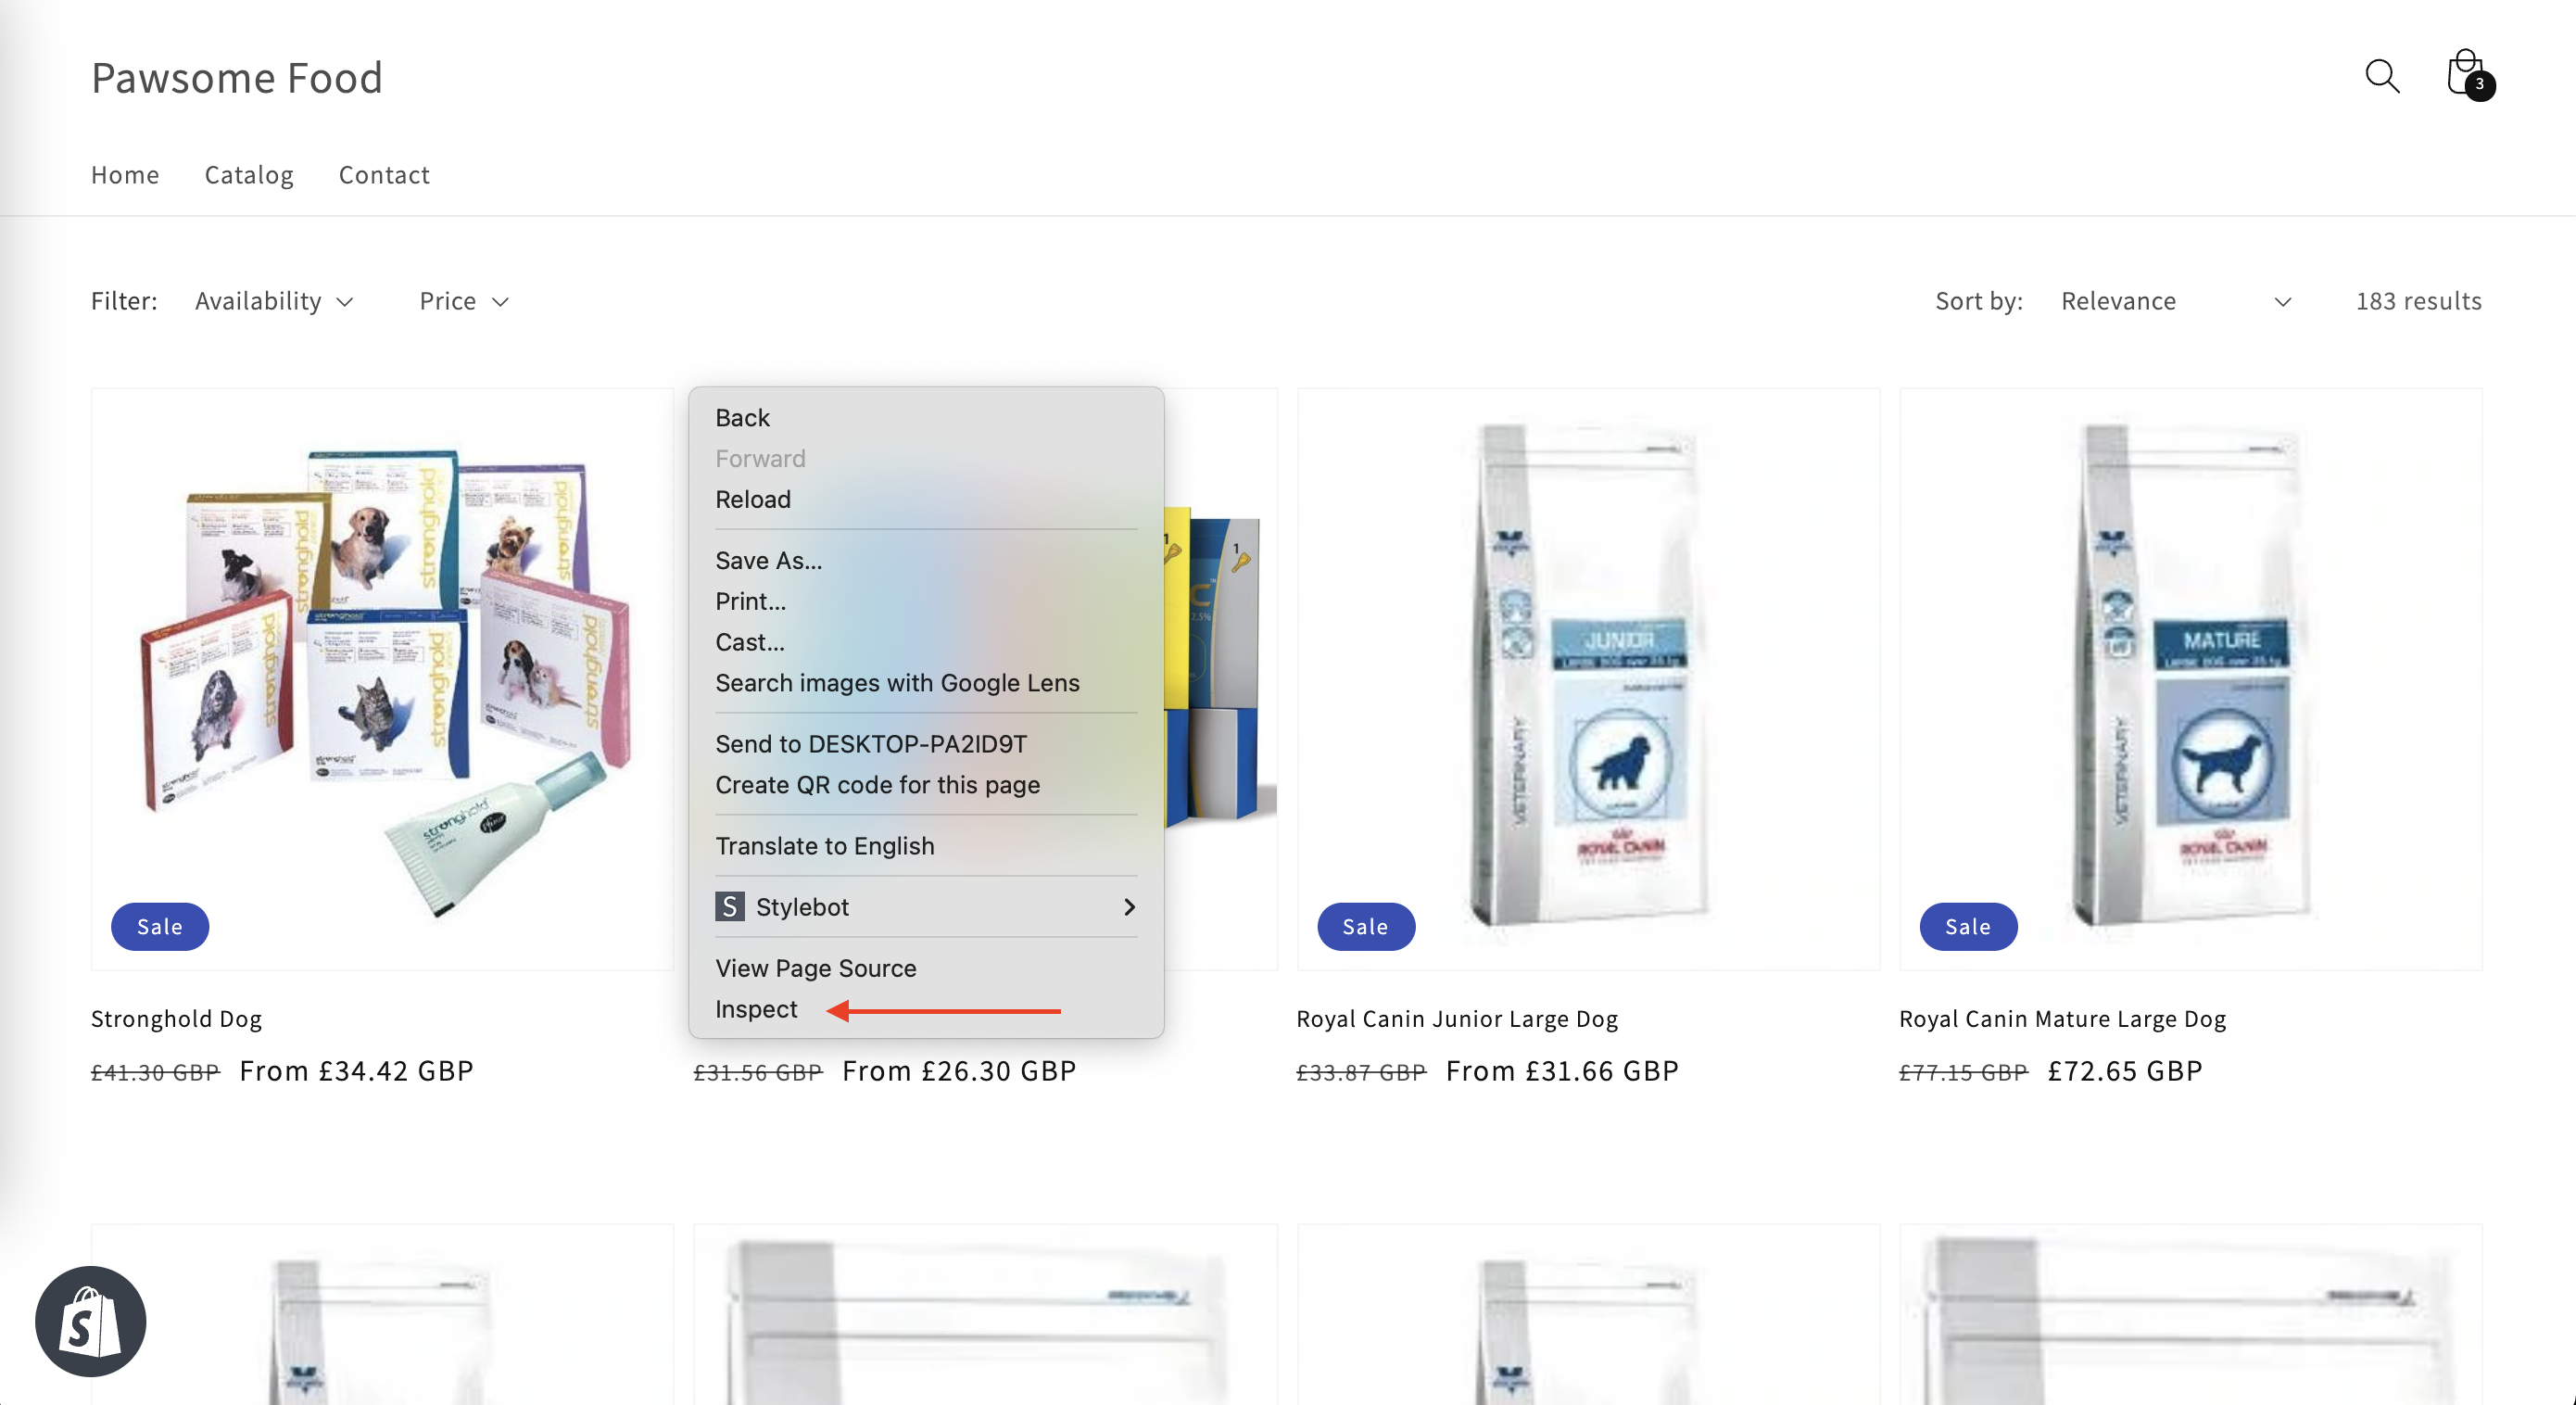
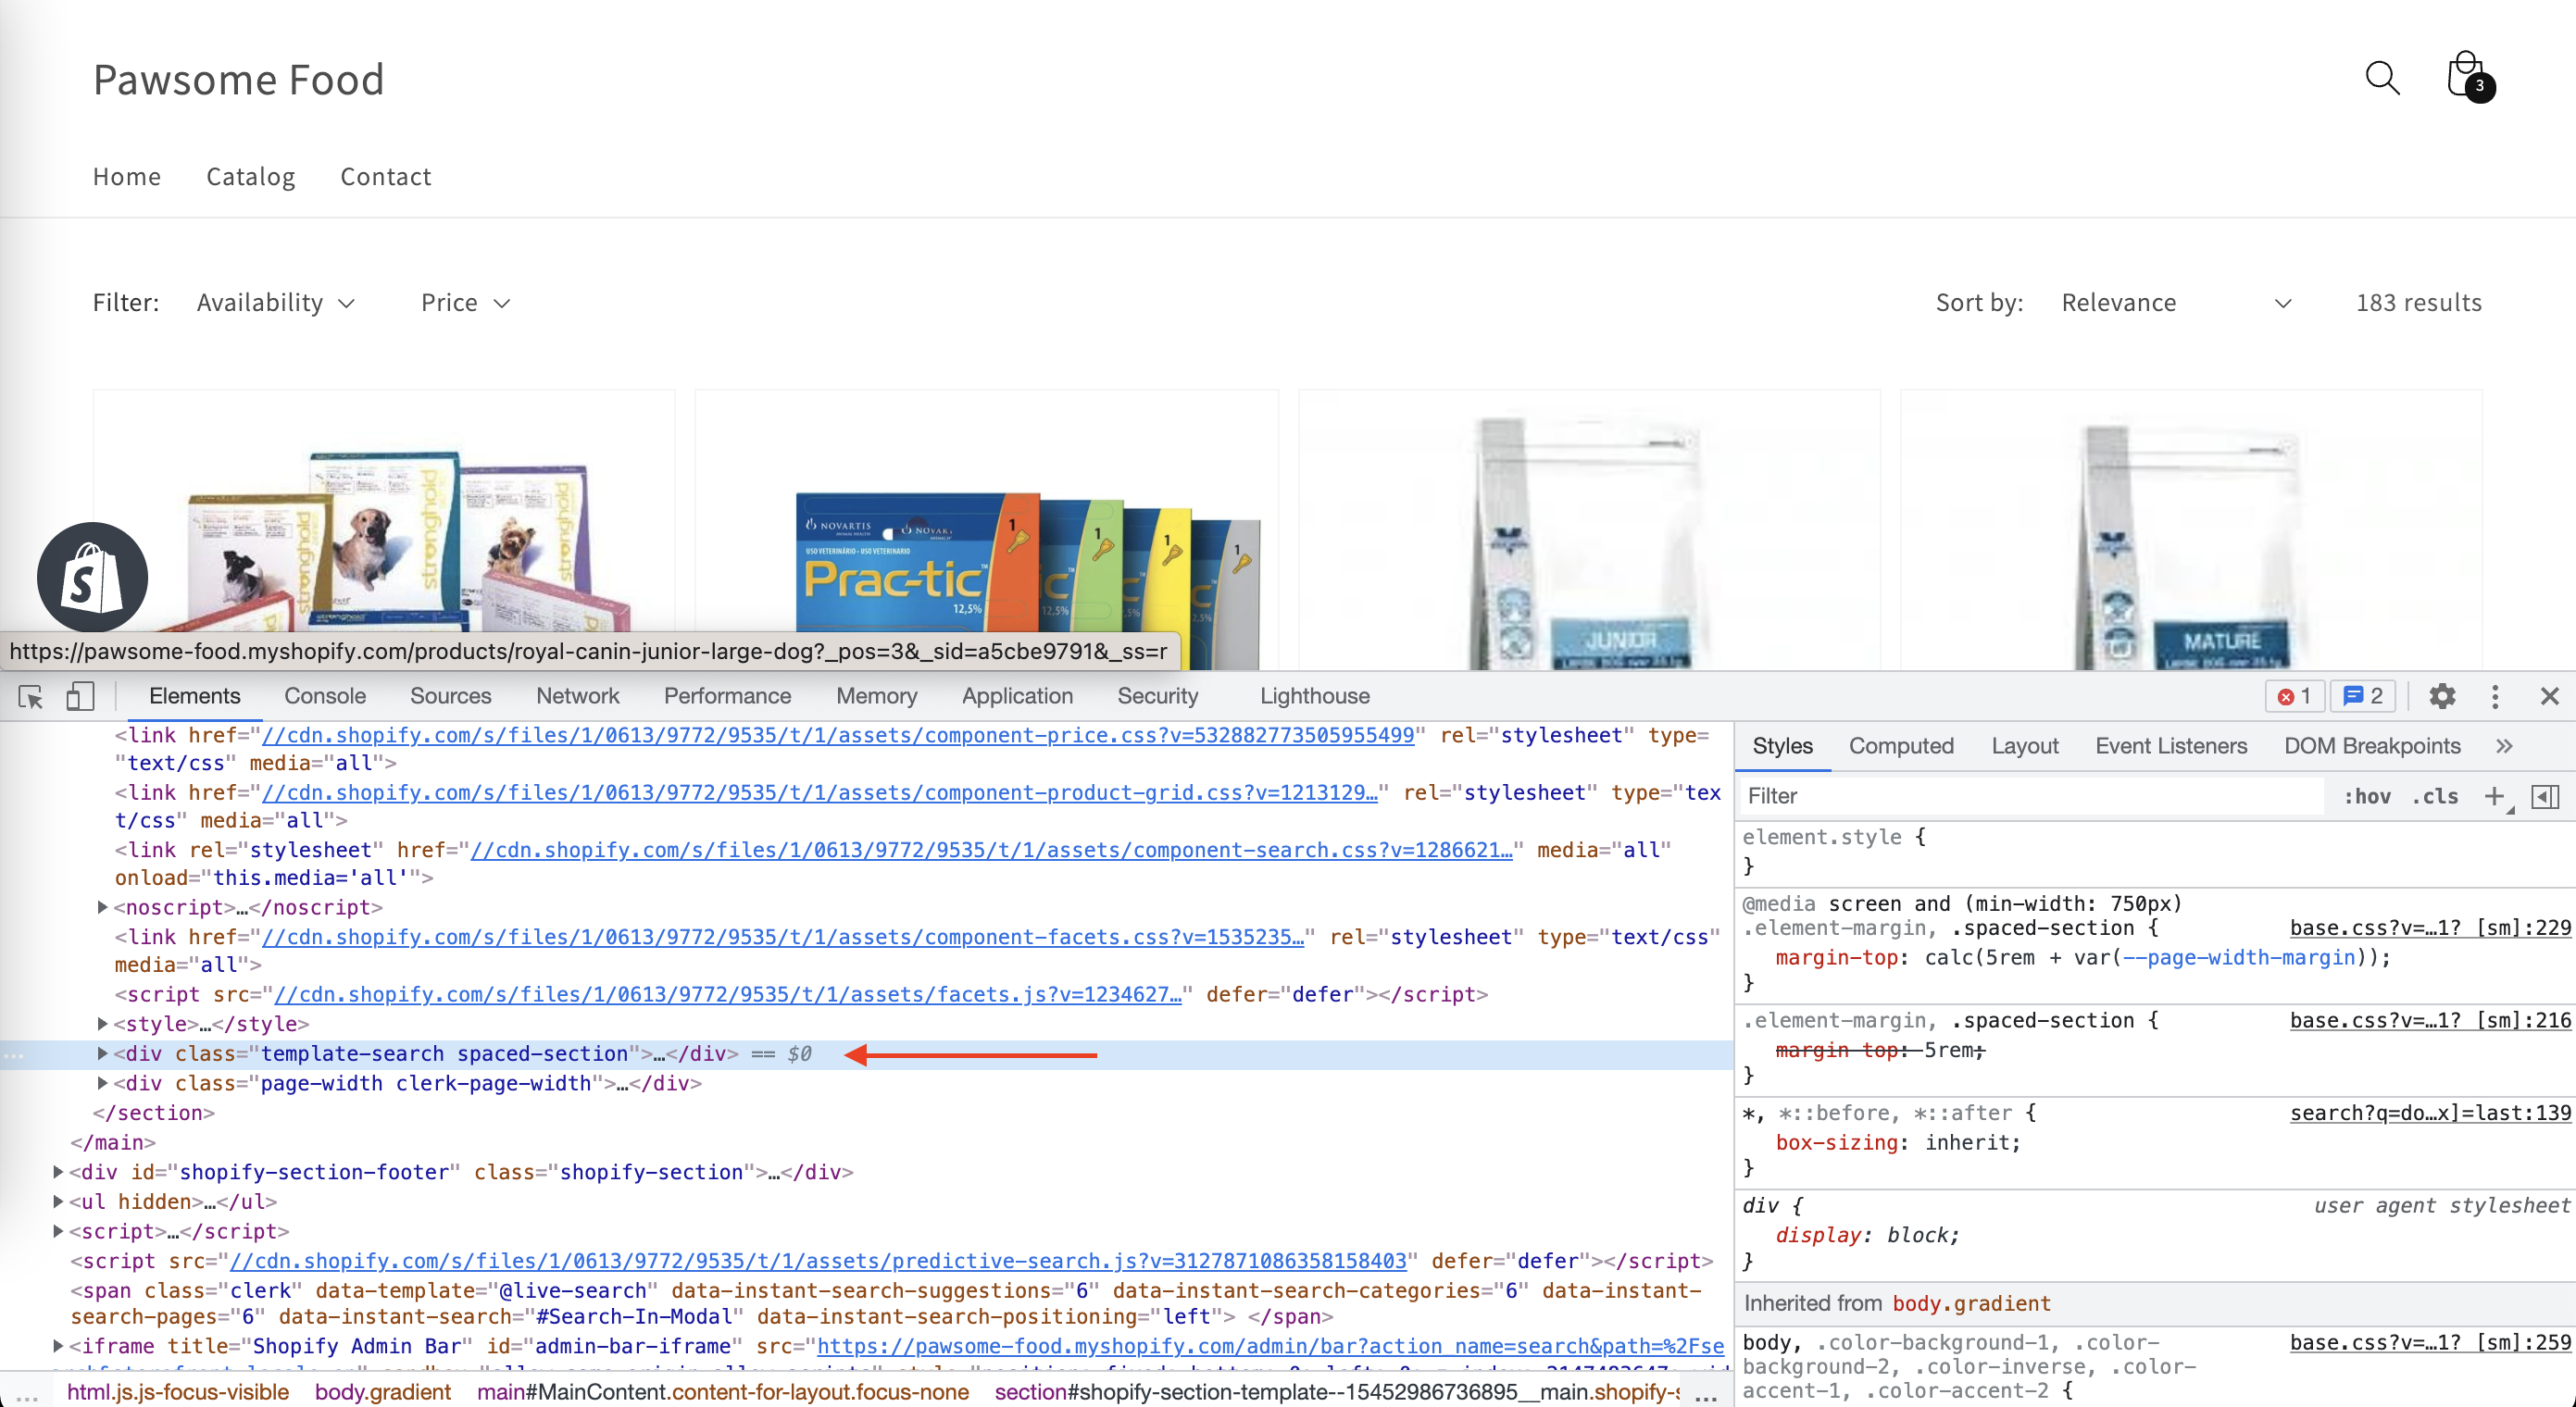
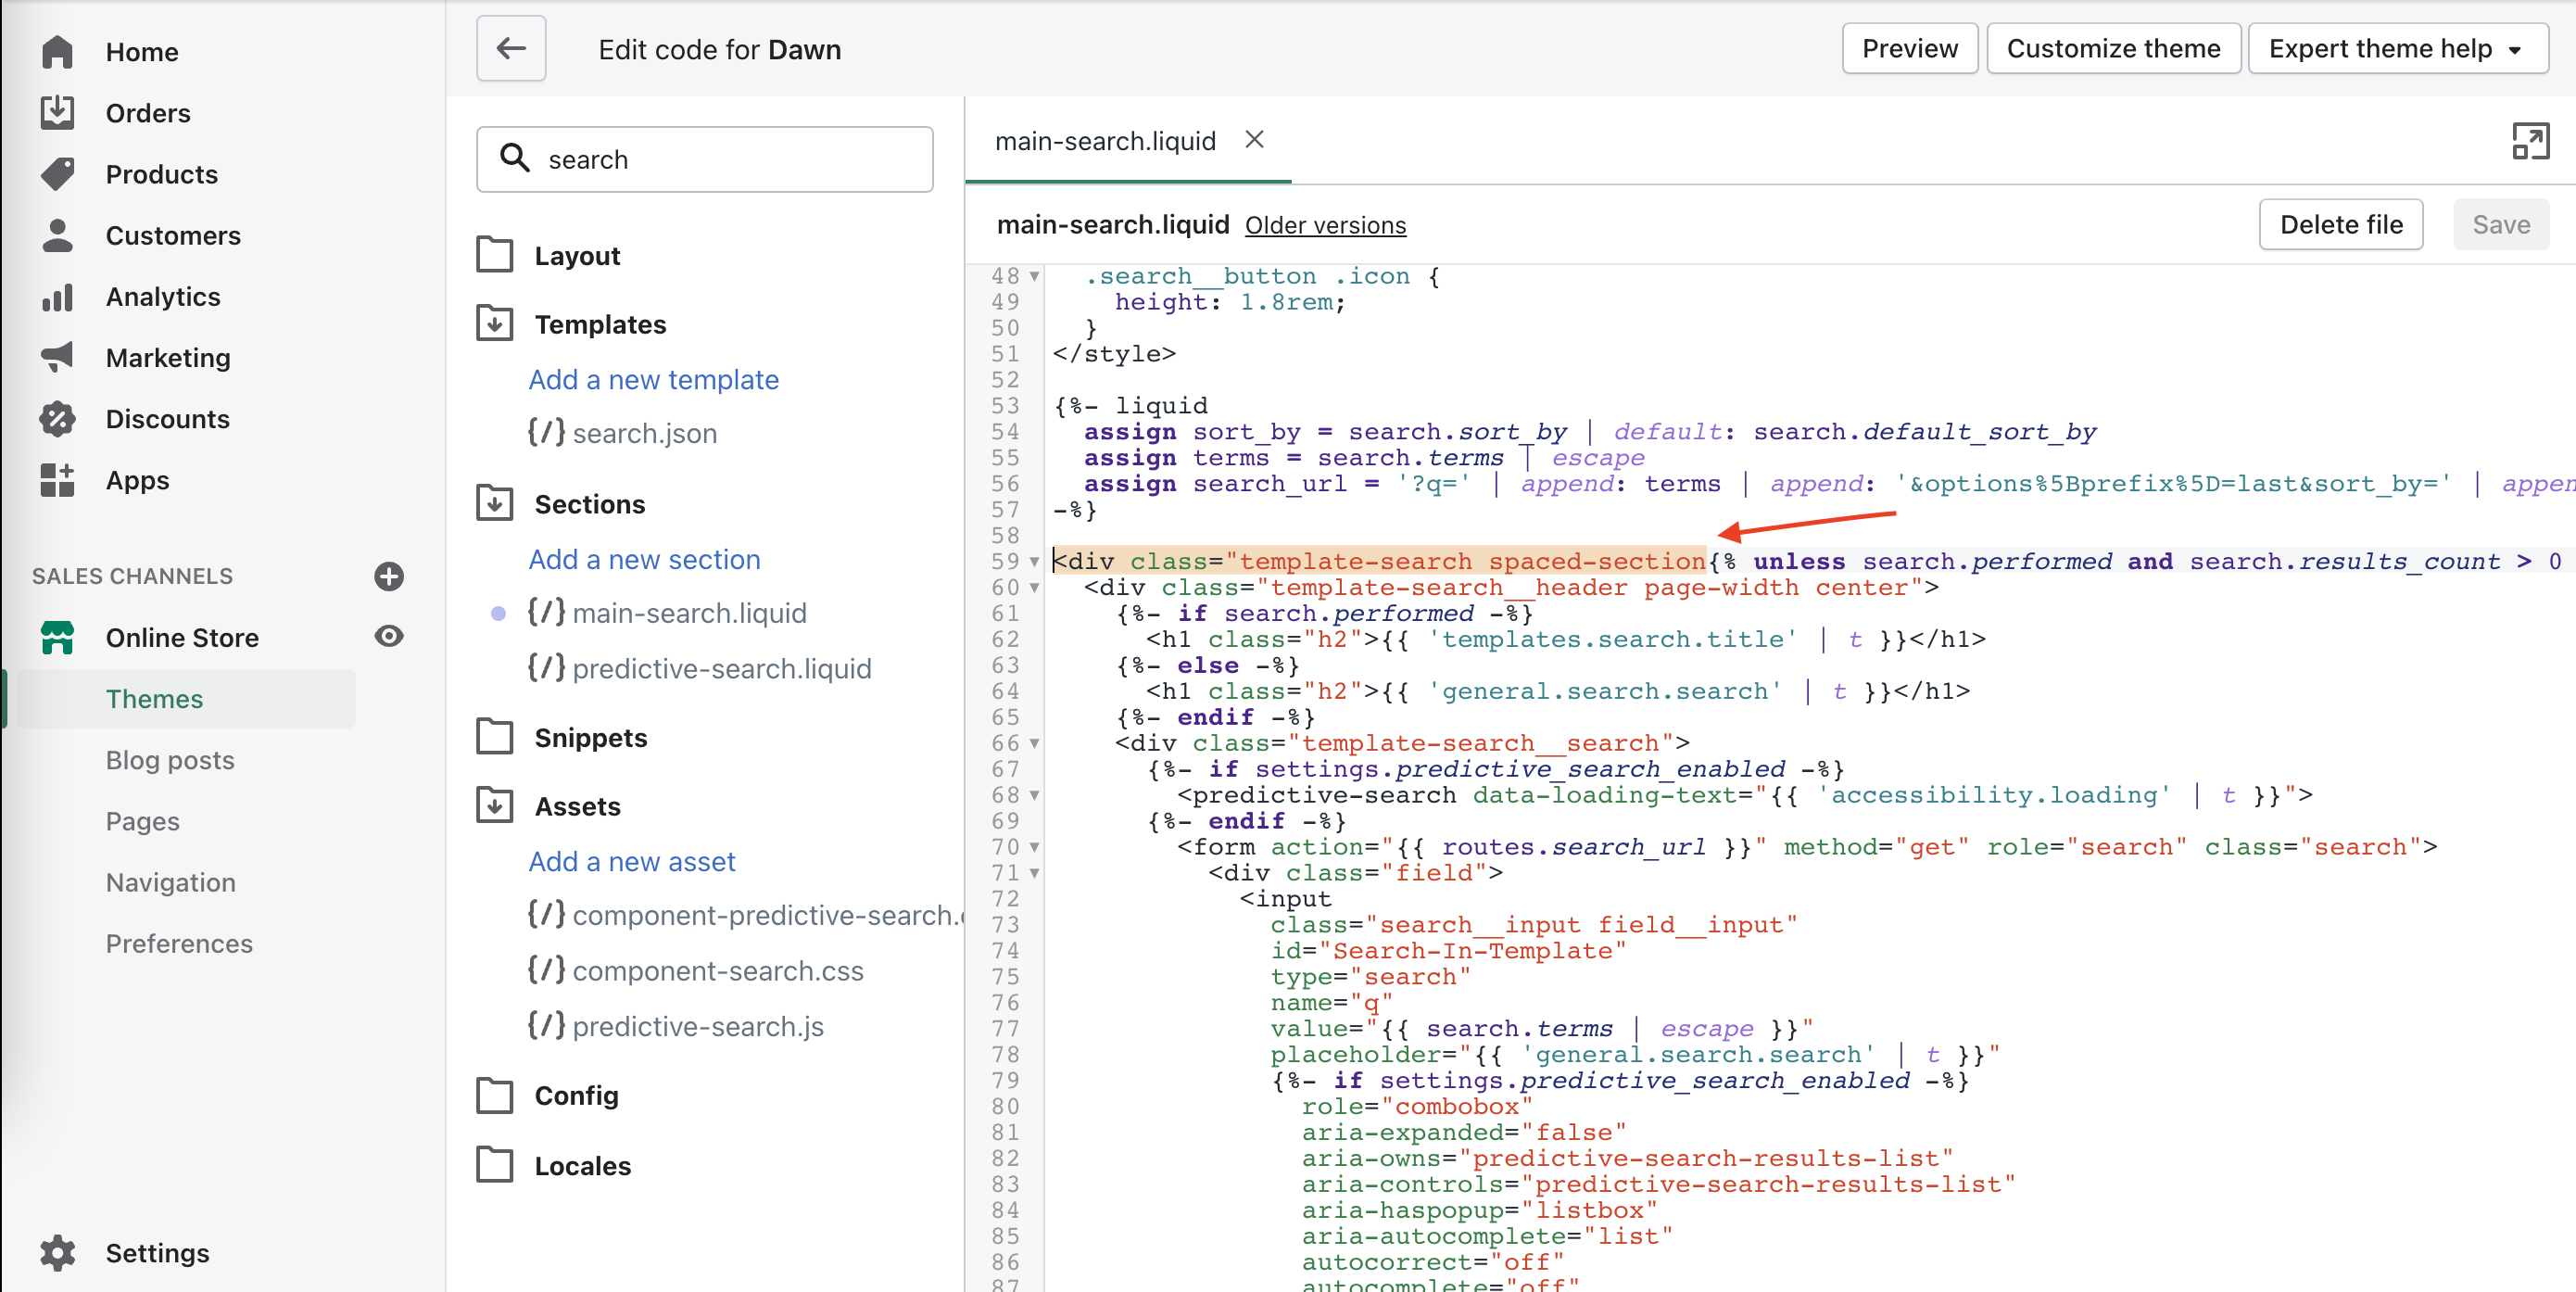
You can then inspect the HTML on the page and check if the class/ID of elements are the same in the file as on the page.
If you need further assistance with this, you can also reach out to our support team.
Cart drawer recommendations #
Installation by a Shopify developer is strongly recommended.
This guide outlines a highly customized solution that may behave differently across various Shopify themes. It is specifically designed for themes where the cart is part of the DOM on every page but remains hidden until opened by the user.
Displaying Clerk Recommendations in the cart drawer on Shopify is a great way to showcase additional products to shoppers before they begin the checkout process.
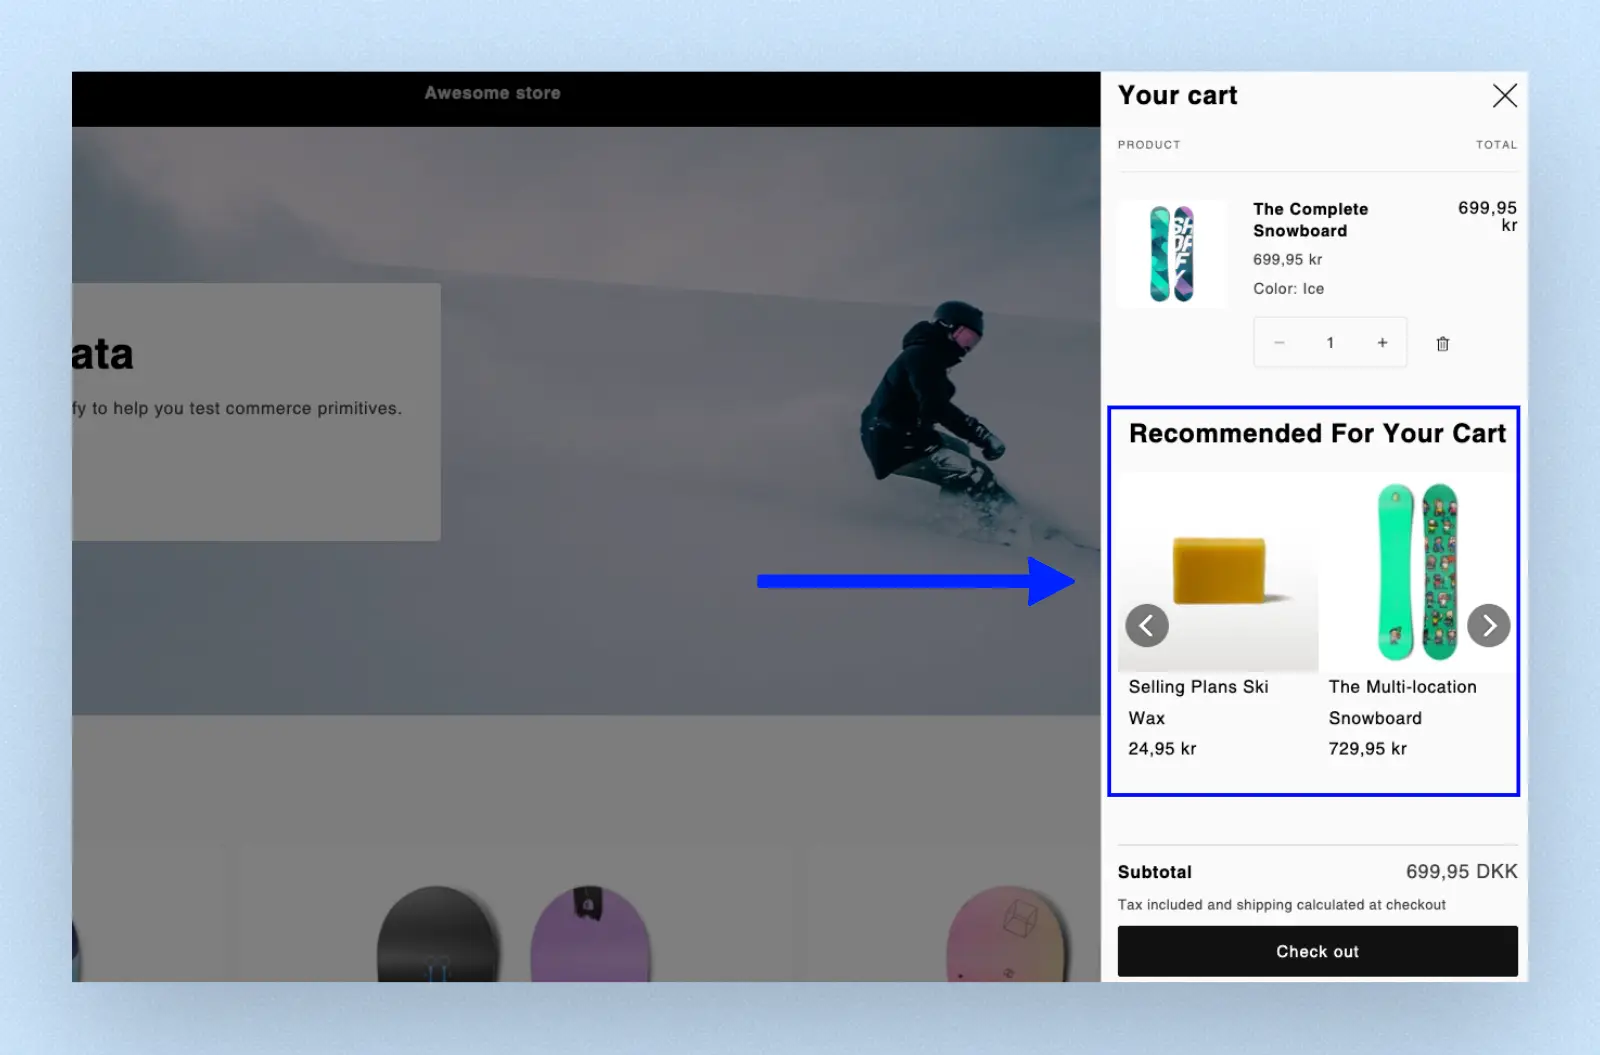
Edit the code of your Shopify theme in Online Store > Themes > Edit code.
Find the file where the cart drawer template is (usually called cart-drawer.liquid or similar).
Insert a Clerk Recommendations snippet from Recommendations > Elements.
Rename the class from
clerkto control the rendering. For example, by calling itclerk_m:
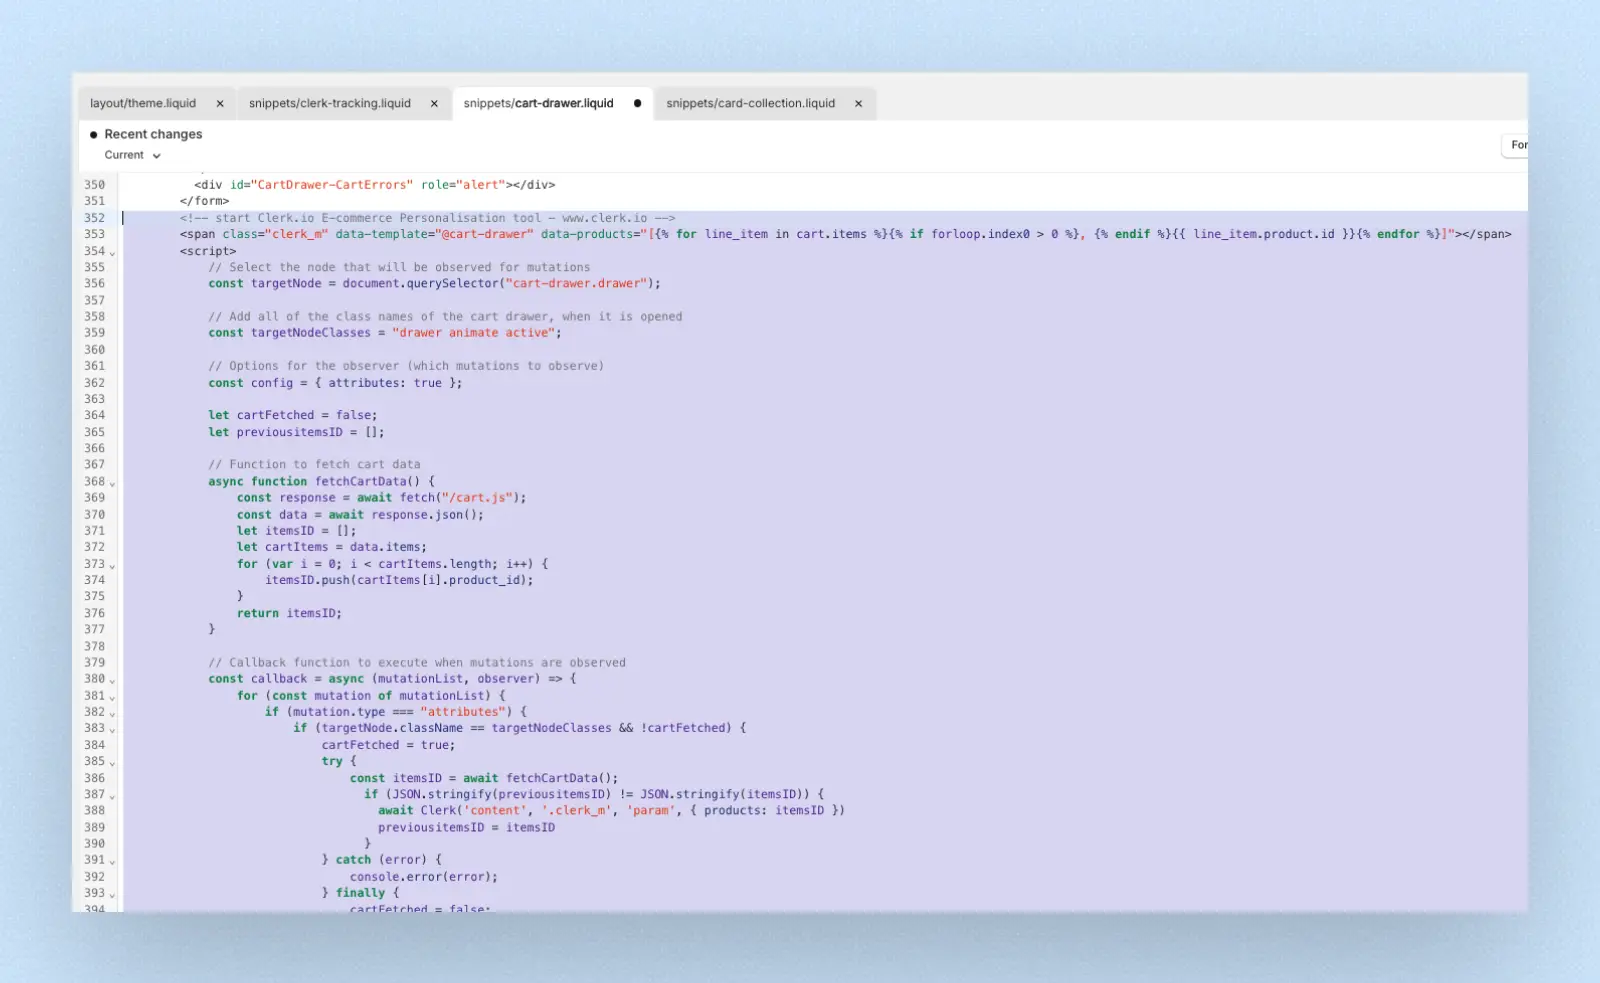
<span class="clerk_m" data-template="@cart-others-also-bought" data-products="[{% for line_item in cart.items %}{% if forloop.index0 > 0 %}, {% endif %}{{ line_item.product.id }}{% endfor %}]"></span>
- Along with the above snippet, include a script to render Clerk Recommendations when the user opens the cart. One approach is to use a MutationObserver. The below script includes all of these elements, giving you an example of how to approach it:
<script>
    // Select the node that will be observed for mutations
    const targetNode = document.querySelector("cart-drawer.drawer");

    // Add all of the class names of the cart drawer, when it is opened
    const targetNodeClasses = "drawer animate active";

    // Options for the observer (which mutations to observe)
    const config = { attributes: true };

    let cartFetched = false;
    let previousitemsID = [];

    // Function to fetch cart data
    async function fetchCartData() {
        const response = await fetch("/cart.js");
        const data = await response.json();
        let itemsID = [];
        let cartItems = data.items;
        for (var i = 0; i < cartItems.length; i++) {
            itemsID.push(cartItems[i].product_id);
        }
        return itemsID;
    }

    // Callback function to execute when mutations are observed
    const callback = async (mutationList, observer) => {
        for (const mutation of mutationList) {
            if (mutation.type === "attributes") {
                if (targetNode.className == targetNodeClasses && !cartFetched) {
                    cartFetched = true;
                    try {
                        const itemsID = await fetchCartData();
                          if (JSON.stringify(previousitemsID) != JSON.stringify(itemsID)) {
                            await Clerk('content', '.clerk_m', 'param', { products: itemsID })
                            previousitemsID = itemsID
                          }
                    } catch (error) {
                        console.error(error);
                    } finally {
                        cartFetched = false;
                    }
                }

            }
        }
    };

    // Create an observer instance linked to the callback function
    const clerk_observer = new MutationObserver(callback);

    // Start observing the target node for configured mutations
    clerk_observer.observe(targetNode, config);
</script>
Your cart drawer file should look like this:
HTTP authentication #
HTTP authentication is often used on staging sites to avoid unwanted visitors.
This will block the Clerk importer and display a 401 Unauthorized error in the sync log.
You can fix this by inserting the authentication info in the import URL.
In my.clerk.io > Data > Configuration, update your import URL like this:
https://USER:PASS@www.ewoksRus.com
Common sync errors #
When importing data with the Shopify integration, your webshop’s server is responsible for sending product, category, and sales data to Clerk.
However, in some cases, the server’s configuration might stop the Importer from getting access, causing an error in Data Sync.
Below is a list of the most common errors and how to fix them.
401 Unauthorized #
This error happens if your webshop or dev environment requires HTTP authentication to access it.
This is solved by inserting the Username and Password as part of the Import URL:
http://username:password@awesomeshop.myshopify.com
Permissions error #
This error usually happens if you have not given Read Access to Store content like articles, blogs, comments, pages and redirects in your Private App.
To fix it:
Login to Shopify and go to Apps > Manage Private Apps > Clerk.io (or the name you gave the App).
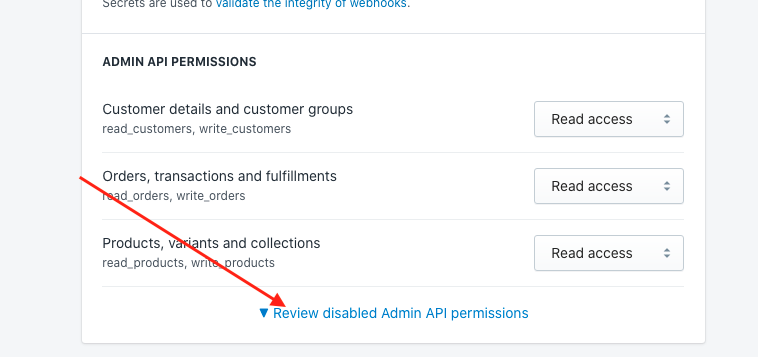
Scroll to Admin API Permissions, and click on Review disabled Admin API permissions.
Find Store content like articles, blogs, comments, pages and redirects and choose Read access:
- Scroll to the top of the page and click Save.
Handling require.js #
This guide only applies when using Clerk.js 1.
In some setups, Require.js stops Clerk.js from loading, which means that no sliders or search results will be shown.
When this happens, the following error will be shown in your console:
Uncaught ReferenceError: Clerk is not defined
There are two ways to handle Require.js. Both approaches require you to make changes to the tracking-script, which is normally inserted in index.liquid.
Include in Require.js #
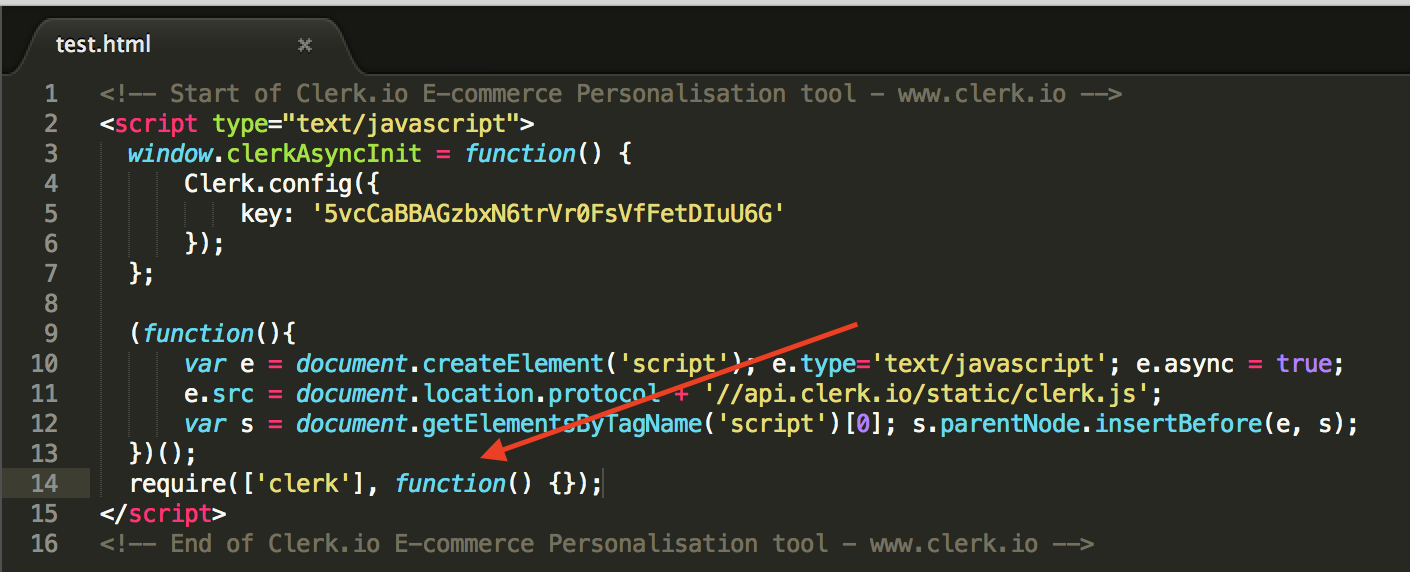
The best approach is trying to get Require.js to recognize Clerk.
You can do this by inserting require(['clerk'], function() {}); in the bottom of the tracking script:
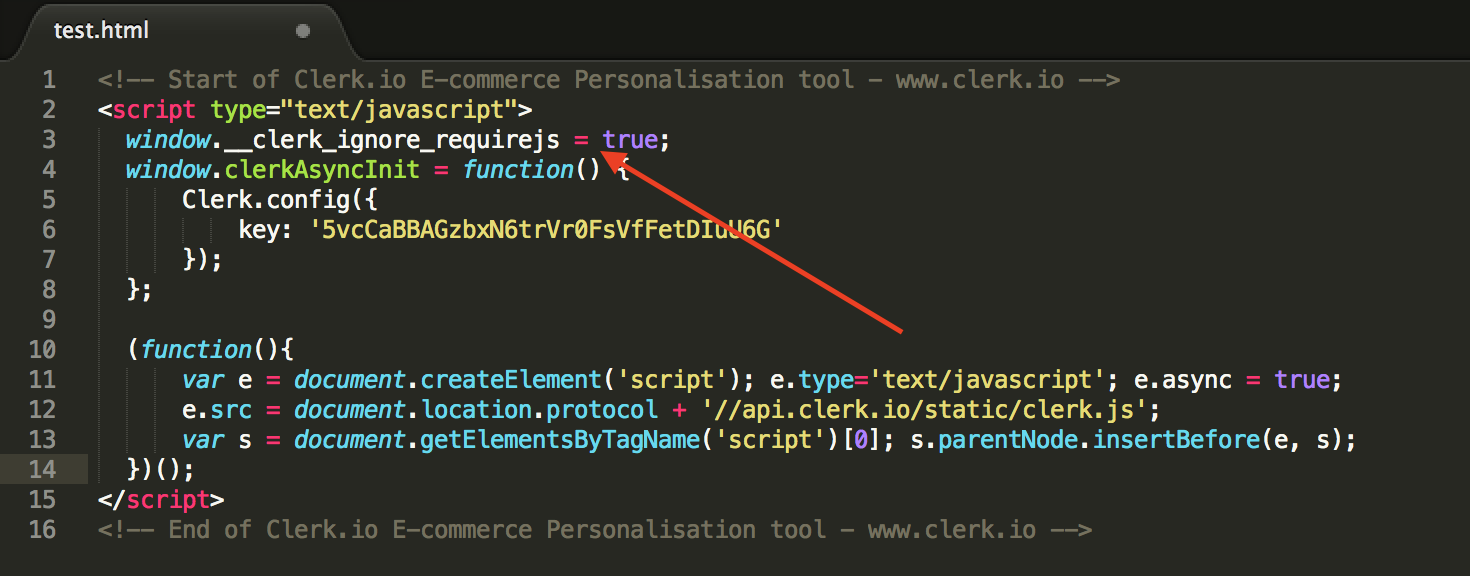
Ignore Require.js #
If the above solution doesn’t work, it’s possible to ignore Require.js.
You can do this by inserting window.__clerk_ignore_requirejs = true; in the top of the tracking script:
After using one of these approaches, Require.js will now be compatible with Clerk.
Upgrade to Clerk.js 2 #
Clerk.js 2 is a faster and more flexible version of our JavaScript library.
It makes installing Clerk on any webshop easier.
However, since the two versions work slightly differently, you need to follow these steps to successfully upgrade.
The two main differences in Clerk.js 2 are:
The Designs in my.clerk.io use the Liquid templating language, but can also easily be created using the Design Editor.
The script must be inserted just before the
</head>tag in your webshop’s template.
Create designs #
Since Clerk.js 2 has a different approach to Designs, you need to create new ones.
You can create your Clerk.js 2 Designs in one of two ways:
Use the intuitive Design Editor to create new Designs, as described in the following points.
Convert your old Designs. Follow this guide to see how to do it.
Design Editor option #
Go to my.clerk.io > Recommendations/Search > Designs > New Design.
On the following screen, give your Design a Name (we recommend adding “V2” so it’s obvious that you are using Clerk.js 2).
Choose Design Type.
Click Publish Design when you are done, and go to Step 2 in the guide.
In the Design Editor, click any of the existing elements like the name, image, button, etc. to edit it, or add new elements to the Design to add more information about products.
Click Publish. This will temporarily cause them to not show up on your webshop until you are done with Step 2. Choose the new Design for all Elements that should be updated.
Go to Recommendations/Search > Elements and change your Clerk Element to use your new Design.
You are now ready to switch over to Clerk.js 2.
Replace script #
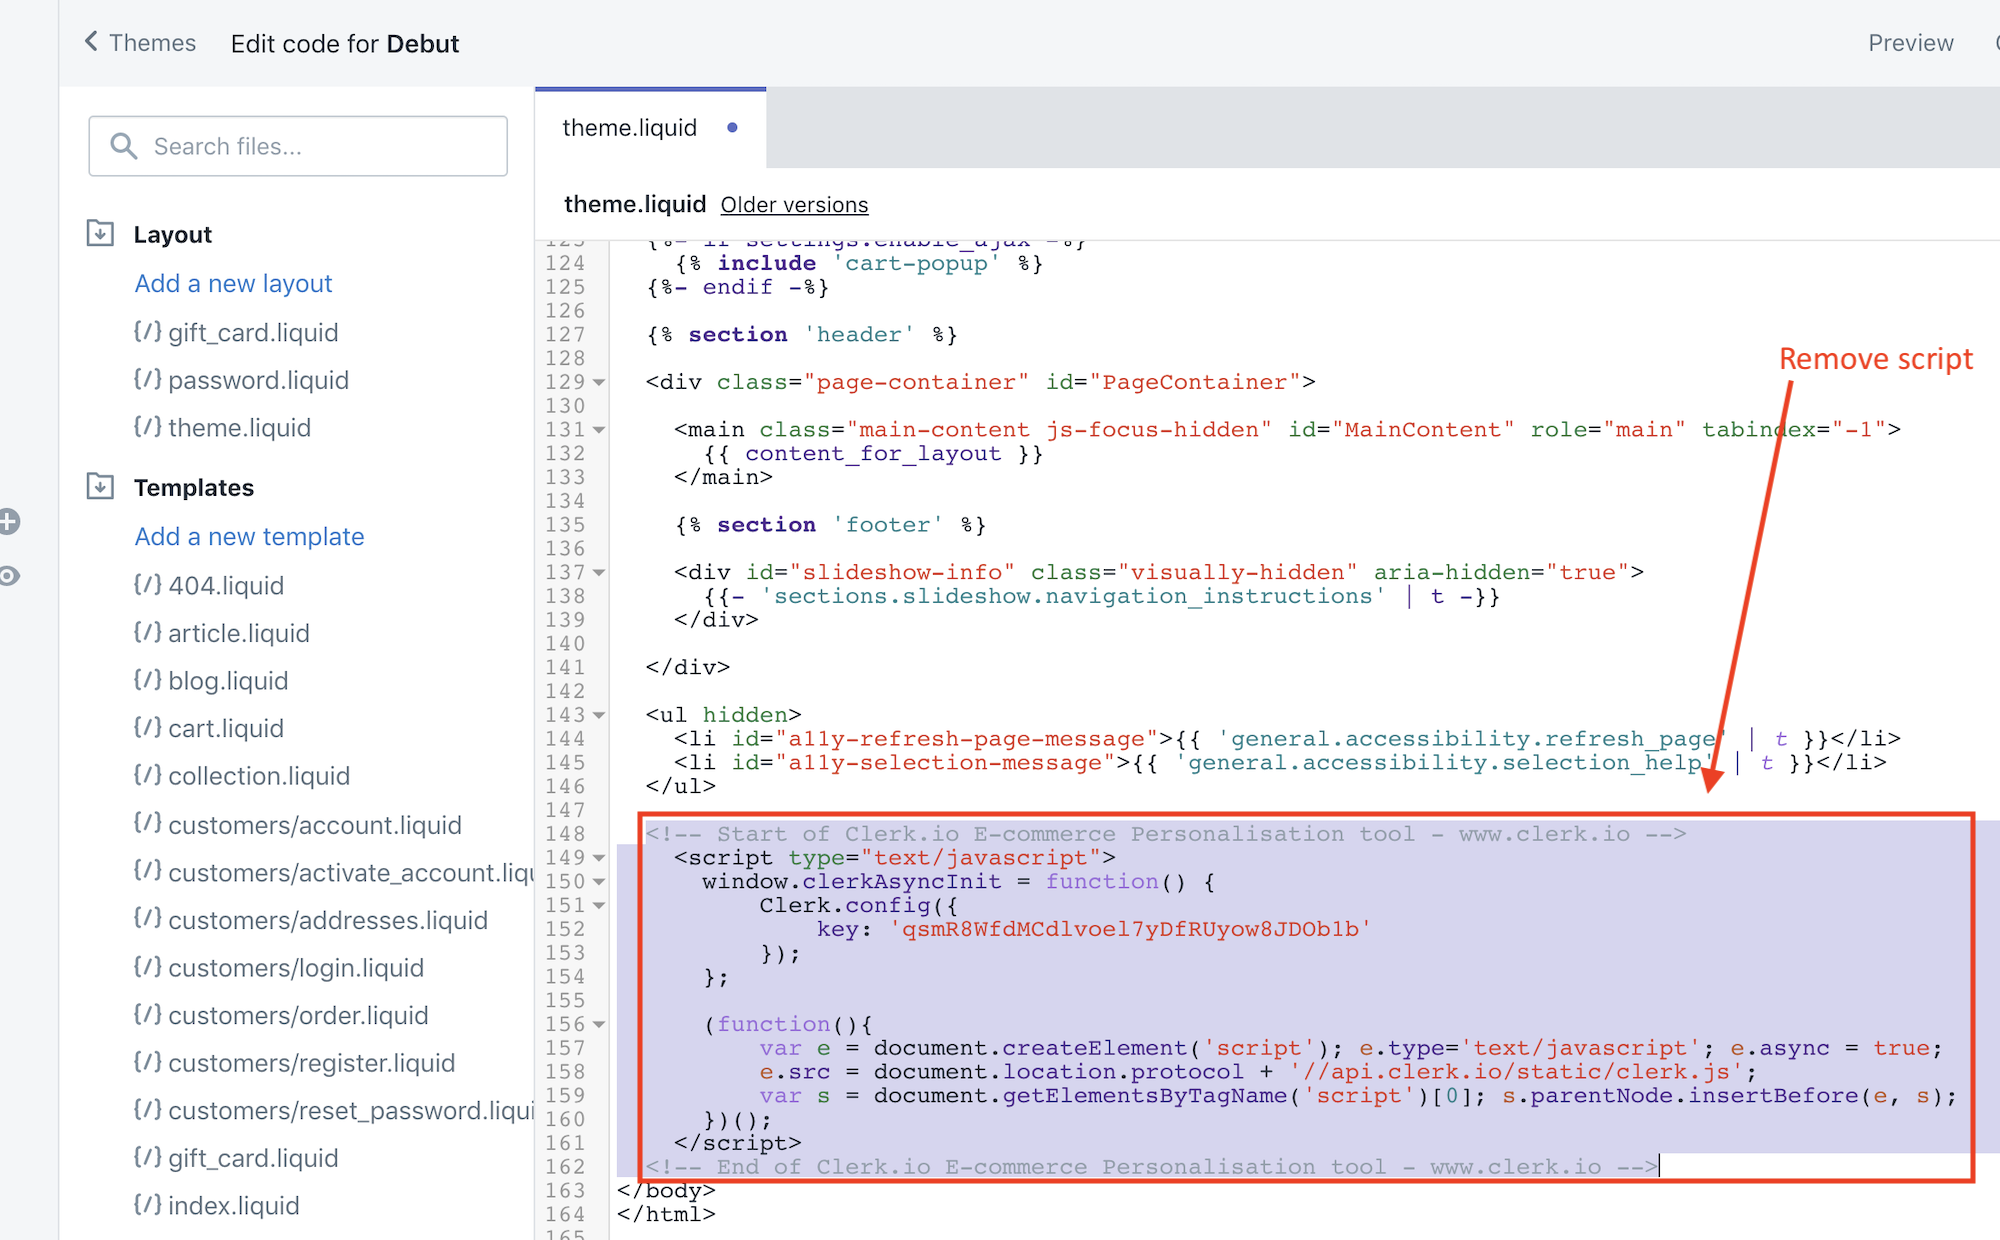
Locate the template file that is used to show all pages of the webshop, and where the original Clerk.js script is found near the bottom.
Remove the old script from the file:
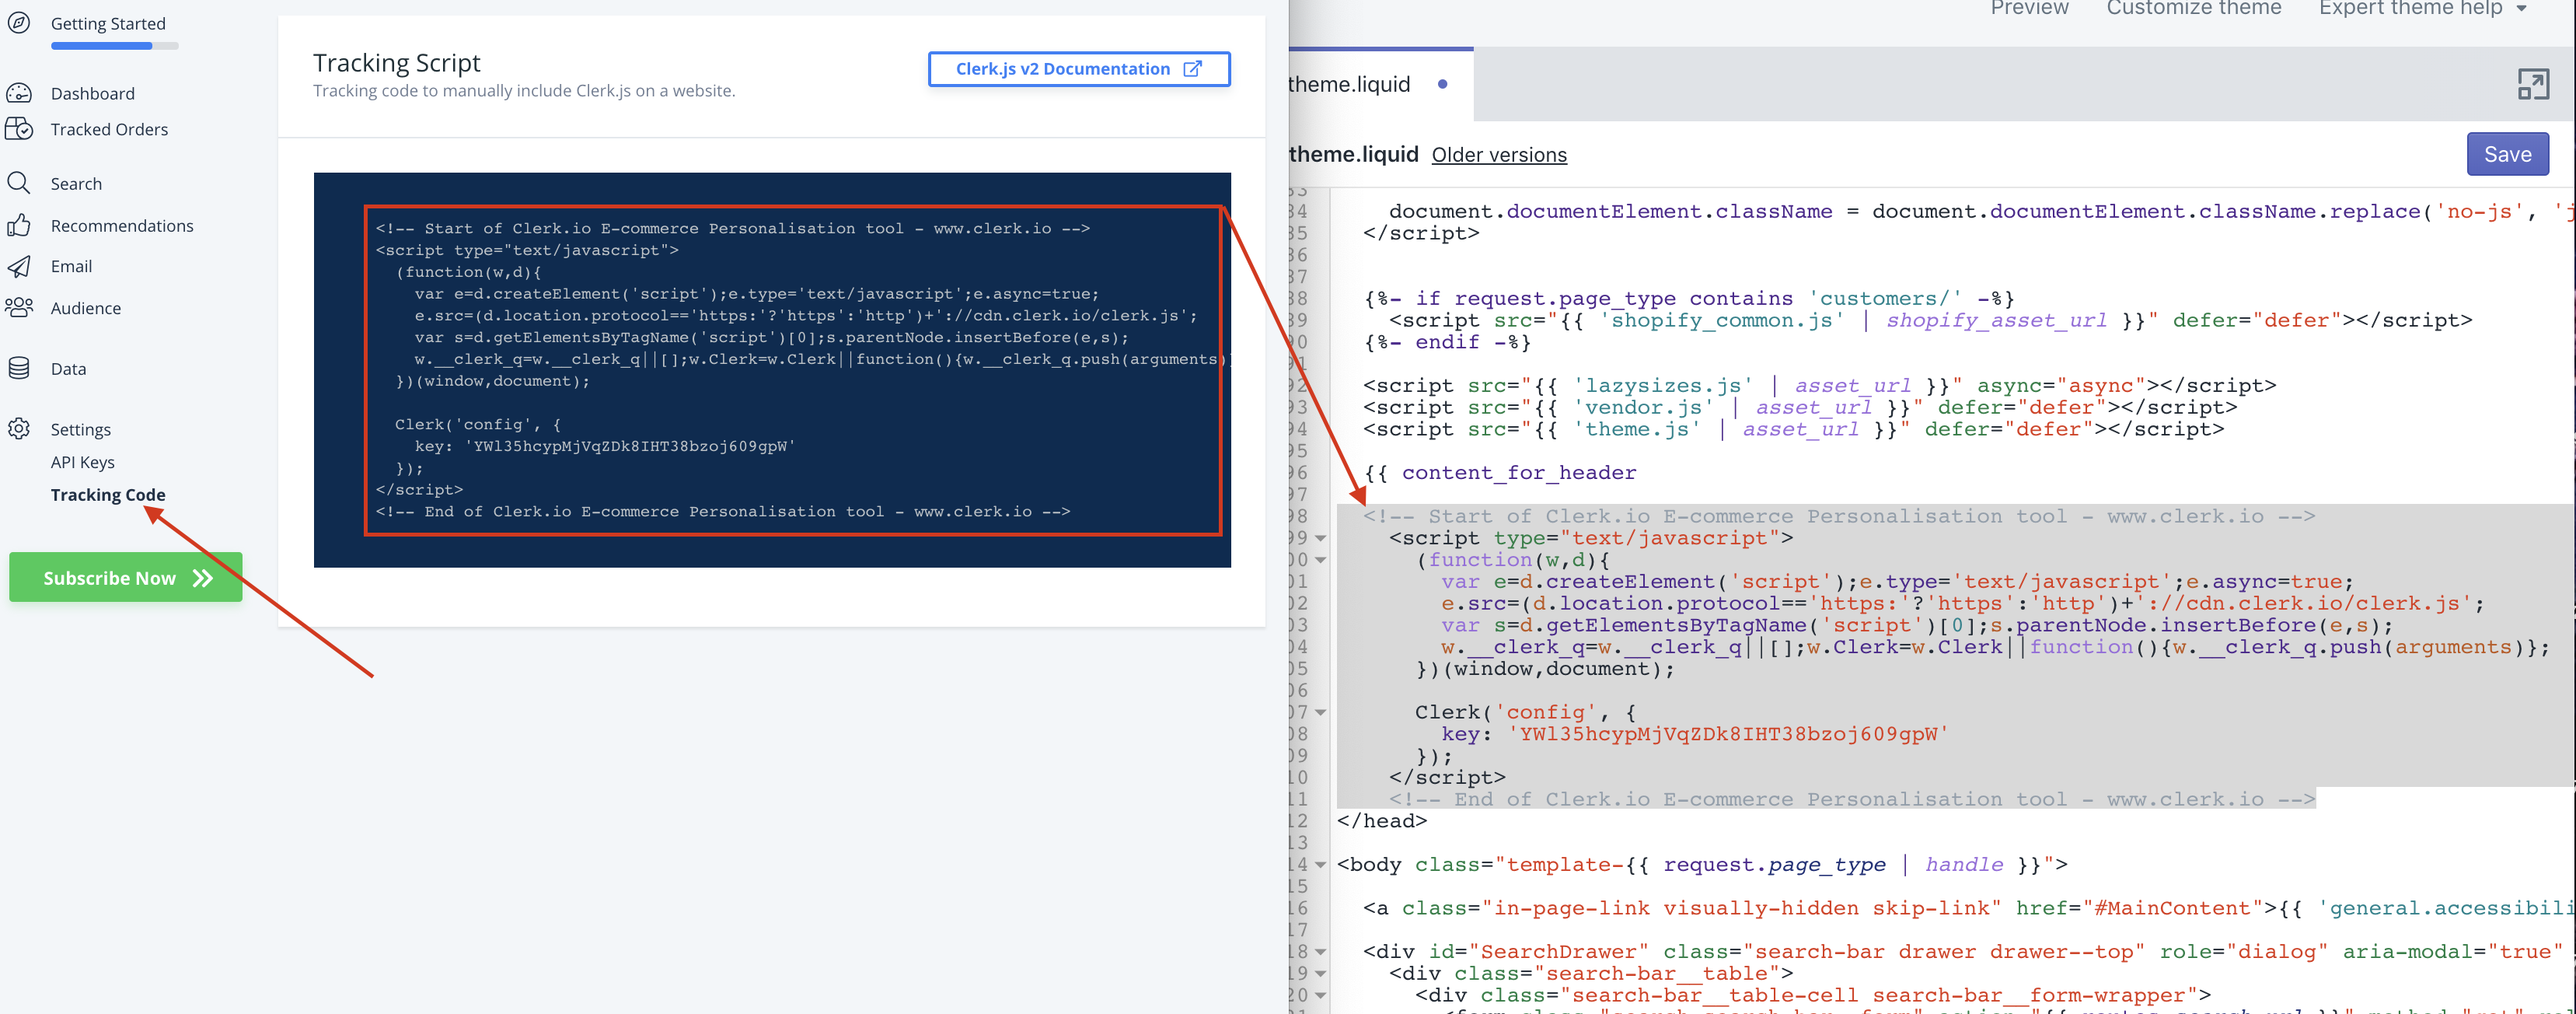
Go to my.clerk.io > Developers > Tracking Code. This page now contains your Clerk.js 2 tracking code.
Copy this code and insert it just before the
</head>tag in the template:
- Save your template.
Congratulations! You are now running on the much-improved Clerk.js 2 setup!
You can see the full documentation for Clerk.js 2 here: https://docs.clerk.io/docs/clerkjs-quick-start
Grant Clerk access to Customer Events #
When we help you set up or troubleshoot order tracking via Shopify pixels, we may ask for access to the Customer events area in your Shopify admin.
Follow these steps to grant the necessary permissions:
- In Shopify, go to Settings > Users and permissions.
- Click the staff member named Clerk.io (or the staff user you want to update).
- Scroll to Store settings and enable:
- View customer events
- Manage and add custom pixels
- Click Save.
These permissions let our team view the Customer events section and manage the Clerk pixel so we can verify order tracking is working correctly.