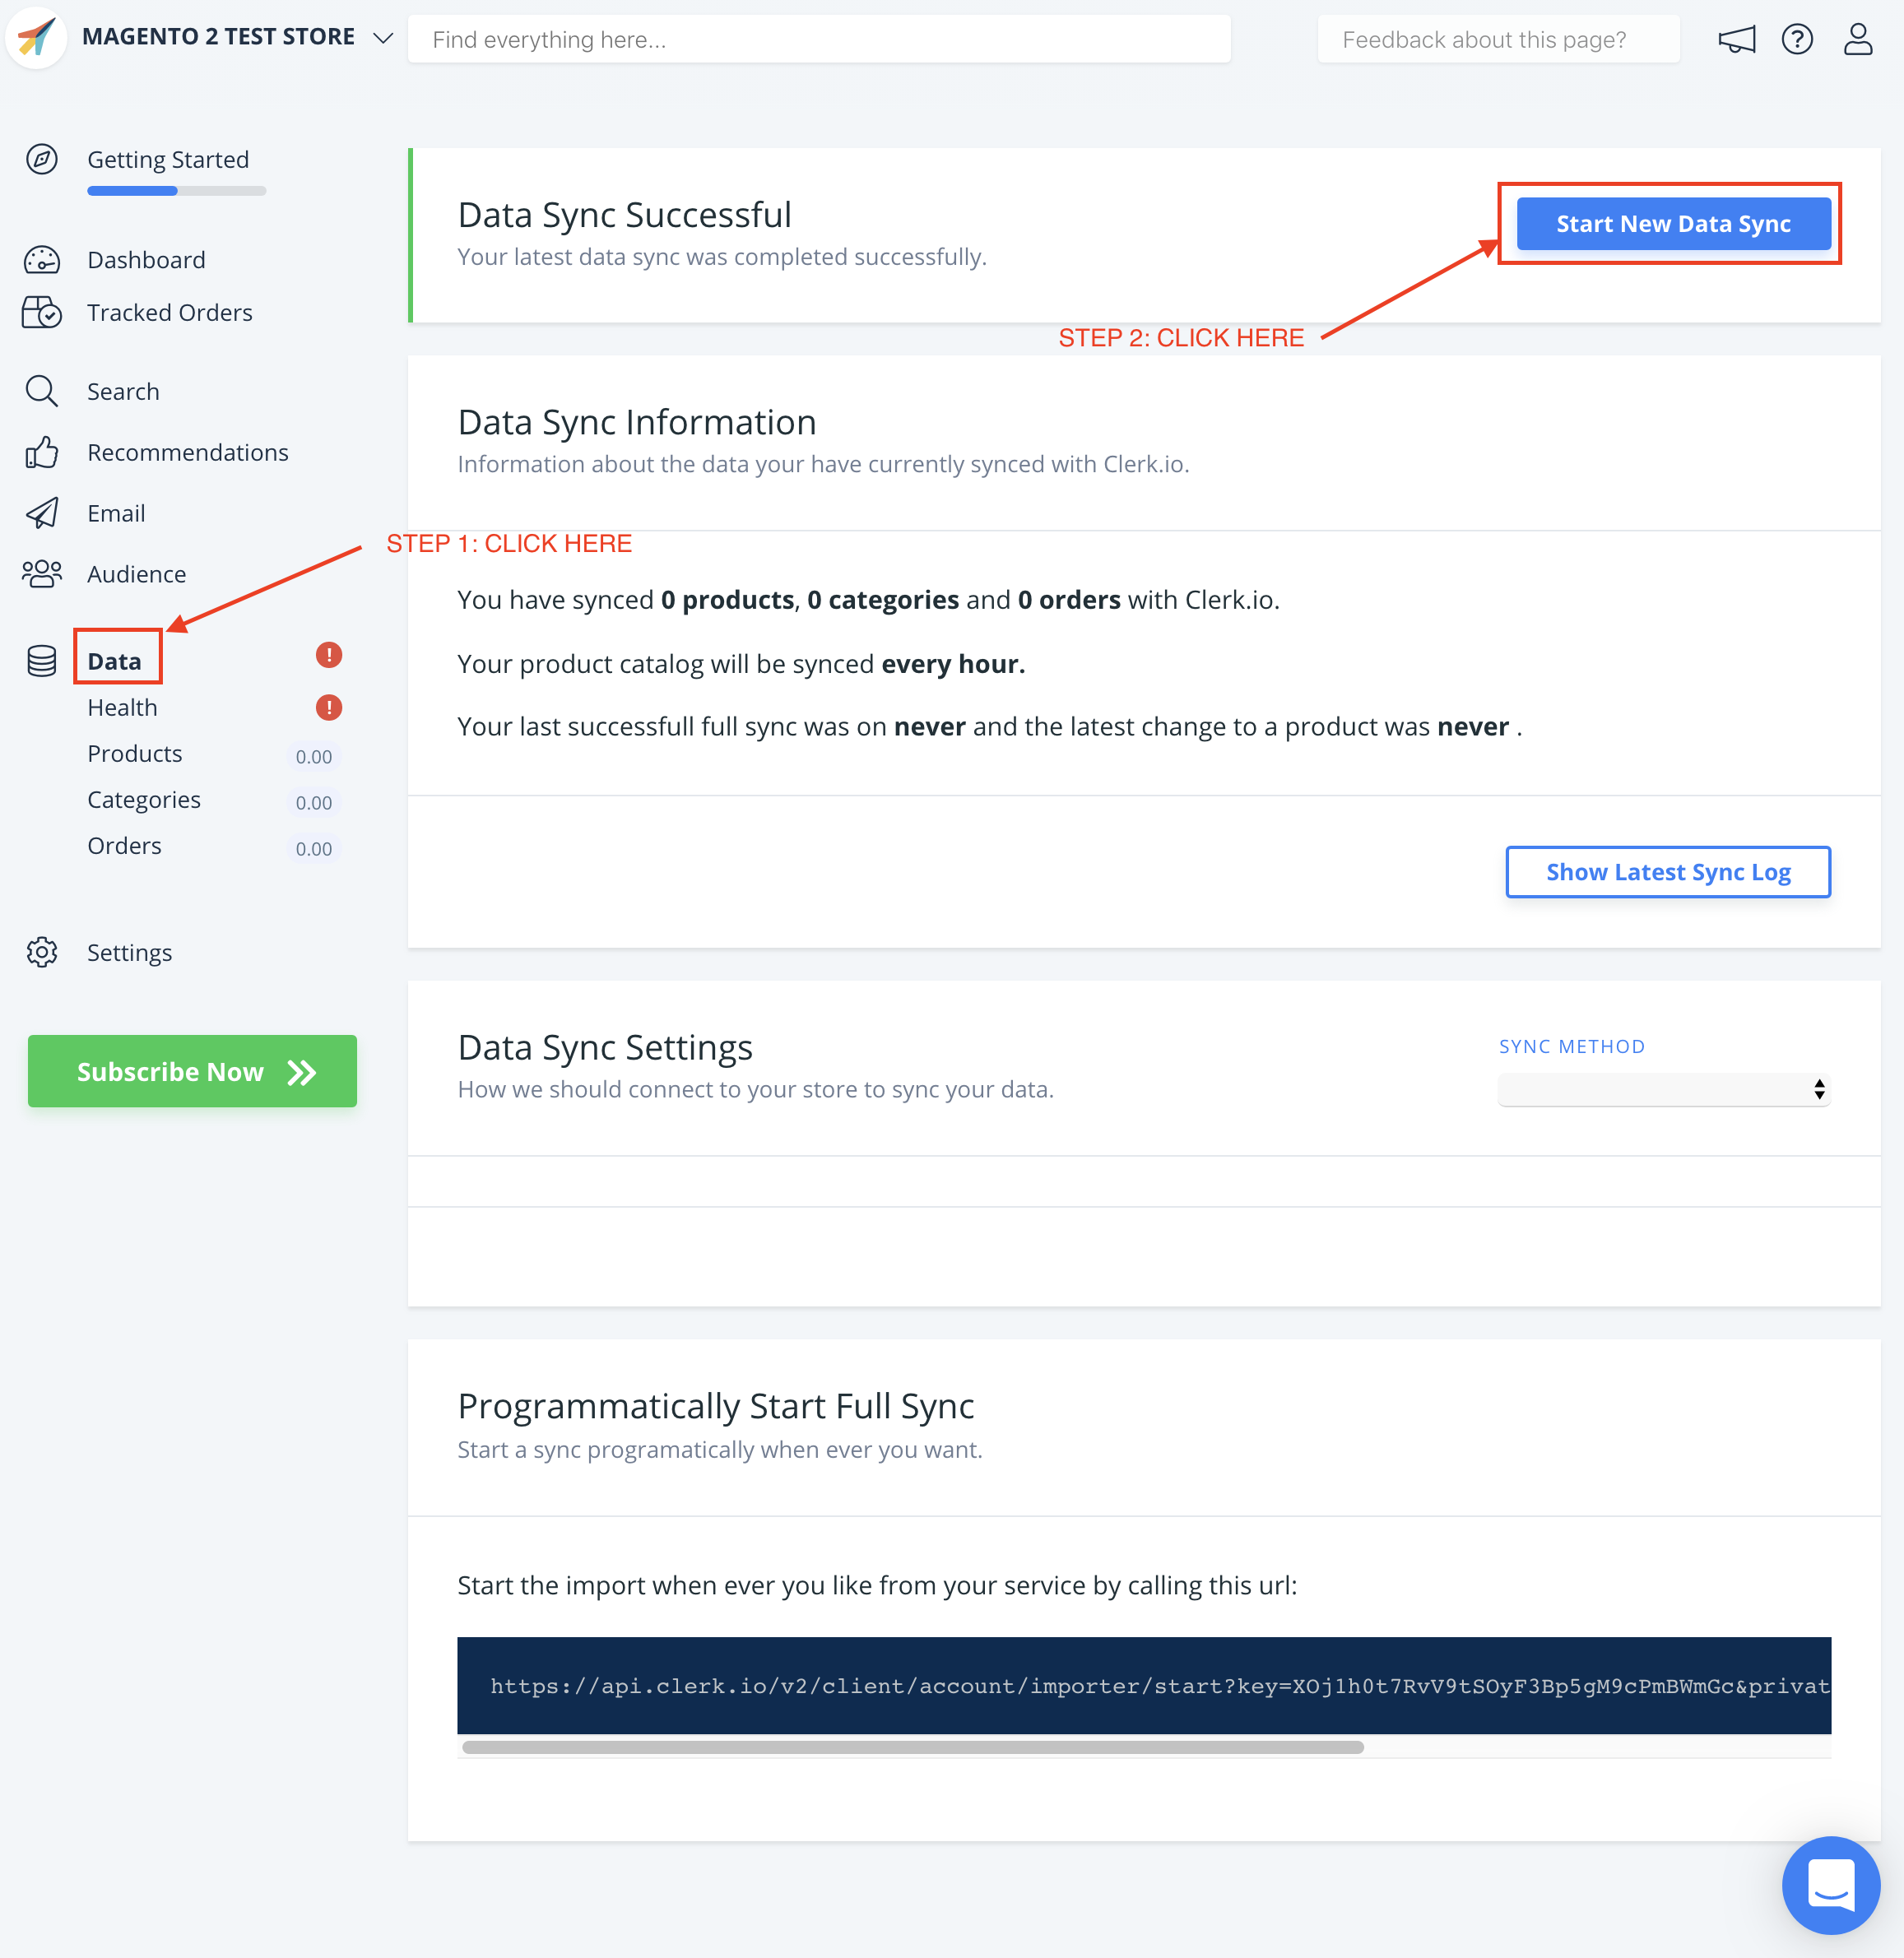
Sync Data
Sync your Magento 1 products, attributes, and order data to Clerk. This guide covers customizing product data, choosing which products to import, changing image sizes, and managing order sync.
Before syncing data, make sure you have installed and configured the Clerk extension in your Magento 1 backend. See the Get Started guide for installation instructions.
Set up Sync #
To sync your Magento 1 store data with Clerk, you need to configure the import URL in the Clerk extension and start the sync.
- In the Magento extension, copy the Import URL for your store.

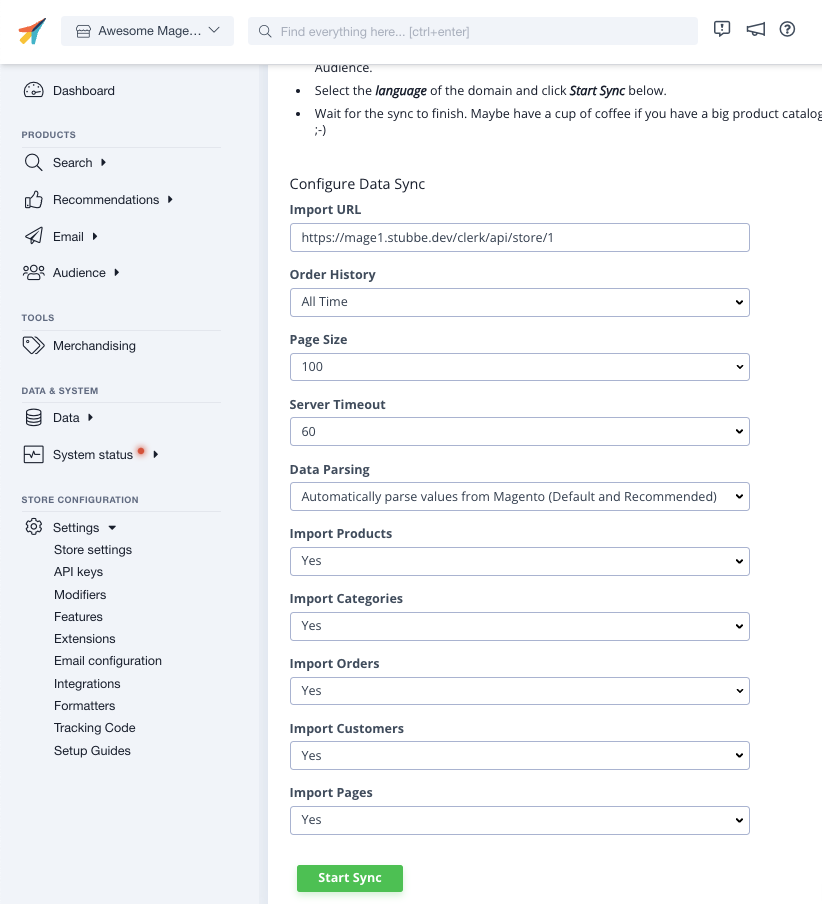
Go to my.clerk.io > Data > Configuration and paste the Import URL into the Import URL field.
If you plan to use Email & Audience, set Collect Emails to Yes in the Magento extension and Save.
Select the language for your domain if applicable.
Click Start Sync and wait for the sync to complete.
Deactivate order sync #
After the first data sync has run successfully, order sync from Magento1 can be deactivated as the sales-tracking from the extension takes over.
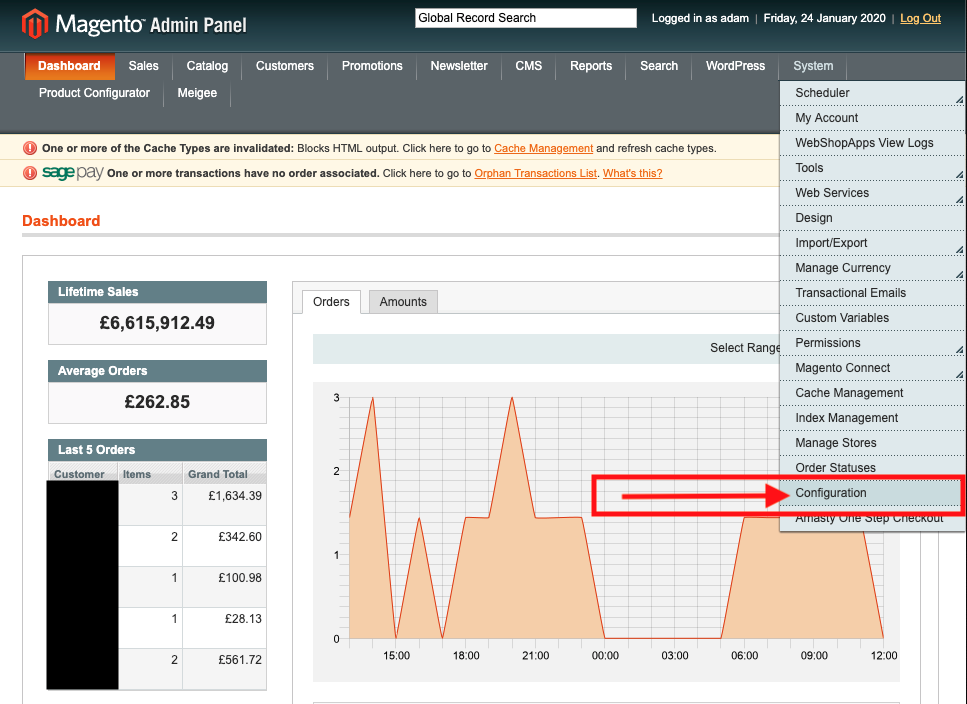
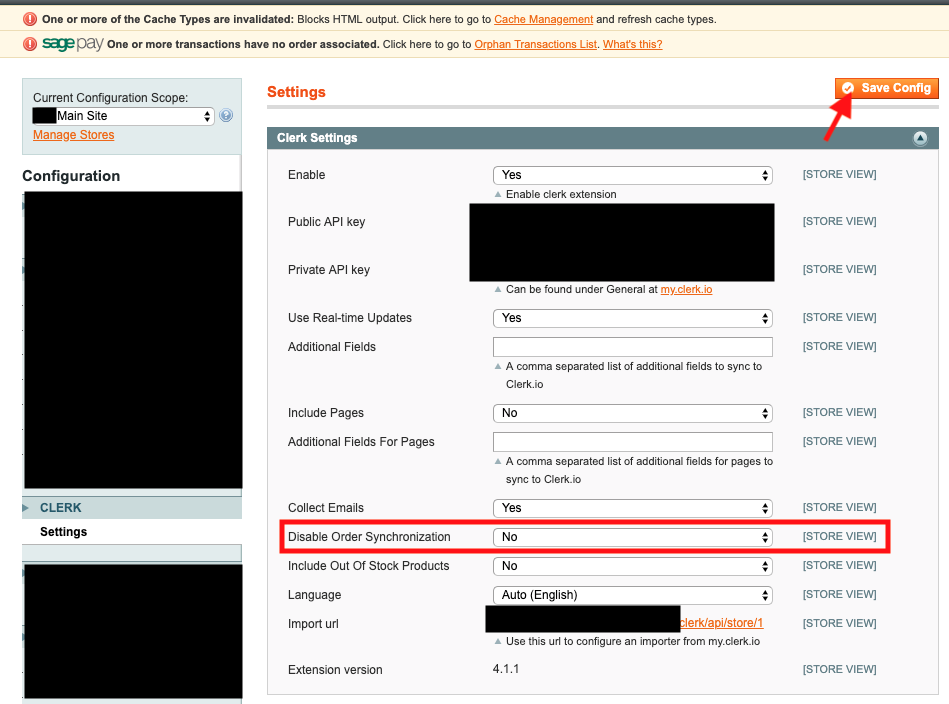
To deactivate order sync, go into your Magento1 backend, choose SYSTEM in the menu bar and press CONFIGURATION:
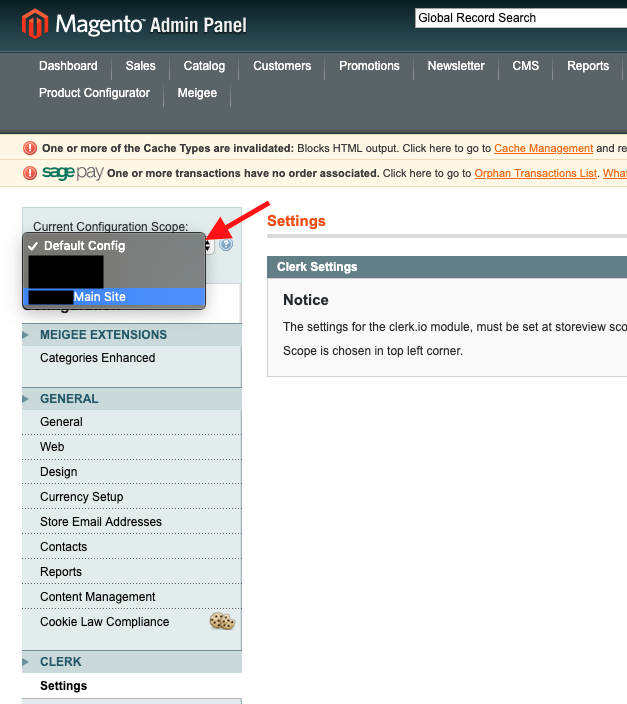
Choose the main site (the site you’re attempting to affect) under CURRENT CONFIGURATION SCOPE:
Then click on SETTINGS under the CLERK tab in the left side bar and then change the field next to DISABLE ORDER SYNCHRONIZATION from NO to YES.
Press SAVE CONFIG to make the changes take effect immediately:
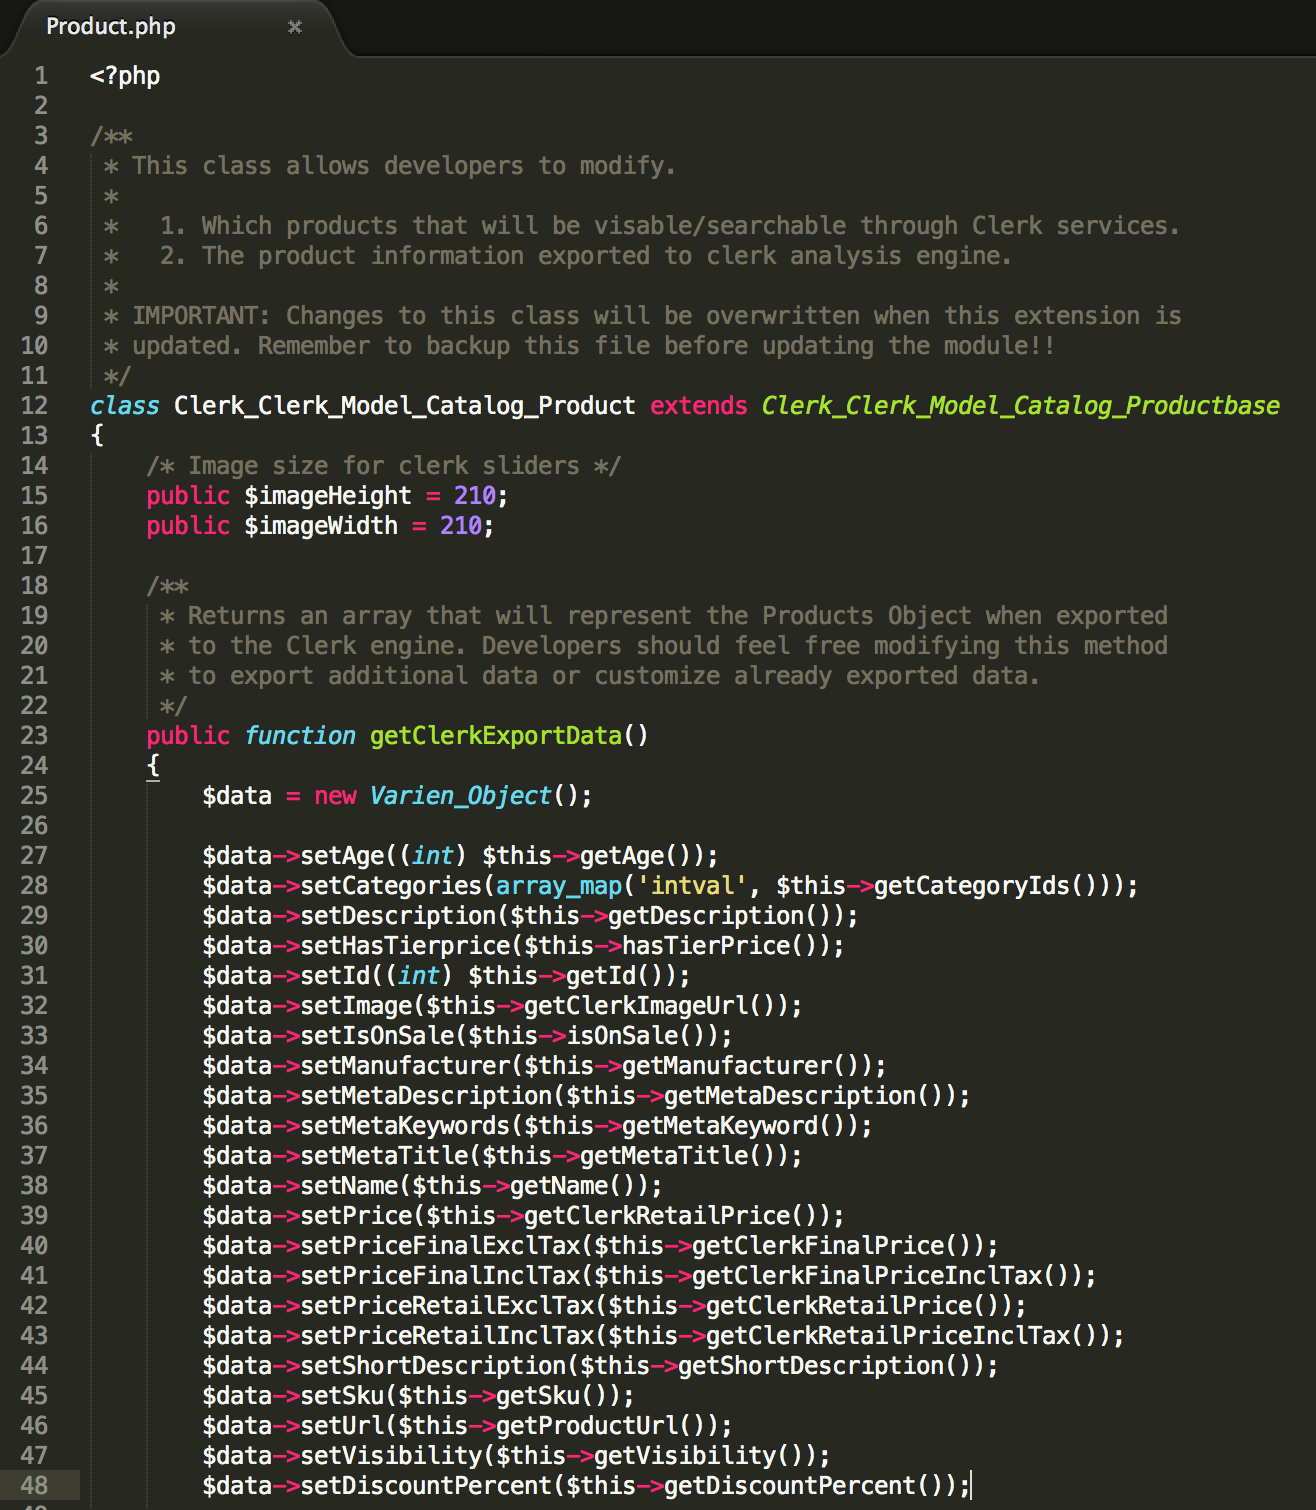
Changing image sizes #
Per standard, the Clerk extension for Magento fetches images with a size of 210x210 px.
This can be changed in the following file:
app->code->community->Clerk->Clerk->Catalog->Product.php
In the top of this file, the $imageHeight and $imageWidth variables control the height and width of each image:
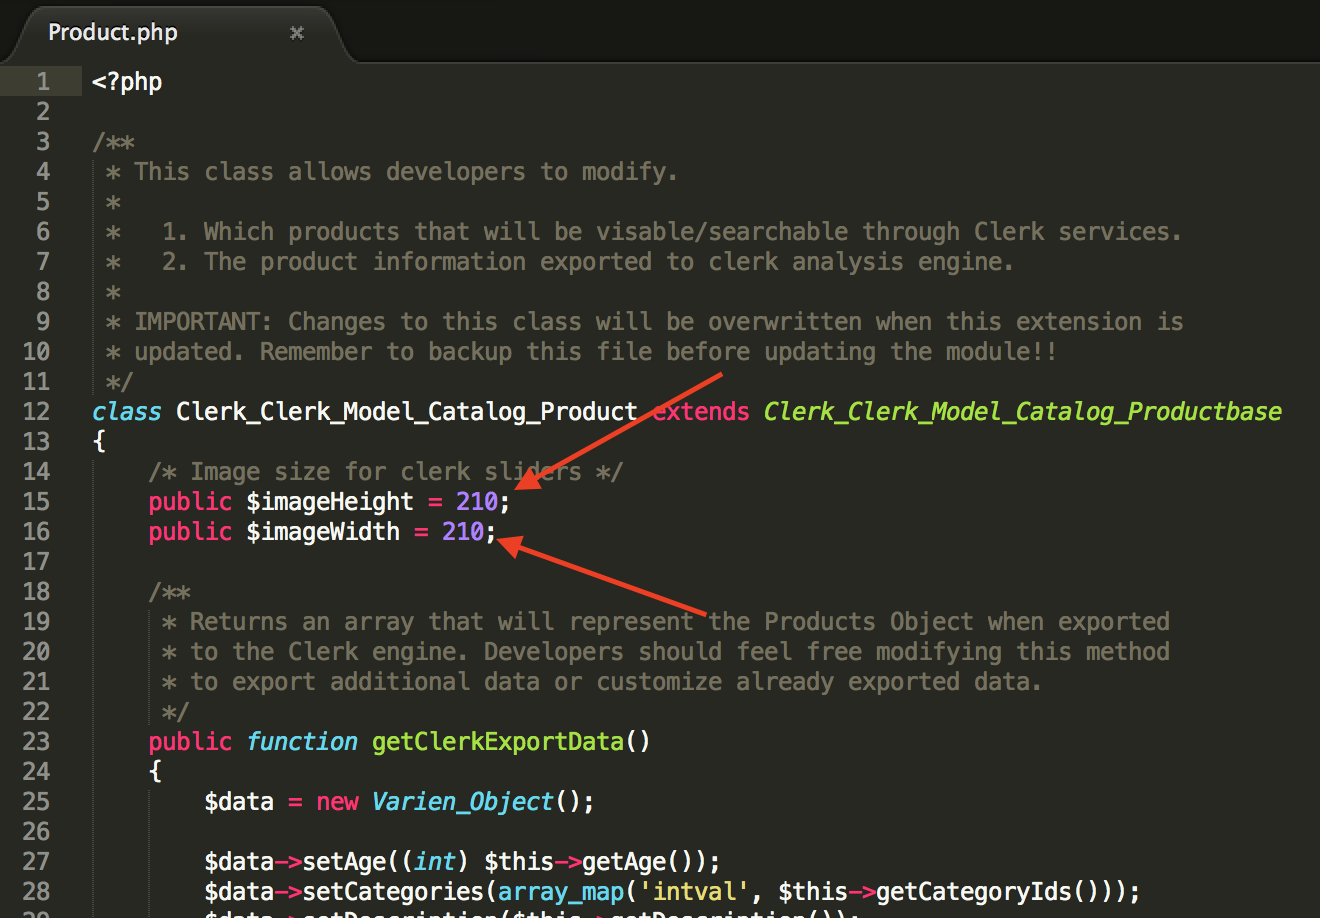
Change these values to the size you want images to have, and save the file.
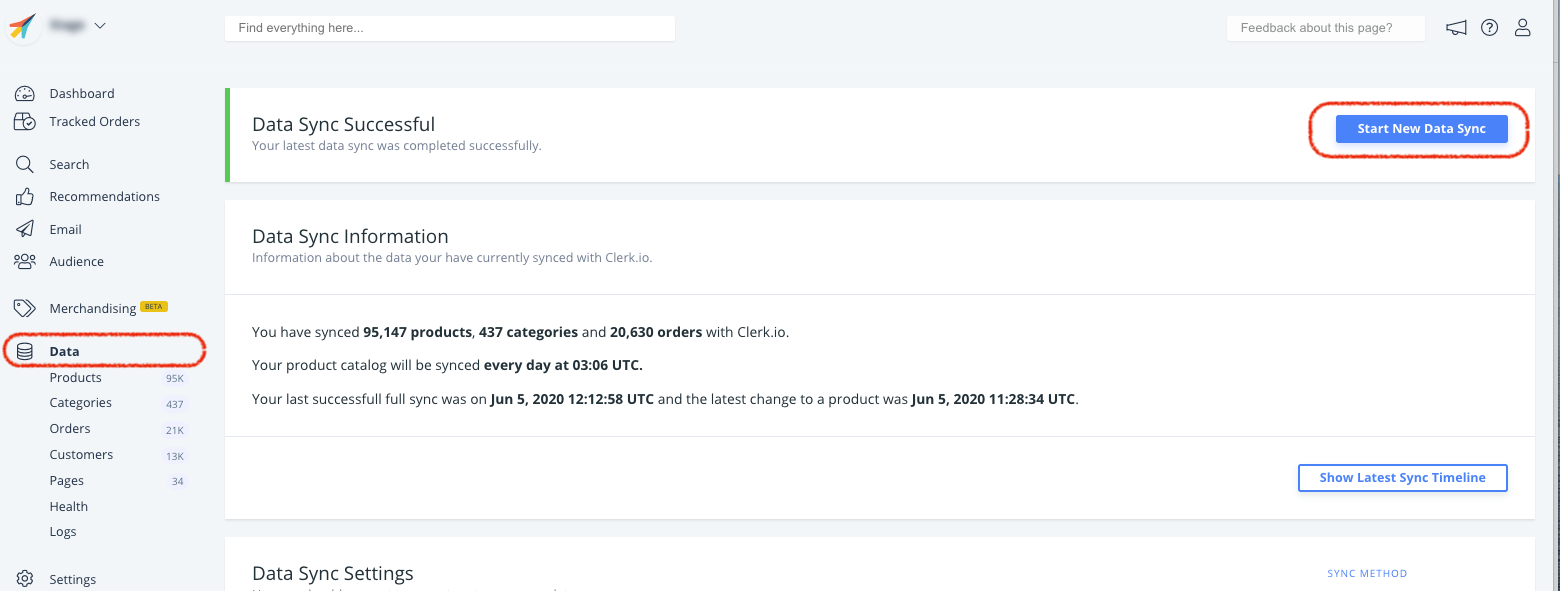
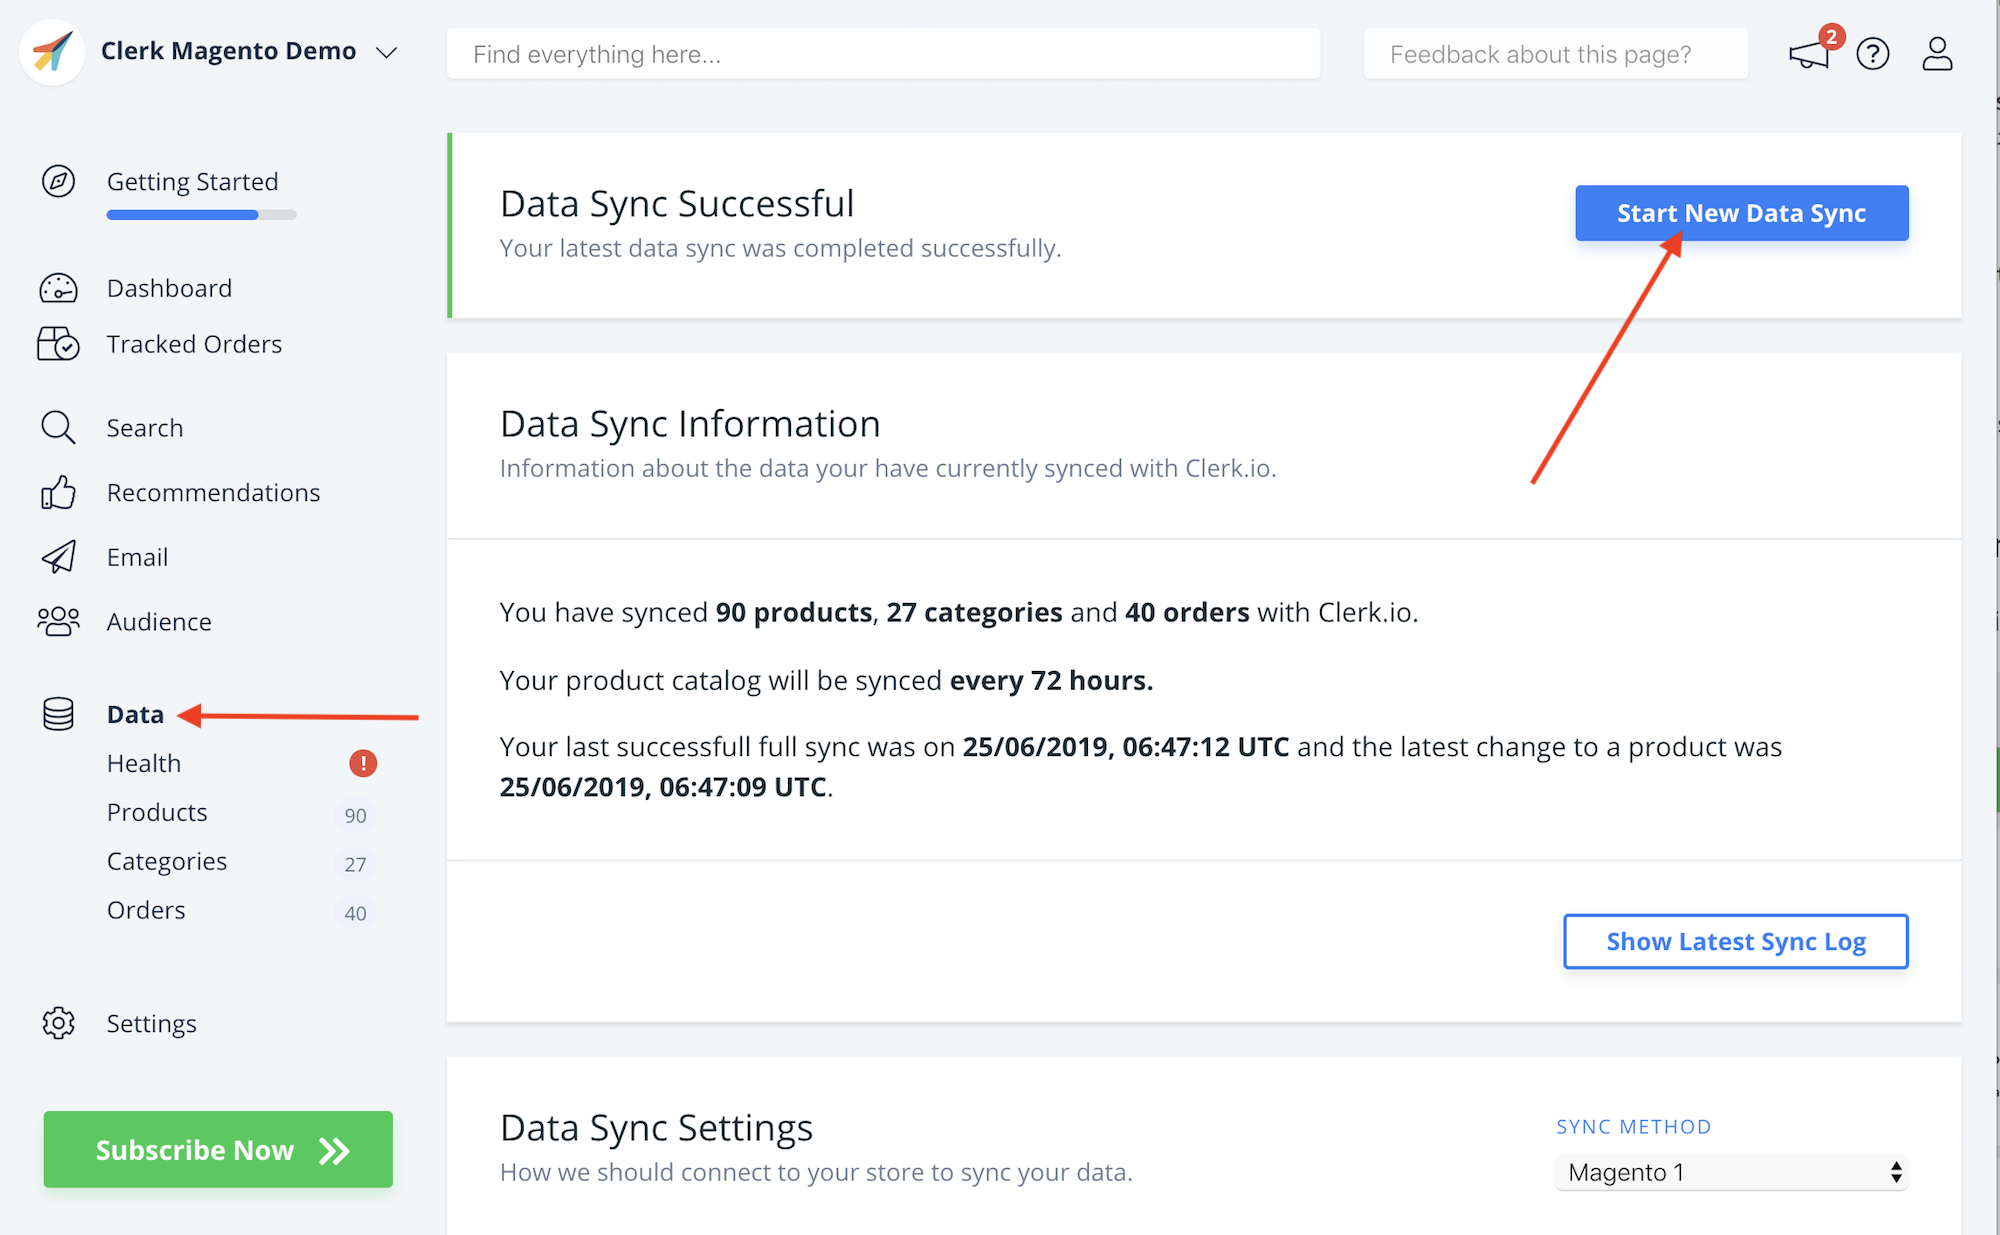
Then go to my.clerk.io -> Data Sync and run a new sync, by clicking Start Sync.
Your new images will now be synced.
Choosing products to import #
Showing out-of-stock products #
If you want to also show products that are out of stock in your Clerk results, you can easily control this in the Magento backend.
Start by going to:
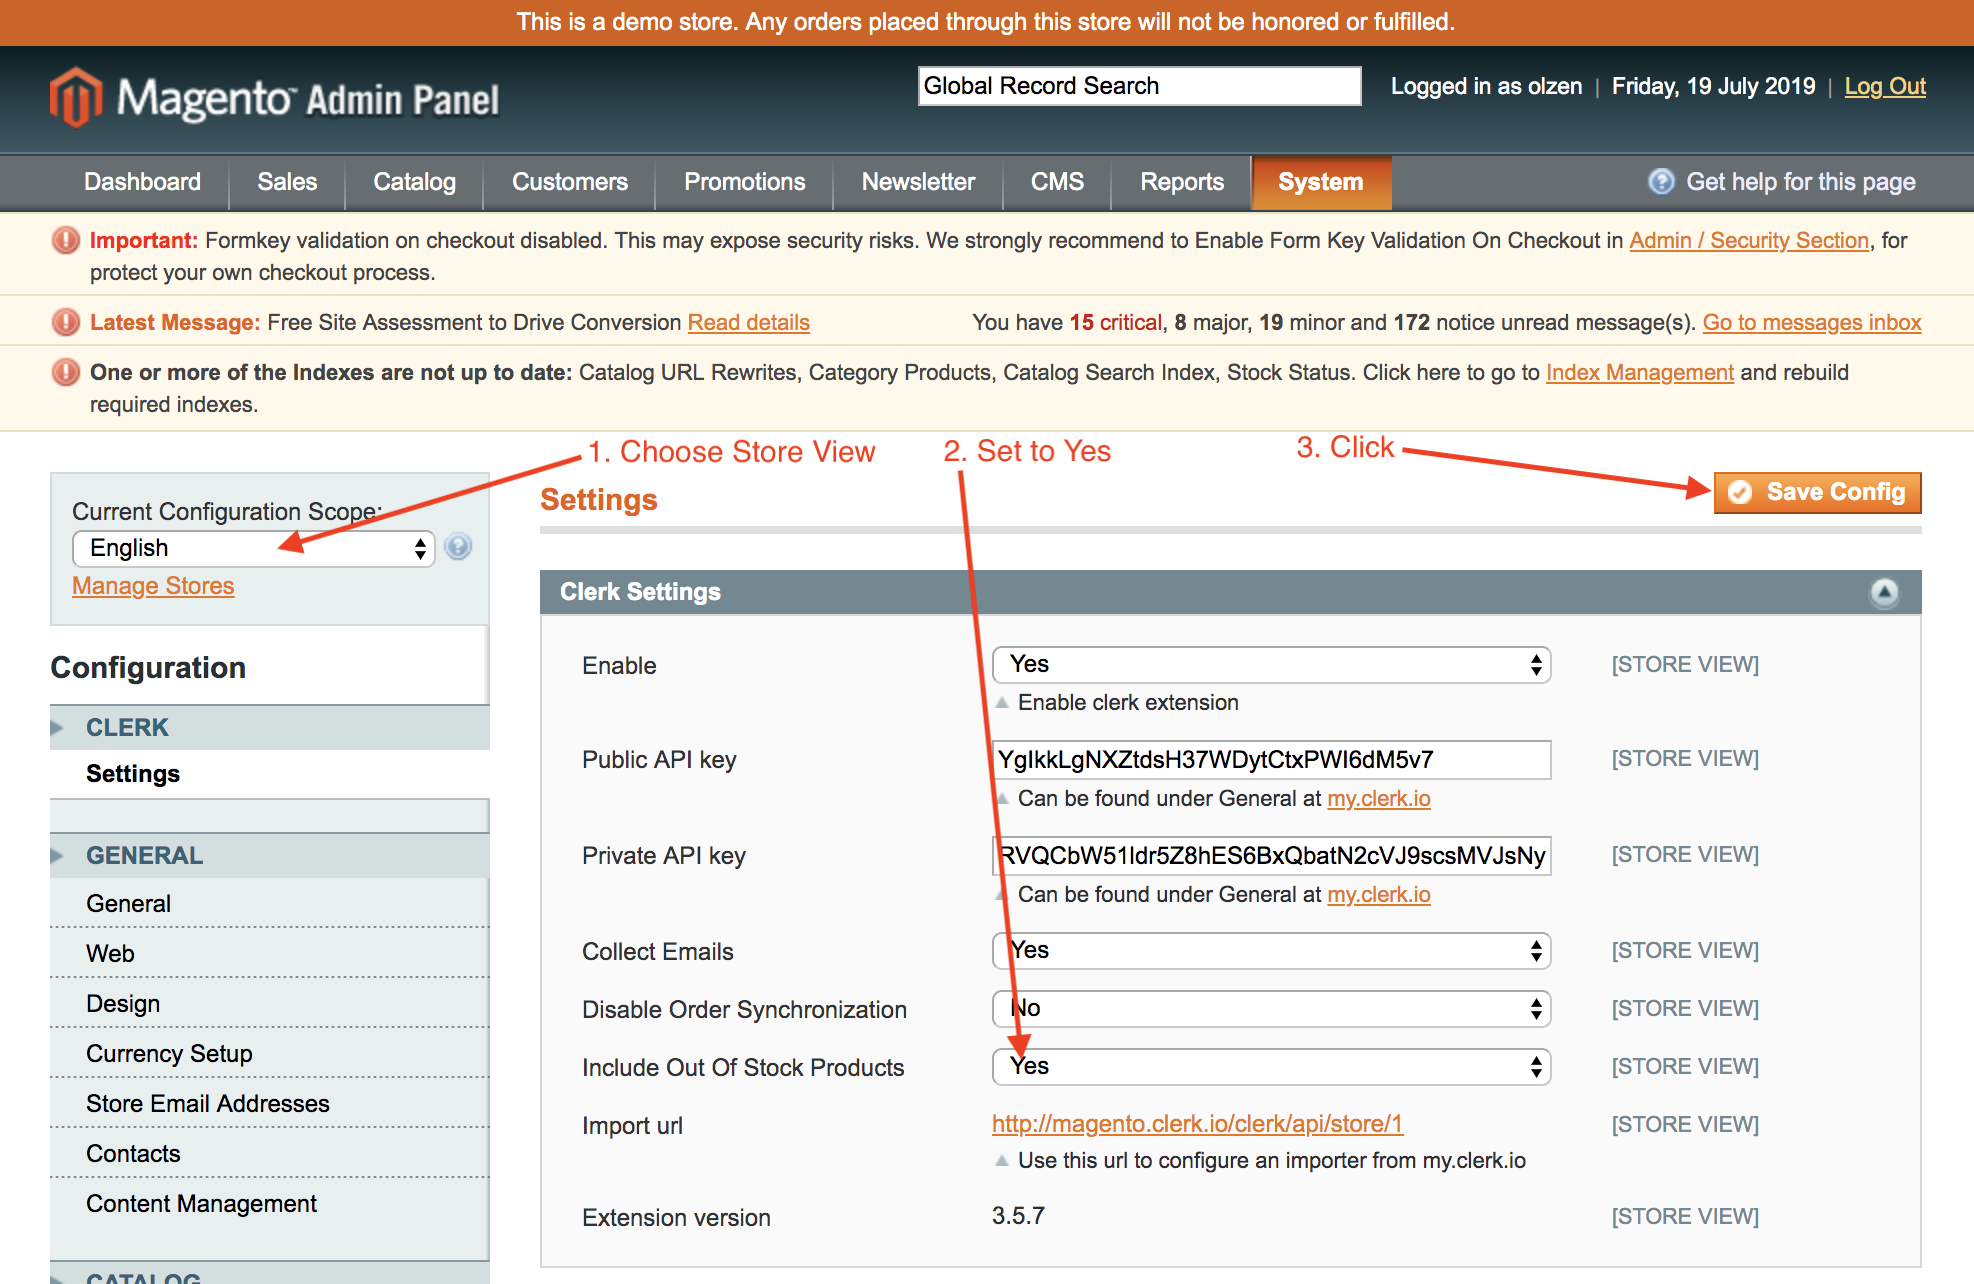
System -> Configuration -> CLERK -> Settings
Choose your Store View from the left menu, and go to Clerk Settings.
In here, set Include Out Of Stock Products to Yes and click Save Config:
Finally, go to my.clerk.io -> Data and click Start New Data Sync to import all products, including ones that are out-of-stock.
Advanced changes #
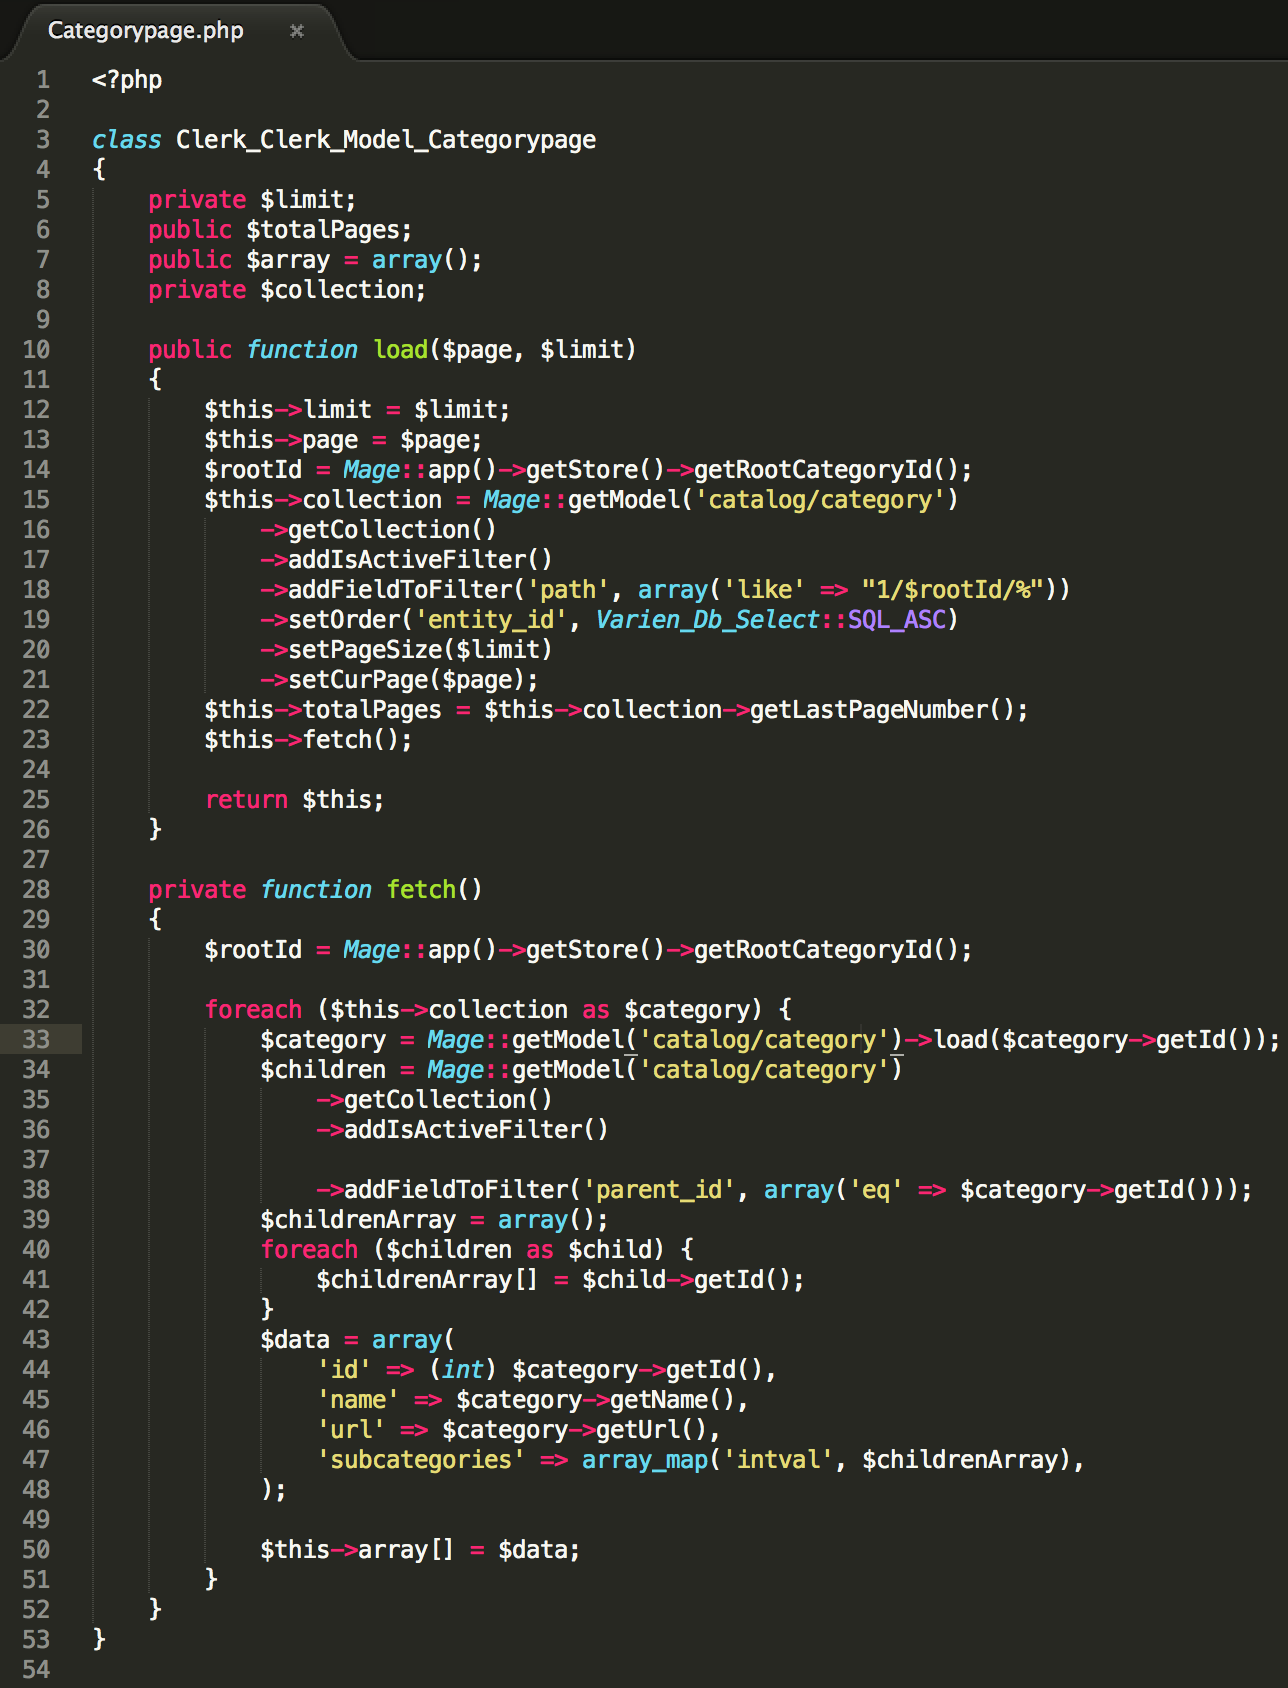
In Magento, the following file controls which products are imported to Clerk:
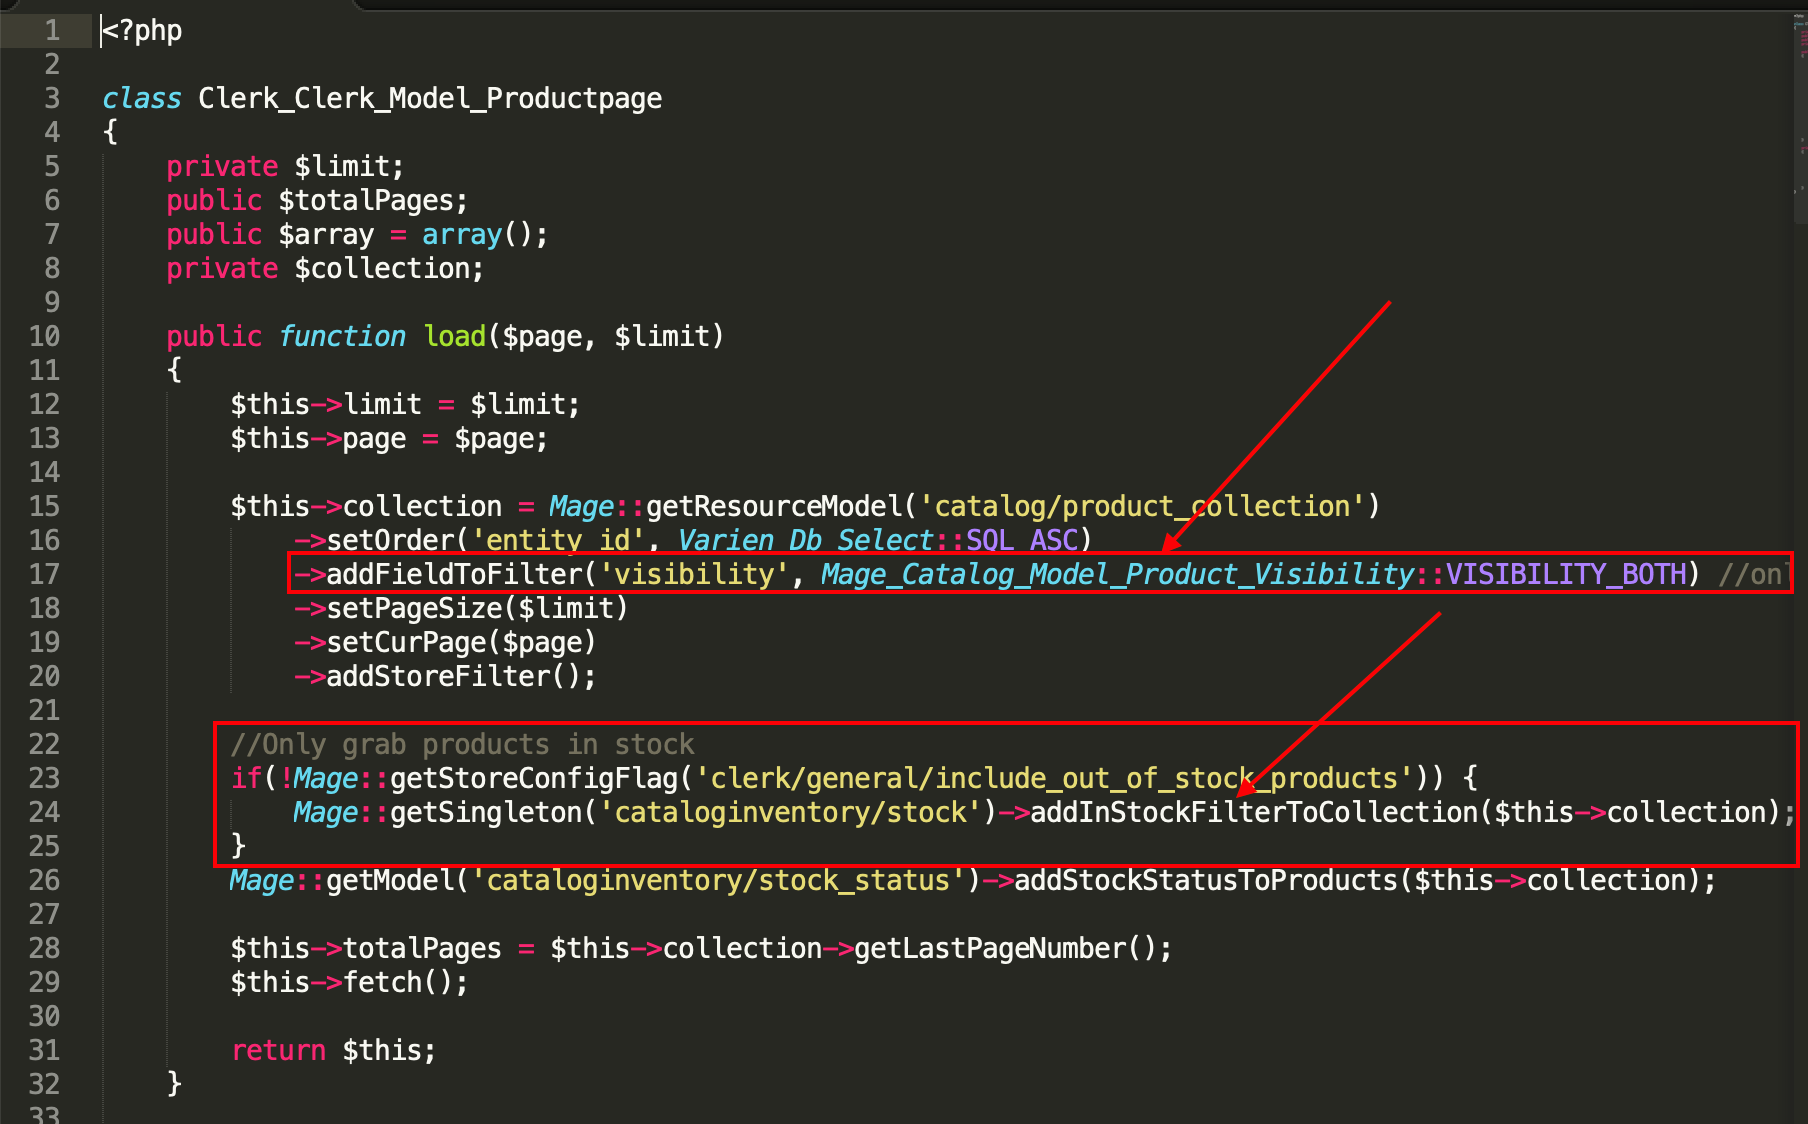
app->code->community->Clerk->Clerk->Model->Productpage.php
The function load($page,$limit) is responsible for controlling the collection of products that are sent to Clerk.
Per default, only products with visibility: both(Catalog, Search) which are also in stock, are imported.
This can be changed in the two following places:
If you change the products imported by Clerk, we strongly recommend that you also add an extra attribute which indicates when a product is not saleable or visible, so you can show it in your Design and you can filter on it.
Assuming you create an attribute called is_saleable which is either true or false, you can use it like this in Designs:
{% if product.is_saleable %}
   <div class="in-stock">In Stock</div>
{% else %}
  <div class="not-in-stock">Not In Stock</div>
{% endif %}
Finally, go to my.clerk.io -> Data and click Start New Data Sync to import your new data.
Customizing product data #
In Magento 1, you can add custom product attributes through the Magento backend, or through the Clerk extension in code, if needed.
Adding simple attributes #
Note: This feature only works from v.4.2.3.
If the attributes you want to send are already available as simple attributes in your Magento admin, they can easily be added on the Extension page.
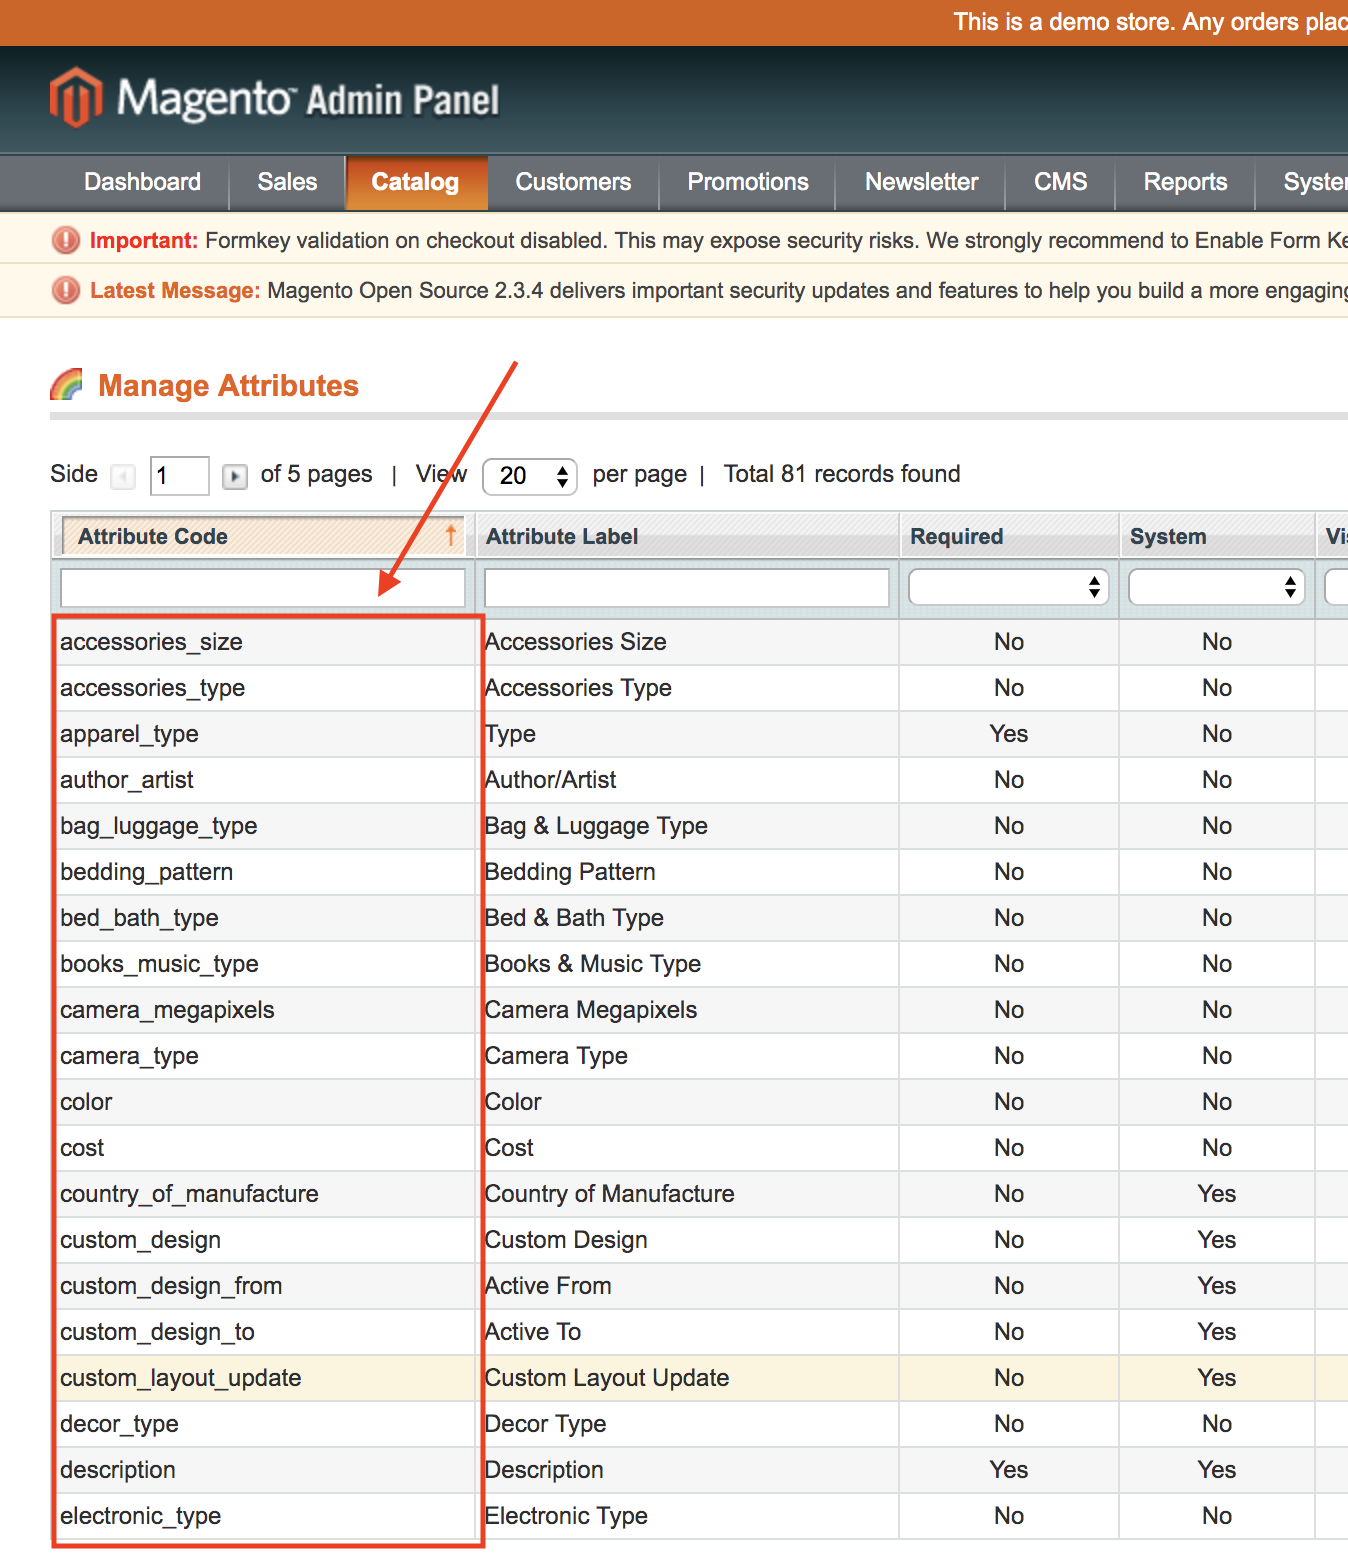
In your Magento backend, start by going to Catalog -> Attributes -> Manage Attributes
Find the attribute codes of the attributes you want to add:
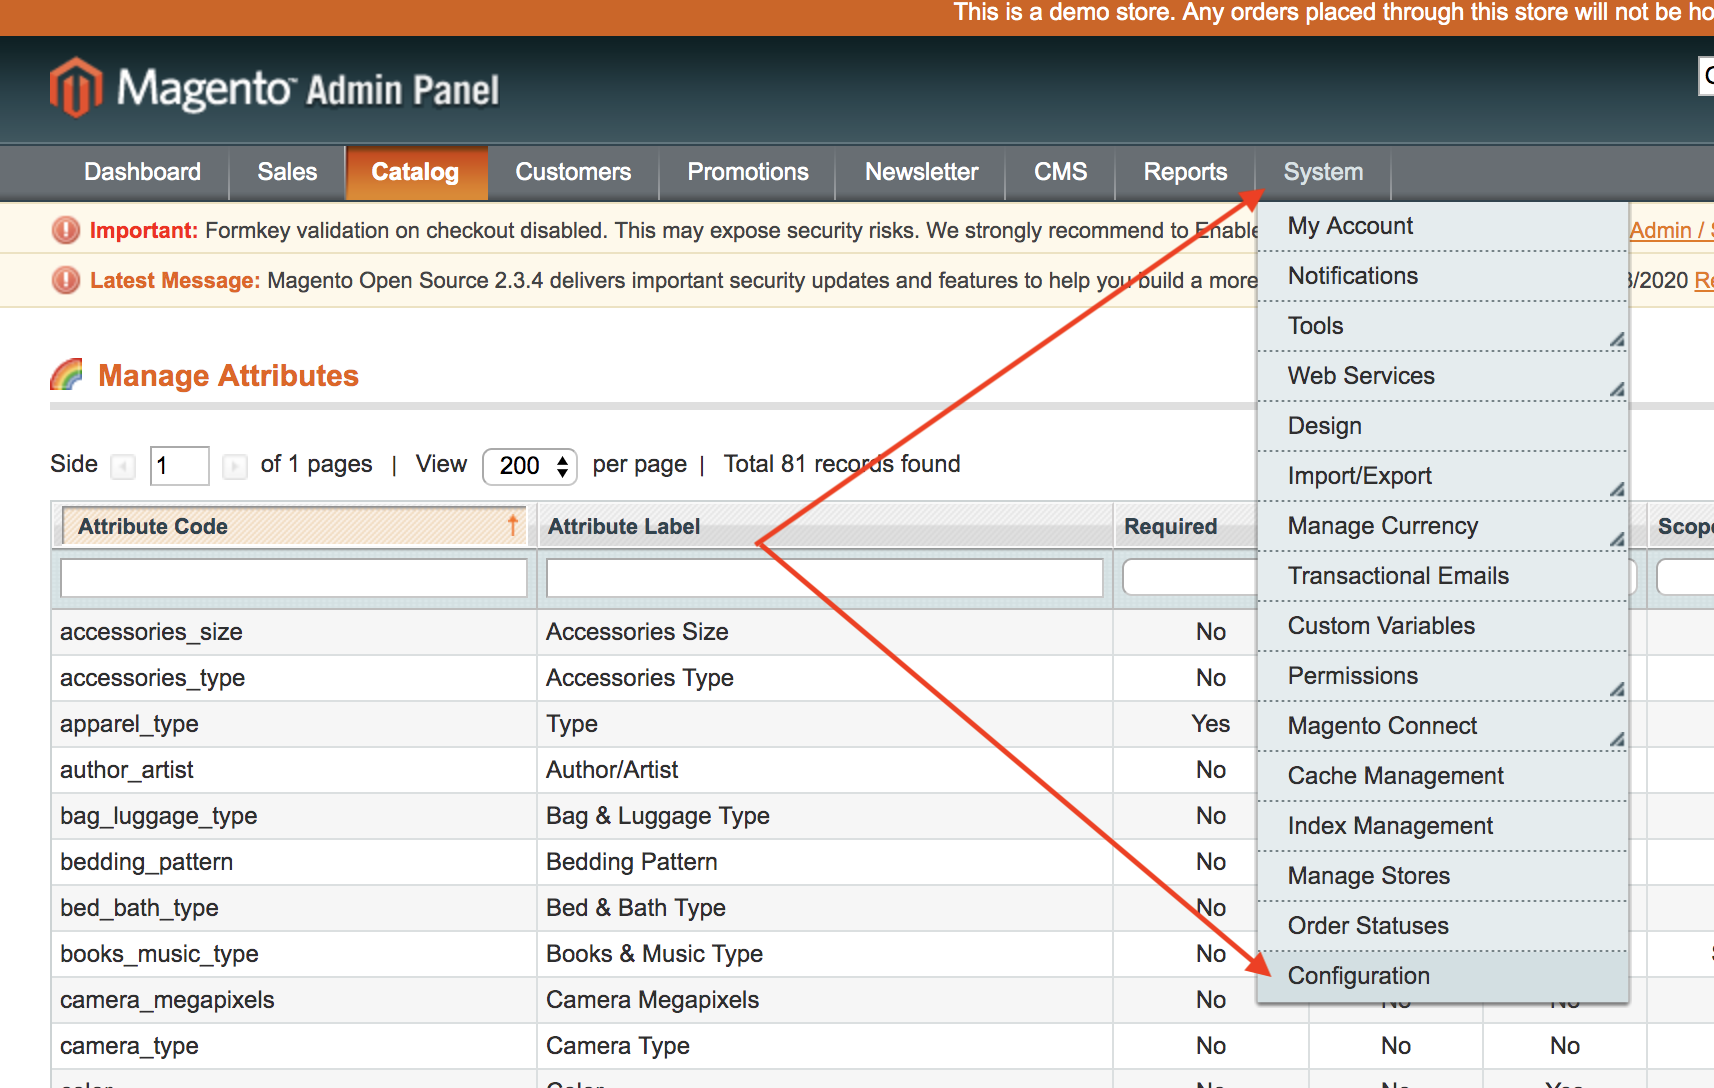
- Go to System -> Configuration
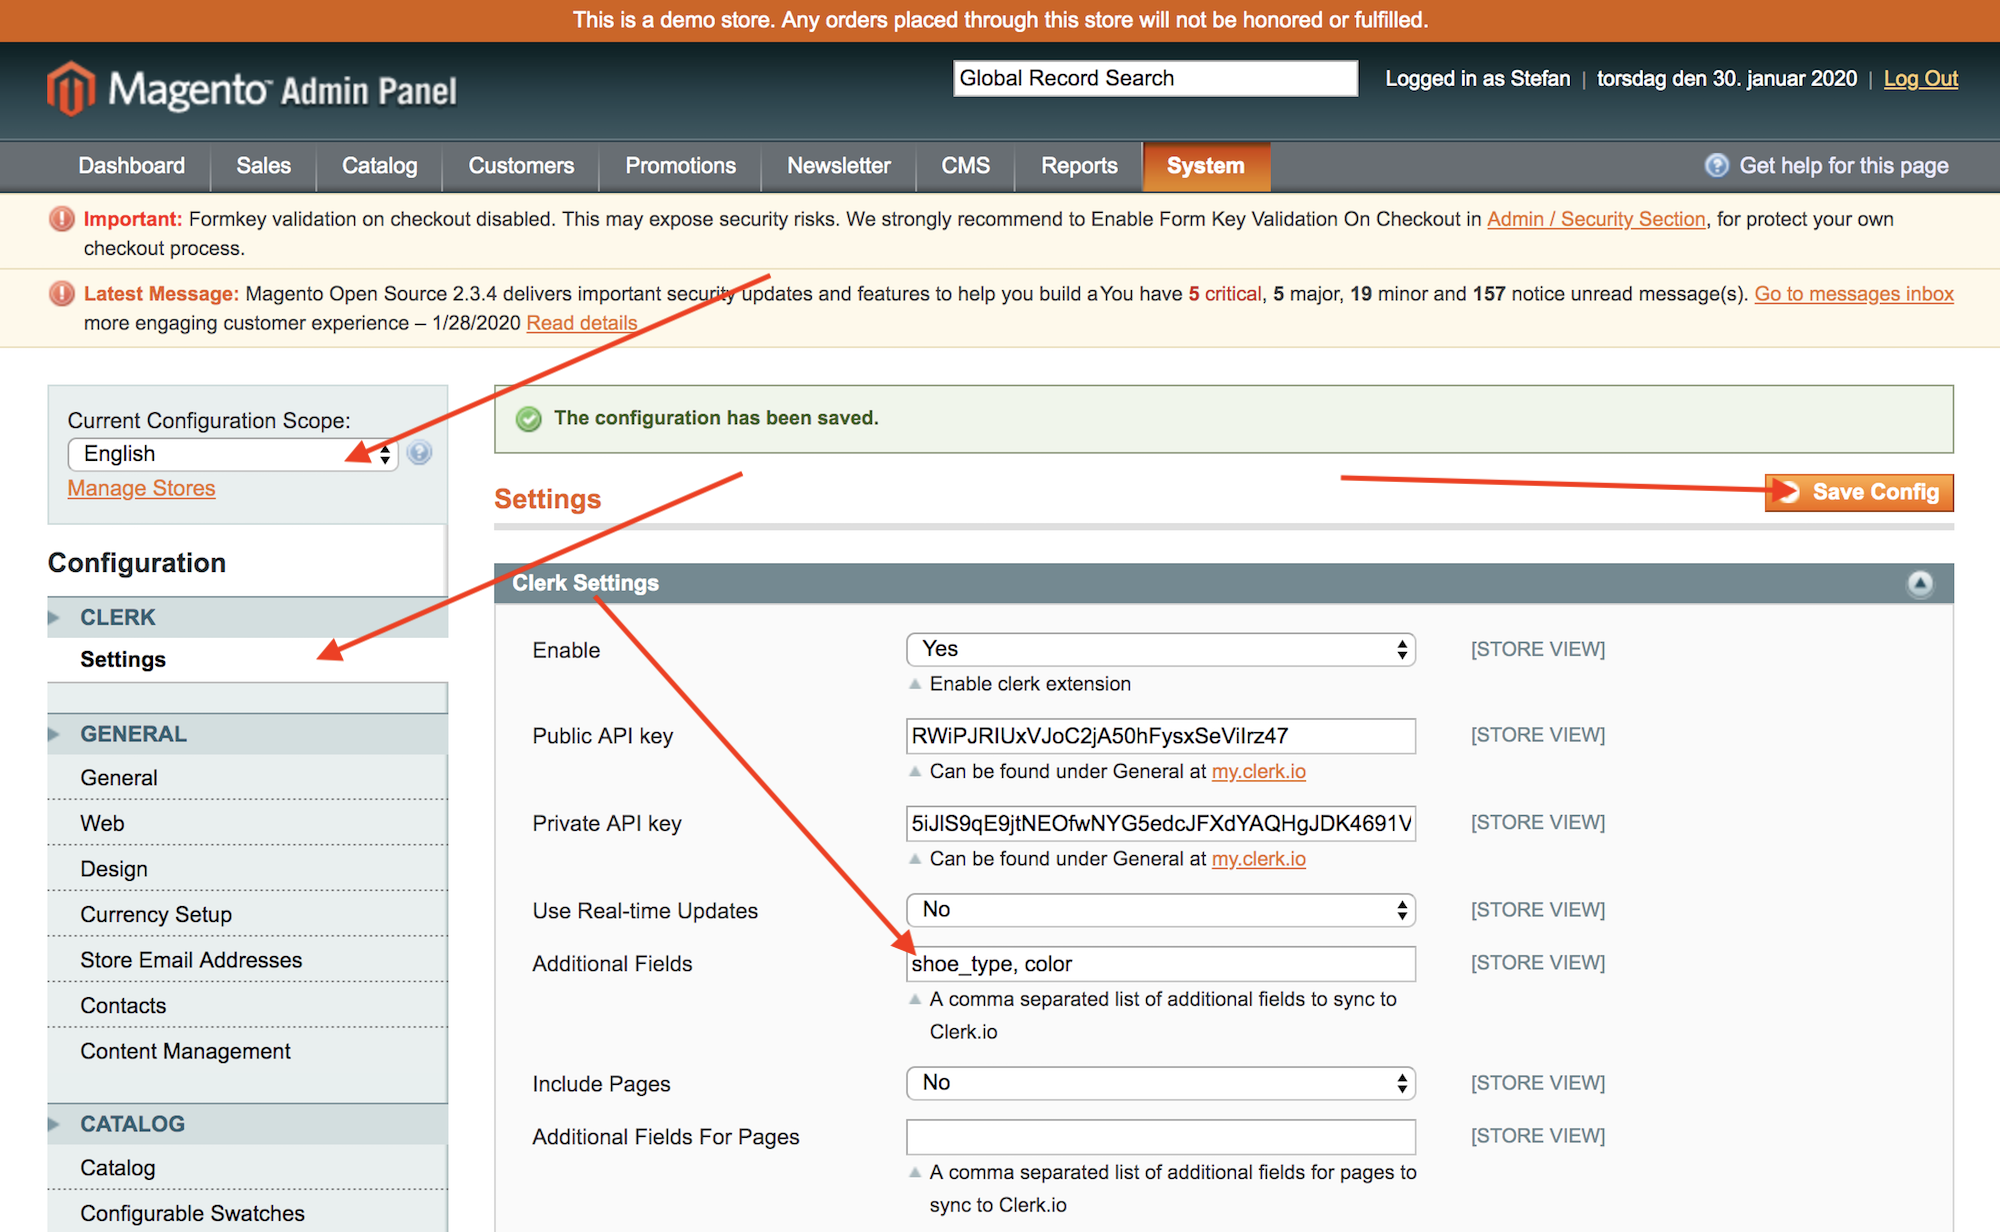
- Under Clerk -> Settings write in your attributes in Additional Fields and click Save Config:
- After implementing your attributes, go to my.clerk.io->Data and click Start New Data Sync in the upper right corner.
If the attributes you want to send are already available as part of your configurable/grouped products data in your Magento admin, they can easily be synced on the latest version of your plug-in.
They will appear as child_attribute, for example, child_color, child_skus etc.

Adding attributes through code #
If your attribute uses a standard Magento function, this can be implemented directly in Product.php:
app->code->community->Clerk->Clerk->code->Model->Catalog->Product.php
The function getClerkExportData() builds the product-object, with all the attributes:
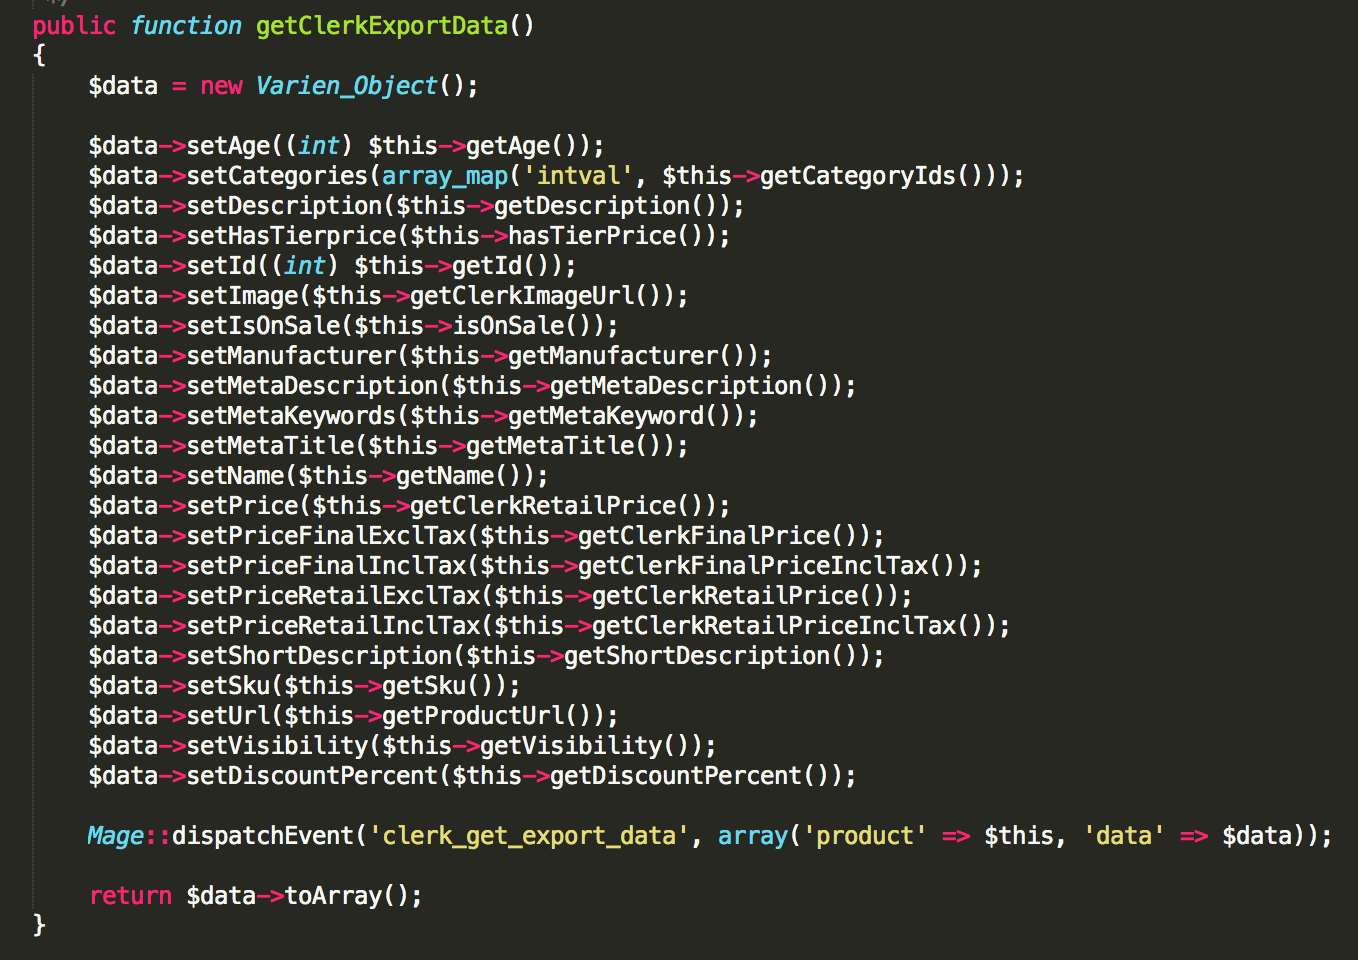
You can then add new attributes in the list with this syntax:
$data->setAttributeName($this->insertMagentoLogic());
where setAttributeName defines the name you want it to have in Clerk, and insertMagentoLogic(); uses a Magento logic to pull a value from the product.
Using custom attribute functions #
Sometimes, a Magento attribute might require a more advanced logic, than a simple function.
In this case, locate this file:
app->code->community->Clerk->Clerk->Model->Catalog->Productbase.php
In Productbase.php you can write advanced PHP functions to load custom attributes.
After defining a function, you can include it in Product.php just like the existing functions.
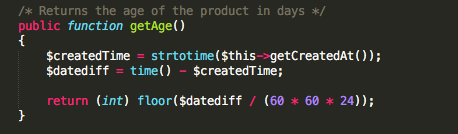
For example:
$data->setAge($this->getAge());
After implementing your attributes, go to my.clerk.io->Data and click Start New Data Sync in the upper right corner.
Modifying the extension #
Adding/changing product data #
In case you want to add extra attributes or change existing ones for your products, you should find these files:
app->code->community->Clerk->Clerk->Model->Catalog->Product.php
app->code->community->Clerk->Clerk->Model->Catalog->Productpage.php
Product.php builds the product model, and lets you add simple attributes.
Productpage.php lets you create advanced logics for getting attributes, and use them in Product.php.
Changing category data #
Maybe you need to restructure category names, or remove specific categories from Clerk.
In these cases, find this file:
app->code->community->Clerk->Clerk->Model->Catalog->Product.php
This file handles which categories are included, and the data id, name, URL, and subcategories for each category.
You cannot add extra data to each category, but you can modify what is being sent.
Styling the powerstep #
The powerstep has a standard styling, but you might want to change it to match your designs.
These files are used for the styling:
app->design->frontend->base->default->template->clerk->powerpage.phtml
app->design->frontend->base->default->template->clerk->powerpopup.phtml
skin->frontend->base->default->clerk->style.css
powerpage.phtml contains the HTML for the page while powerpopup.phtml is for the popup.
style.css contains the CSS for all parts of the Clerk extension, including the Powerstep.
You can use these files to modify the look of the Powerstep.

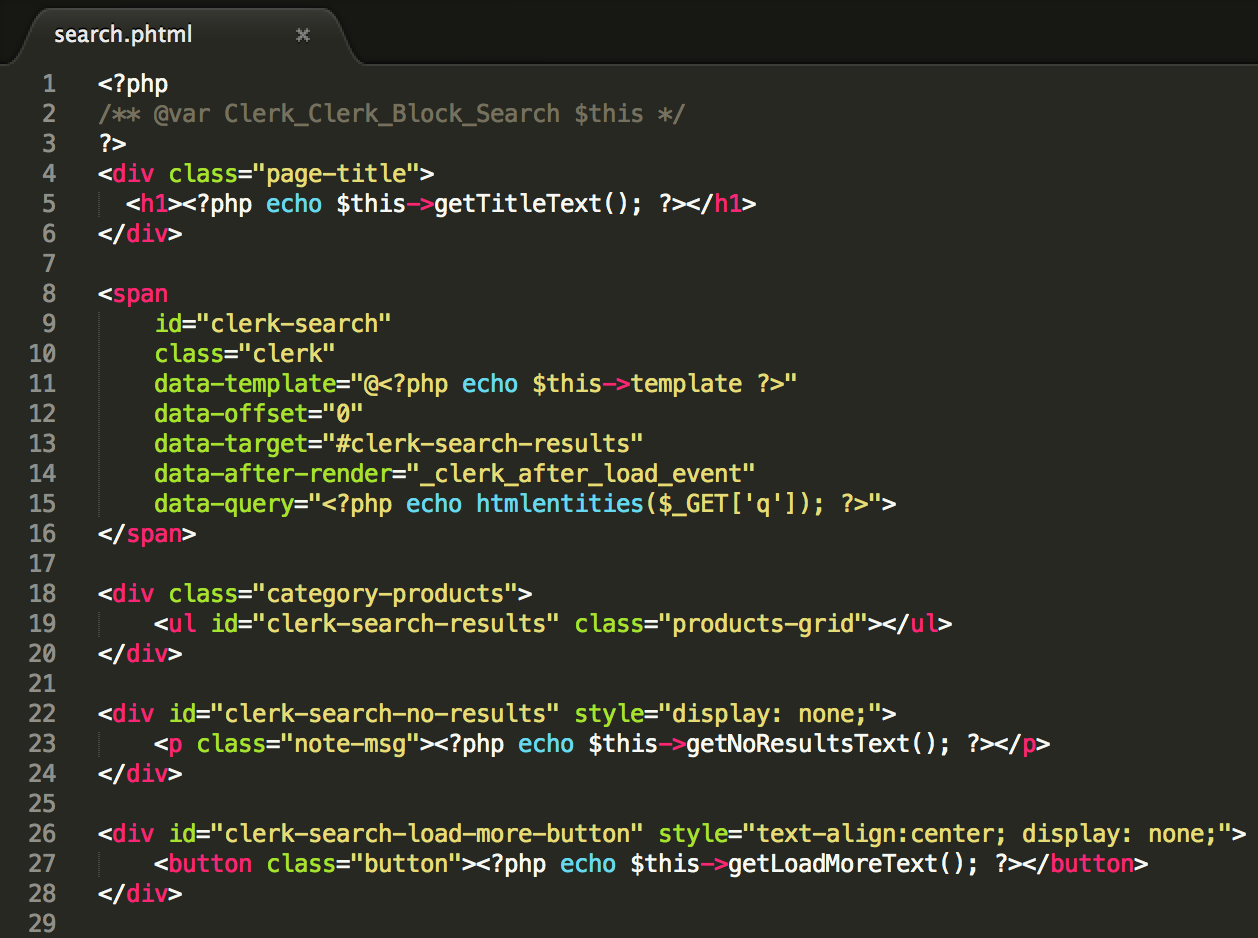
Modifying the search page #
If you want to change the layout of the Search Page, add a slider to the no-results page etc. you need to find this file:
app->design->frontend->base->default->template->clerk->powerpage.phtml
This lets you change the search embedcode, and other parts of the search page.
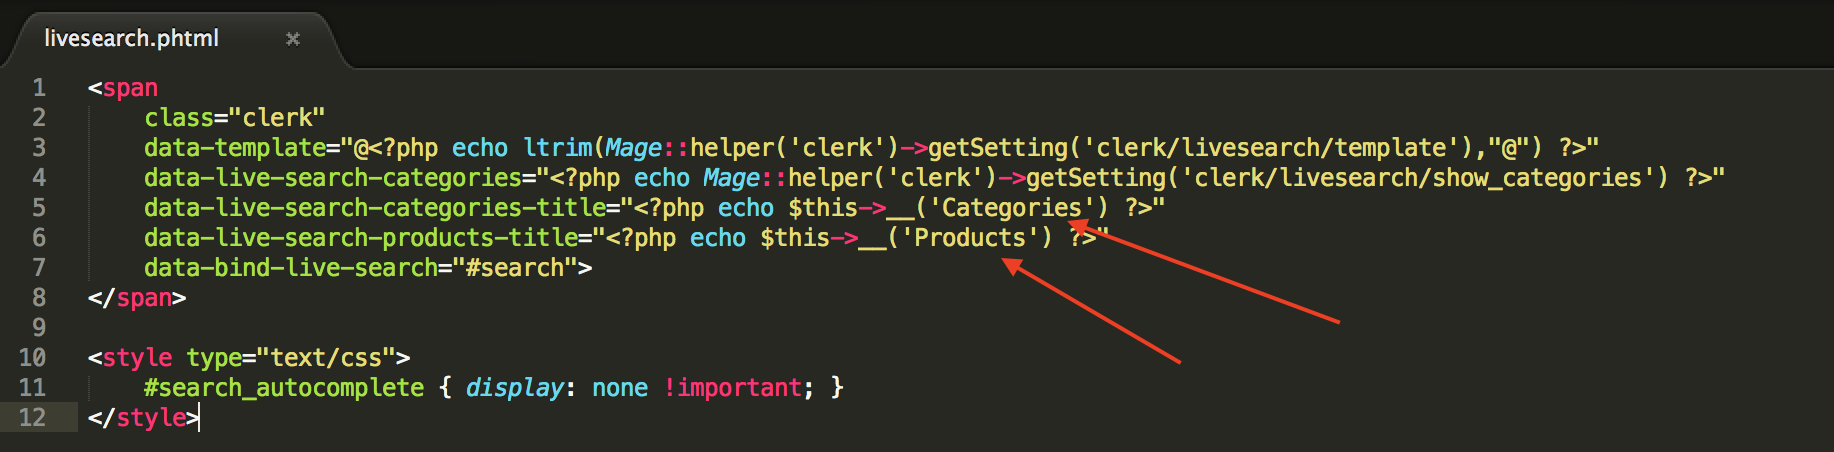
Changing live-search titles #
The titles shown in the Live-Search for products and categories can be changed in this file:
app->design->frontend->base->default->template->clerk->livesearch.phtml
In here, simply translate Categories and Products to what you want to:
Grouped products as variants #
Per standard, Magento uses Configurable Products to handle main-products and variants.
The Clerk extension has been made to support this, as it is the best-practice for Magento.
However, if you have setup your Variants using Grouped Products, your sales-tracking will not work, since you will be tracking ID’s of products, that Clerk has not imported from your Magento webshop.
This is because Variants usually are not visible.
Clerk will not be able to see connections between products, when they are not imported:
For Clerk, it usually doesn’t matter which variant is purchased, as long as " main" product it belongs to is tracked.
To fix this, you need to change 2 files in the extension, to match your setup.
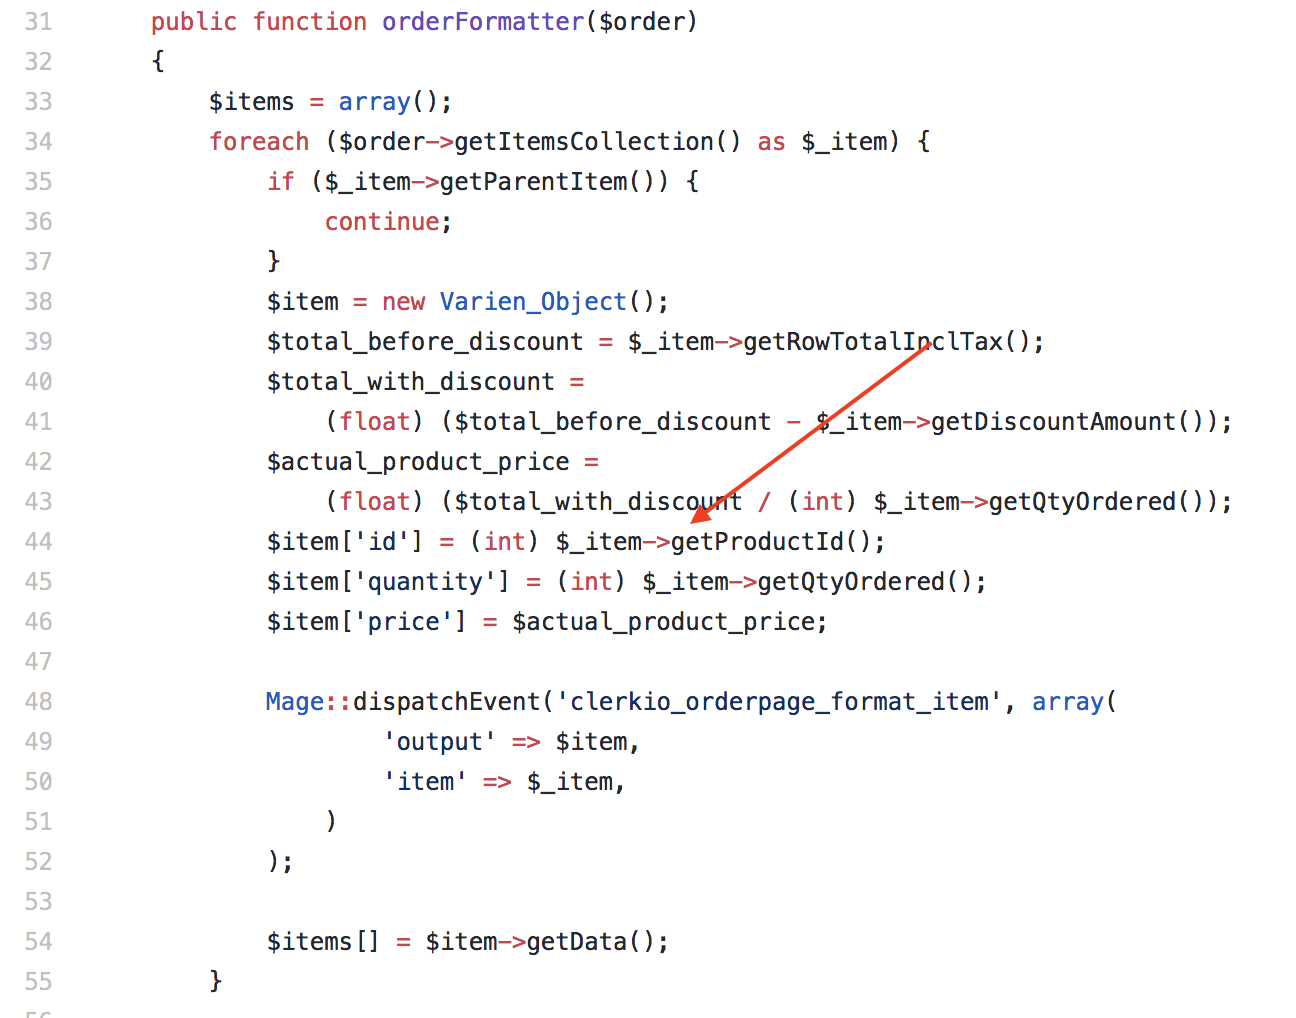
The sales-tracking #
The file that generates the sales-tracking data, is this:
app->code->Block->SalesTracking.php
In this file, usually around line 65, the following piece of code is used to get the ID of the product that has been purchased:
This needs to be changed, so no matter which grouped product variant has been purchased, its always the ID of the “main” product that is sent.
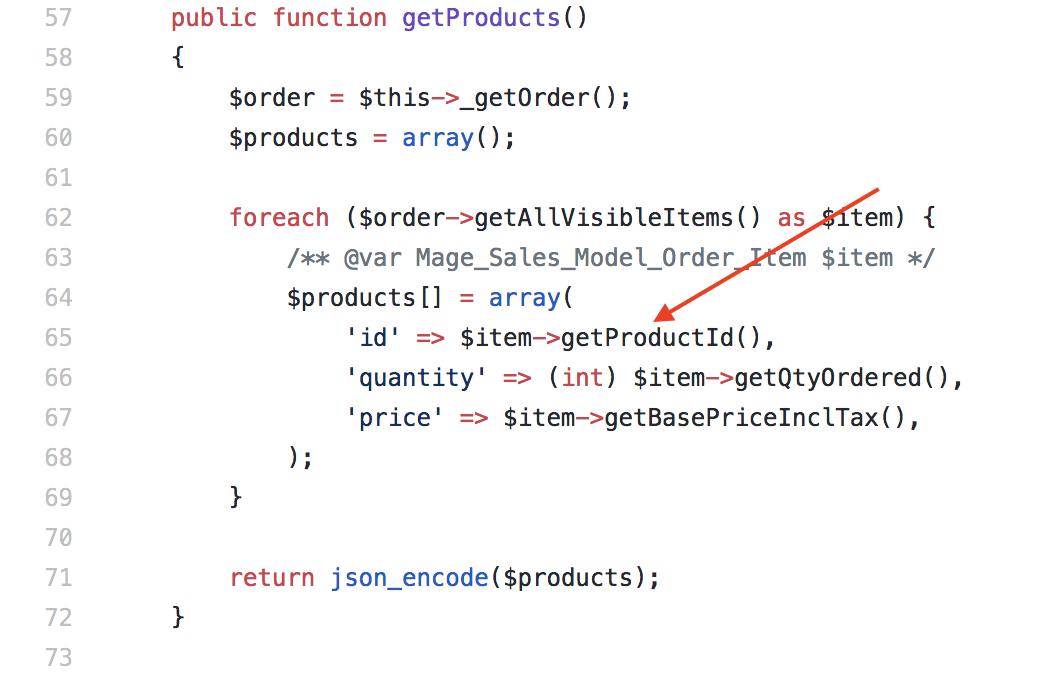
The imported orders #
The same process needs to be done for the previous orders that are imported so we know which “main” products have previously been purchased.
This file handles it:
app->code->Model->Orderpage.php
Around line 44, in the function orderFormatter($order) the ID of the product is sent from Magento:
Change this to the same logic as the sales-tracking.
Check if your changes work #
Now, go to my.clerk.io -> Data and click Start New Data Sync to import the newest data:
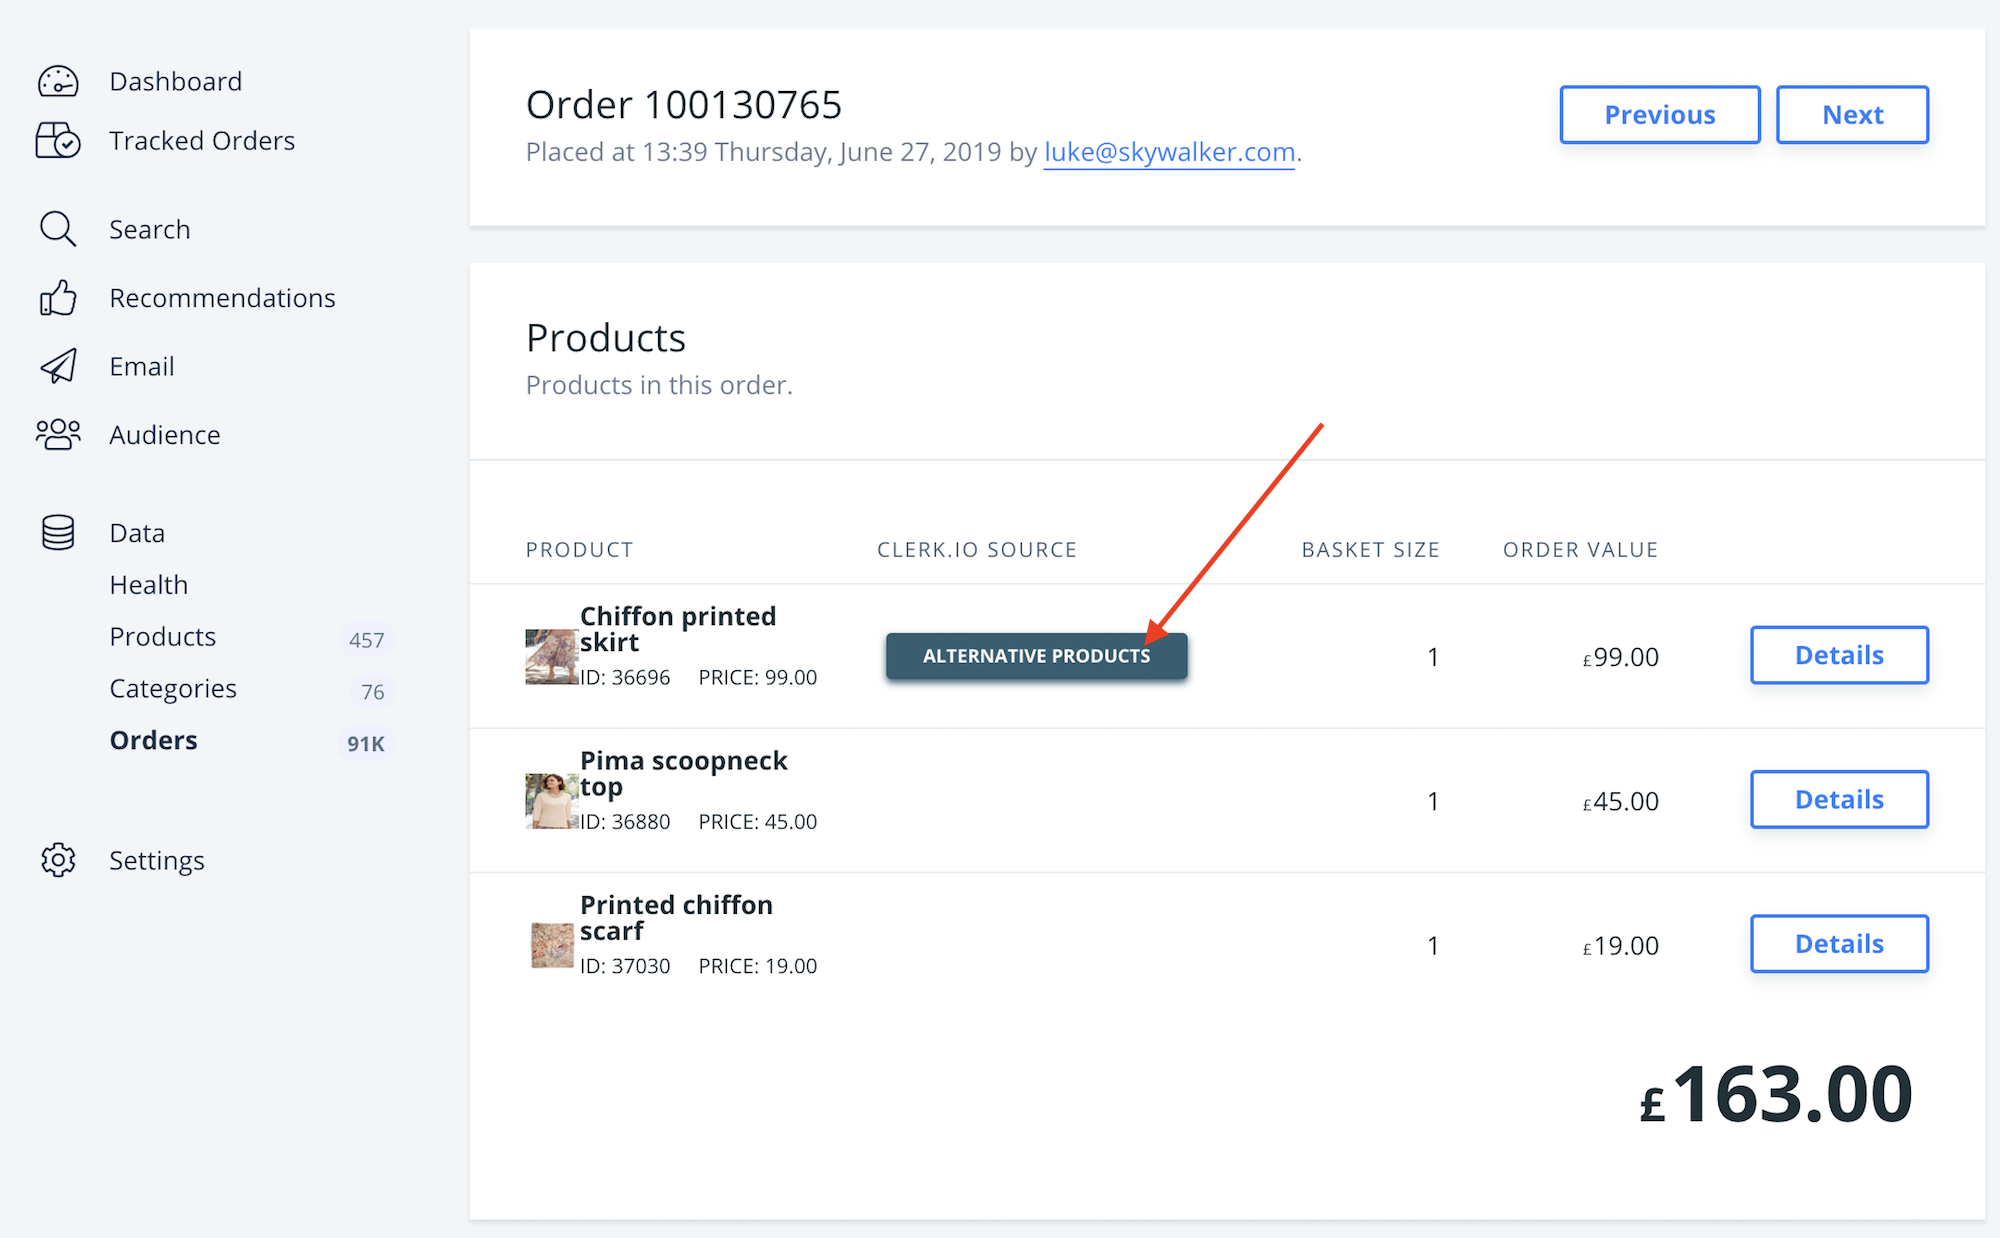
Proceed to place a test-order where you purchase a product that has variants.
Afterwards, go to Orders and open the order you just placed.
If you can see the Main products in the order, including their name and image, your code works: