Recommendations
Clerk.io offers more than 23 different types of product logics, making it possible for you to display completely automated products on any page. This article explains how to get started when using a Clerk.js setup in Shopify.
For our full Best Practices, read this article on which Recommendations to use.
Slider Setup #
Recommendations are created with Elements that reference a Design. Below is the basic guide for setting up an Element.
Following the steps in my.clerk.io > Settings > Setup Guides will automatically create the Elements for our Best Practices.
Create Design #
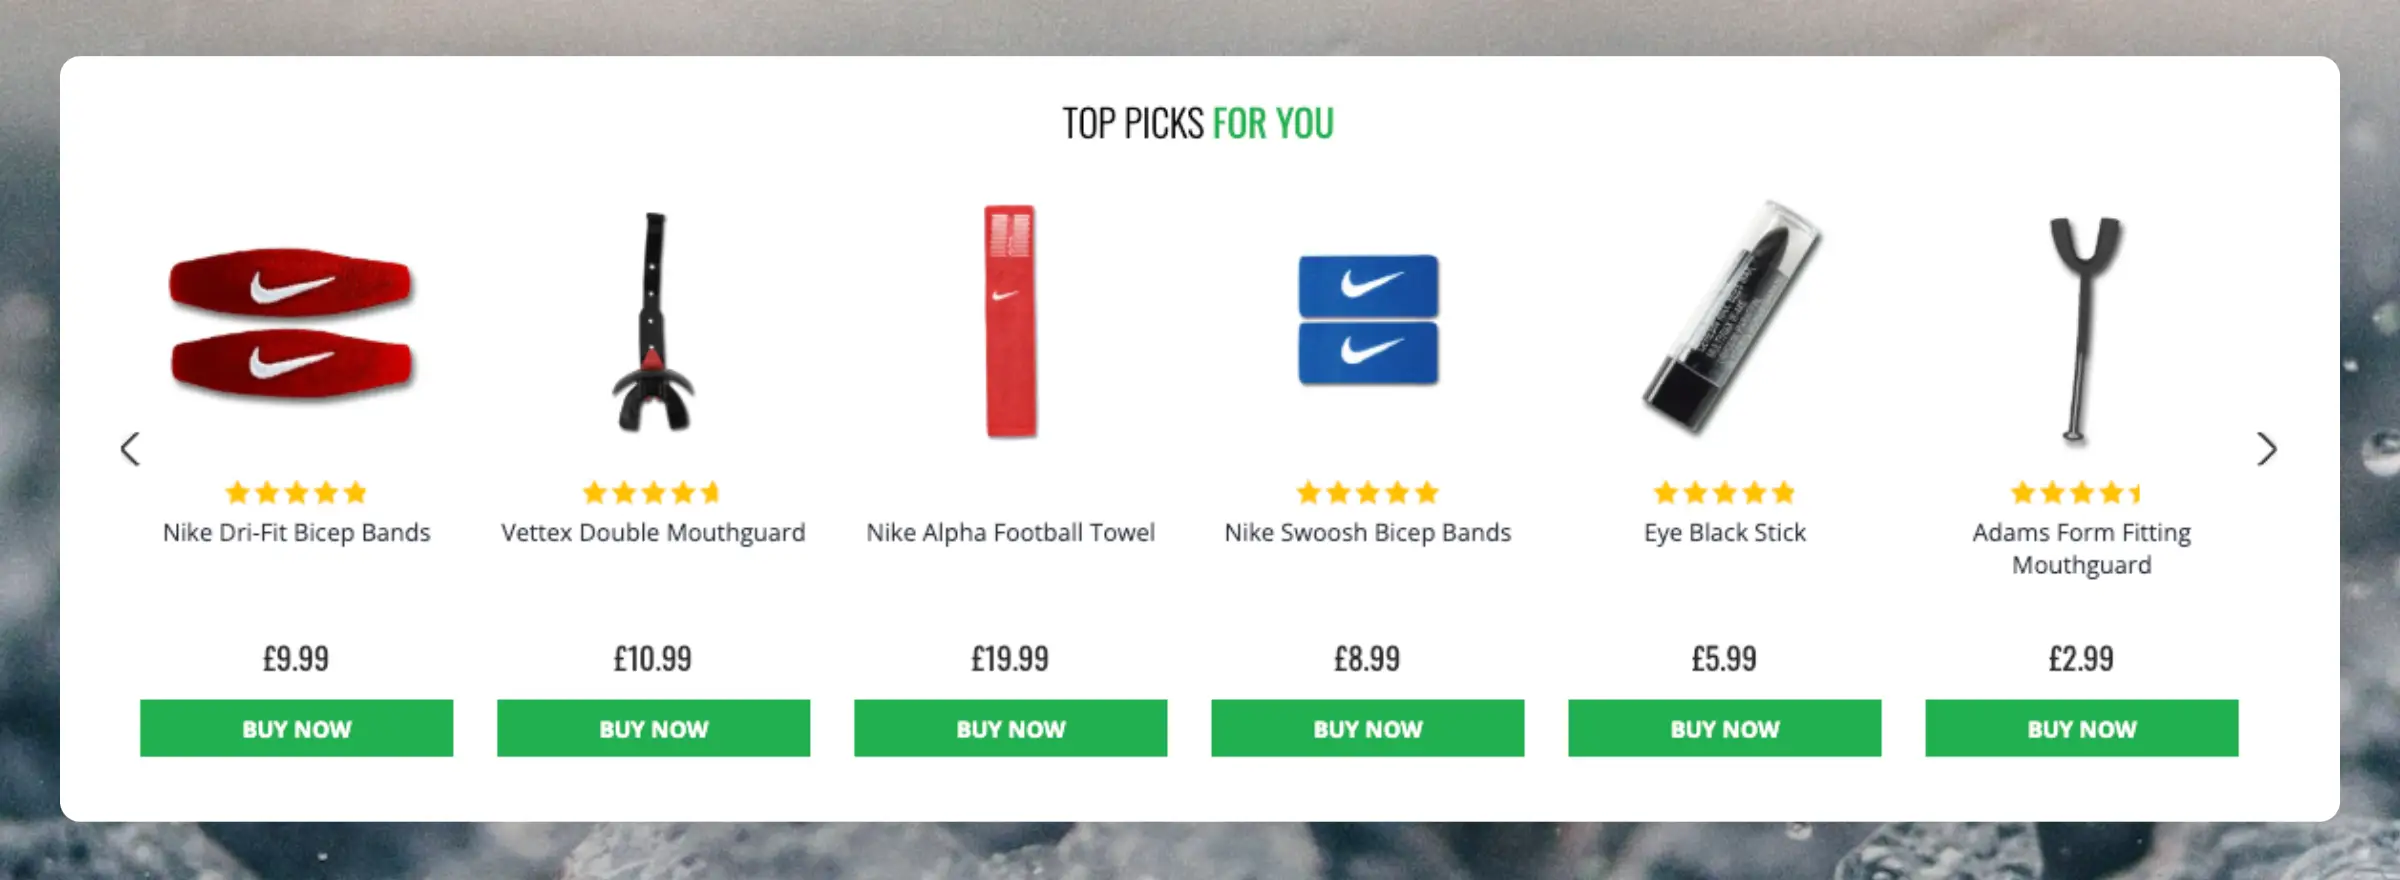
Recommendations are shown as a slider by default. This allows customers to see more products with fewer clicks. You can either use the Design Editor to configure it visually, or use code designs.
A design can be reused for any number of Recommendations elements you create.
Design Editor #
- Go to Recommendations > Designs and click New Design.
- Choose Product Slider
- From the list of design templates, choose the one you want to start with.
- Give it a name and click Create design.
- Make any changes you want to the design.
Code Design #
- Go to Recommendations > Designs and click New Design.
- Choose Other designs > Blank > Code.
- Give it a name and click Create design.
- Create a code design from scratch using Liquid code.
If you want a starting design, check the Slider template further down.
Create Element #
This contains all the settings used to display the Recommendations, and make it embeddable in your website. Follow these steps for each Recommendations banner you want to create.
- Go to Recommendations > Elements.
- Click New Element.
- Give it a descriptive name. We recommend naming it based on the page and logic you want to use. E.g., “Home Page / Visitor Recommendations”.
- In Element type, select the product logic you want to use from the dropdown. You can see an overview of all the product logics here.
- In Design select the design you created from the dropdown and choose the number of products you want to show.
- Click Save at the top of the screen.
Add to Website #
- Open the Insert into website tab.
- Here you have two options:
- Using injection allows you to insert the code by using a CSS selector.
- Using embedded code allows you to insert the code into your website manually.
- Pick the option that is easiest for you to use.
- For some Logics you will see the Choose your platform dropdown. Select Shopify in these cases. This will prefill the embedcode with the correct Shopify shortcodes.
Typical theme file paths (may vary by theme):
- Homepage: Online Store > Themes > Customize > Add Section > Custom Liquid.
- Product page: Sections > main-product.liquid.
- Collection page: Sections > main-collection-product-grid.liquid.
- Cart page: Sections > main-cart-footer.liquid.
- Global (Exit Intent): Layout > theme.liquid (insert before
</body>).
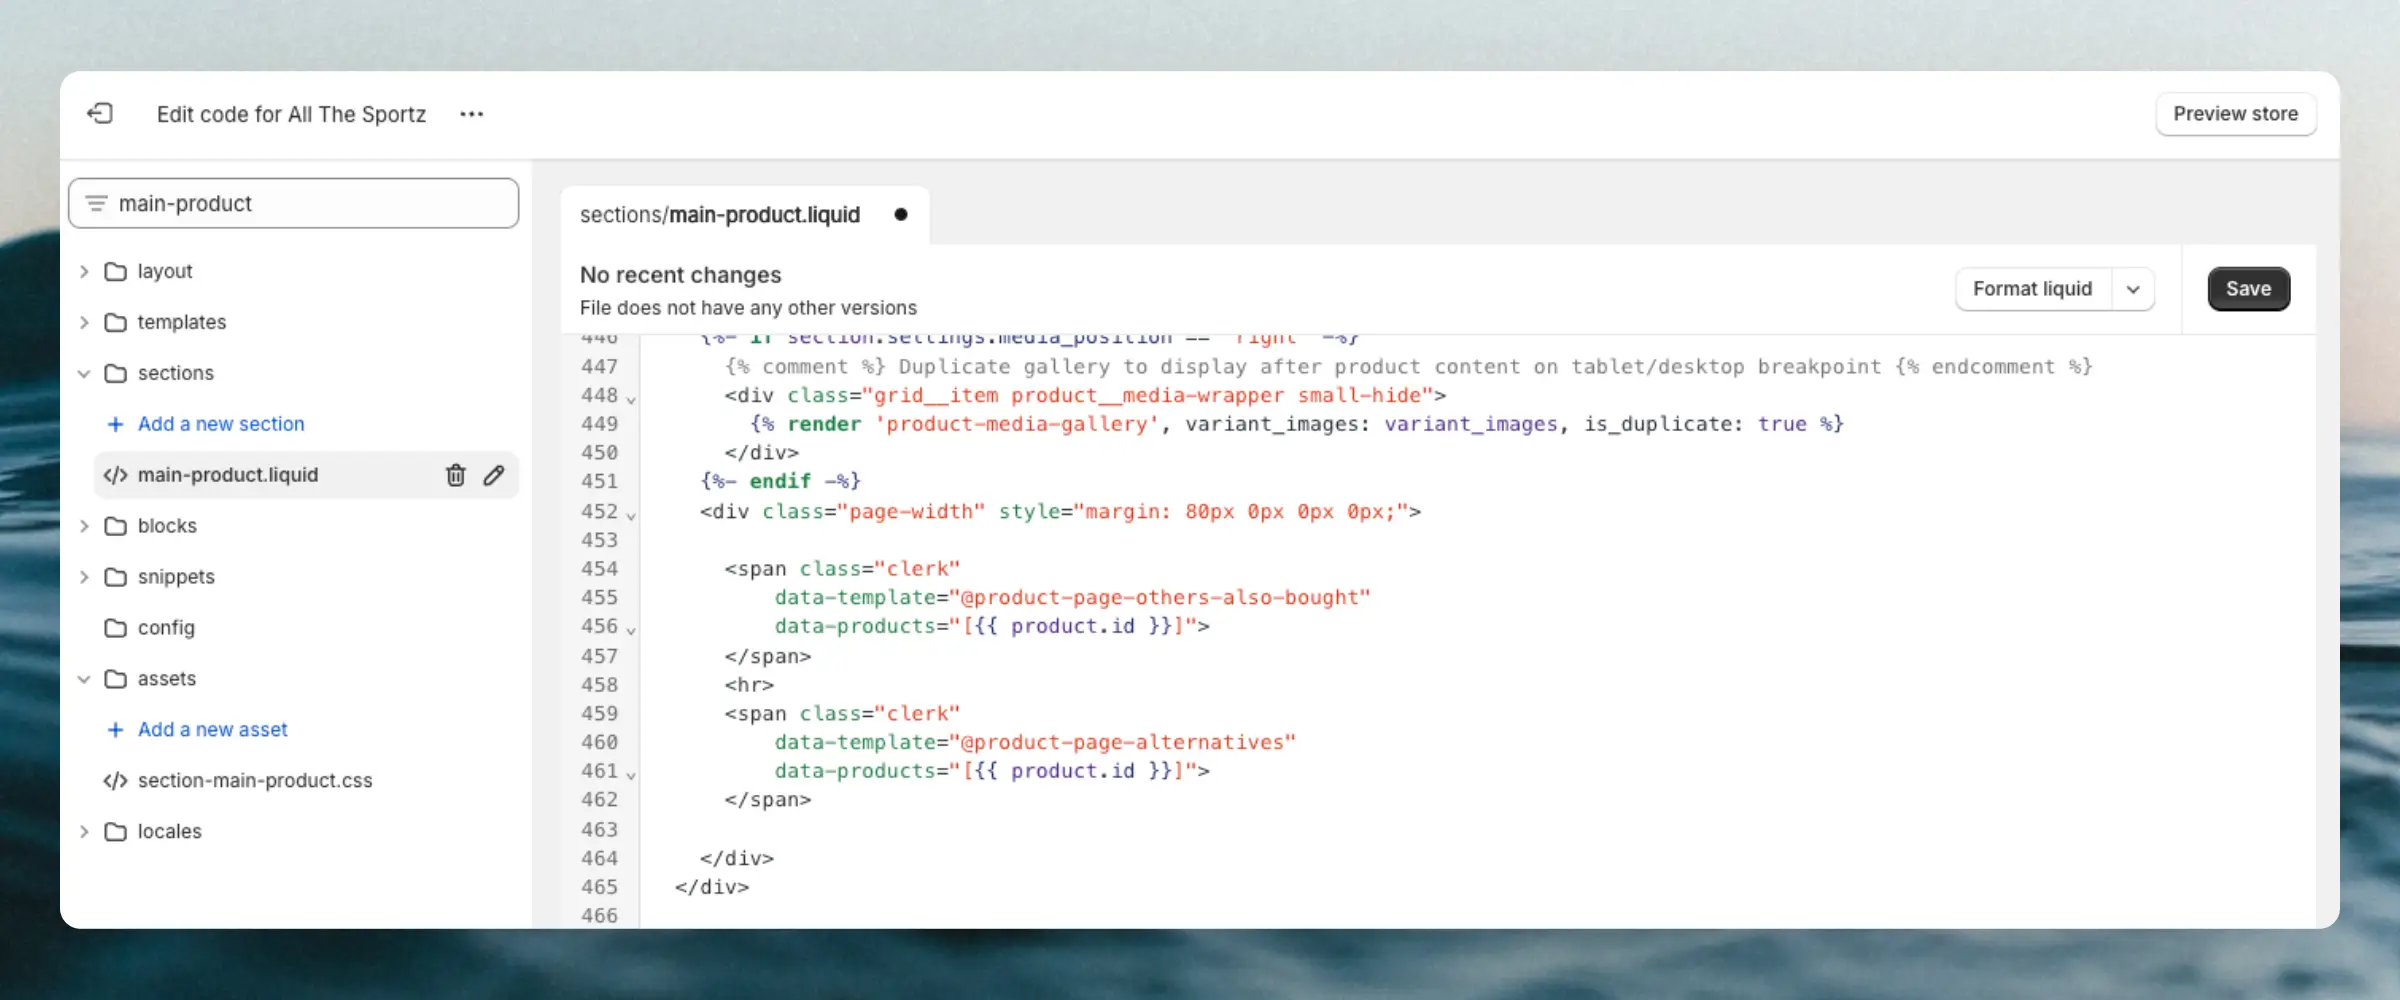
Here’s a complete Recommendations embed code example, with a Shopify shortcode for inserting the product ID:
<span class="clerk"
  data-template="@product-page-alternatives"
  data-products="[{{ product.id }}]">
</span>
Pages #
The snippets should be inserted in the theme’s HTML files, which are normally found in the Shopify Admin > Online Store > Themes. Alternatively, you can inject results if you know the CSS selectors for the elements you want to insert results into.
Homepage #
- In my.clerk.io, create 3 Elements with the following logics:
- Visitor Recommendations
- Bestsellers
- Hot Products
- In Shopify, go to Online Store > Themes > Customize
- Click Add Section > Custom Liquid.
- Insert the embedcodes to the Custom Liquid box.
- Click Save.
If you want to show all the banners on top of each other, insert all embedcodes to the same box. In case you want to split them across the Home Page, simply follow the above process multiple times.
Category Page #
- In my.clerk.io, create an Element with the logic Bestsellers In Category.
- In the Insert into website > Choose your platform dropdown, select Shopify, and copy the embedcode.
- Go to Shopify’s theme files and find the file that generates your Collection pages. This is most often Sections > main-collection-product-grid.liquid.
- Insert the embedcode somewhere below the title and description. Depending on your theme, this placement will vary.
Product Page #
- In my.clerk.io, create 2 Elements with the following logics:
- Best Alternative Products
- Best Cross-Sell Products
- In Insert into website > Choose your platform dropdown, select Shopify for each of them and copy the embedcodes.
- In the Shopify theme files, find the file that generates your product pages. This is most often Sections > main-product.liquid.
- Insert the embedcodes somewhere below the product description. Depending on your theme, this placement will vary.
Add-To-Basket Step #
- In my.clerk.io, create an Element with the logic Best Cross-Sell Products.
- Give it the name “Add-To-Basket / Others Also Bought”. This is important for the embedcode to work properly.
- Click Save in the top of the page.
- In the Shopify theme files, find the file that generates your product pages. This is most often Sections > main-product.liquid.
- Insert the Add-To-Basket embedcode in the bottom of the file and click Save. You can find the embedcode in the Starting Templates section.
The Add-To-Basket popup will now show when a customer adds a product to their cart from the product page.
If it does not, it’s likely because your add-to-cart button has a different class or ID. Inspect your button and replace .product-form__cart-submit in the embedcode with the class/id of your button.
Cart Page #
- In my.clerk.io, create an Element with the logic Best Cross-Sell Products.
- In the Insert into website > Choose your platform dropdown, select Shopify, and copy the embedcode.
- Go to Shopify’s theme files and find the file that generates your Cart pages. This is most often Sections > main-cart-footer.liquid.
- Insert the embedcode somewhere below the cart items and checkout button, for example just before the
{% schema %}tag.
Exit Intent #
- In my.clerk.io, create an Element with the logic Visitor Recommendations.
- Go to Shopify’s theme files and find the primary theme file. This is most often Layout > theme.liquid.
- Insert the embedcode just before the closing
</body>tag. - Add the
data-exit-intent="true"attribute to the embedcode. Here is an example of what it should look like:
<span
  class="clerk"
  data-template="@exit-intent-visitor-recommendations"
  data-exit-intent="true">
</span>
After adding this, the Exit Intent popup will show when a customer hovers their mouse over the address bar of their browser.
Blog Page #
- In my.clerk.io, create an Element with the logic Products Related To A Page.
- In Shopify, go to Online Store > Blog posts.
- Click the post you want to add recommendations to.
- Click on the <> button in the top right corner of the text-box to see the HTML of the post.
- Insert the embedcode to a part of the post where it’s natural to show recommendations, and replace
INSERT_PAGE_ID_HEREwith the page ID of the post. You can find this ID in the URL of the post.
Starting Templates #
If you want to use code designs, these templates can get you started.
Slider Code #
This template will render a standard slider with various product information, that you can tailor to your needs.
HTML #
<div class="clerk-recommendations">
<h2 class="section-title" style="text-align:center; text-transform: uppercase;"><span>{{ headline }}</span></h2>
<div class="clerk-slider">
{% for product in products %}
<div class="clerk-slider-item">
<div class="clerk-slider-product">
<a href="{{ product.url }}">
{% if product.price < product.list_price %}
<div class="clerk-slider-badge">On Sale</div>
{% endif %}
<div class="clerk-slider-image" style="background-image: url('{{ product.image }}');"></div>
<div class="clerk-slider-brand">{{ product.brand }}</div>
<div class="clerk-slider-name">{{ product.name }}</div>
<div class="clerk-slider-pricing">
{% if product.price < product.retail_price %}
<div class="clerk-slider-list-price">£{{ product.retail_price | money }}</div>
{% endif %}
<div class="clerk-slider-price">£{{ product.price | money }}</div>
</div>
</a>
{% if product.stock == 0 %}
<a class="clerk-not-in-stock" href="{{ product.url }}" data-event-type="product-click">
<div class="clerk-slider-button-not-in-stock">Out of Stock</div>
</a>
{% else %}
<a class="clerk-add-to-cart" href="/cart.php?action=add&product_id={{ product.id }}" data-event-type="product-click">
<div class="clerk-slider-button">Add to Cart</div>
</a>
{% endif %}
</div>
</div>
{% endfor %}
</div>
</div>
CSS #
.clerk-recommendations {
    margin: 1em 0;
}

.clerk-recommendations-headline {
    font-weight: bold;
    font-size: 2em;

    text-align: center;
}

.clerk-slider-item {
    margin: auto;
}

.clerk-slider-product {
    position: relative;
    overflow: hidden;

    margin: 1em;
    padding: 1em;

    background-color: white;

    border: 1px solid #eee;
    border-radius: 1em;

    box-shadow: 0 .1em .2em 0 rgba(0,0,0,.08);

    text-align: center;
}

.clerk-slider-badge {
    position: absolute;
    top: 5px;
    right: -35px;

    display: inline-block;

    width: 120px;

    margin: 10px auto;
    padding: 5px 0;

    border-radius: 3px;

    background-color: #fbc531;

    font-size: 10px;
    color: white;

    text-align: center;
    letter-spacing: 1px;

    transform: rotate(45deg);
}

.clerk-slider-tags {
    position: absolute;
    top: .8em;
    left: .8em;
}

.clerk-slider-tag {
    display: inline-block;

    padding: .2em .8em;

    border-radius: .3em;

    background-color: gray;

    font-size: 10px;
    color: white;

    letter-spacing: 1px;
}

.clerk-slider-image {
    width: 100%;
    height: 8em;

    margin-bottom: 1em;

    background-position: center center;
    background-repeat: no-repeat;
    background-size: contain;
}

.clerk-slider-brand {
    font-size: 0.9em;
    color: #757575;
}

.clerk-slider-name {
    height: 3em;
    overflow: hidden;
    color: #4a3b40;
    font-weight: bold;
    font-size: 15px;
    margin-bottom: 1em;
}

.clerk-slider-pricing {
    display: flex;

    margin-bottom: 1em;
}

.clerk-slider-price {
    flex: 1;
    color: #757575;
    font-weight: bold;
}

.clerk-slider-list-price {
    flex: 1;

    opacity: .8;

    font-weight: normal;
    text-decoration: line-through;
    color: gray;
}

.clerk-add-to-cart, .clerk-add-to-cart:hover {
    color: white;
}

.clerk-not-in-stock, .clerk-not-in-stock:hover {
    color: #4a3b40;
}

.clerk-slider-button-not-in-stock {
    display: block;

    margin: 0 auto;
    padding: .6em 2em;

    border: none;
    border-radius: .5em;

    background-color: white;
    color: #4a3b40;

    text-transform: uppercase;
    text-align: center;

    white-space: nowrap;

    font-weight: bold;

    cursor: pointer;
}

.clerk-slider-button {
    display: block;

    margin: 0 auto;
    padding: .6em 2em;

    border: none;
    border-radius: .5em;

    background-color: #b6c254;
    color: white;

    text-transform: uppercase;
    text-align: center;

    white-space: nowrap;

    font-weight: bold;

    cursor: pointer;
}


.clerk-load-more-button {
    display: block;

    width: 20em;

    margin: 1em auto;
    padding: .6em 2em;

    border: none;
    border-radius: .5em;

    background-color: #b6c254;
    color: white;

    text-transform: uppercase;
    text-align: center;

    white-space: nowrap;

    font-weight: bold;
    font-size: 1.2em;

    cursor: pointer;
}

@media screen and (min-width: 1100px){
    .clerk-slider-item {
        width: 20%;
    }
}

@media screen and (min-width: 900px) and (max-width: 1100px){
    .clerk-slider-item {
        width: 25%;
    }
}

@media screen and (min-width: 414px) and (max-width: 900px) {
    .clerk-slider-item {
        width: 50%;
    }
    .clerk-slider-button, .clerk-slider-button-not-in-stock {
        font-size: 0.8em;
    }
}

@media screen and (max-width: 413px) {
    .clerk-slider-item {
        width: 100%;
    }
}
Add-To-Basket Code #
This embedcode should be inserted at the bottom of the product page theme file. It will show a popup with a slider of products when a customer adds a product to their cart. It can be customized as needed.
HTML #
<script>
    document.addEventListener('DOMContentLoaded', function(){
    const buyBtn = (document.querySelector('[data-add-to-cart]')) ? '[data-add-to-cart]' : '.product-form__submit';
    const prodPage = (document.querySelector('[data-section-id="product-template"] > div')) ? '[data-section-id="product-template"] > div' : '.product-section > section';
    const clerkPowerstep = document.getElementById('clerk_powerstep');

    document.querySelector(buyBtn).addEventListener('click', open_powerstep);

    function open_powerstep() {
        Clerk('content', '.clerk-powerstep-recommendations');

        clerkPowerstep.style.display = 'block';
        clerkPowerstep.style.padding = '5px 15px';
        clerkPowerstep.classList.toggle('animate_top');

        setTimeout(function(){

            document.querySelector(prodPage).addEventListener('click', close_powerstep);
            document.getElementsByTagName('header')[0].addEventListener( 'click', close_powerstep );

        }, 500);
    }

    });

    function close_powerstep() {
        var clerkPowerstep = document.getElementById('clerk_powerstep');
        //window.location.reload();
        clerkPowerstep.style.display = 'none';
    }
</script>
<div style="display: none;" id="clerk_powerstep">
    <span class="clerk-popup-close" onclick="close_powerstep()">✕</span>
    <div class="clerk_powerstep_wrap">
        <div class="clerk_powerstep_header">
        <h2>You added <b><u>{{ product.title }}</u></b> to your cart.</h2>

        </div>

        <div class="clerk_powerstep_image">
        <img src="{{ product.images[0].src | img_url: 'x150', scale: 2 }}" alt="You added <b><u>{{ product.title }}</u></b> to your cart.">
        </div>

        <div class="clerk_powerstep_actions">
            <button class="powerstep_continue button btn" onclick="location.href='{{ routes.cart_url }}';">Continue to Checkout</button>
            <button class="powerstep_close button btn" onclick="close_powerstep();">Continue Shopping</button>
        </div>
        <br>
        <span class="clerk-powerstep-recommendations"
            data-template="@add-to-basket-others-also-bought"
            data-products="[{{product.id}}]">
        </span>
    </div>
</div>

<style>
    @keyframes top {
        from {
        top: -100%;
        }
        to {
        top: 50%;
        }
    }

    .animate_top {
        animation: top 100 ease-in-out;
        top: 50% !important;
    }
    #clerk_powerstep {
        width: clamp(45ch, 50%, 100ch) !important;
        left: 50% !important;
        transform: translate(-50%, -50%) !important;
        margin: 0px !important;
        border: 3px solid #888 !important;
        border-radius: 2px !important;
        position: fixed;
        top: -100%;
        z-index: 999;
        display: none;
        background-color: white;
        box-shadow: 0px 8px 40px 0px rgba(0,0,60,0.15);
        transition-property: all;
        transition-duration: 1s;
        transition-timing-function: ease-in-out;
    }

    #clerk_powerstep h2 {
        text-align: center;
    }

    .clerk_powerstep_image {
        text-align: center;
        display: flex;
        justify-content: center;
        flex-direction: column;
    }

    .clerk_powerstep_image img {
        object-fit: contain;
        max-height: 240px;
        height: 25vh;
        margin: auto;
    }

    .clerk-popup-close {
        position: absolute;
        right: 5px;
        top: 5px;
        cursor: pointer;
        font-family: Arial;
        font-size: 32px;
        line-height: 1;
        color: gray;
        z-index: 2;
        padding: 3px;
    }
    .clerk_powerstep_header {
        position: relative;
    }

    .clerk_powerstep_wrap {
        position: relative;
        overflow-y: scroll;
        overflow-y: overlay;
        max-height: 80vh;
        -ms-overflow-style: none;  /* IE and Edge */
        scrollbar-width: none;  /* Firefox */
    }
    .clerk_powerstep_wrap::-webkit-scrollbar {
      display: none;
    }
    .clerk_powerstep_actions {
        display: flex;
        flex-direction: row;
        justify-content: space-around;
    }

    .clerk_powerstep_actions button {
        margin: 0 0 10px 0;
    }

    @media only screen and (max-width: 800px){
        .clerk_powerstep_actions {
            display: flex;
            flex-direction: column;
            justify-content: center;
            align-items: center;
        }
    }
</style>