Sync Data
Sync your WooCommerce products, categories, orders, and pages to Clerk. This guide covers the basics and advanced customization options.
Before syncing data, make sure you have installed and configured the Clerk plugin in your WooCommerce backend. See the Get Started guide for installation instructions.
Set up Sync #
To sync your WooCommerce store data with Clerk, you need to configure the import URL in Clerk.
In the plugin, copy your Import URL from the General section.
Enable Use Legacy Authentication in the General section. This option is required when using regular Clerk Private API keys.
Go to my.clerk.io > Data > Configuration and paste the Import URL into the Import URL field.
If you plan to use Email & Audience, set Collect Emails to Yes in the plugin and Save.
Select the language for your domain if applicable.
Click Start Sync and wait for the sync to complete.
Clerk will now import your products, categories and orders.
Customizing product data #
In WooCommerce, you can add Custom product attributes through the WooCommerce backend or through the Clerk plugin in code, if needed.
Add simple attributes #
If the attributes you want to send are already available as simple attributes in your WooCommerce admin, they can easily be added on the Plugin page.
Go to your WooCommerce backend.
Navigate to Products > Attributes.
Find the slug of the attribute you want to add.
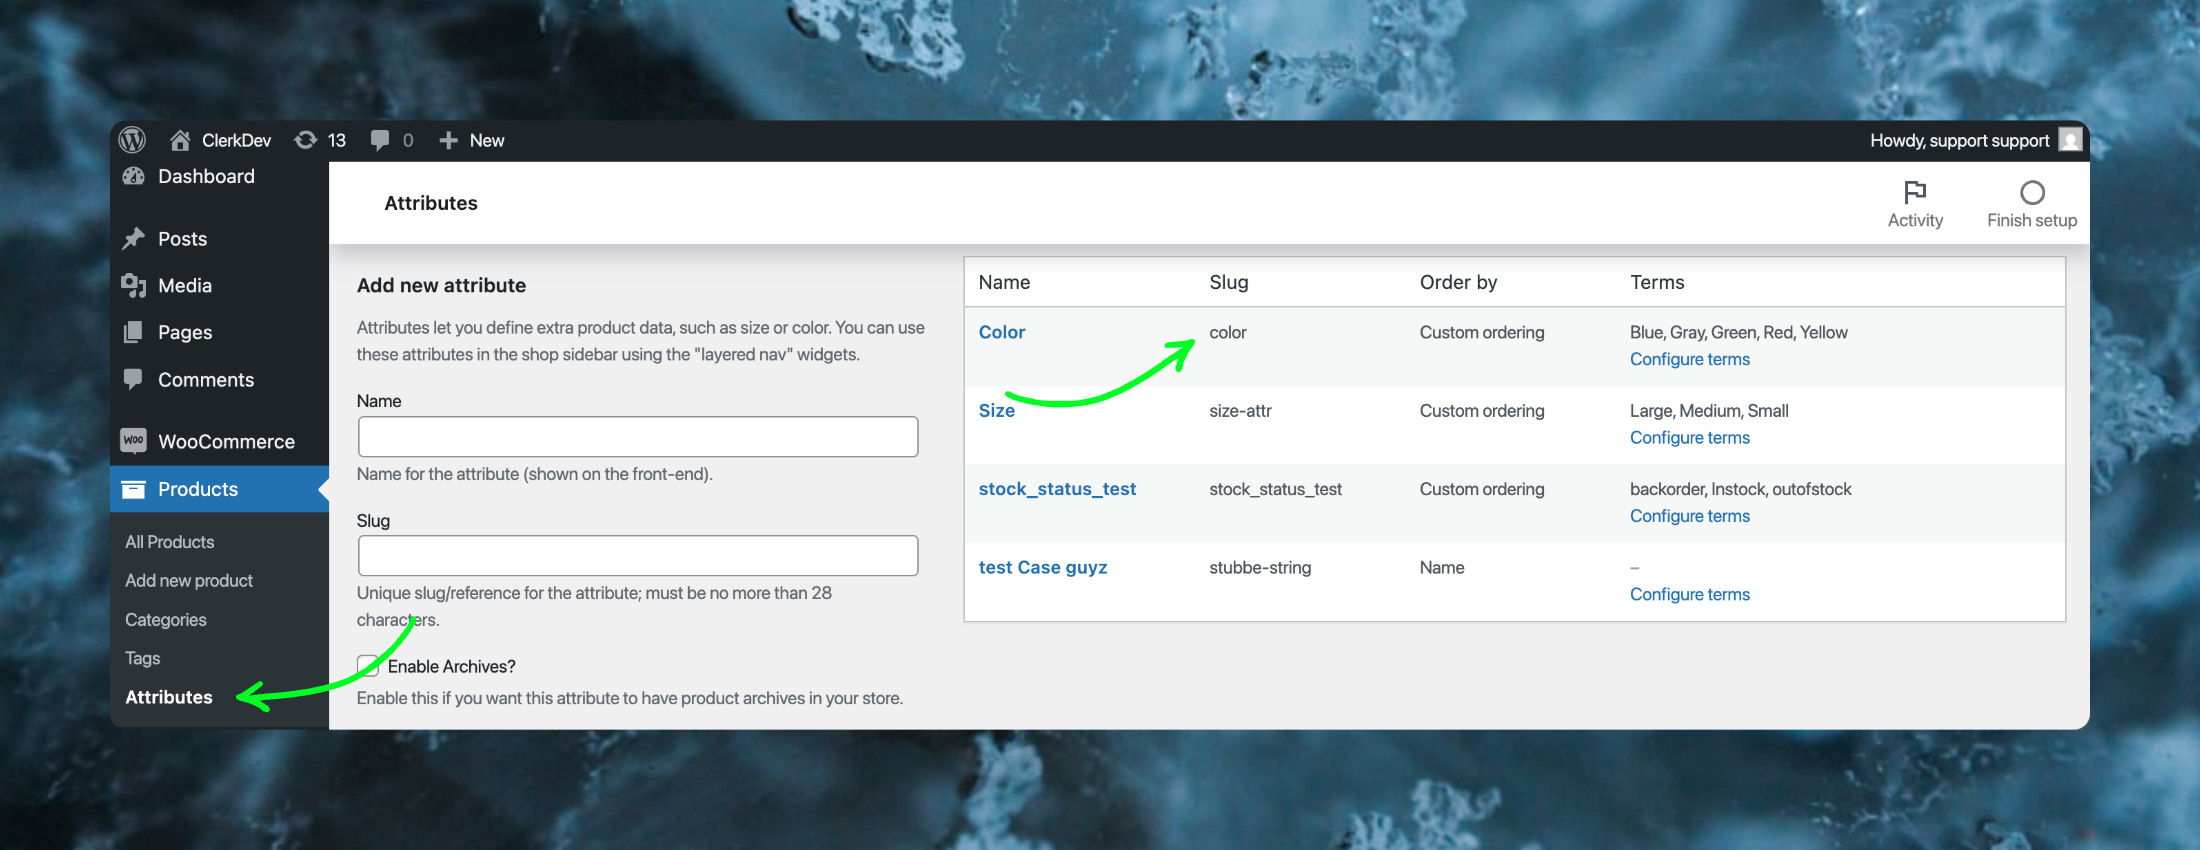
Click on the Clerk Plugin in the left sidebar menu.
In the Data Sync section, add the attribute slug in the Additional Fields. You can also add several different ones, separated by commas.
Click Save Settings.
Go to my.clerk.io > Data > Configuration and click Start New Data Sync.
Add attributes manually #
Attributes in WooCommerce can also be added through code in two files.
These files are used to sync products both manually and automatically when changes are made in the webshop.
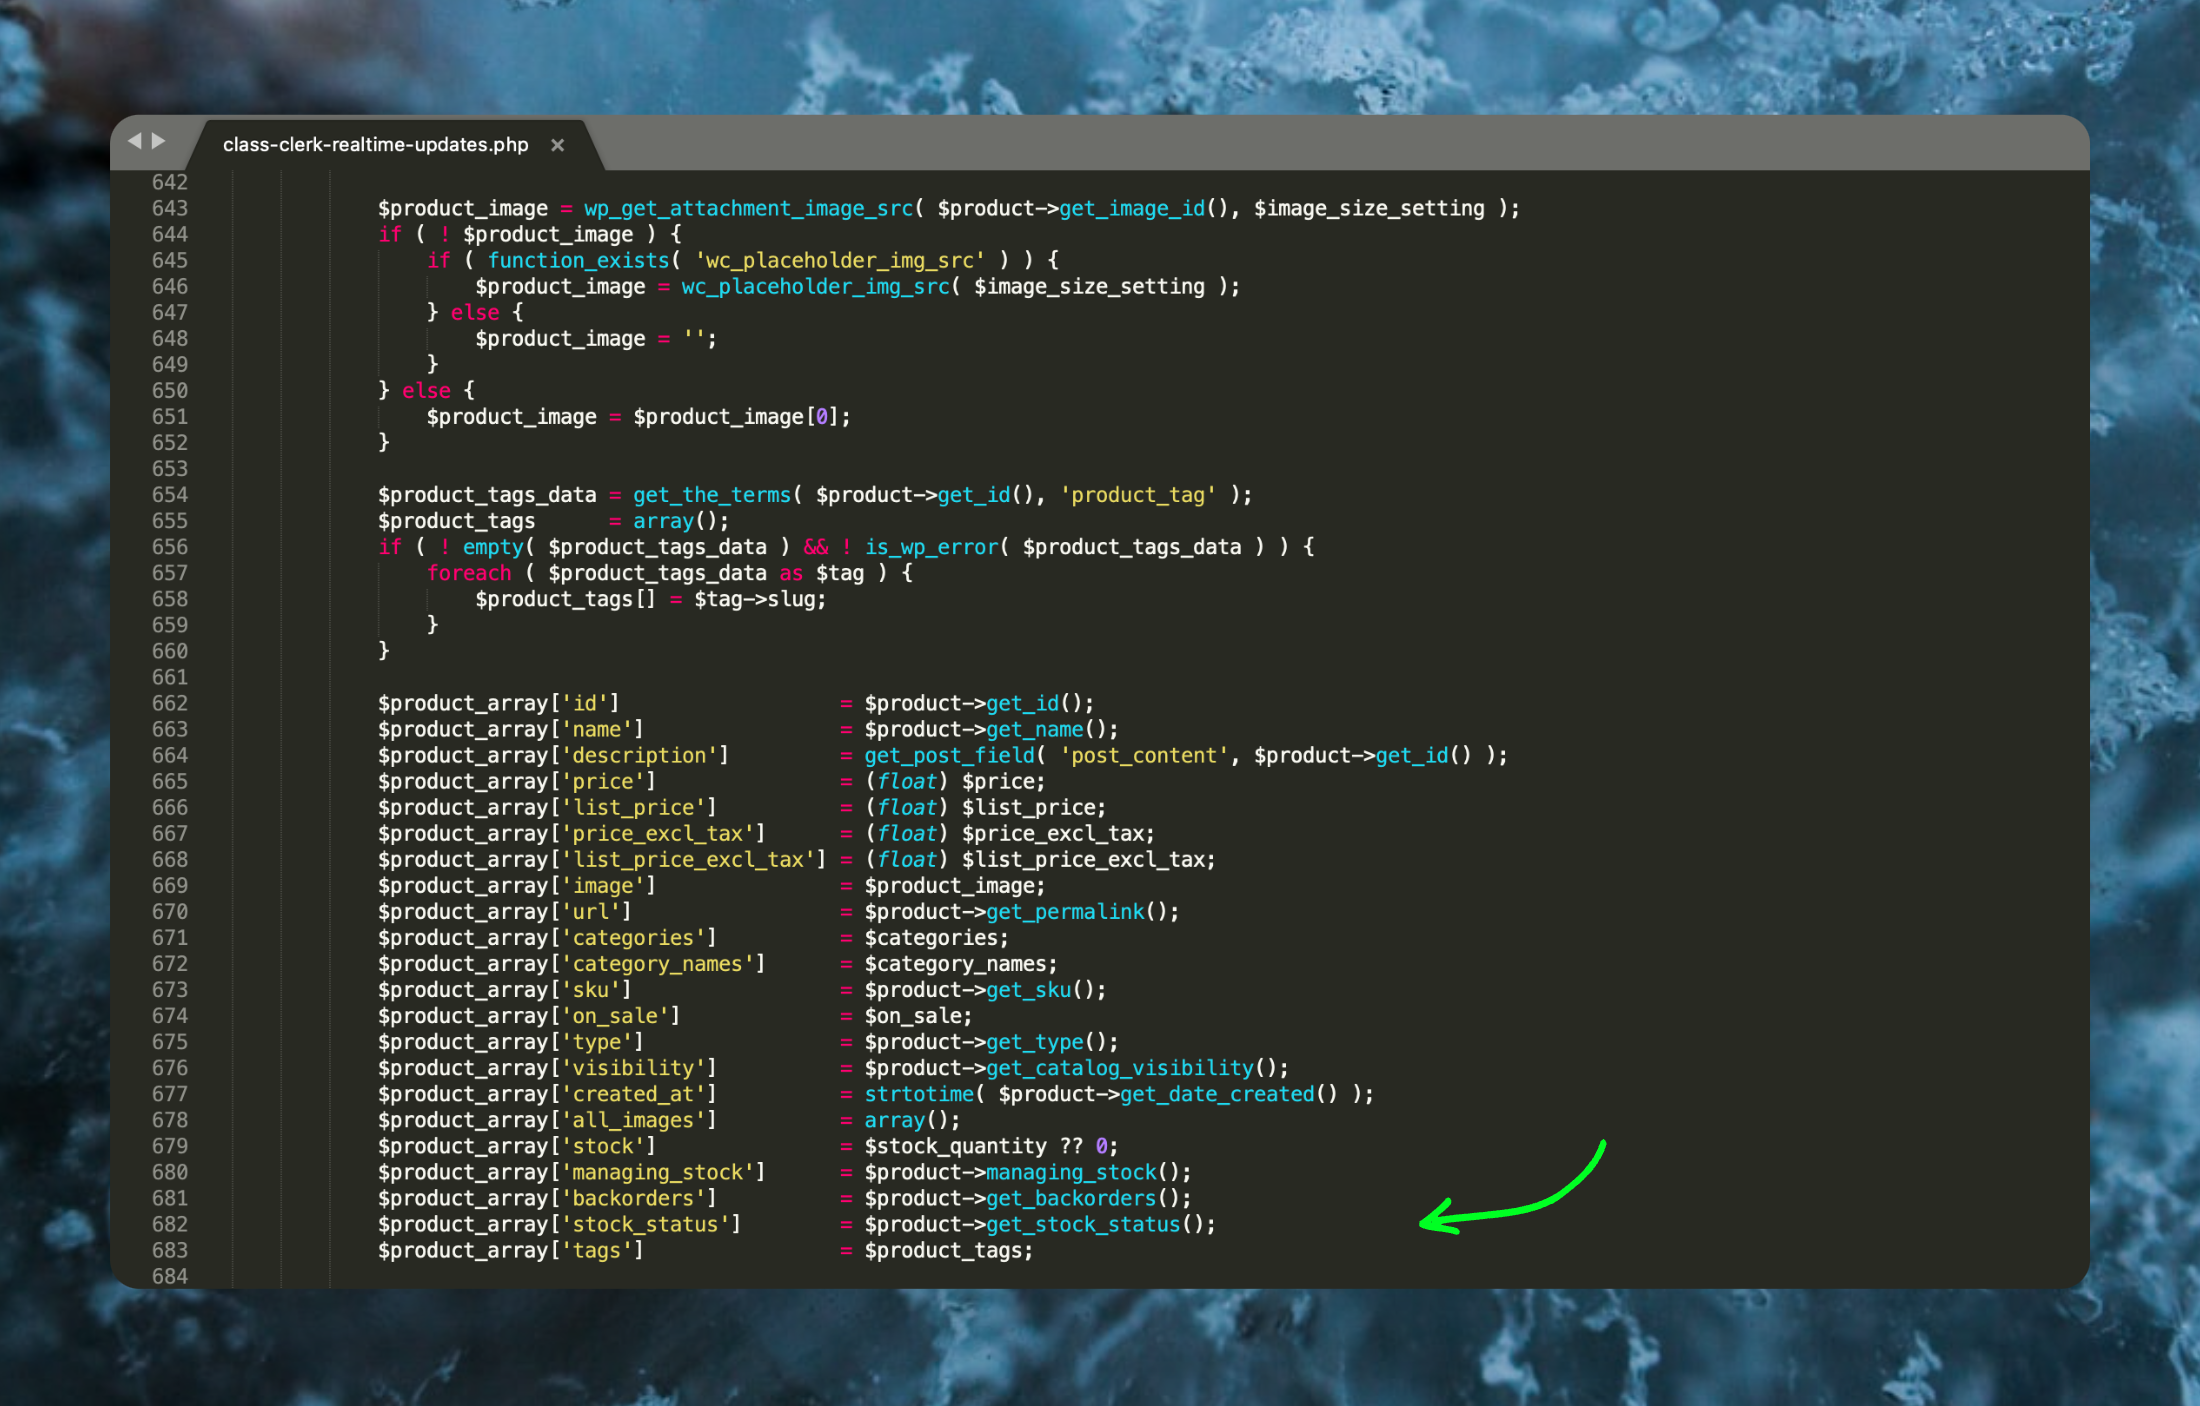
These are the files:
- wp-content > plugins > clerkio > includes > class-clerk-realtime-updates.php in the function
add_product:
- wp-content > plugins > clerkio > includes > class-clerk-rest-api-php in the function
product_endpoint_callbackin$product_array:
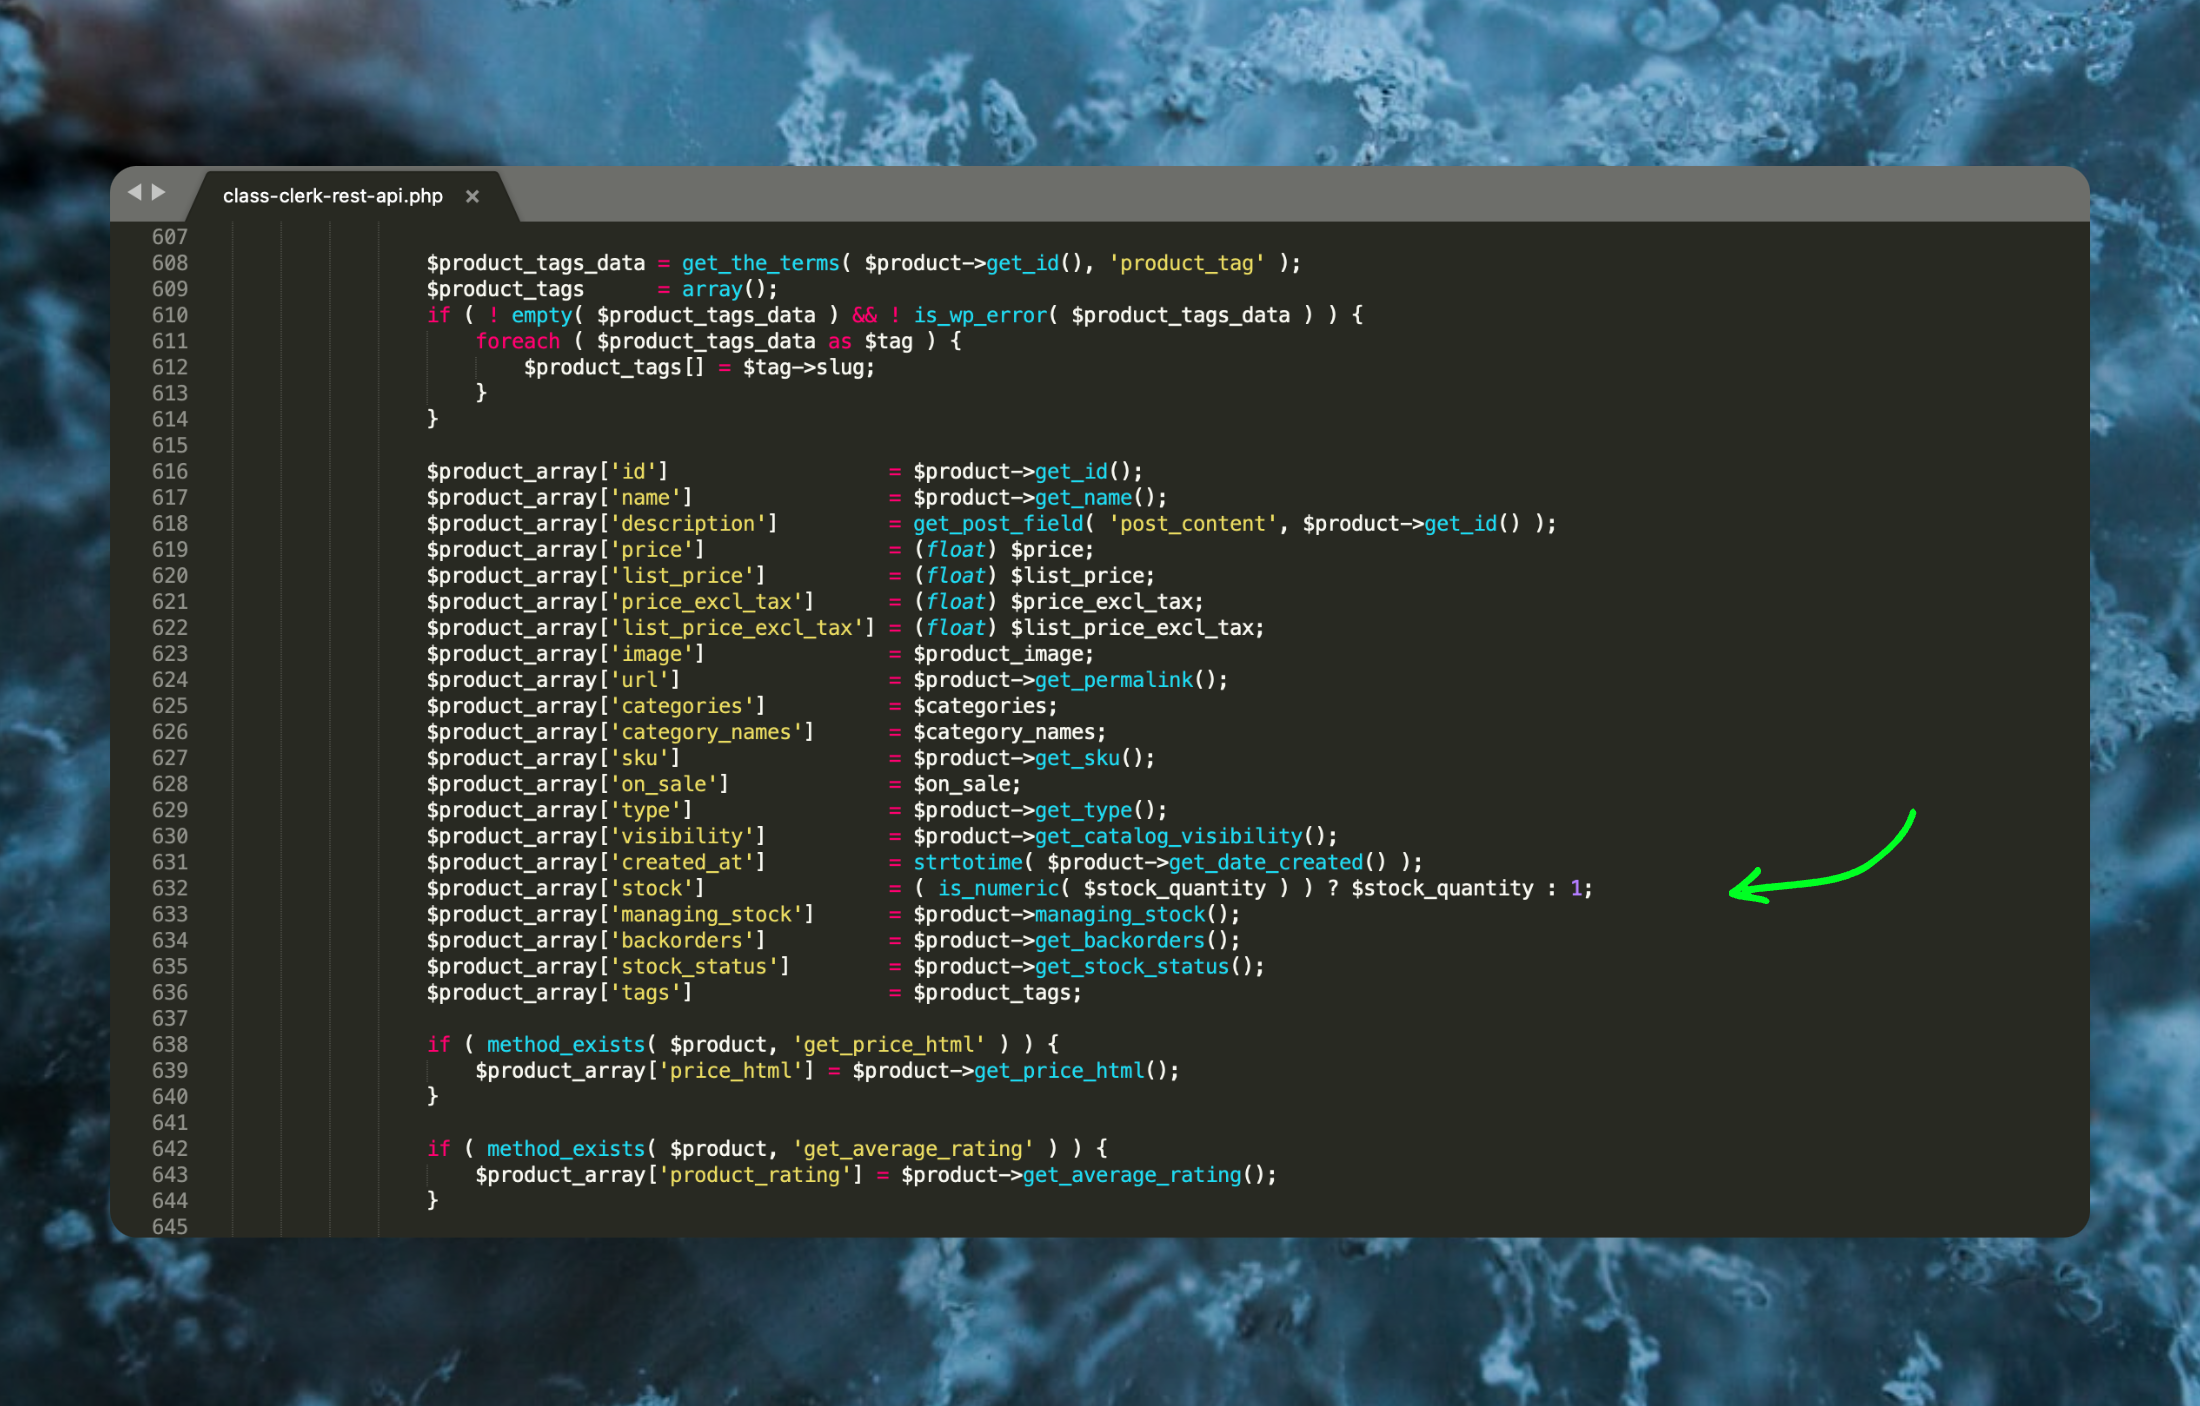
Each attribute is structured like this:
$product_array['sku'] = $product->get_sku();
Where ['sku'] defines the name you want the attribute to have in Clerk, and = $product->get_sku() is the WooCommerce logic for retrieving the attribute.
Functions.php attributes #
You can also add new attributes to Clerk by modifying the functions.php file.
These changes will persist even when the plugin is updated.
Follow these steps:
- Add the following code to Appearance > Theme Editor > functions.php:
// Alters clerk parameters
add_filter( 'clerk_product_sync_array', 'clerk_change_params', 10, 2 );
add_filter( 'clerk_product_array', 'clerk_change_params', 10, 2 );

function clerk_change_params( $params, $product ) {

// Used to hide hidden products from search
   $params['catalog_visibility'] = $product->get_catalog_visibility();

// We only use short_description
   $params['description'] = $product->get_short_description();

    return $params;
}
- (Optional) If you want to include custom attributes (such as brand, color, or material) in Clerk, modify the function like this:
add_filter('clerk_product_sync_array', 'clerk_change_params', 10, 2);
add_filter('clerk_product_array', 'clerk_change_params', 10, 2);

function clerk_change_params($params, $product) {

    $params['catalog_visibility'] = $product->get_catalog_visibility();
    $params['description'] = $product->get_short_description();

    // Add custom attributes
    $params['brand'] = $product->get_attribute('brand');
    $params['color'] = $product->get_attribute('color');
    $params['material'] = $product->get_attribute('material');

    return $params;
}
Replace “brand”, “color”, and “material” with any WooCommerce attributes you want to sync. If the attributes do not appear, ensure they are defined under Products > Attributes in your WooCommerce backend.
Finally, go to my.clerk.io > Data > Configuration and click Start New Data Sync to import your new attributes.
Import product settings #
By default, Clerk’s WooCommerce plugin only imports Published products.
This can be changed if needed.
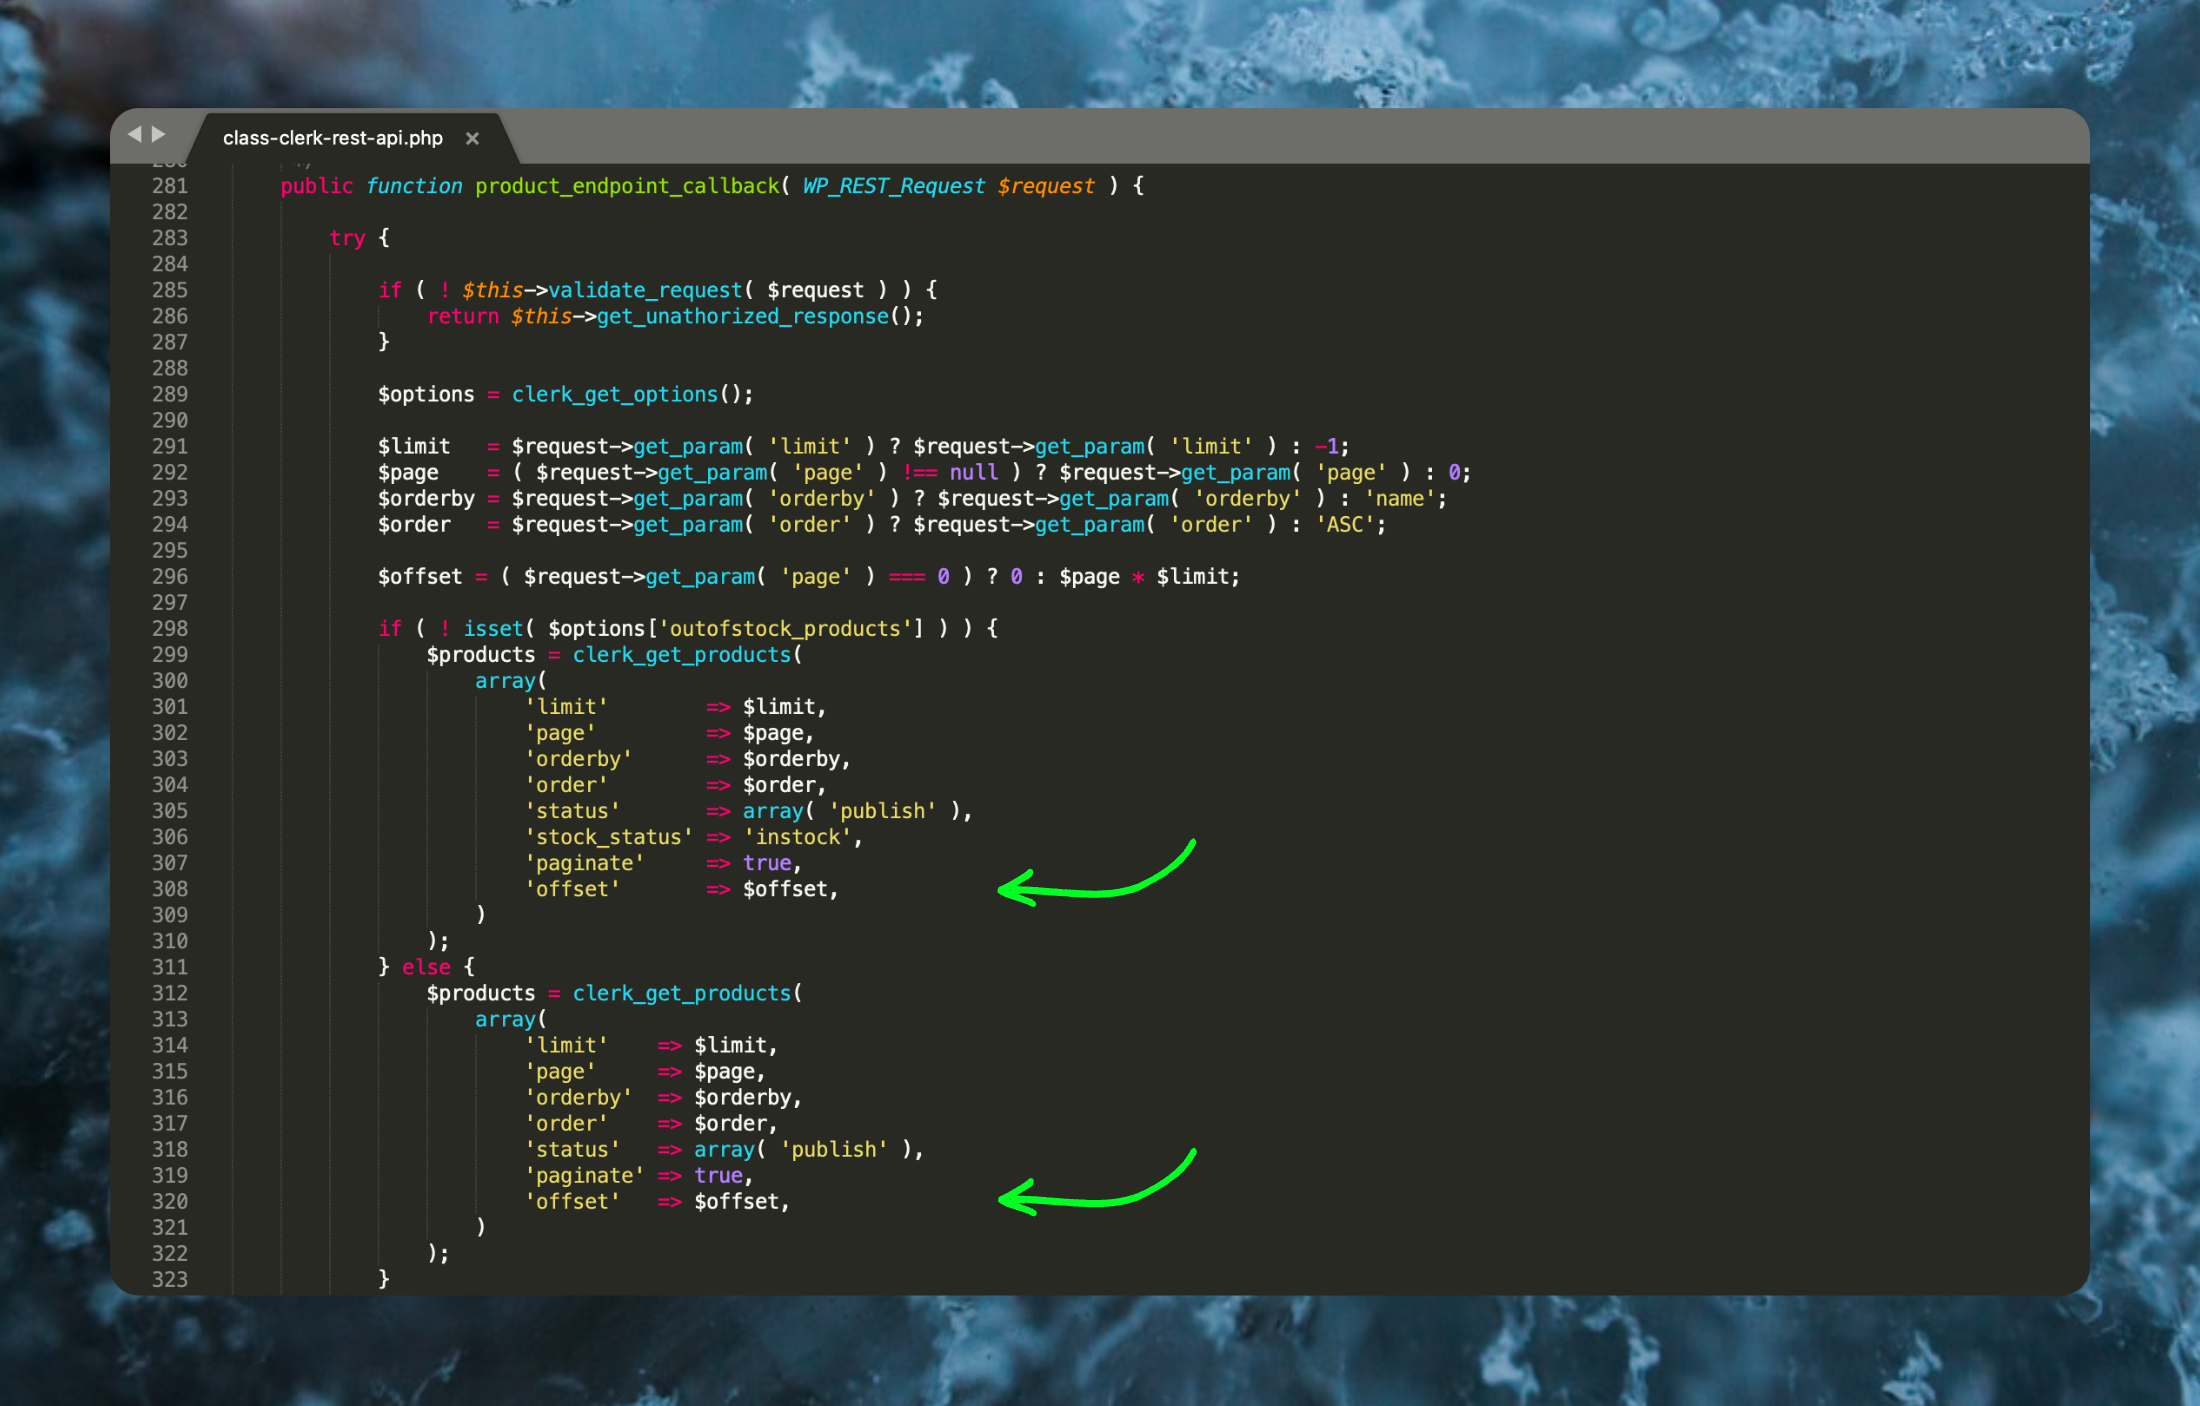
The following file controls which products are imported to Clerk: wp-content > plugins > clerkio > includes > class-clerk-rest-api.php
In the file, locate the function called
product_endpoint_callback.In the
$productslist, under'status', add any Status that you want to include, separated by commas:
- When importing non-published products, add an
is_saleableattribute that returns true or false to track availability.
This allows you to show availability status in your Designs like this:
{% if product.is_saleable %}
   <div class="in-stock">In Stock</div>
{% else %}
  <div class="not-in-stock">Not In Stock</div>
{% endif %}
- Go to my.clerk.io > Data and click Start New Sync to import the new products.
Disable order sync #
After the first data sync has run successfully, order sync from WooCommerce can be deactivated as the sales tracking from the extension takes over.
You have two options: From my.clerk.io or from the Plugin in WooCommerce.
my.clerk.io #
Go to my.clerk.io > Data > Configuration.
Scroll down and on the right, change the option under Import Orders from Yes to No, then click Save.
Clerk will no longer import orders from WooCommerce.
Plugin #
Go to the WooCommerce backend and click on Clerk in the left sidebar menu.
In the Plugin settings, scroll down to the Data Sync: Orders section. Check the box labeled Disable Order Synchronization.
To make the changes take effect, click Save Settings.
Syncing pages #
Important: For this to work, you must have WooCommerce installed and activated in your WordPress setup. You don’t need to use or configure it, but the plugin has essential functionality that the Clerk Plugin needs.
Since a store in Clerk primarily connects to your e-commerce platform to sync catalogs, orders, and customers, keeping external blog content updated can be challenging.
To address this, we now provide a no-code solution for syncing blog content with any Clerk store regardless of primary platform, if you manage your blogs through WordPress/WooCommerce.
To use this feature, follow these steps:
Install our plugin on your WordPress backend.
Once installed, click on Clerk in the left sidebar menu.
Enter your API keys from Developers > API keys in my.clerk.io to configure the plugin.
Since we only want to import written content in this case, you should only need to enable Use Real-time Updates in the Data Sync: Pages section.
Click Save Settings.
After saving the settings, you’ll find a Sync Pages button in the Data Sync: Pages section. Clicking this button will immediately synchronize all your pages with your my.clerk.io store.
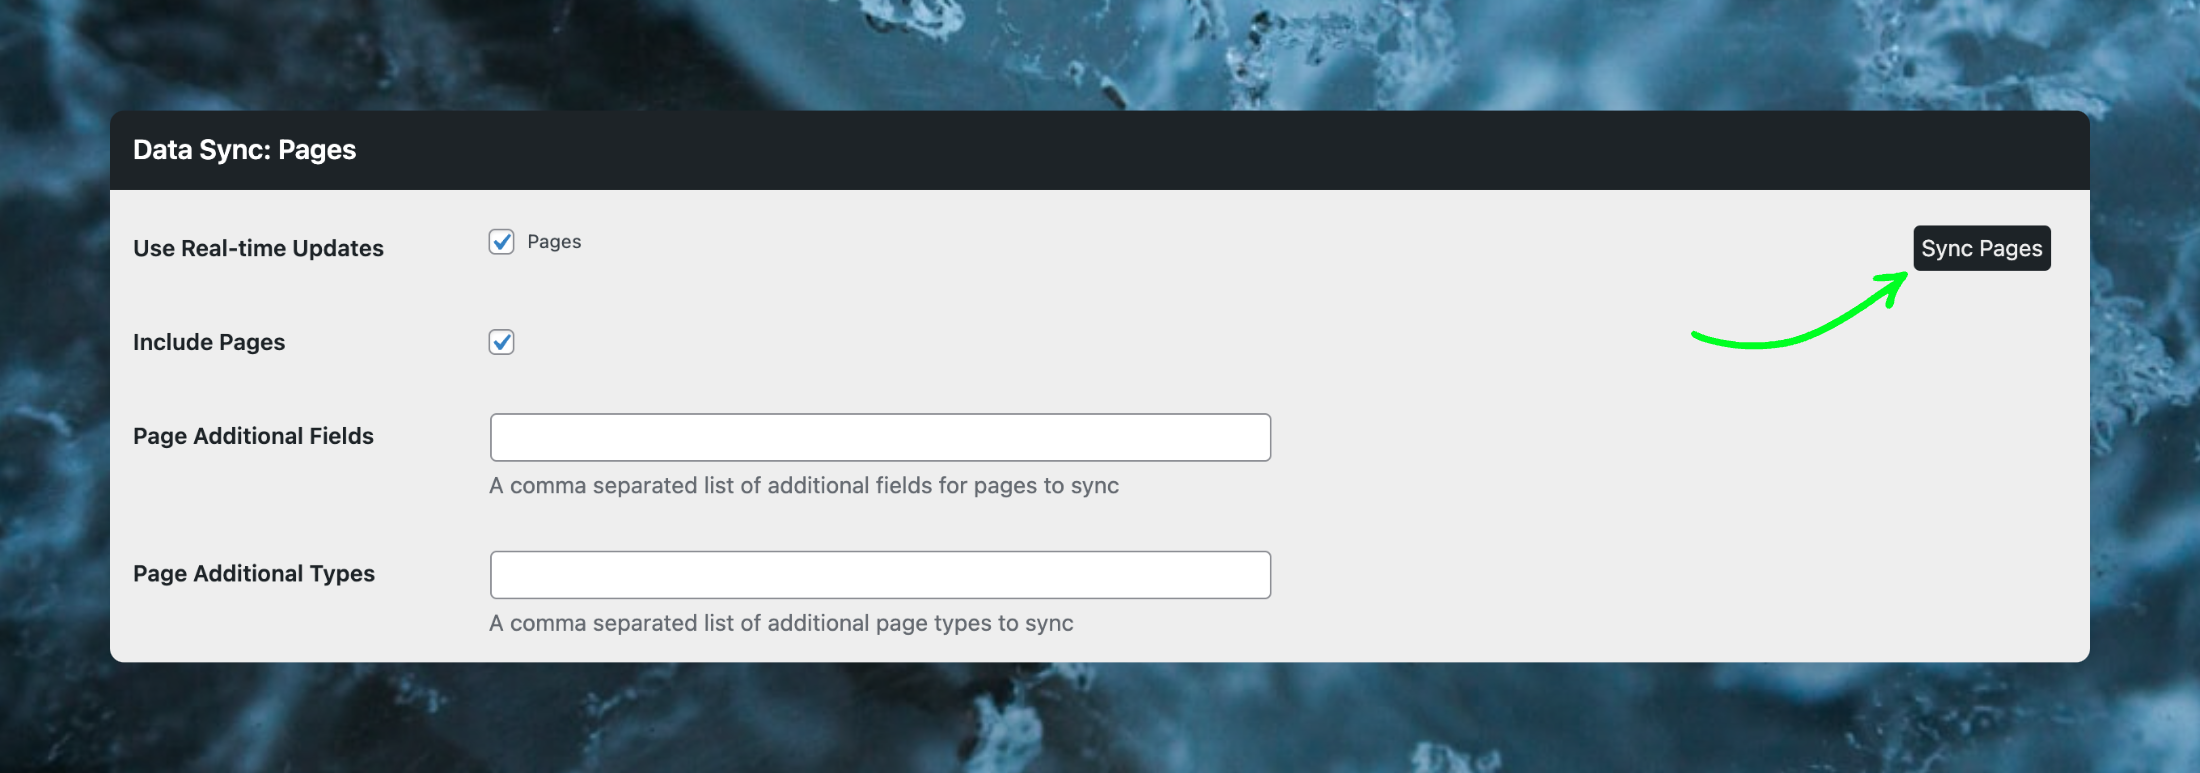
The Plugin also allows you to customize which page attributes are synchronized.
You can specify Additional Fields to retrieve for each page and include Page Additional Types created by third-party plugins.
You should only need to press the Sync Pages button once, as any change to a page, publication of a new page, archival, or deletion will be caught by our plugin and updated in the my.clerk.io store automatically.
Disable pages import #
To ensure pages are only synced from WordPress and not from other sources during the Data Sync, disable page imports in my.clerk.io:
Go to Data > Configuration.
Find the Import Pages setting and set it to No.
Click Save.